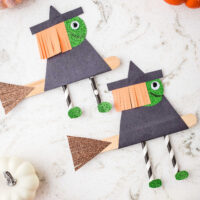
Witch on a Broomstick Craft
Fun and cute Witch on a Broomstick Craft is so fun for a Halloween Craft. Turn a jumbo craft stick into a cute witch craft with Construction paper, cardstock and glue! The perfect Halloween activity for kids.
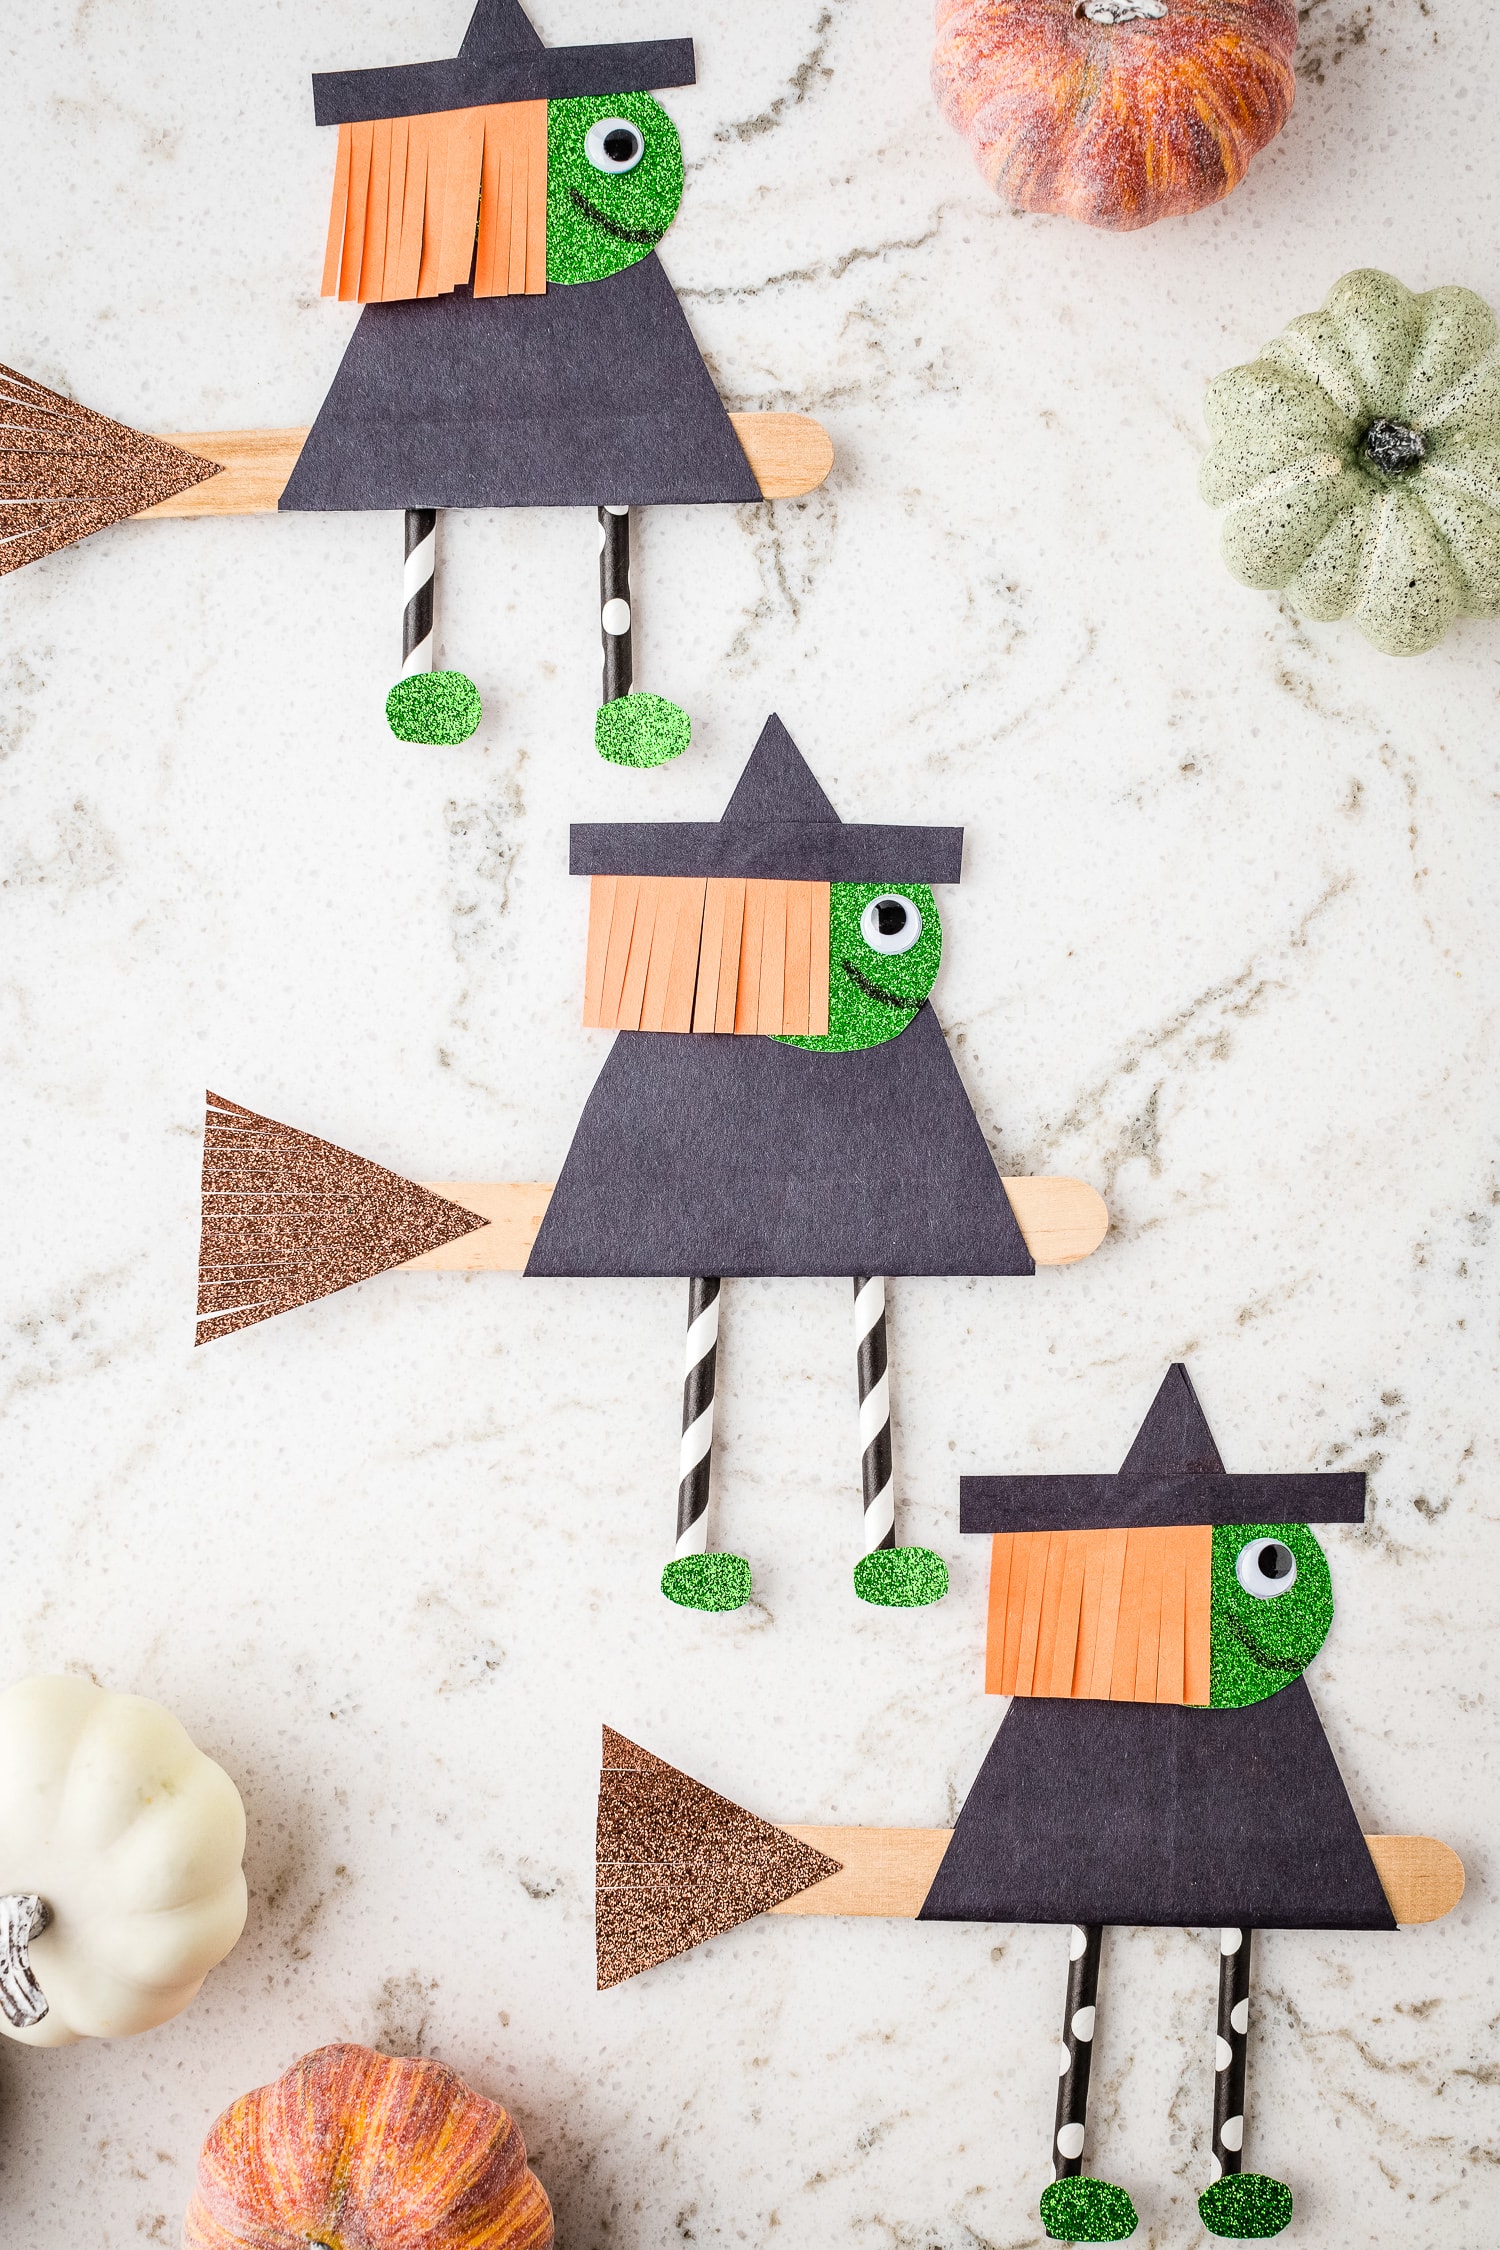
Happy Halloween! Every Halloween celebration needs a witch along with the ghosts and bats, right? That’s why we love this cute Witch on a Broomstick craft. We love making this handprint witches brew and broom activity too!
It’s also a great craft when you are reading the book Room on the Broom, which is a Halloween favorite around my house! Make sure to check out our tips for doing this craft with young children below.
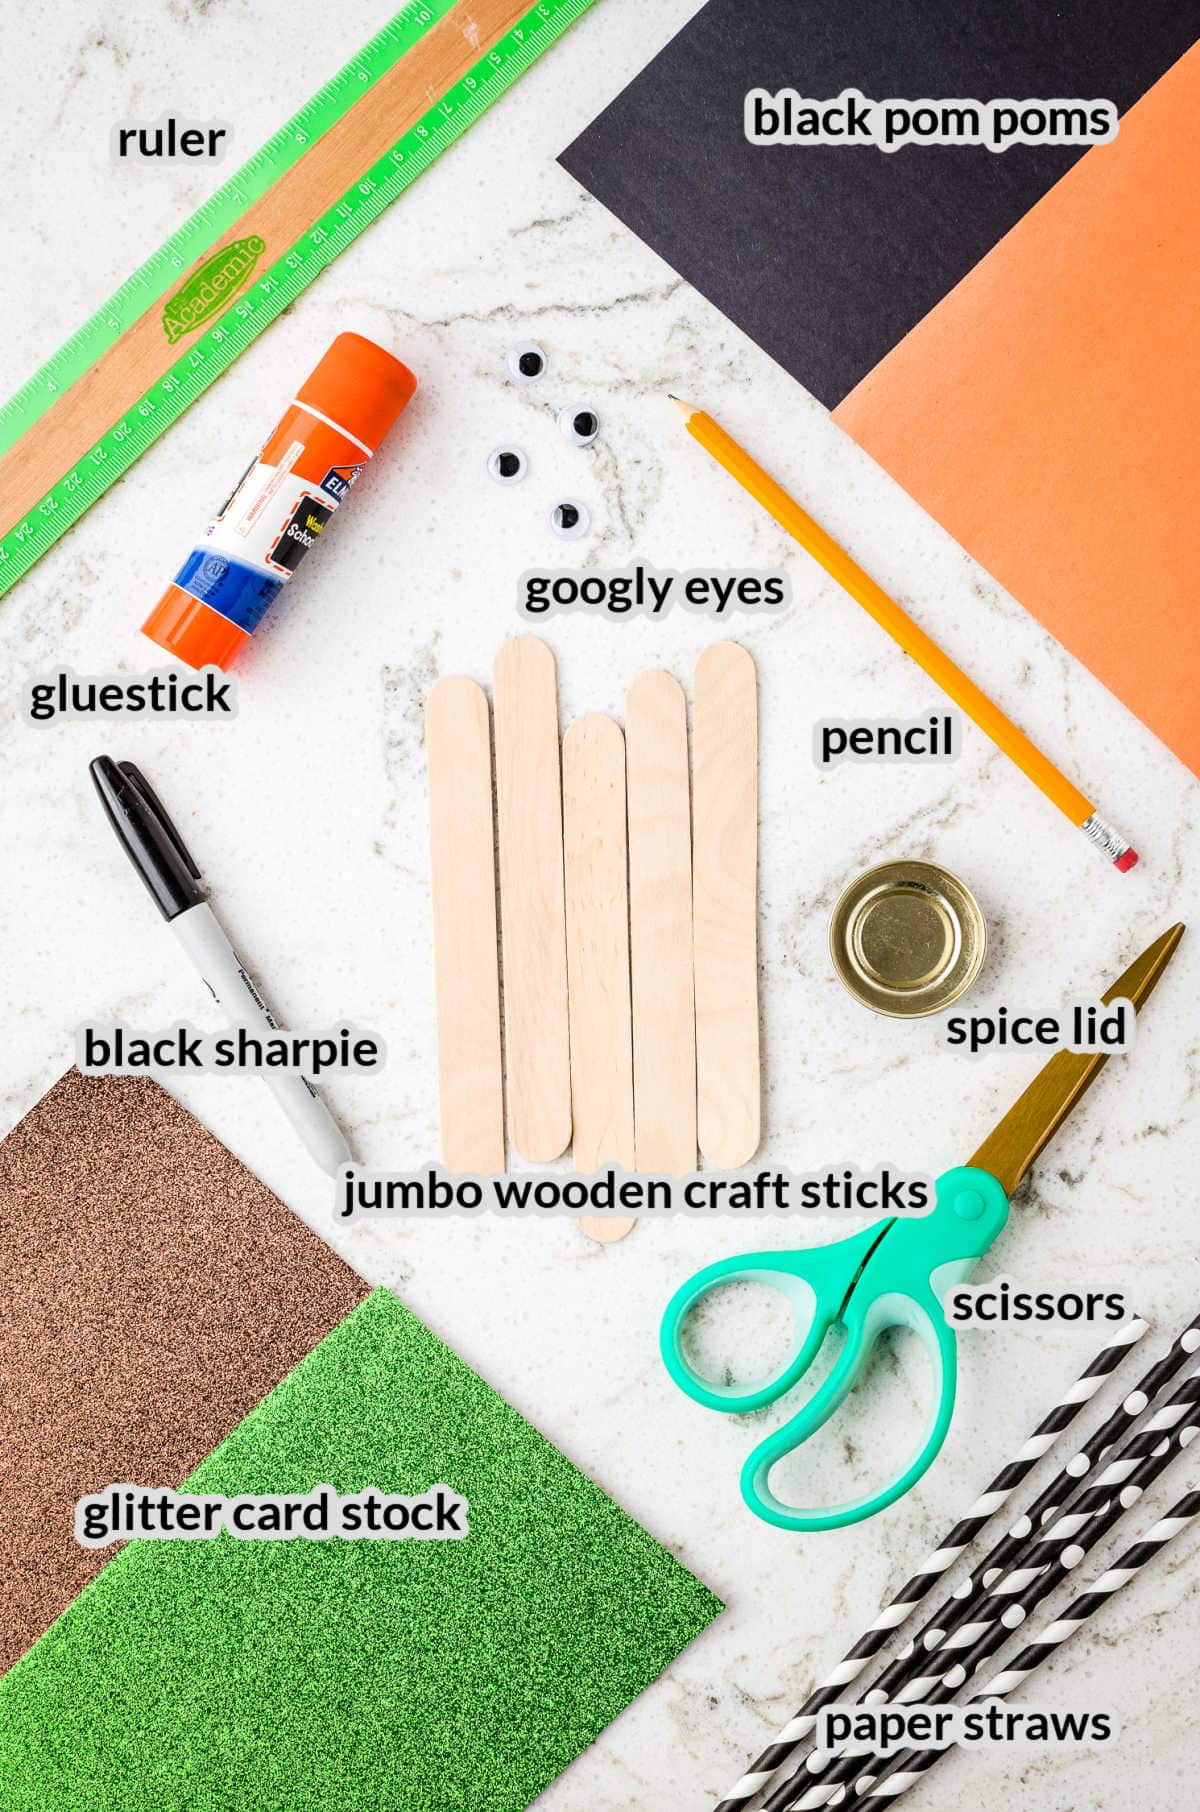
Supplies for Witch Craft
- Construction paper – We used standard construction paper in black and orange, but you could also use card stock.
- Scissors – we use standard scissors. If you are working with smaller children, you may consider blunt-tipped scissors.
- Jumbo wooden craft stick – we used a jumbo wooden craft stick in a natural color.
- Ruler – Any ruler will work.
- Glue stick – We used a regular glue stick for this craft, but you could use any craft glue or adhesive.
- Pencil – We used a pencil to trace this craft, but you could use any writing utensil.
- Spice lid – We used a spice lid to trace the face of the witch. You can use any similar-sized object for the 1 ½ circle or draw it freehand.
- Googly eyes – we used googly eyes from the craft store, but you could also make eyes from construction paper or draw your own!
- Marker – We used a black marker for this project.
- Glitter card stock – We used glitter card stock in green and brown for this project, but you could use plain card stock or construction paper.
- Decorative straws – We used black and white striped decorative straws to make the legs for the witch, but pipe cleaners would be a good substitute if you don’t have straws.
How to Make Witch on a Broomstick Craft!
Check out our easy to follow step by step instructions with pictures to make this easy Halloween craft!
Scroll further down to find printable instructions.
How to Make Witch Body!
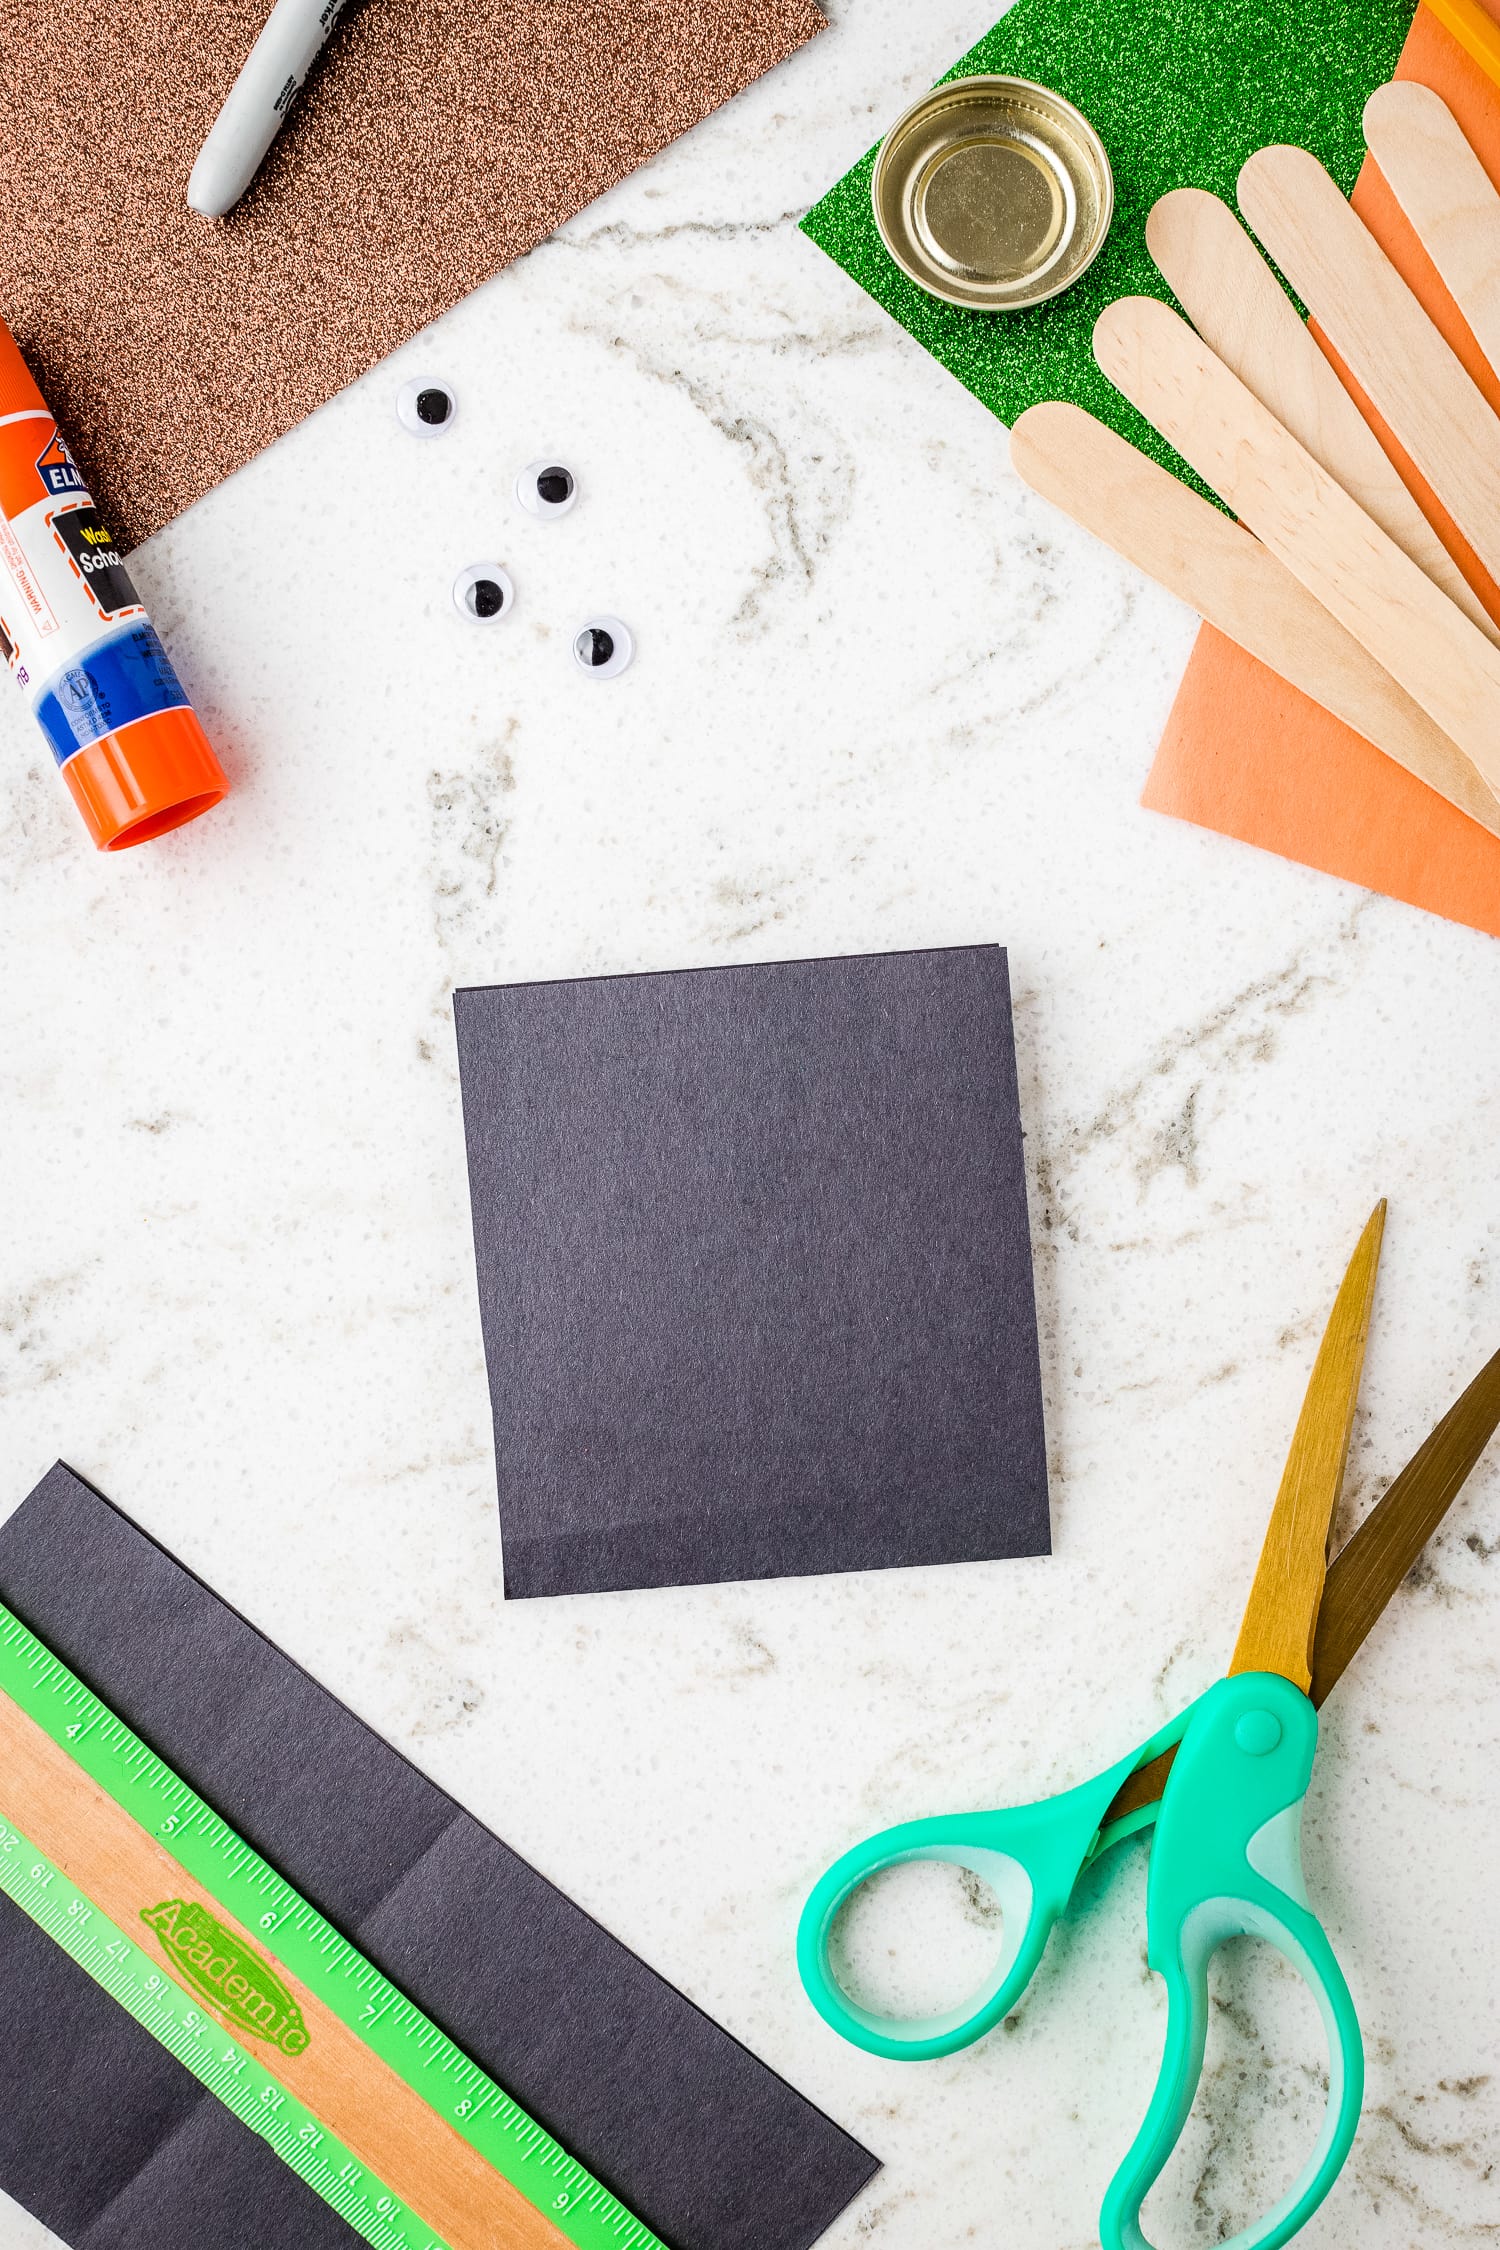
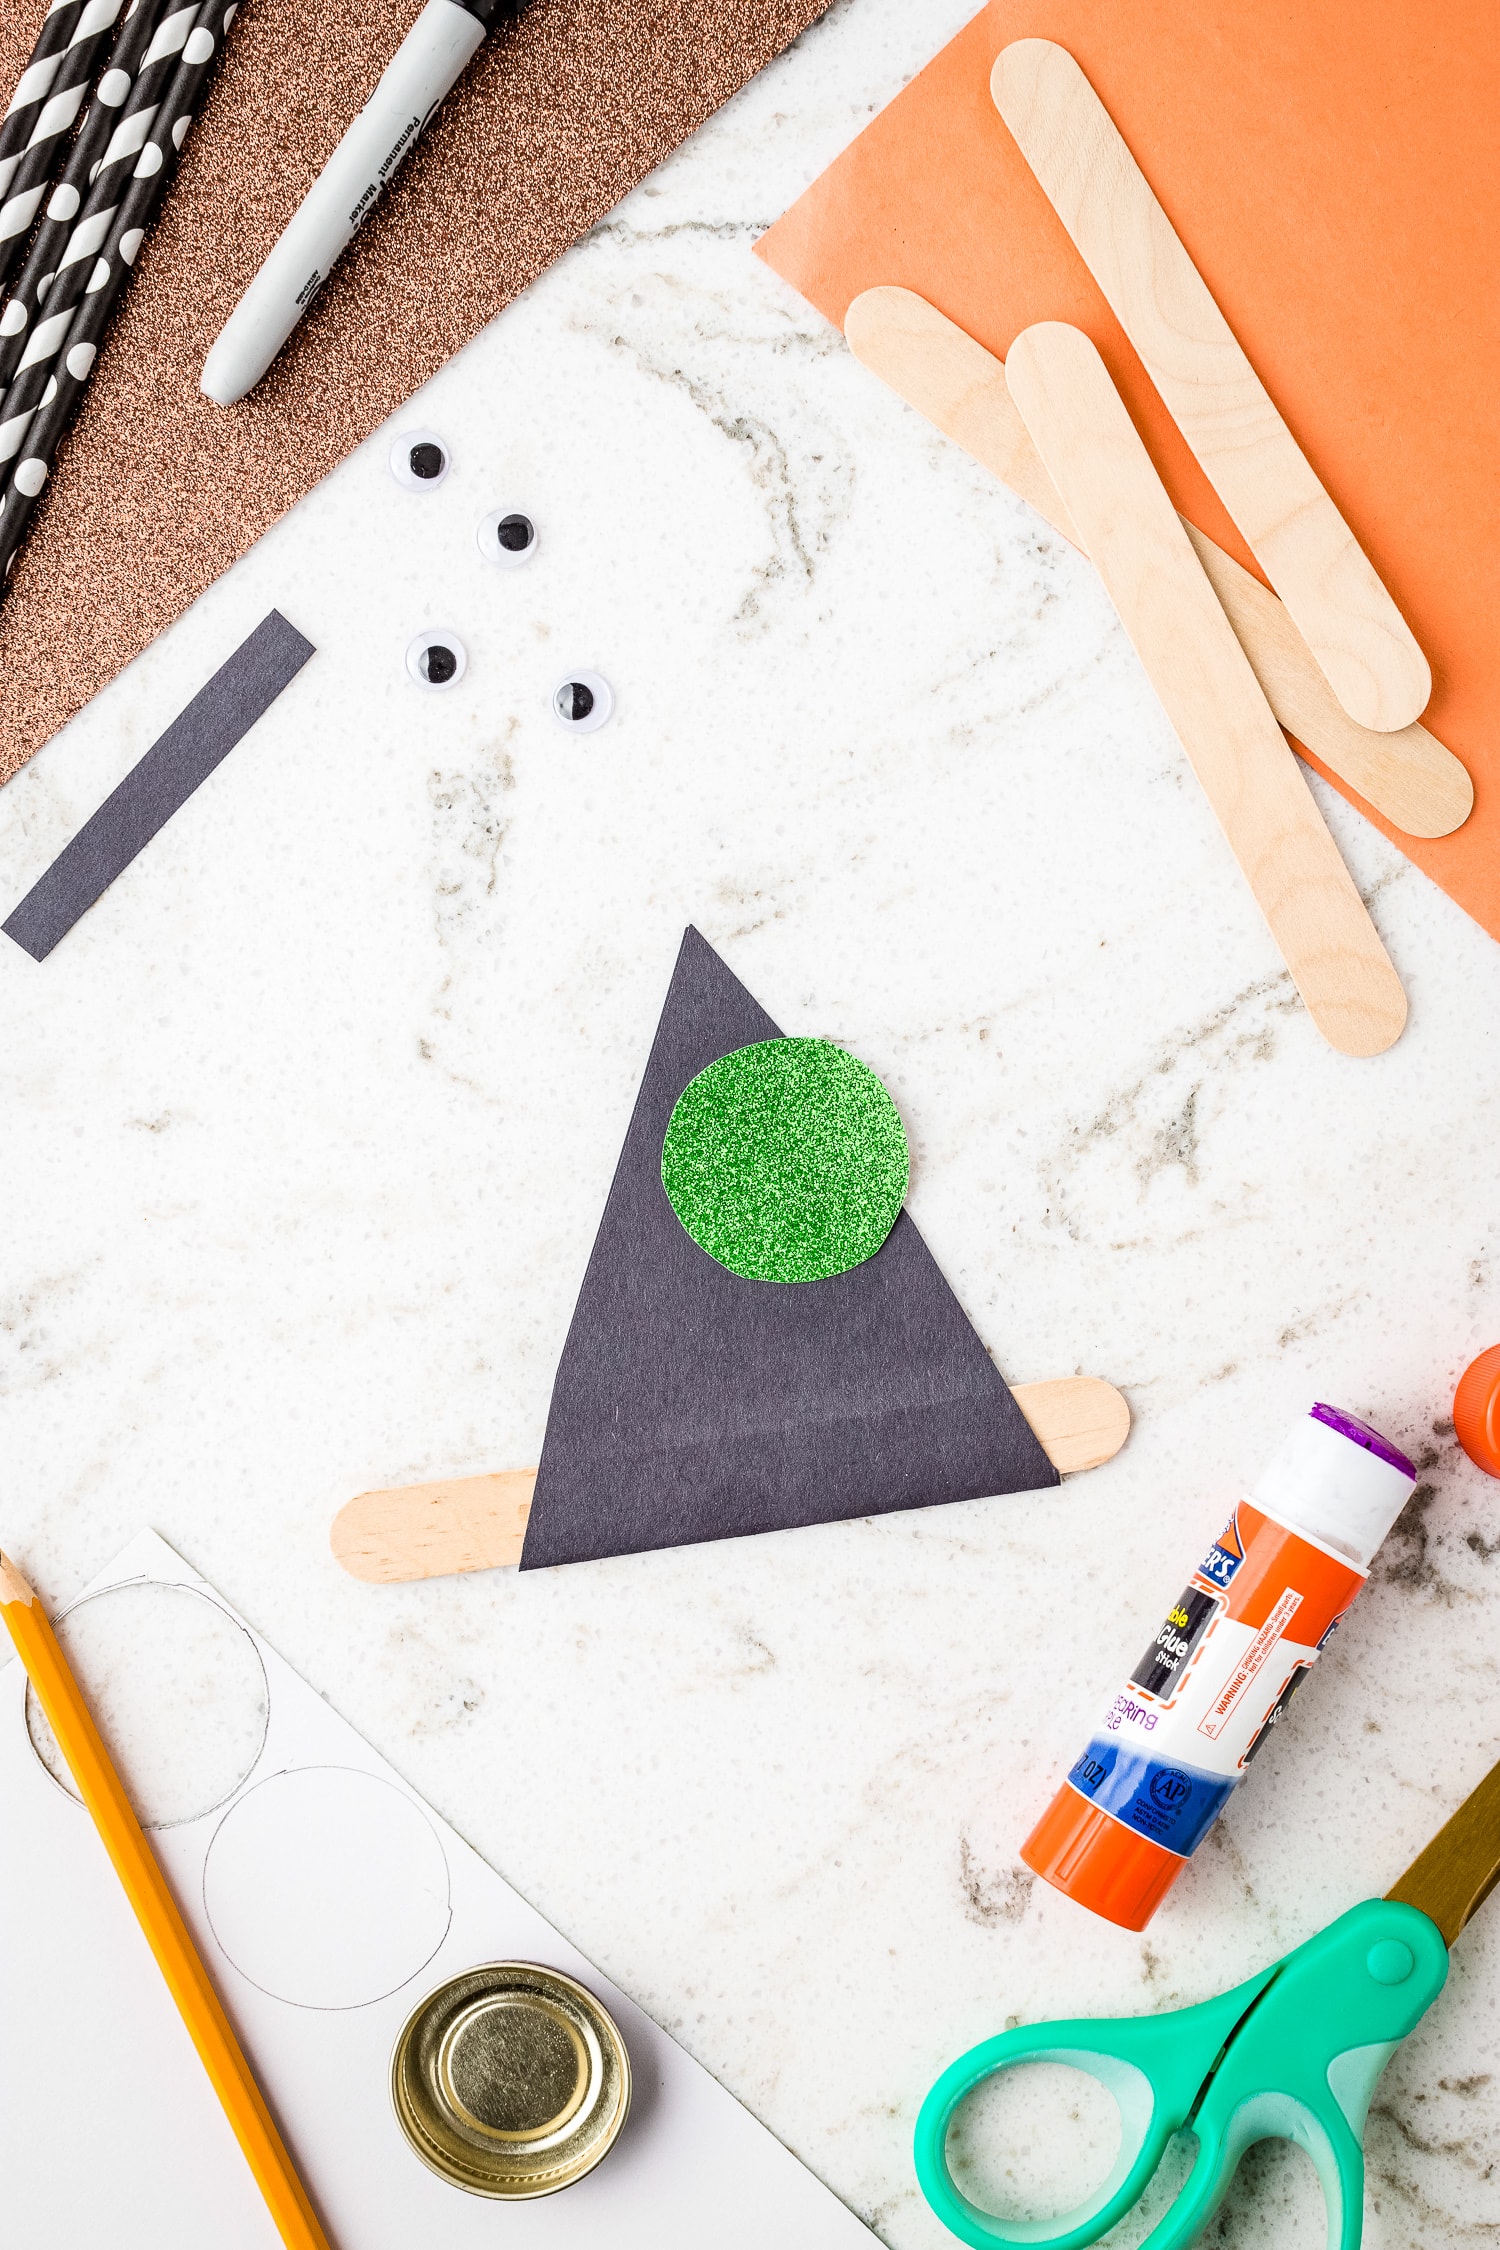
Let’s begin by making the body of the witch! Fold a piece of black construction paper in half long ways and cut it into a 4-inch section.
With the section still folded in half, cut it into a triangle. Grab a jumbo wooden popsicle stick and place it inside the fold of the triangle.
Apply a thin layer of glue to the inside of the triangle. Press the 2 sides together to secure the “broomstick” in between.
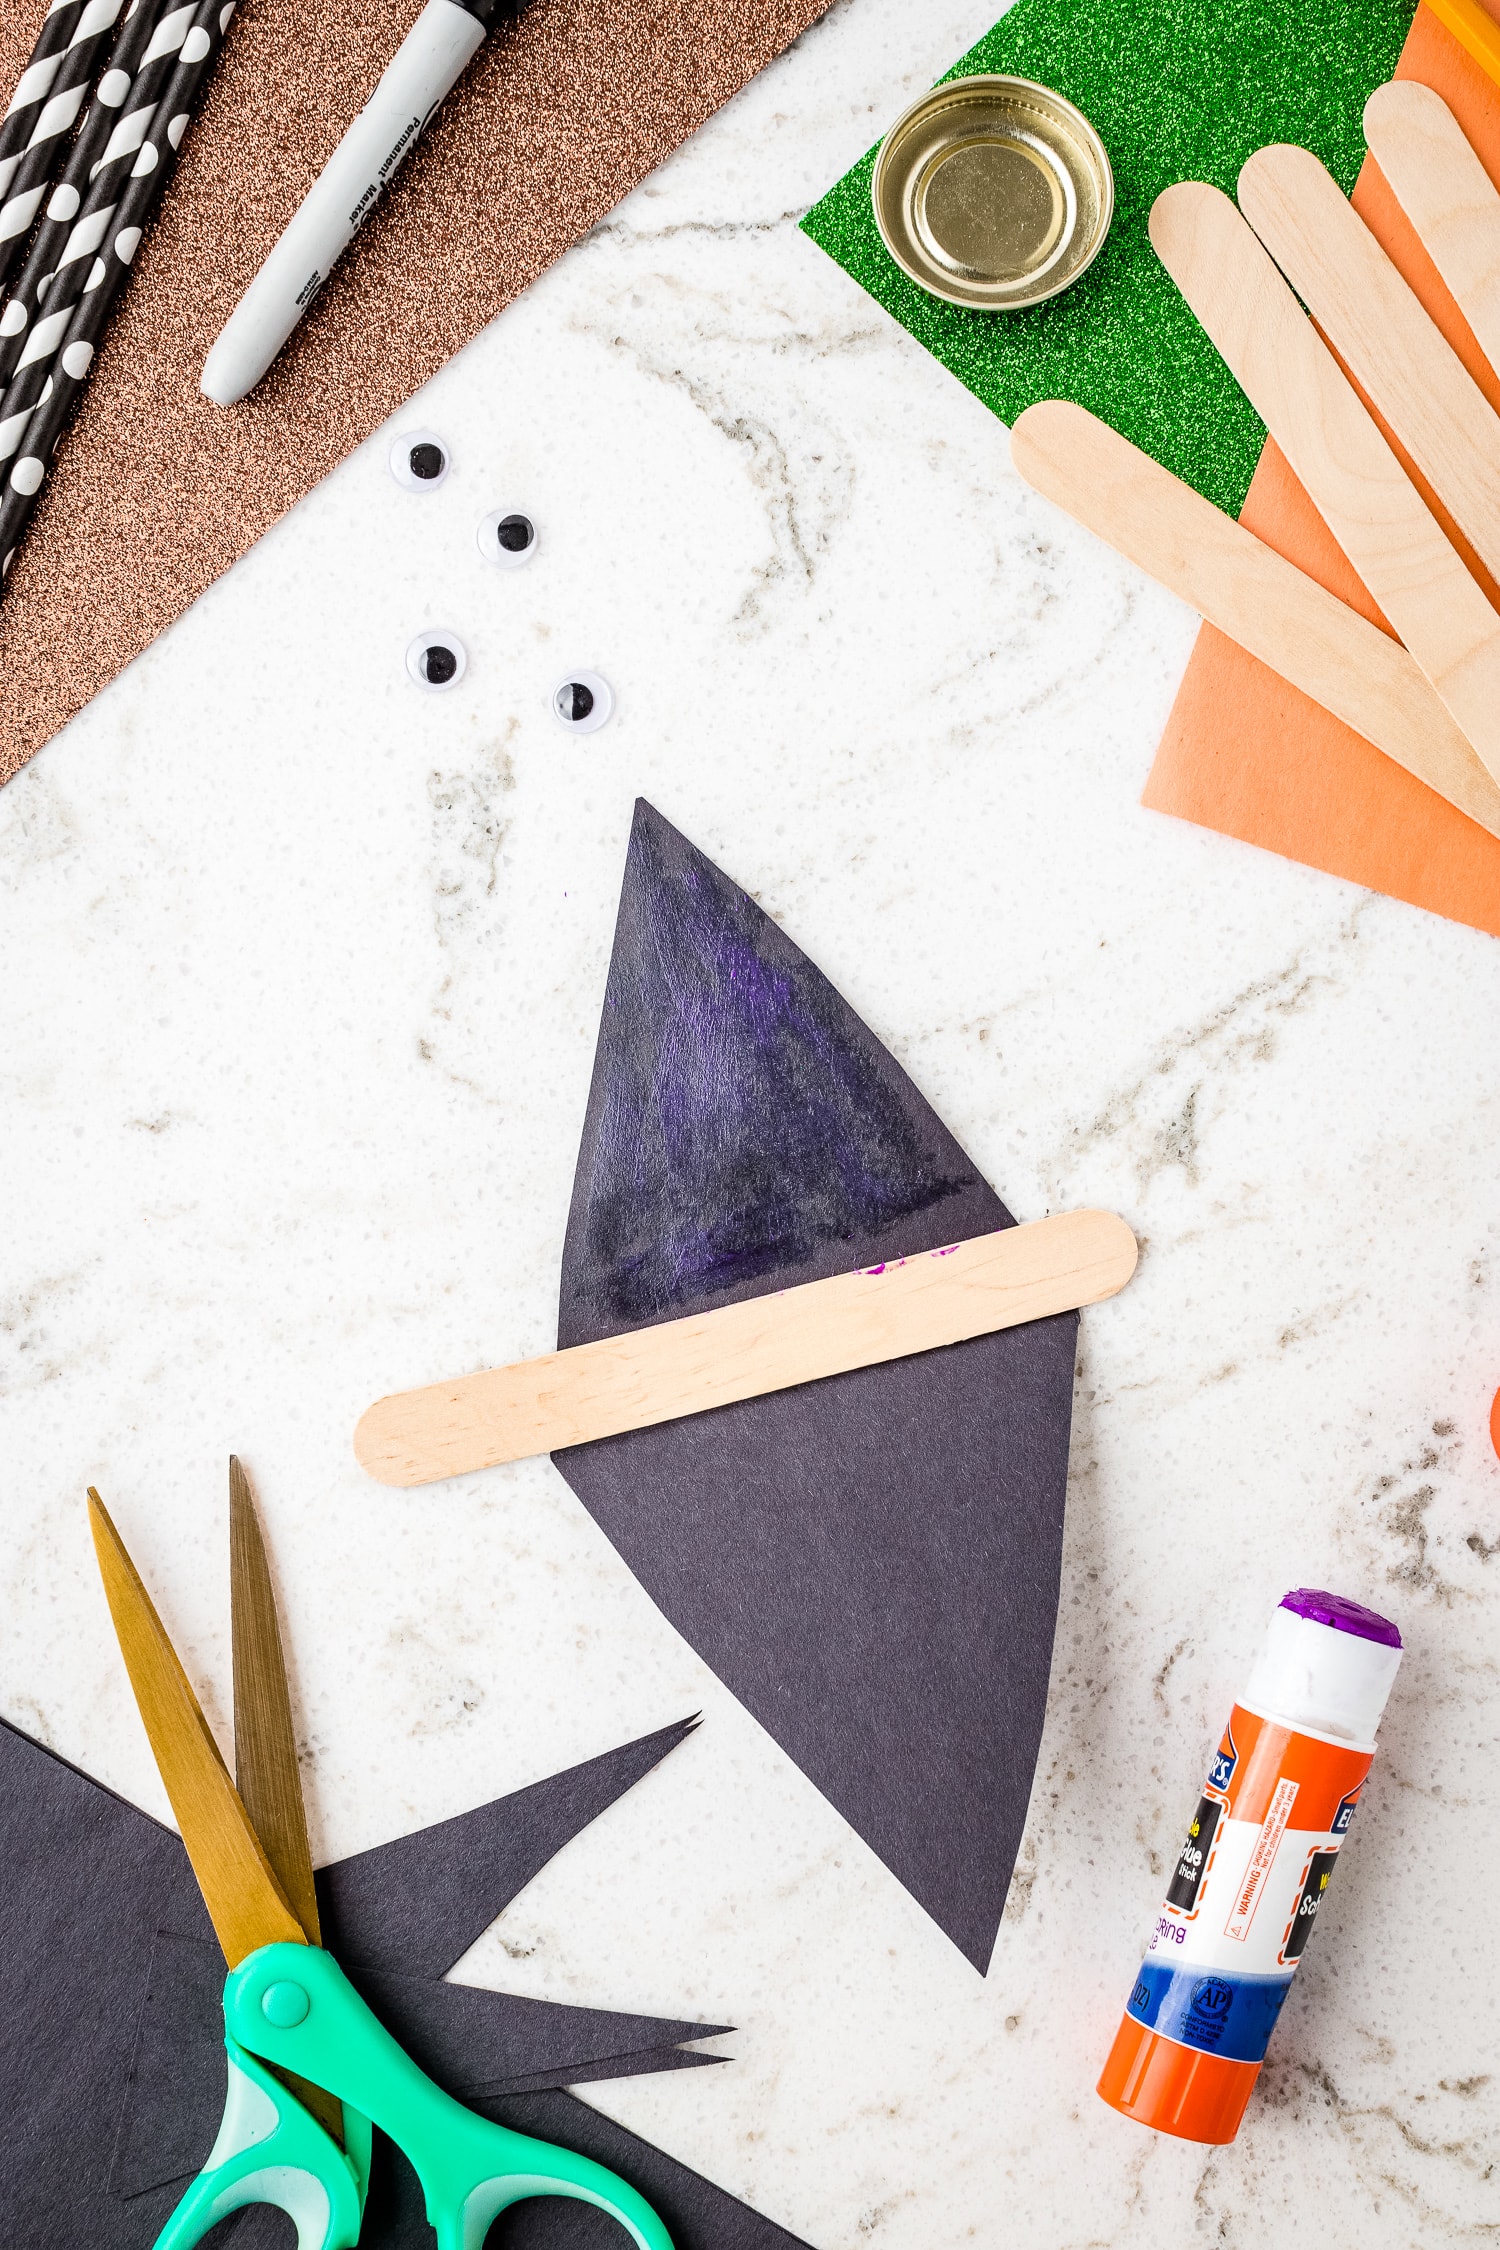
Cut a 3-inch strip out of the same black construction paper for the witch’s hat. Set it aside.
Make a Witch Face and Hair!
Next, let’s make a face! Use a spice lid or something similar to trace a 1 ½ inch circle. Glue the circle so it just hangs off the witch’s body to create the face.
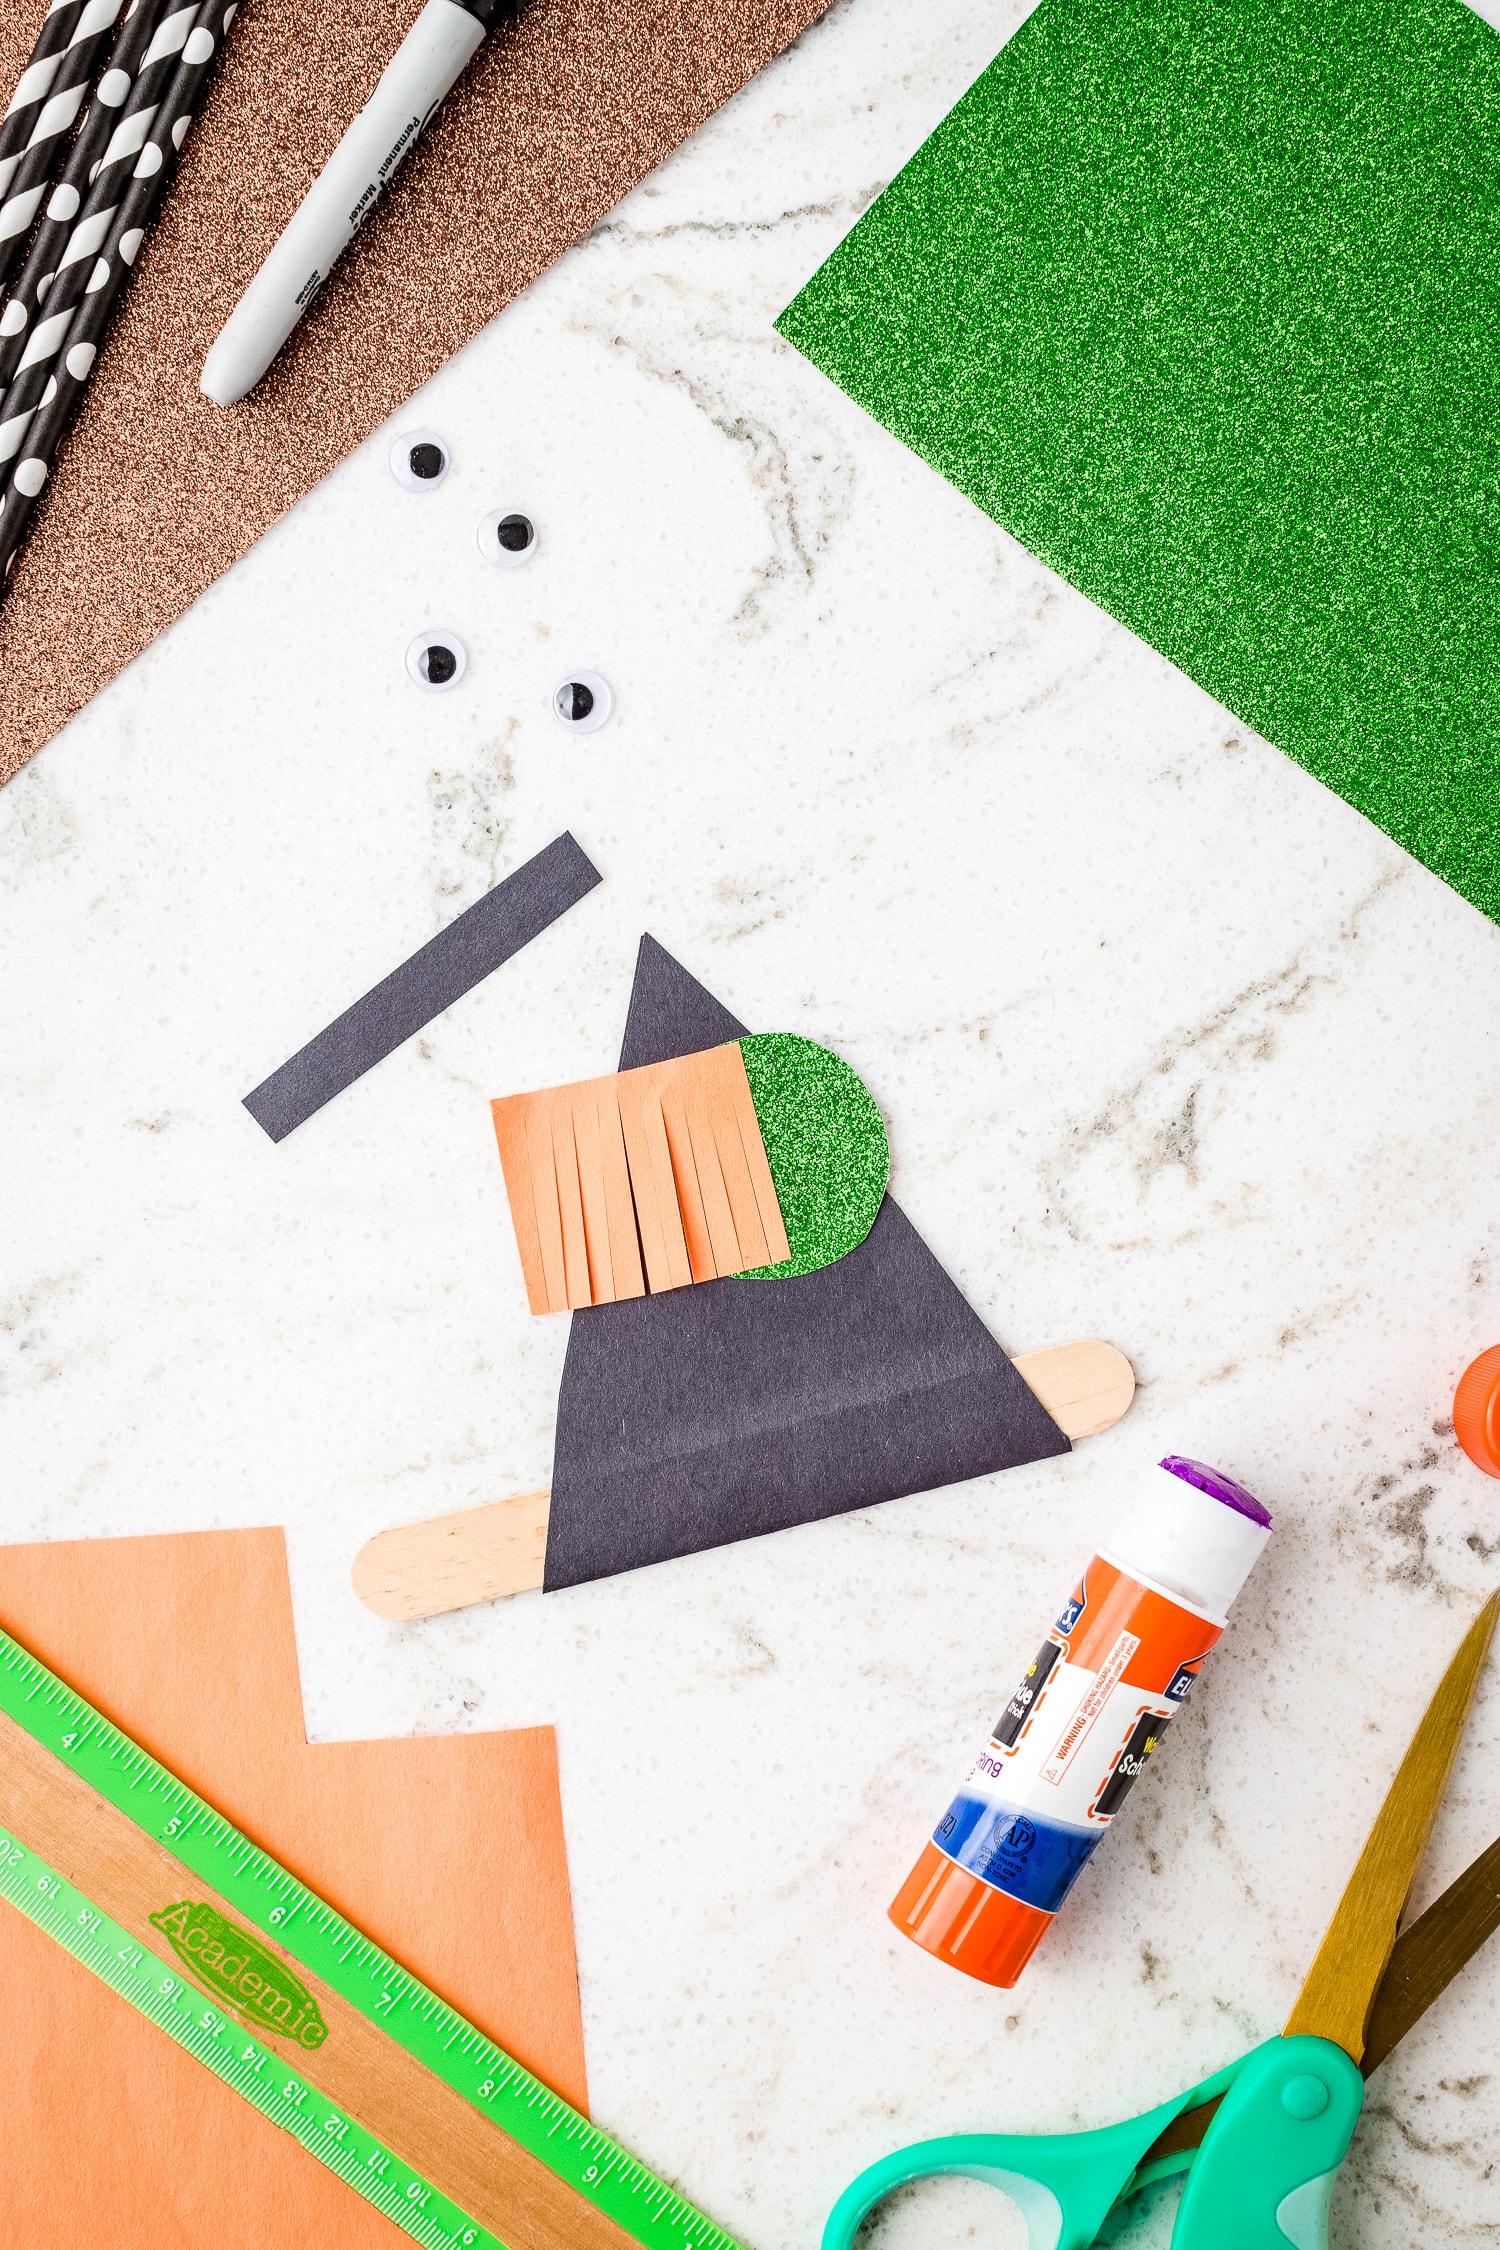
Now it’s time to make our witch’s hair! Cut 1 ½ x 1 ½ inch square of orange construction paper for the witch’s hair.
Cut vertical slits to mimic the look of hair. Glue the hair so that it overlaps the previously glued face.
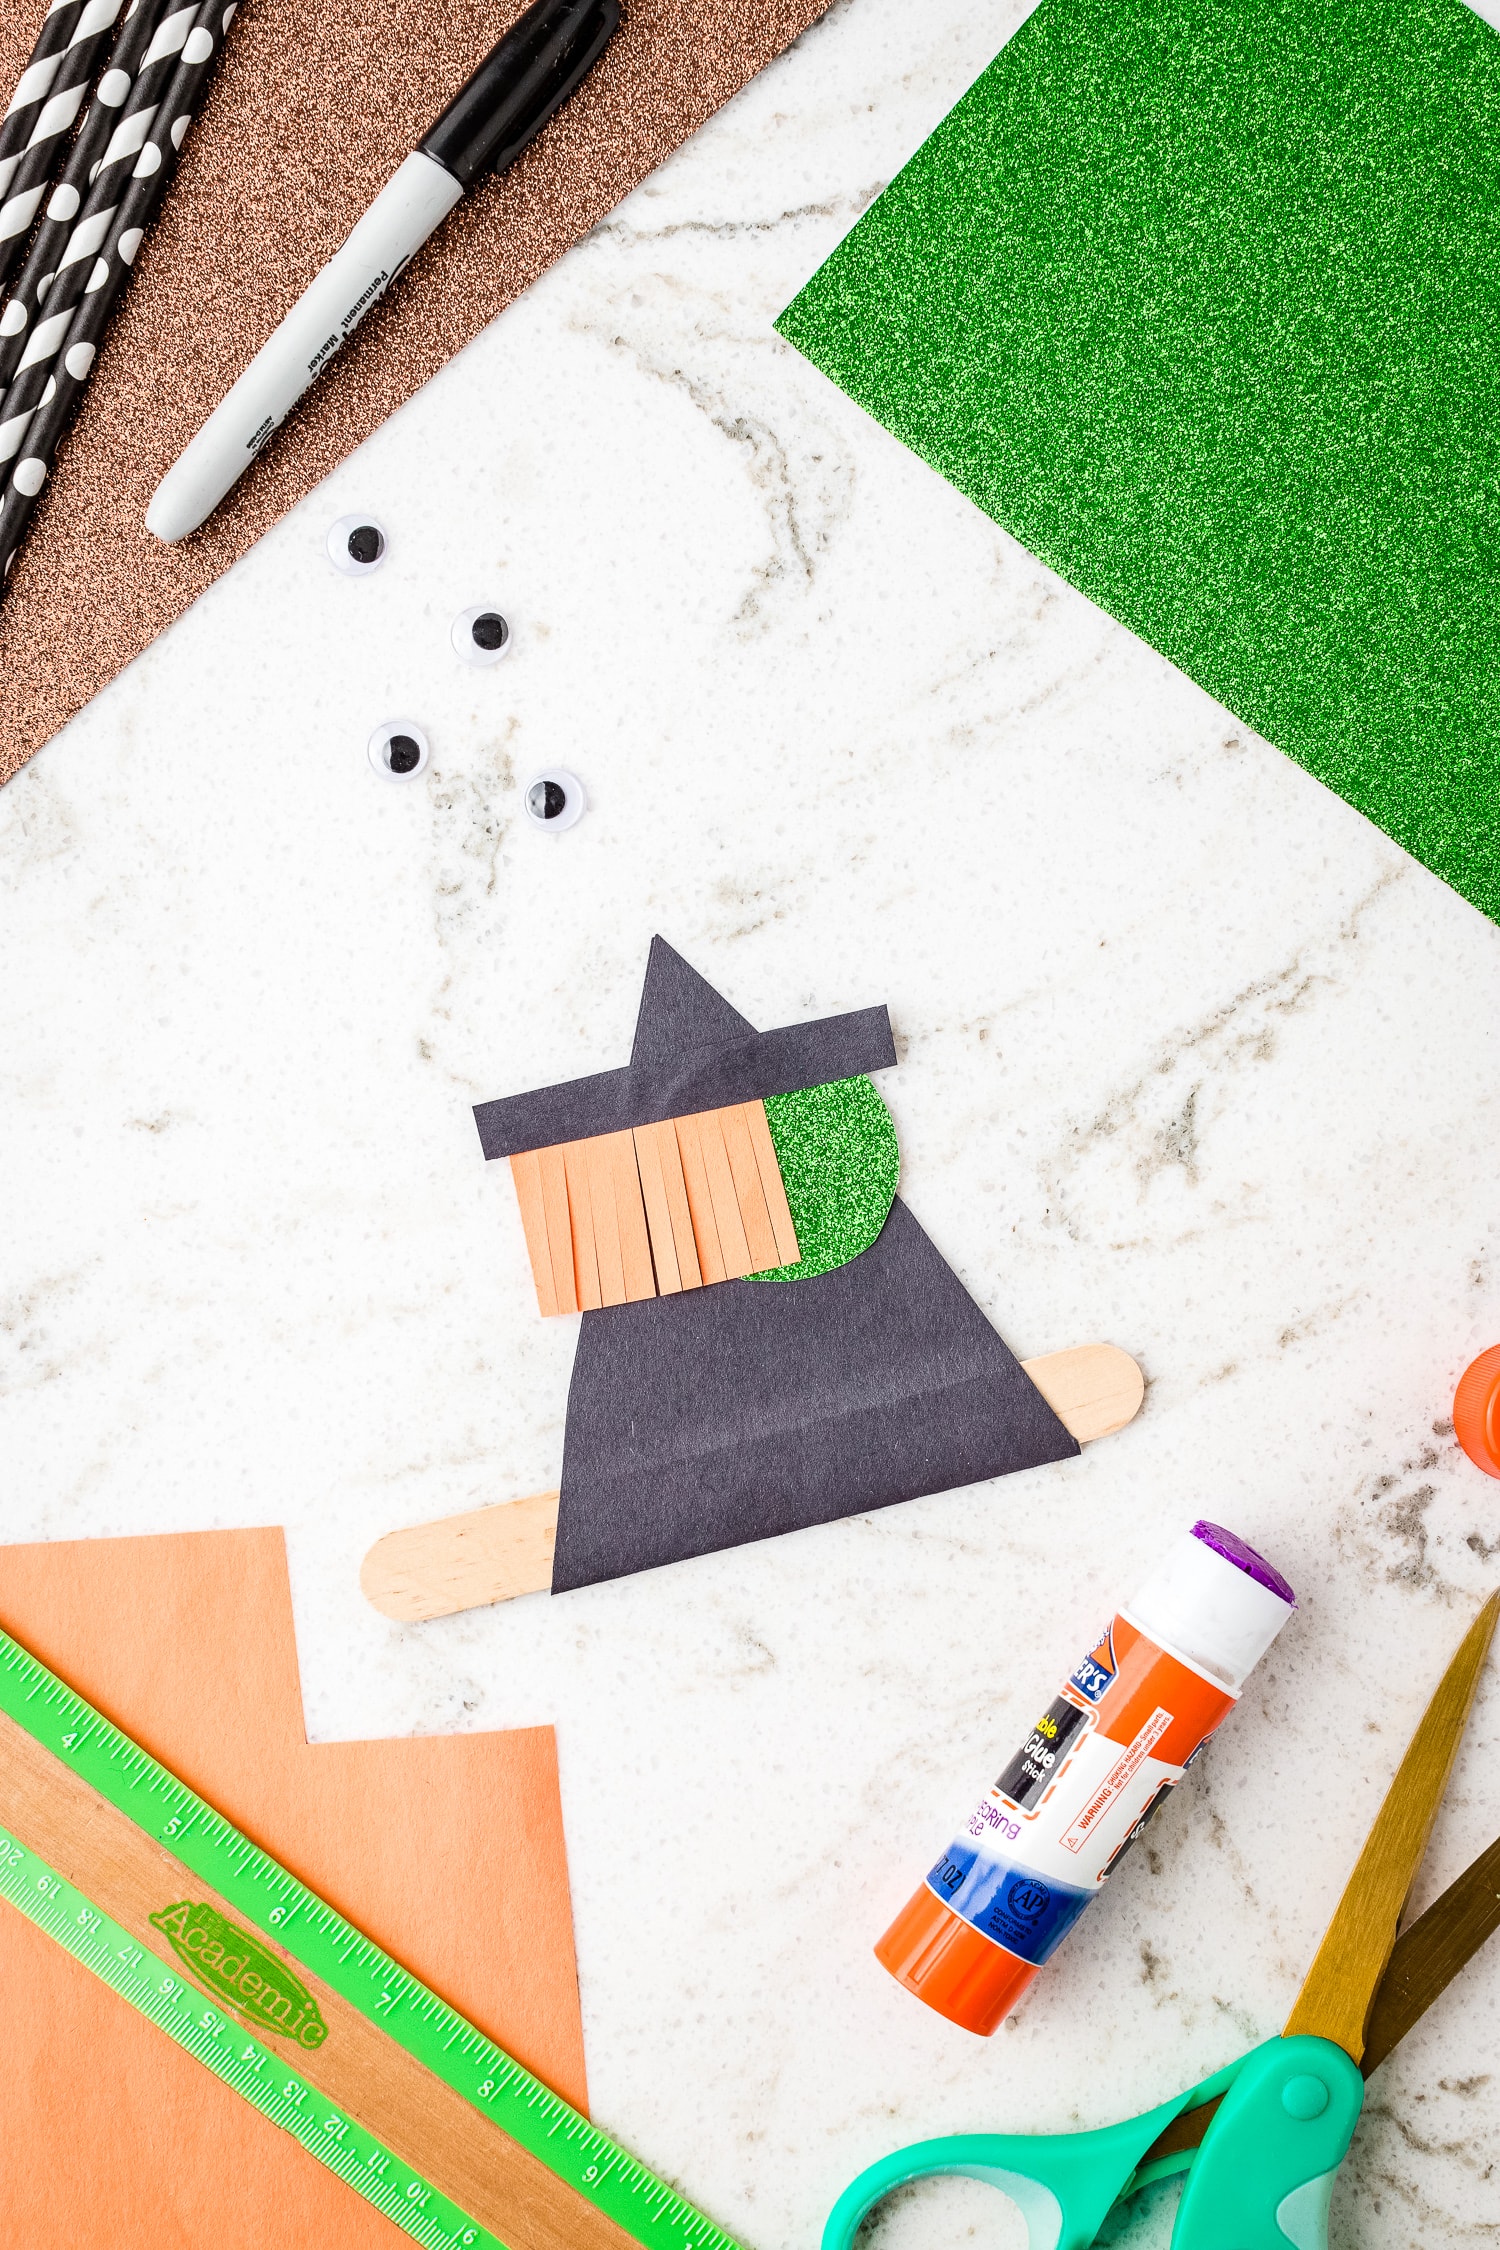
Take the 3-inch strip of black construction paper you previously cut and glue it across the top of the hair and face to create the witch’s hat!
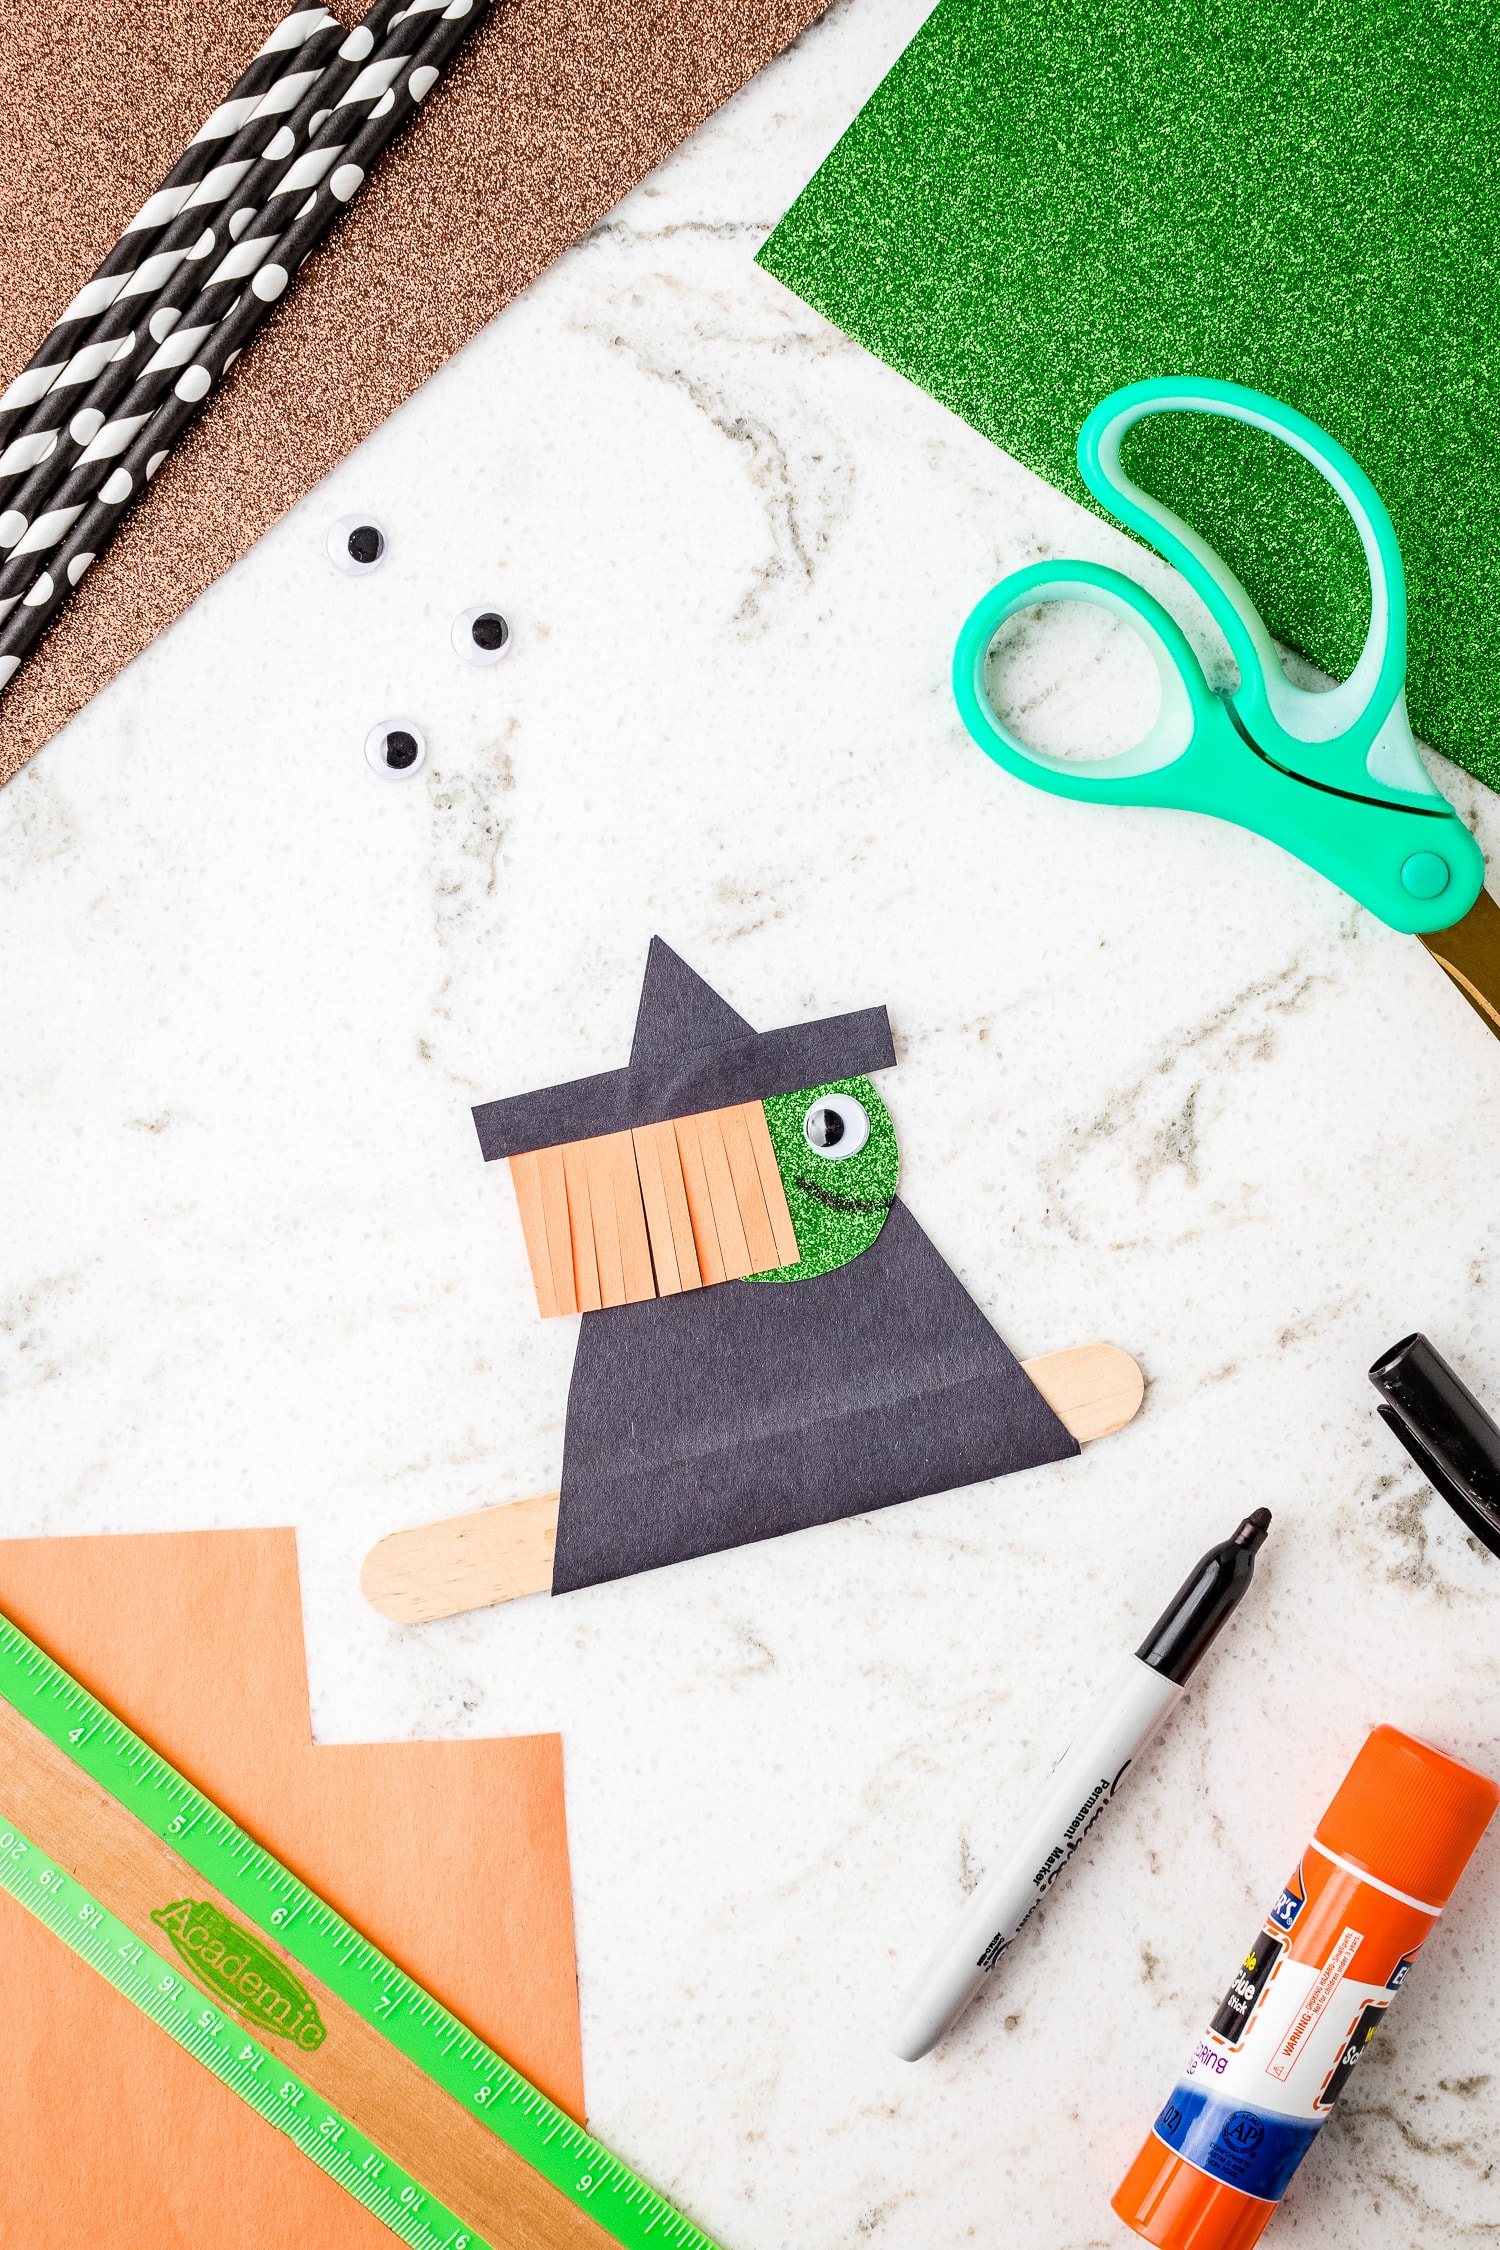
Add a googly eye and draw an expression with a black marker to personalize your witch!
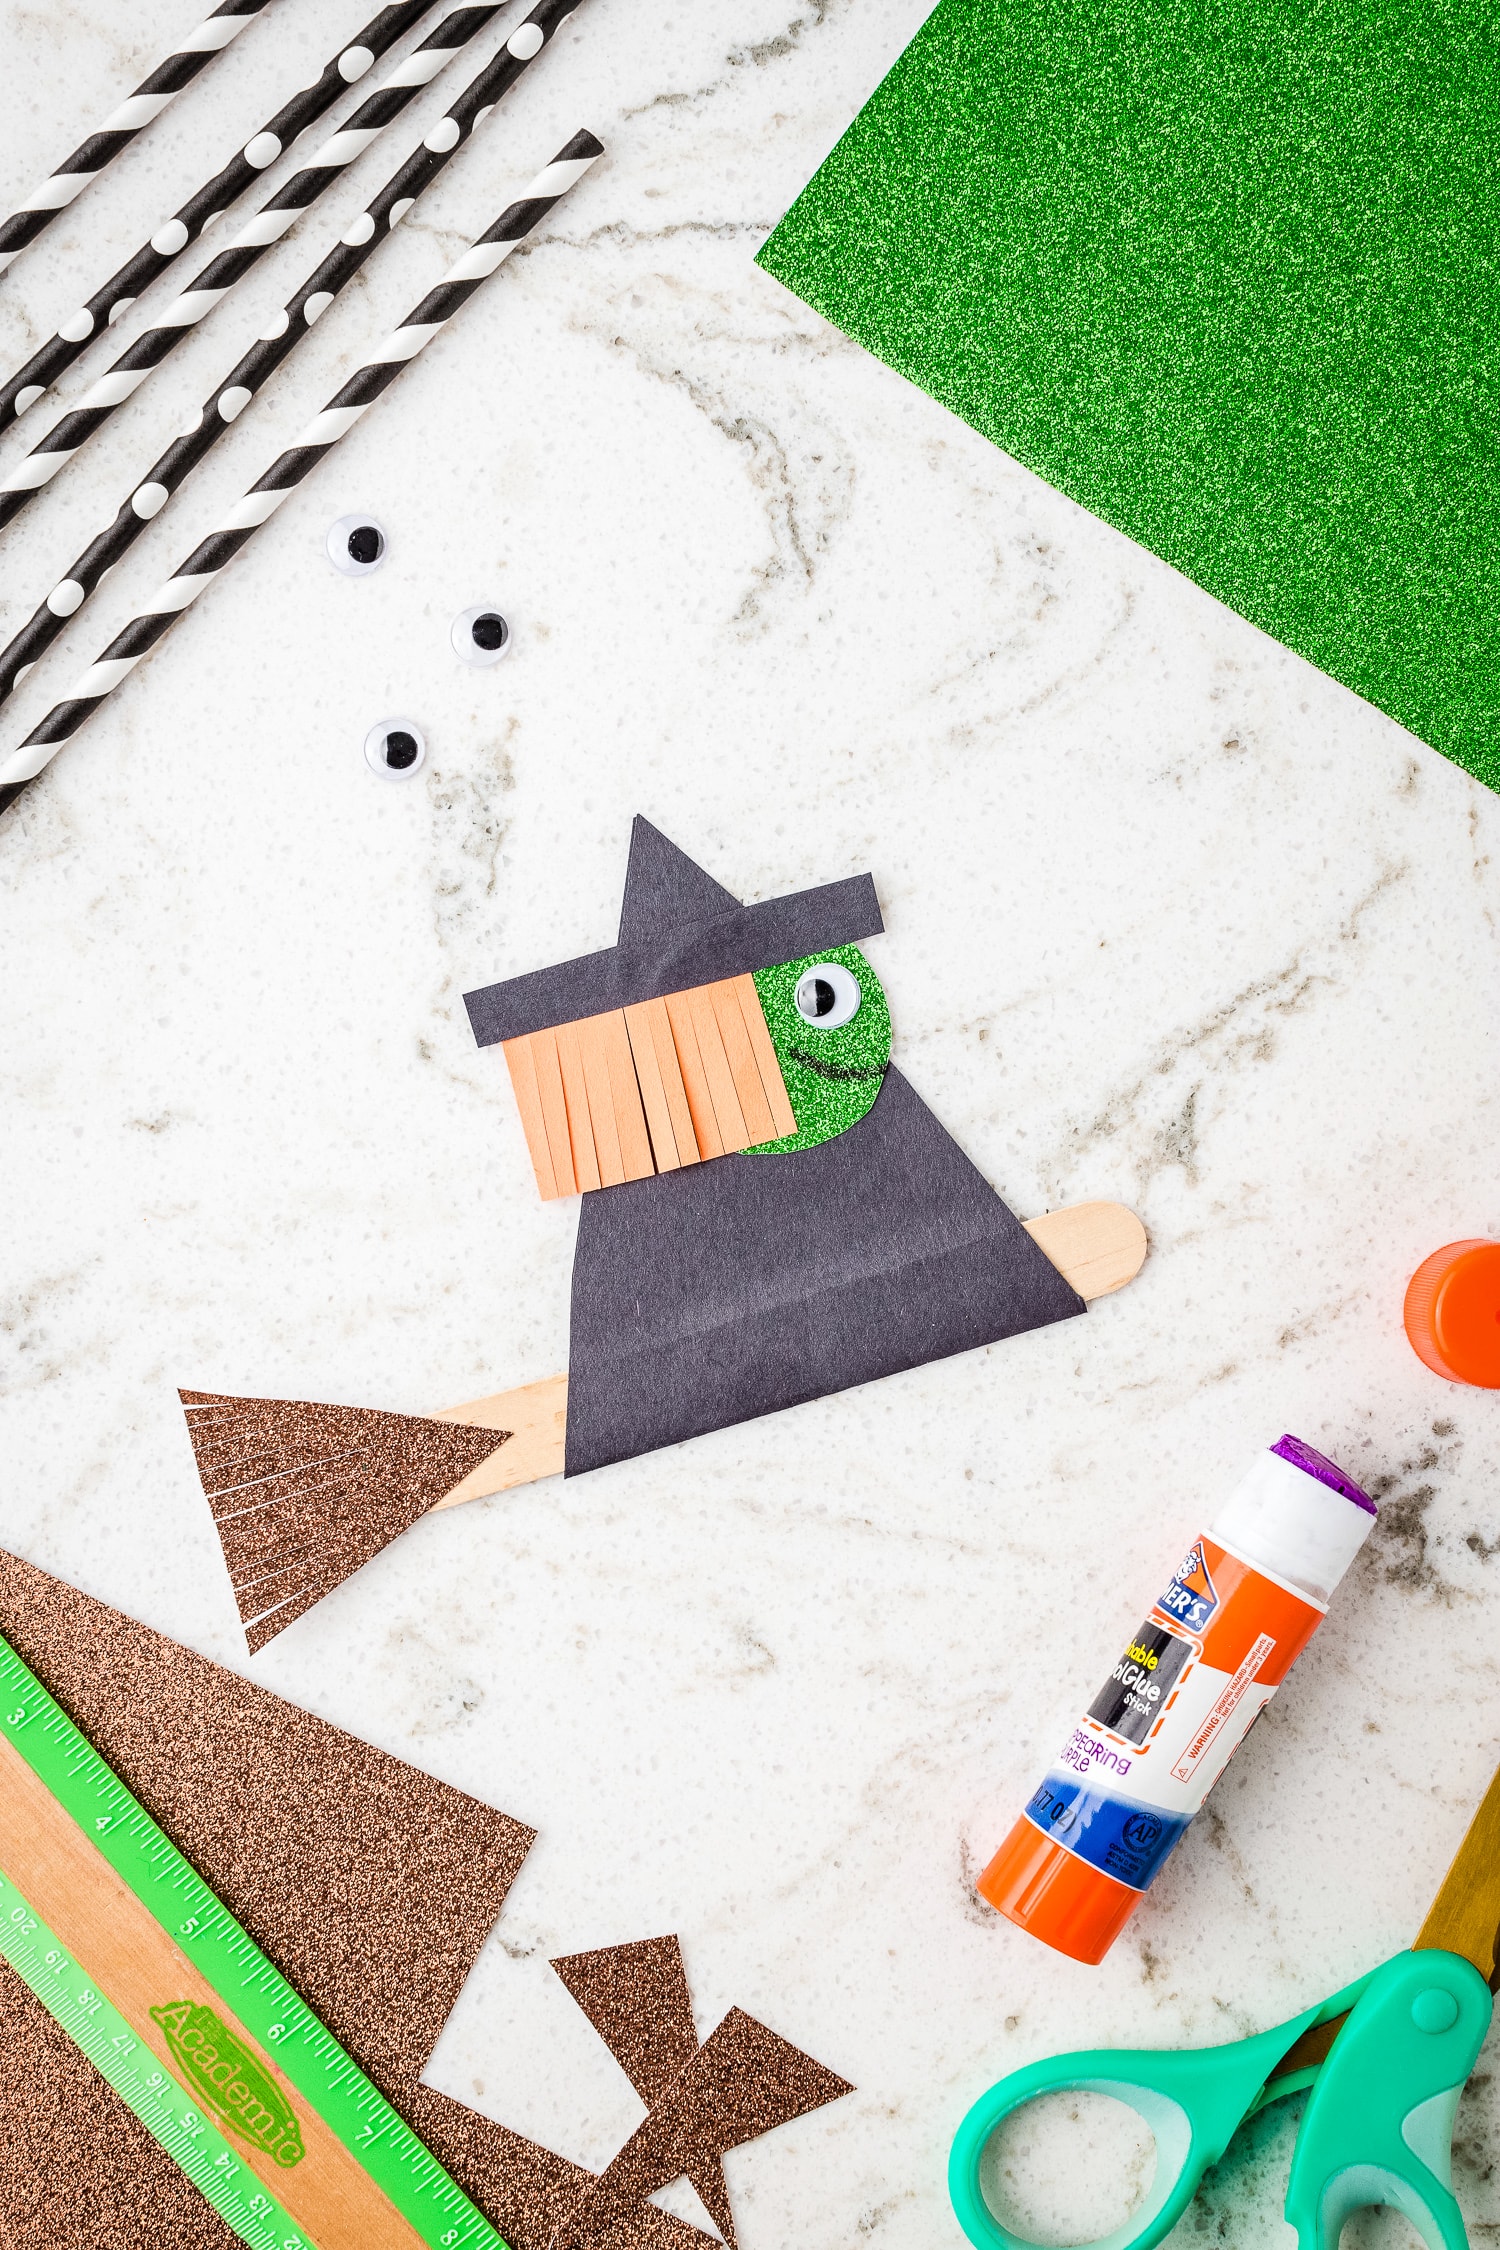
Give the broomstick straw!
Let’s make the straw for the broomstick! Cut a 2-inch triangle out of brown glitter card stock. Cut strips to make straw for the end of the broom.
Once cut, affix it to the tail end of the broom with glue. Press to secure.

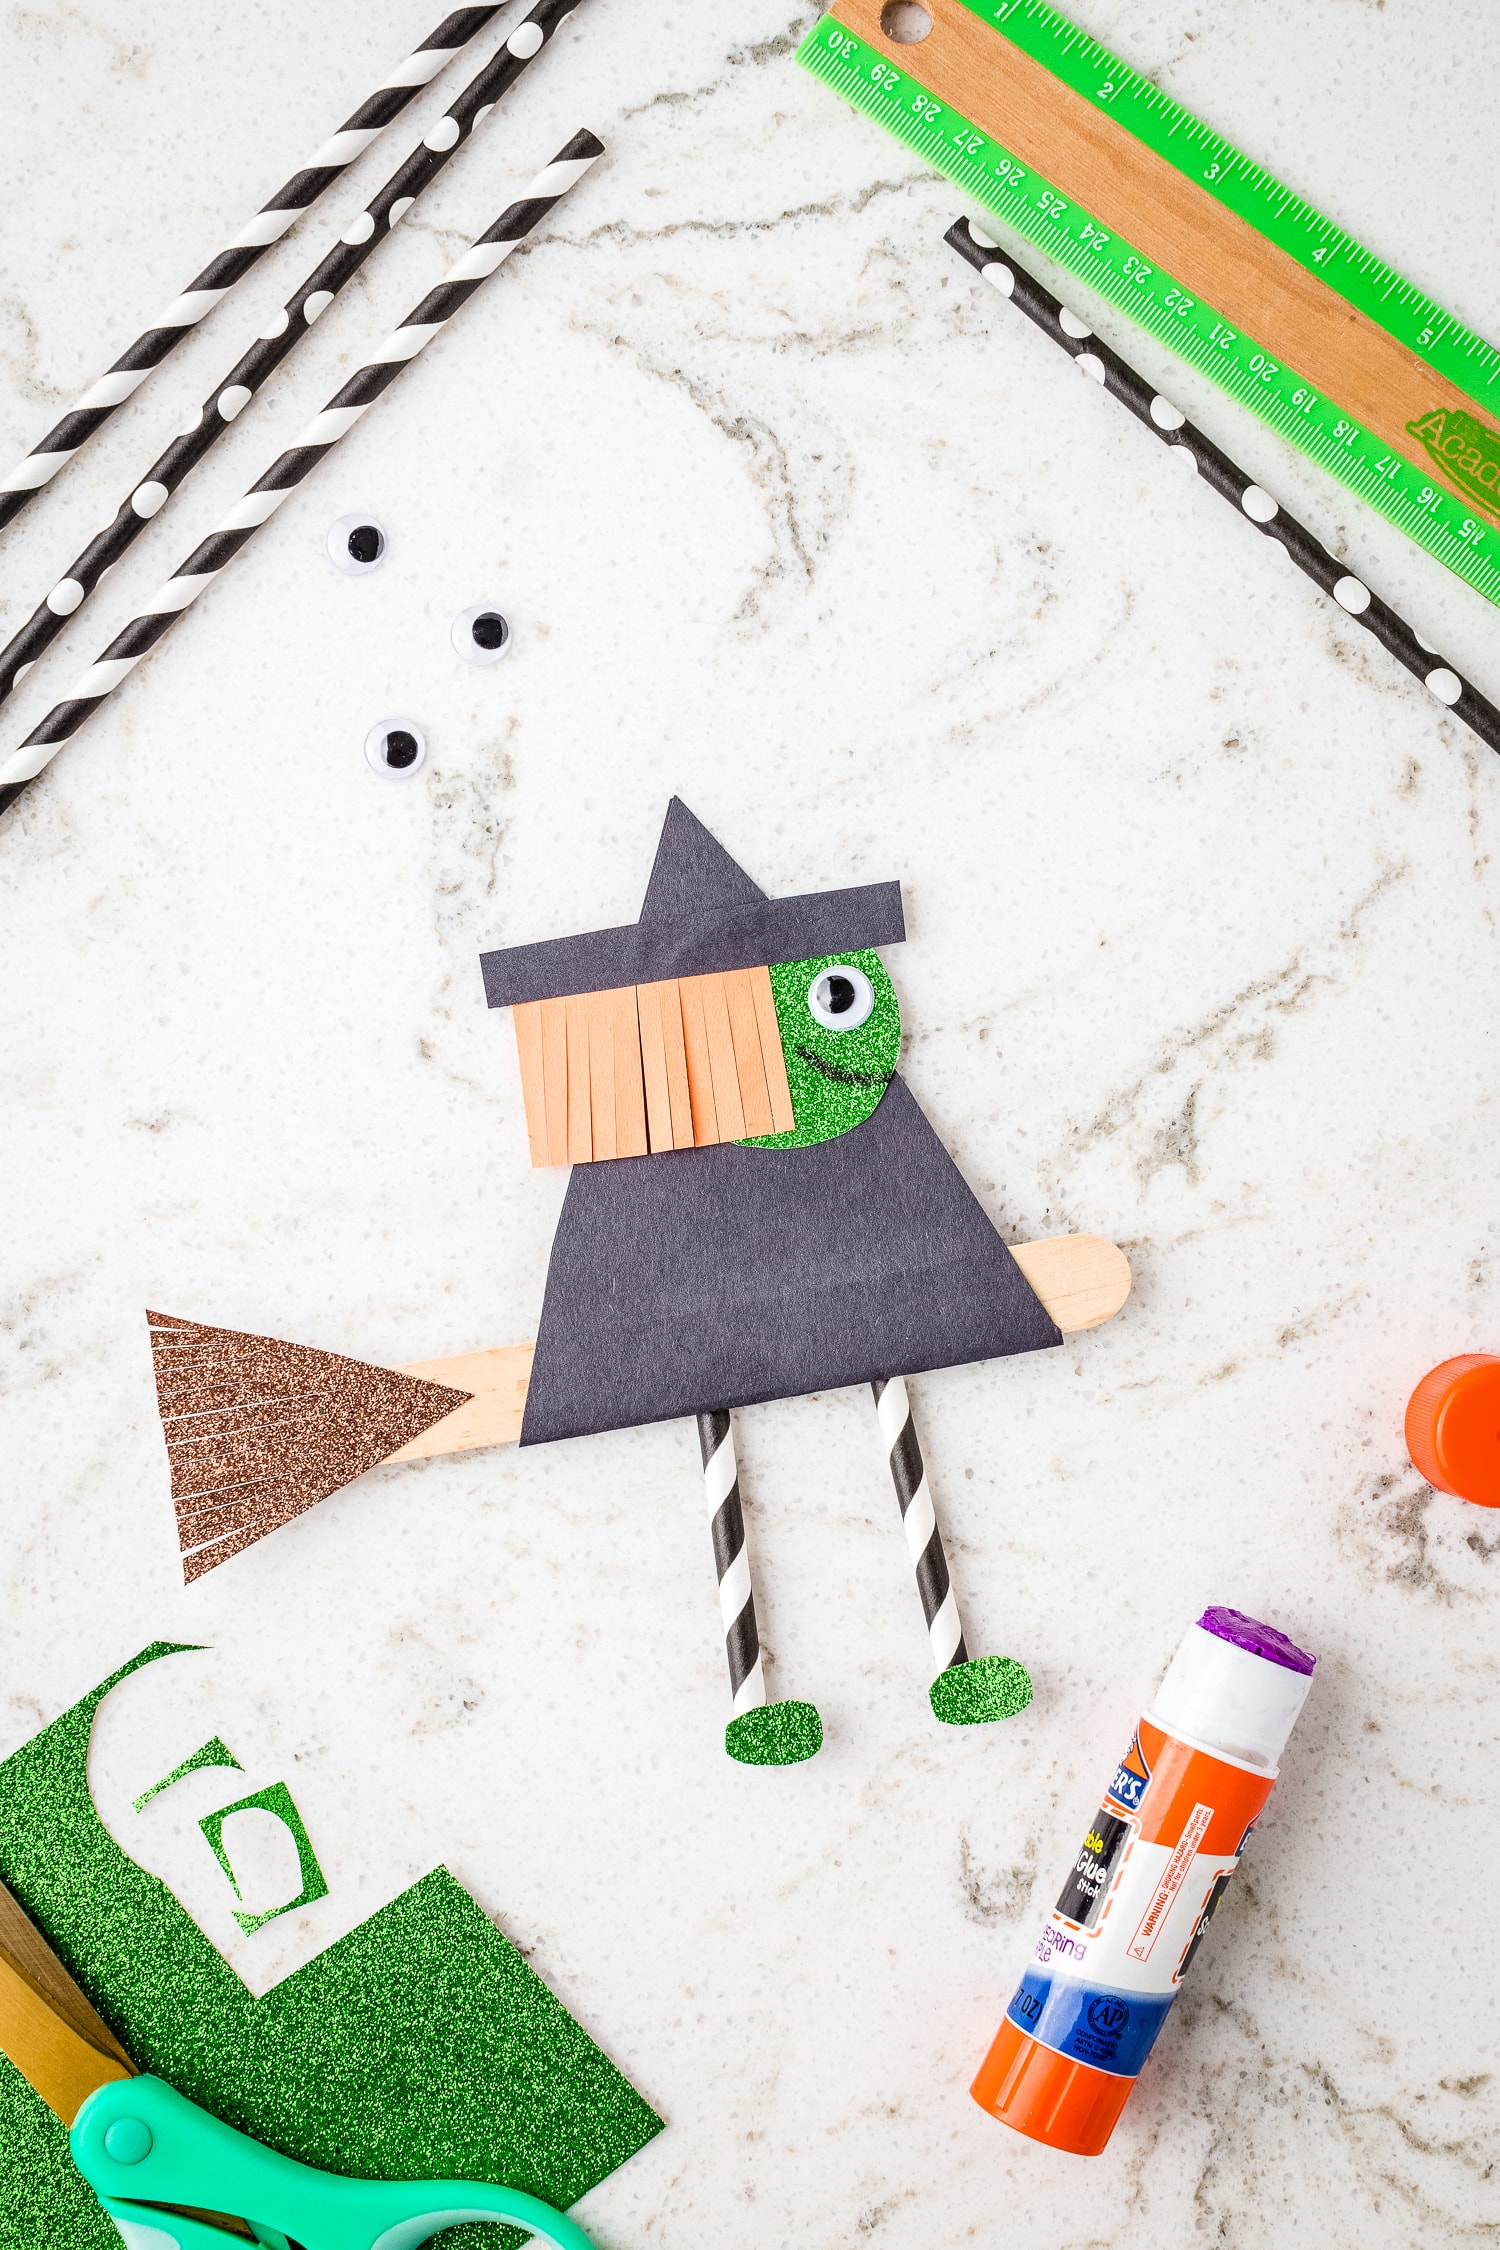
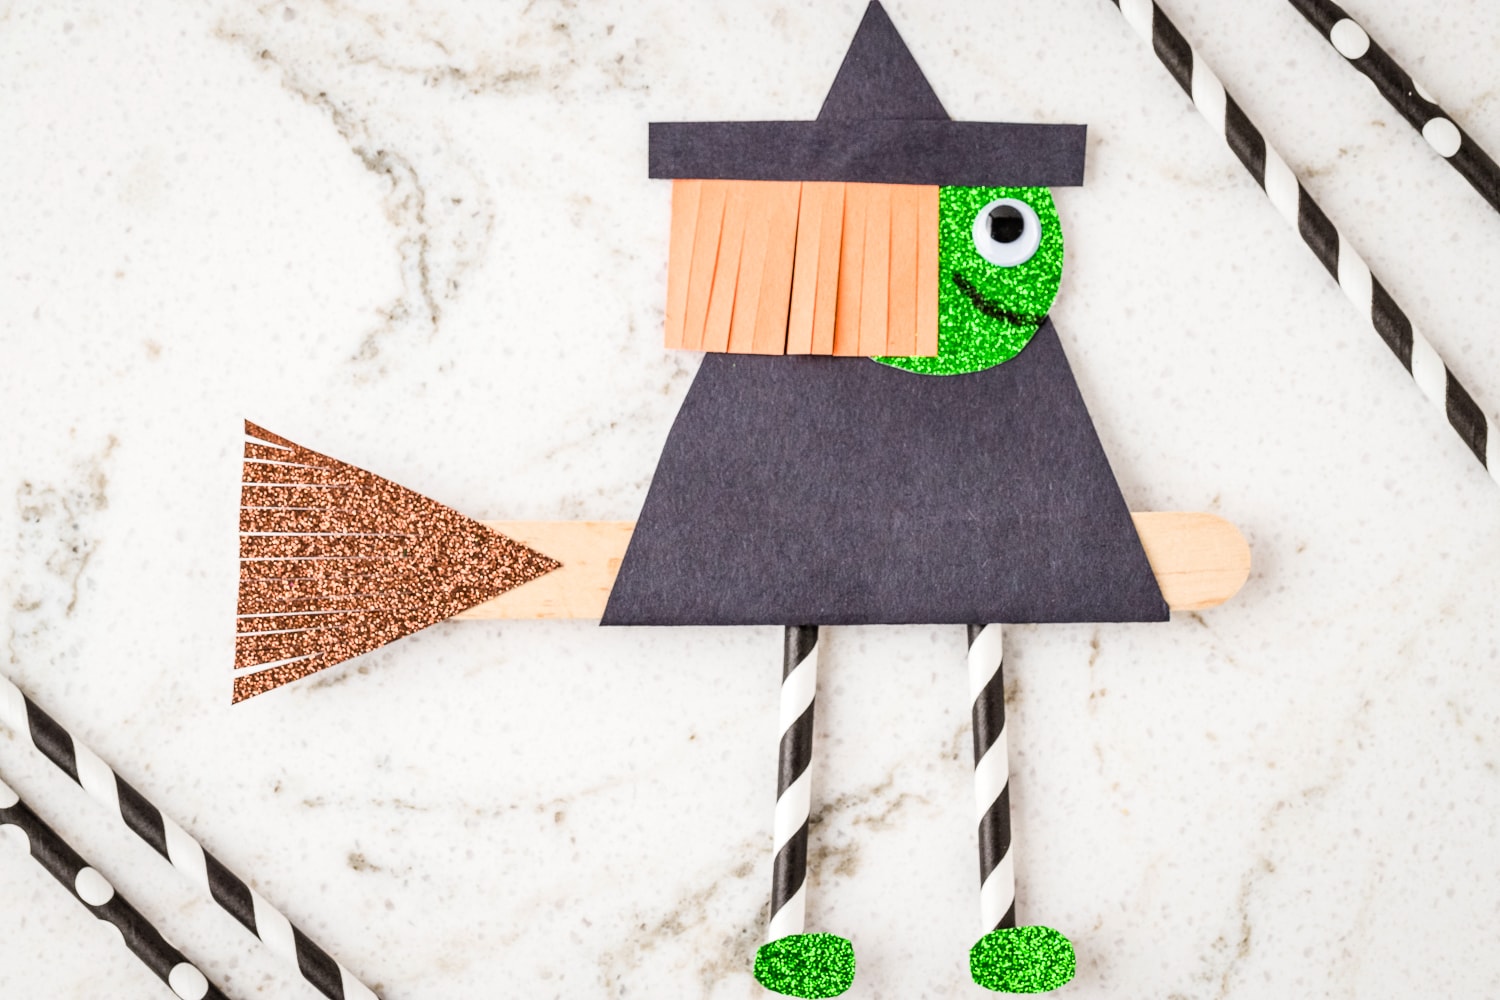
Time for Witch Legs!
Finally, let’s make some legs and feet for the witch! Cut decorative straws into 3-inch sections. Affix to back with glue for legs.
Next, cut 2 small ovals out of the green glitter card stock and glue them to the front of the legs for shoes. Allow drying time.
Now your witches are ready to fly into a night of spooky fun!
Make it a Magnet!
My kids love taking these sticky magnets and putting them on the back of their crafts and hanging them on our refrigerator. This easy witch craft is the perfect craft to display during Halloween.
Better yet, gift them to grandma, grandpa, aunts, uncles and everyone that needs a smile on their face.
Tips for young children!
This craft is best for older elementary and up! If younger kids do this craft we recommend pre-cutting everything so they just need to glue it together.
Variations!
Feel free to be creative with the colors of your witch! You could change the face, hair, and dress color to any you choose!
Add this cute and fun Witch on a Broomstick craft to your agenda this Halloween. It’s fun to do at school, parties or at home!
More Halloween Crafts and Recipes!
- This no-sew felt ghost garland is the perfect craft for older kids or adults. It is fun to make, cute, and the supplies are inexpensive and can be found at the Dollar Store.
- No Bake Halloween Bark with candy eyes is so fun and easy to make at Halloween!
- Free printable Halloween Activities for kids including Halloween Word Search, Word Scramble, Word Challenge, Maze and Coloring Pages!
- Munch on this Halloween Snack Mix while you make this easy witch craft!
If you take a picture and share them on Instagram make sure to #kidsactivityzone or tag us @kidsactivityzoneblog so we can see them!
Witch on a Broomstick Craft
Ingredients
- Construction paper black and orange
- Scissors
- Jumbo wooden craft stick natural
- Ruler
- Glue stick
- Pencil
- Spice lid to use for tracing of witch’s face
- Googly eyes
- Marker black
- Glitter card stock brown and green
- Decorative straws black and white
Instructions
- Let’s begin by making the body of the witch! Fold a piece of black construction paper in half long ways and cut it into a 4-inch section.
- With the section still folded in half, cut it into a triangle.
- Grab a jumbo wooden popsicle stick and place it inside the fold of the triangle. Apply a thin layer of glue to the inside of the triangle. Press the 2 sides together to secure the “broomstick” in between.
- Cut a 3-inch strip out of the same black construction paper for the witch’s hat. Set it aside.
- Use a spice lid or something similar to trace a 1 ½ inch circle. Glue the circle so it just hangs off the witch’s body to create the face.
- Cut 1 ½ x 1 ½ inch square of orange construction paper for the witch's hair. Cut vertical slits to mimic the look of hair. Glue the hair so that it overlaps the previously glued face.
- Take the 3-inch strip of black construction paper you previously cut and glue it across the top of the hair and face to create the witch’s hat!
- Add a googly eye and draw an expression with a black marker to personalize your witch!
- Cut a 2-inch triangle out of brown glitter card stock. Cut strips to make straw for the end of the broom. Once cut, affix it to the tail end of the broom with glue. Press to secure.
- Cut decorative straws into 3-inch sections. Affix to back with glue for legs.
- Next, cut 2 small ovals out of the green glitter card stock and glue them to the front of the legs for shoes. Allow drying time.
Notes
- This craft is best for older elementary and up! If younger kids do this craft we recommend pre-cutting everything so they just need to glue it together.
- Feel free to be creative with the colors of your witch! You could change the face, hair, and dress color to any you choose!