Toilet Paper Roll Fall Tree Craft
Make the most of autumn with this creative and simple toilet paper roll Fall Tree Craft for kids. From pumpkins to scarecrows, this easy fall craft is perfect for a fun fall activity.

Don’t throw away those empty toilet paper rolls! Use them for this adorable toilet paper roll fall tree craft instead. With some fun craft materials and a flex of that creative muscle, you can make the cutest fall craft ever. Fall toilet paper roll crafts are all the rage around here once the leaves begin to change color. And I’m all for it because they’re super affordable! This tree craft is super fun, and my toilet paper roll pumpkin and toilet paper roll turkey are super cute too.
I also love this craft because it’s really simple for little hands to make. There’s not a crazy ton of steps, so it’s easy to follow and always turns out adorable! Once fall season rolls around, you have every reason to make the best fall tree art ever. Before you know it, it’ll be Christmas and there’s loads of crafts for the Christmas season too! So don’t miss out on great crafts, like this fall craft with a toilet paper roll.
Why You’ll Love this Toilet Paper Roll Fall Tree Craft
- Cutting and glueing are great activities to refine fine motor skills! You can get those little fingers working a develop all the little muscles that are so important.
- This craft is really easy to make! Just a few simple steps and you’ve got a fall tree that is so cute.
- I love crafts like this one because they are really affordable. If you’ve leftover cardboard rolls form paper towels or toilet paper, then you only need a few more supplies to make this craft happen!
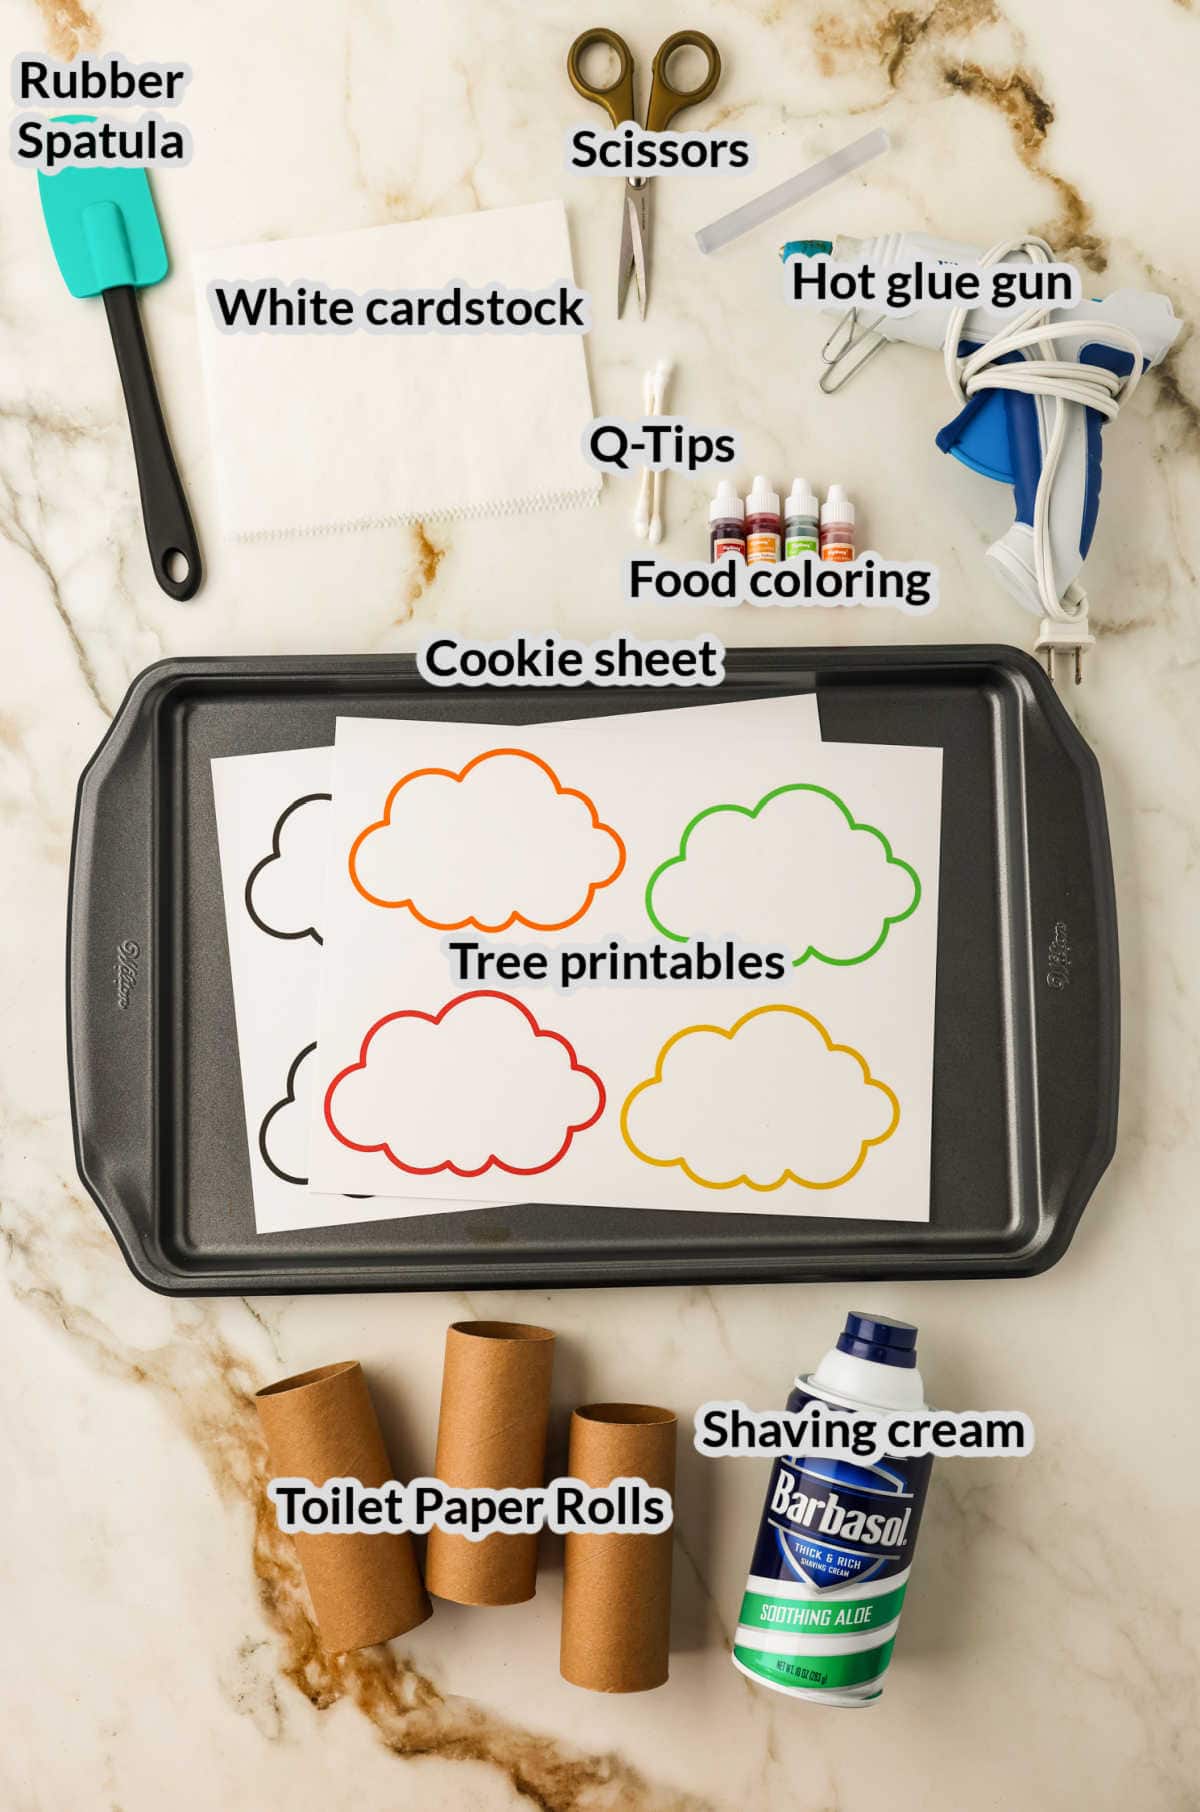
Supplies Needed
- Cookie sheet – You will need a cookie sheet, or other flat surface, to place the shaving cream on.
- Shaving cream – This is key to creating the colorful tree tops. Not only is it artistic fun, but it’s a great sensory addition to this activity.
- Toilet Paper Rolls – Paper towels rolls cut in half will also work for this craft.
- Food coloring – Grab whatever colors you want — this is how you will color the shaving cream to make the tree tops.
- Rubber Spatula – A silicone spatula will help you flatten out the shaving cream mounds to make a printing mold for the tree tops.
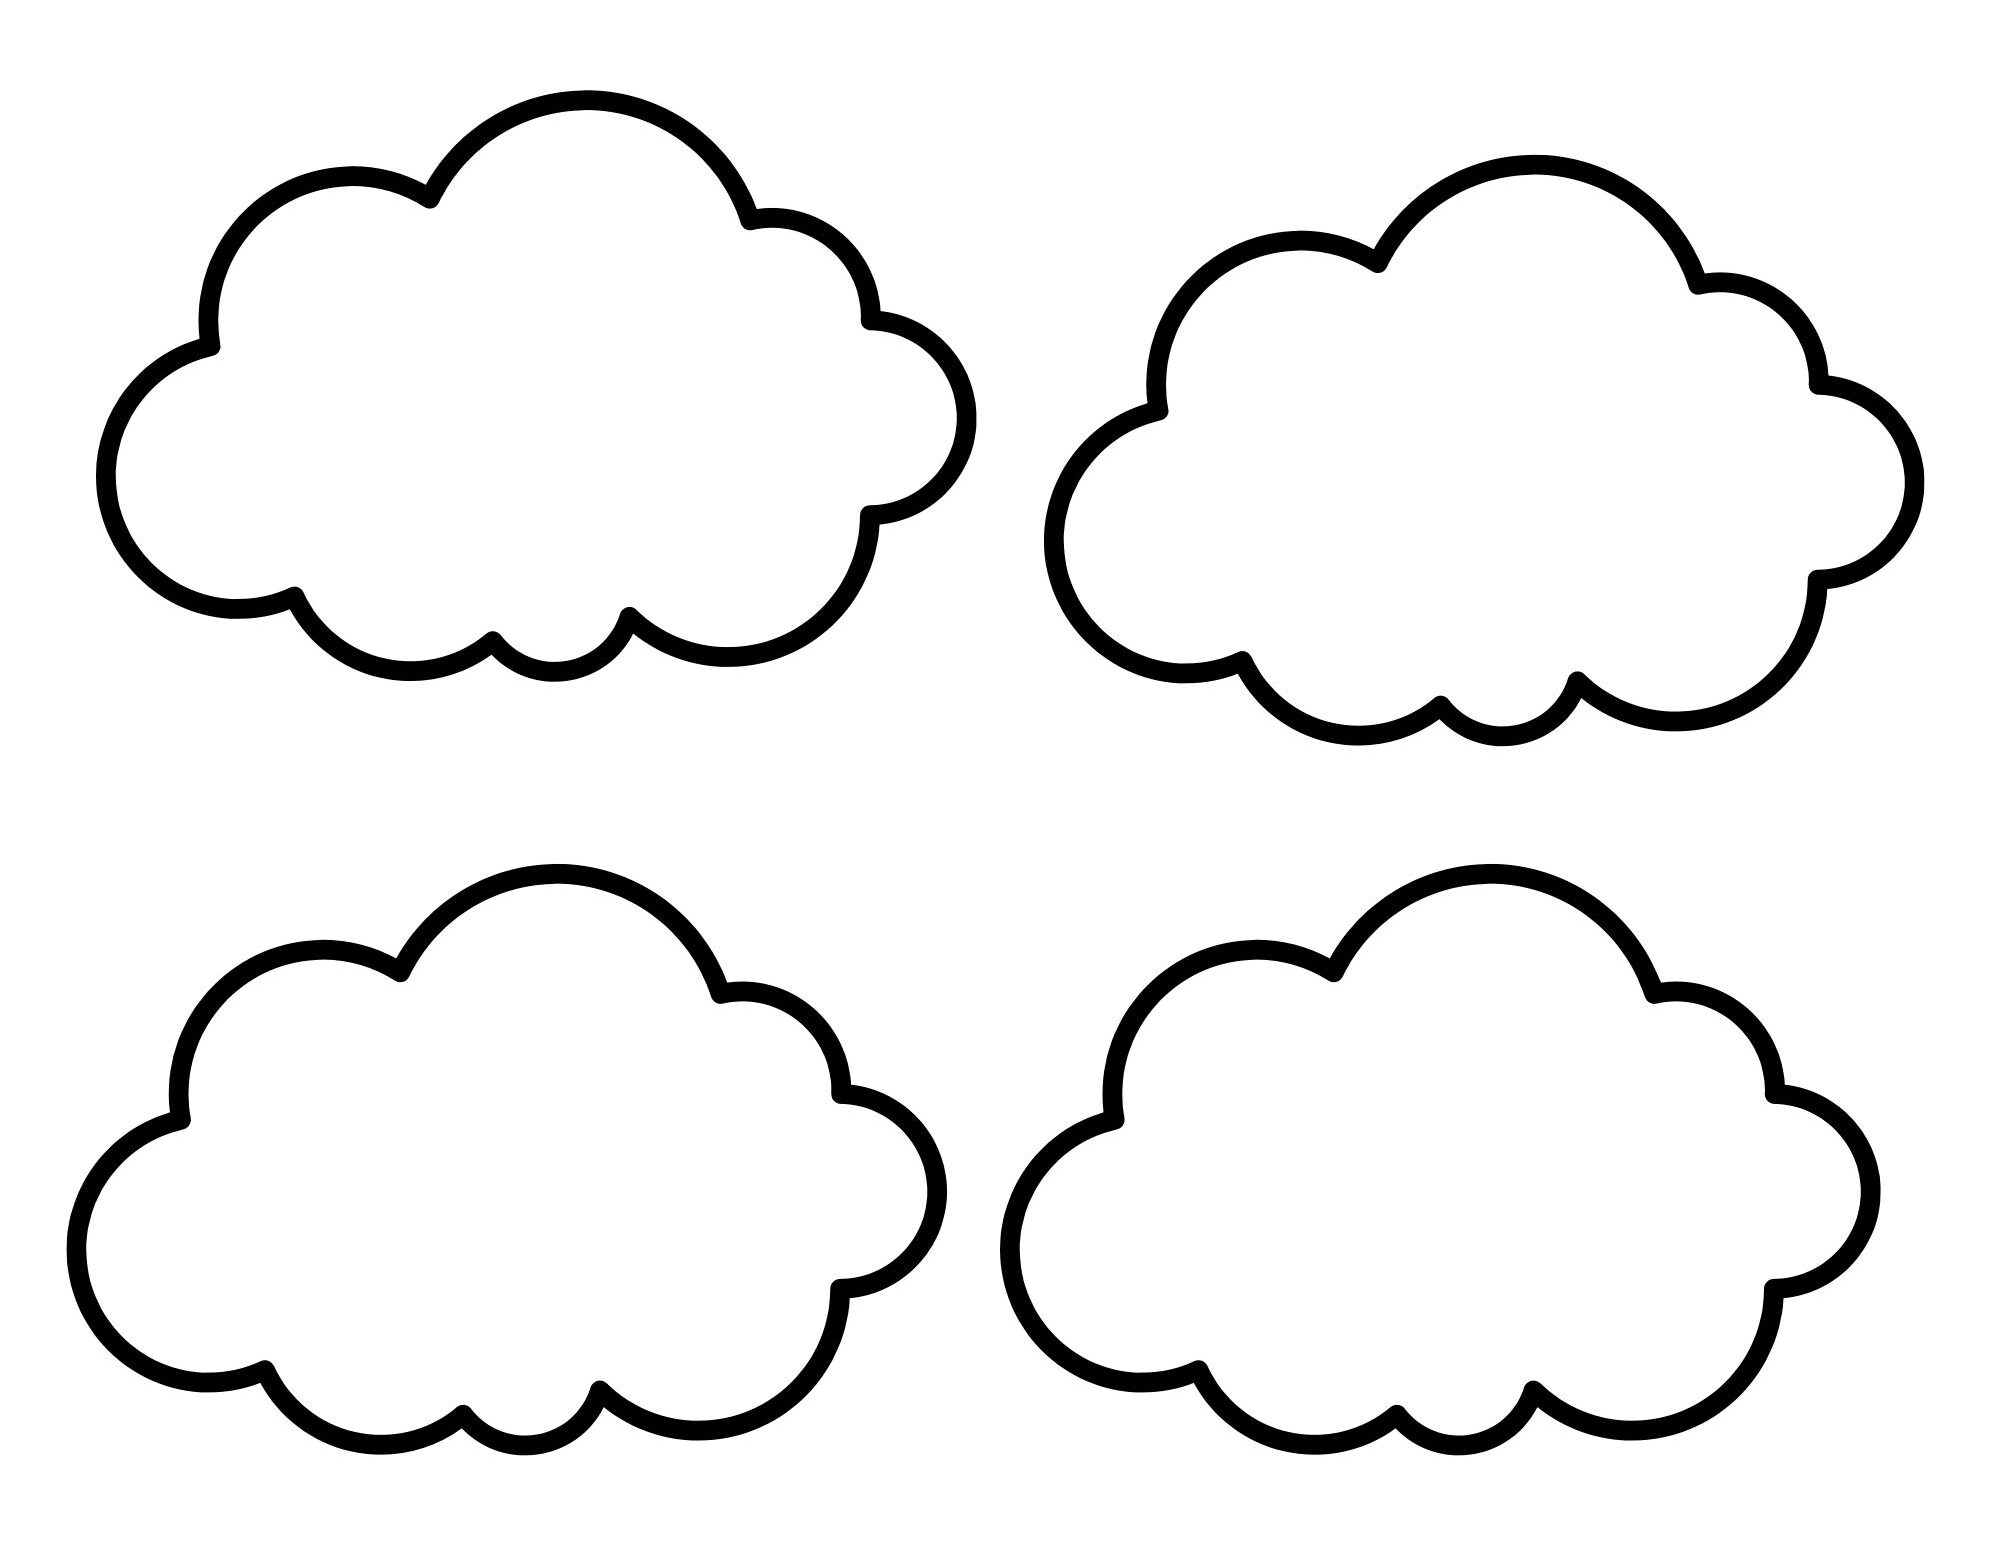
- Tree printables – If you do not have a way to print this free printable, then you can just freehand the tree tops.
- White cardstock – Print the tree template onto white cardstock to make it sturdy.
- Scissors – If you are making this craft with littles, then make sure you’ve got some safety scirssor for them to use.
- Hot glue gun – This is the easiest way to attach the colored tree tops to the toilet paper roll tree trunk.
- Markers – Totally optional, but if you’d like to decorate your fall tree trunk then make sure that you have some markers on hand.
- Googly eyes – Mini googly eyes are really fun to put on the tree trunk to look like there’s a little creature peeking out from a hole in the tree.


How to Make a Toilet Paper Roll Fall Tree Craft
Print the tree tops printable onto white cardstock. You can choose black outlines to use any color for the tree tops, or choose the colorful outlined tree tops for a fun color matching activity!
Cut all of the tree tops into separate squares — don’t worry about cutting the shapes out at this point. Set the tree tops aside.
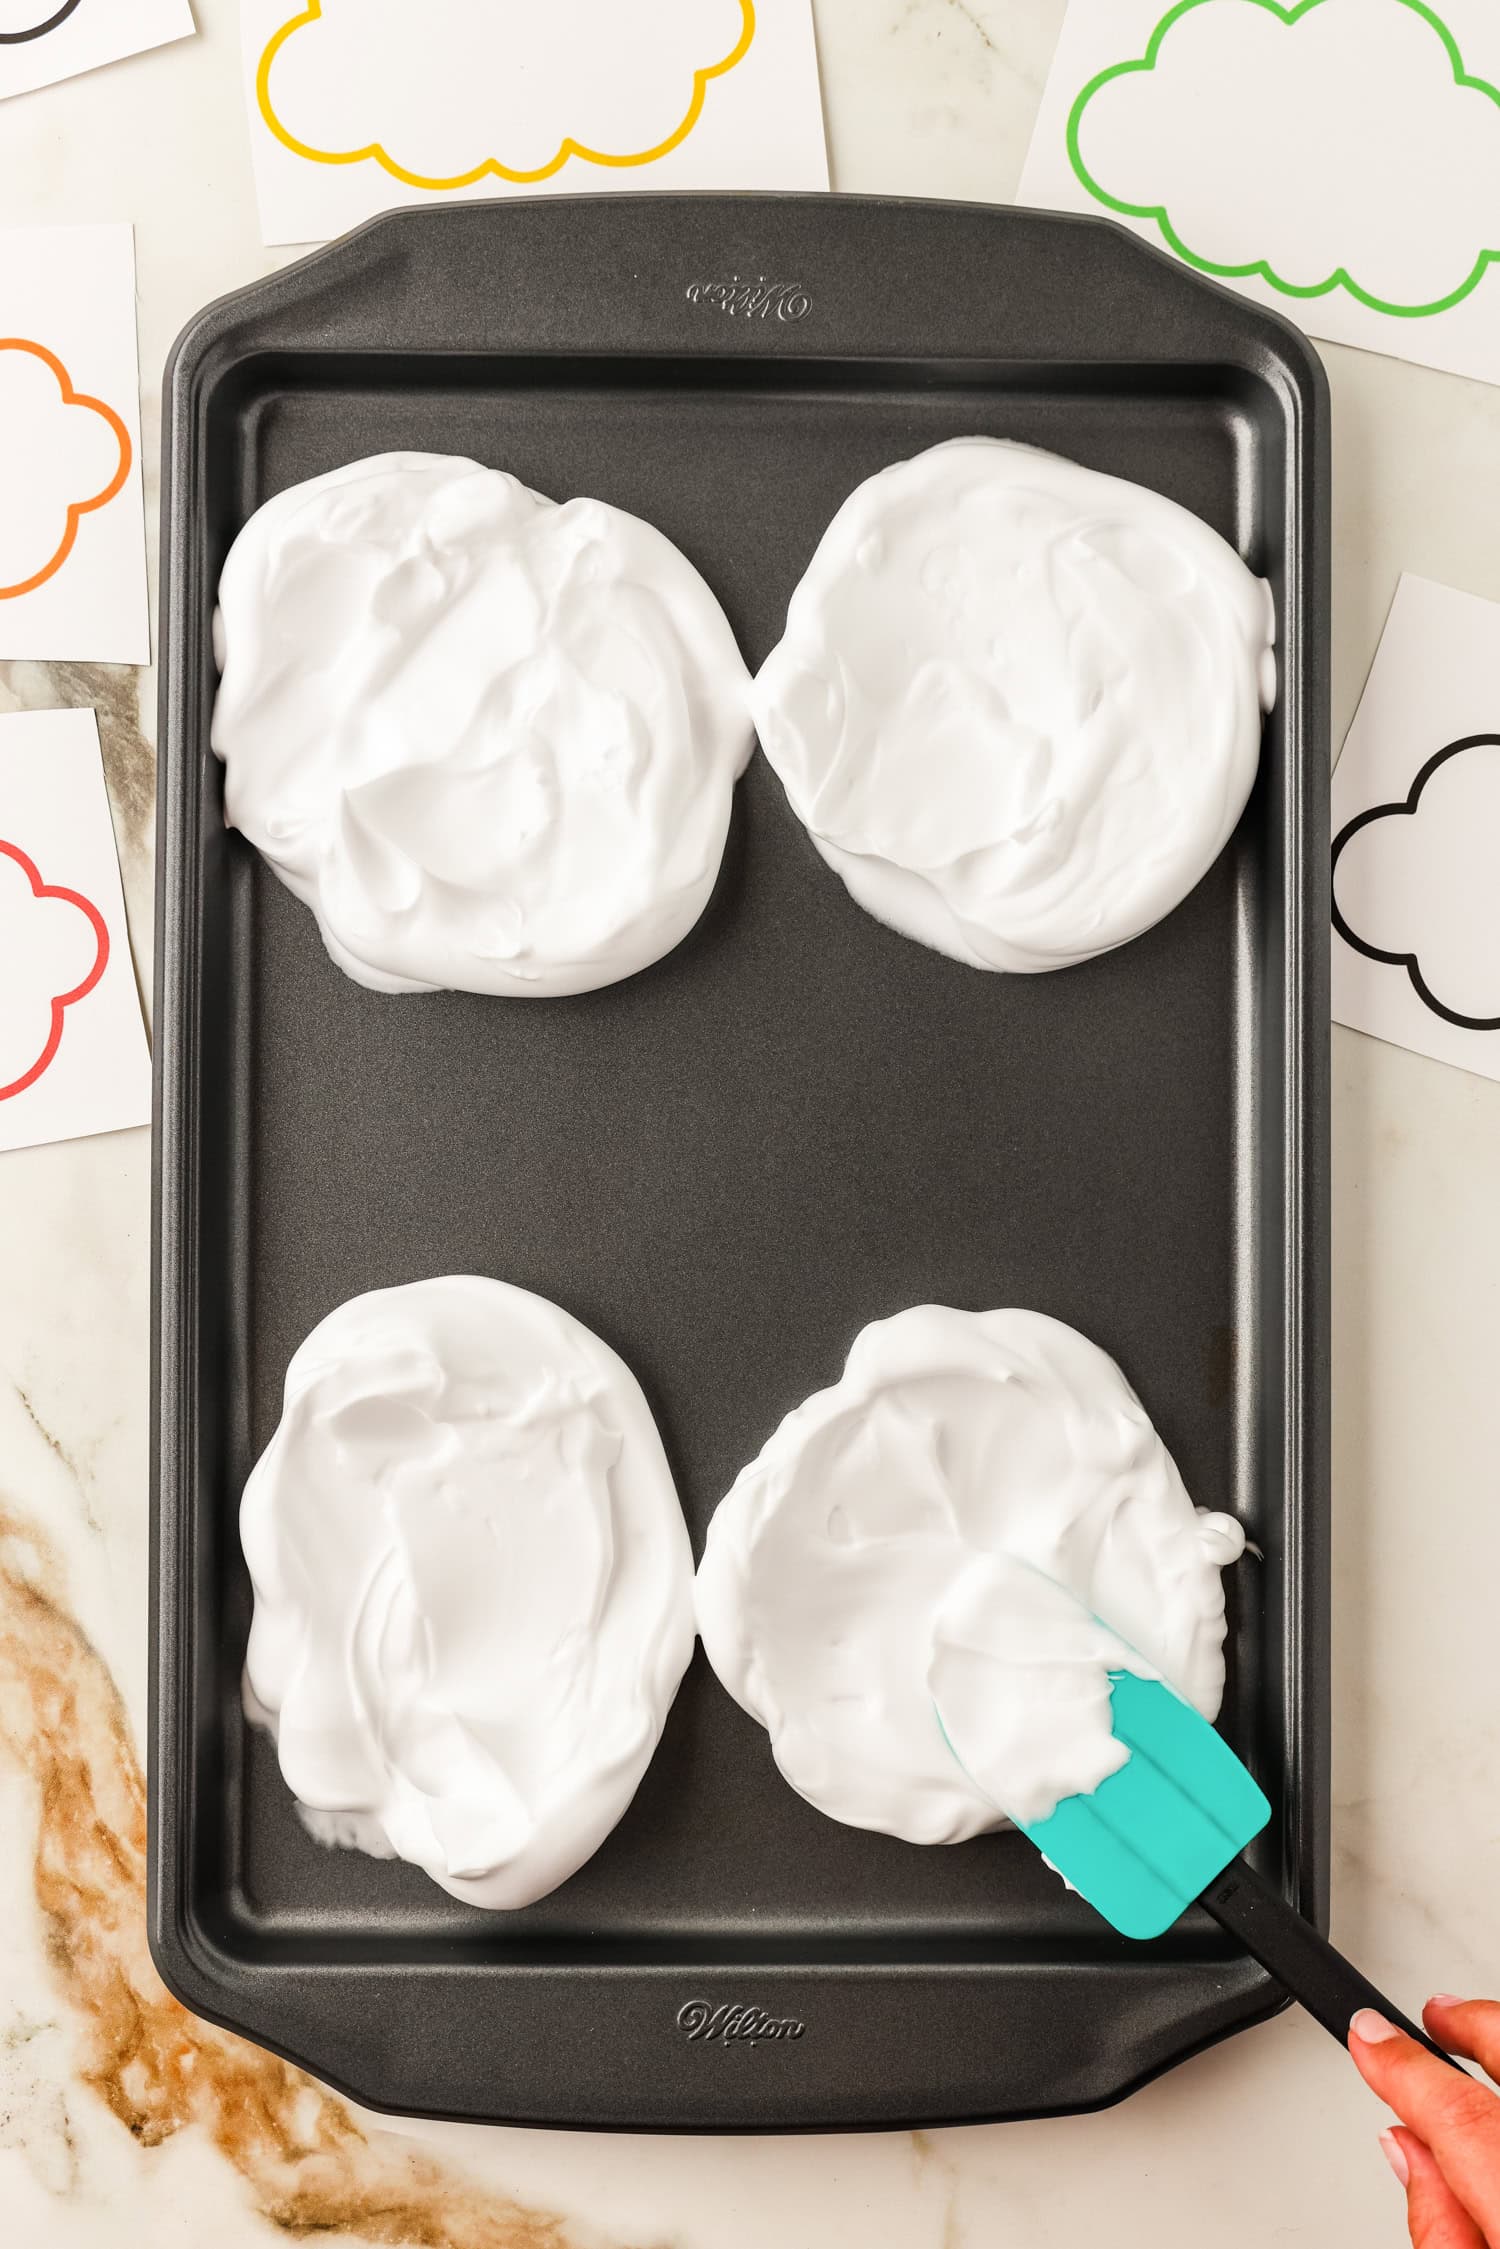
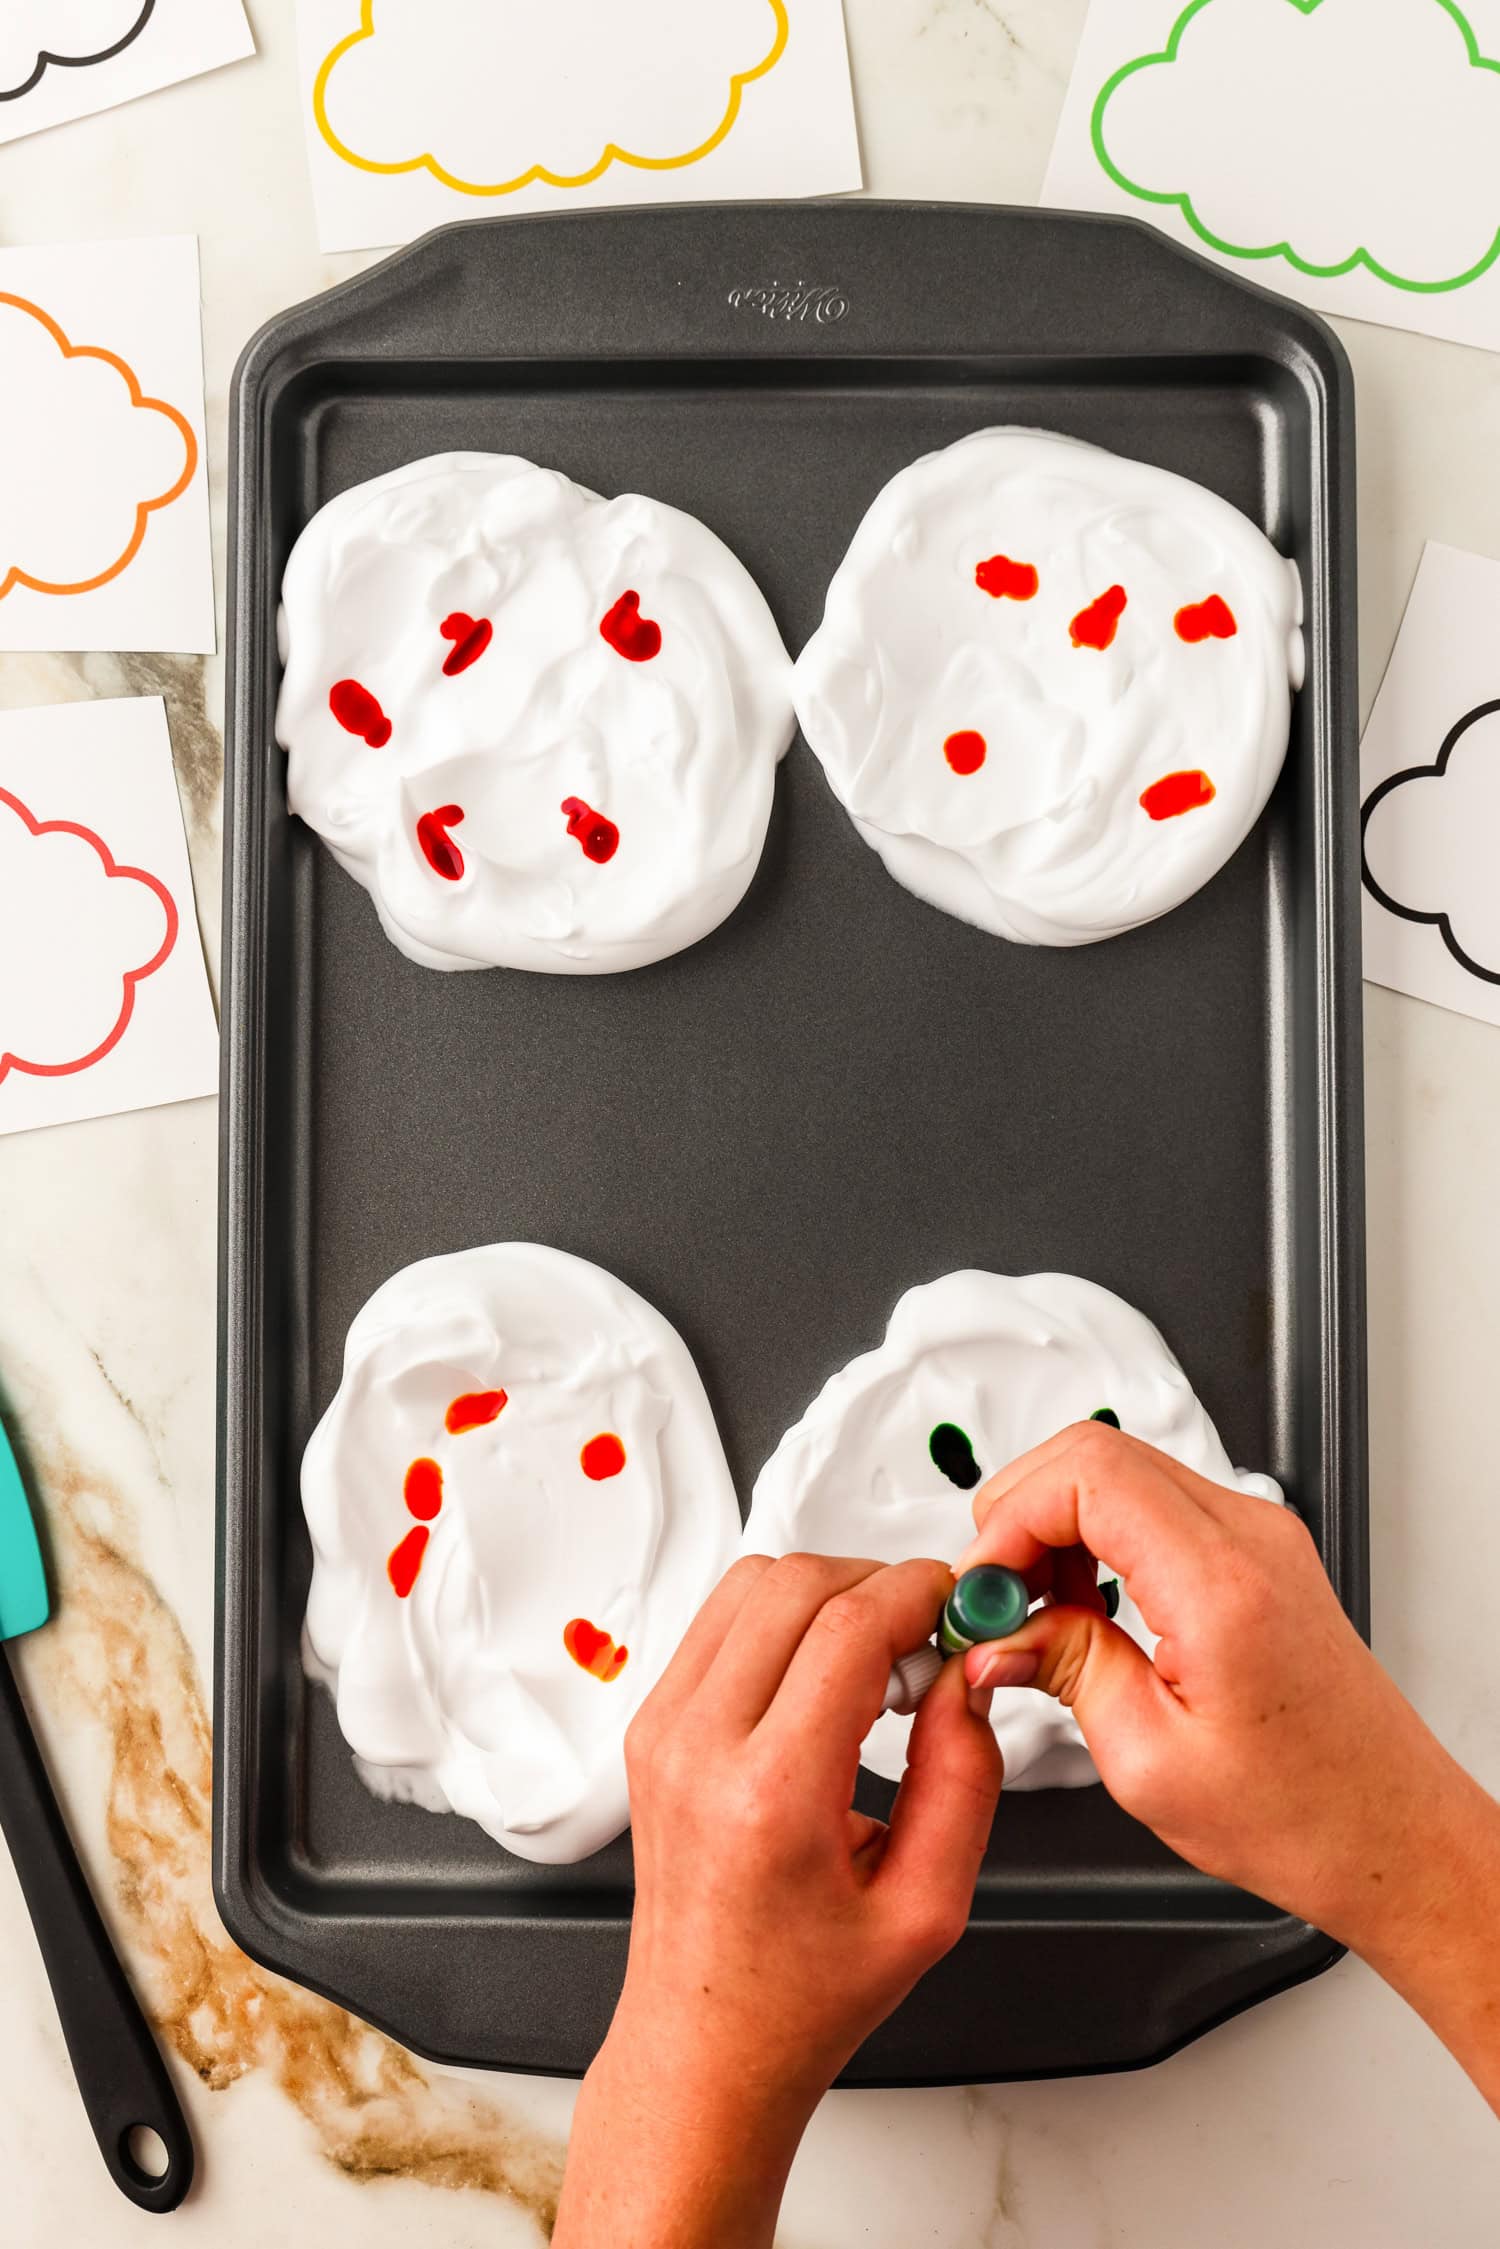
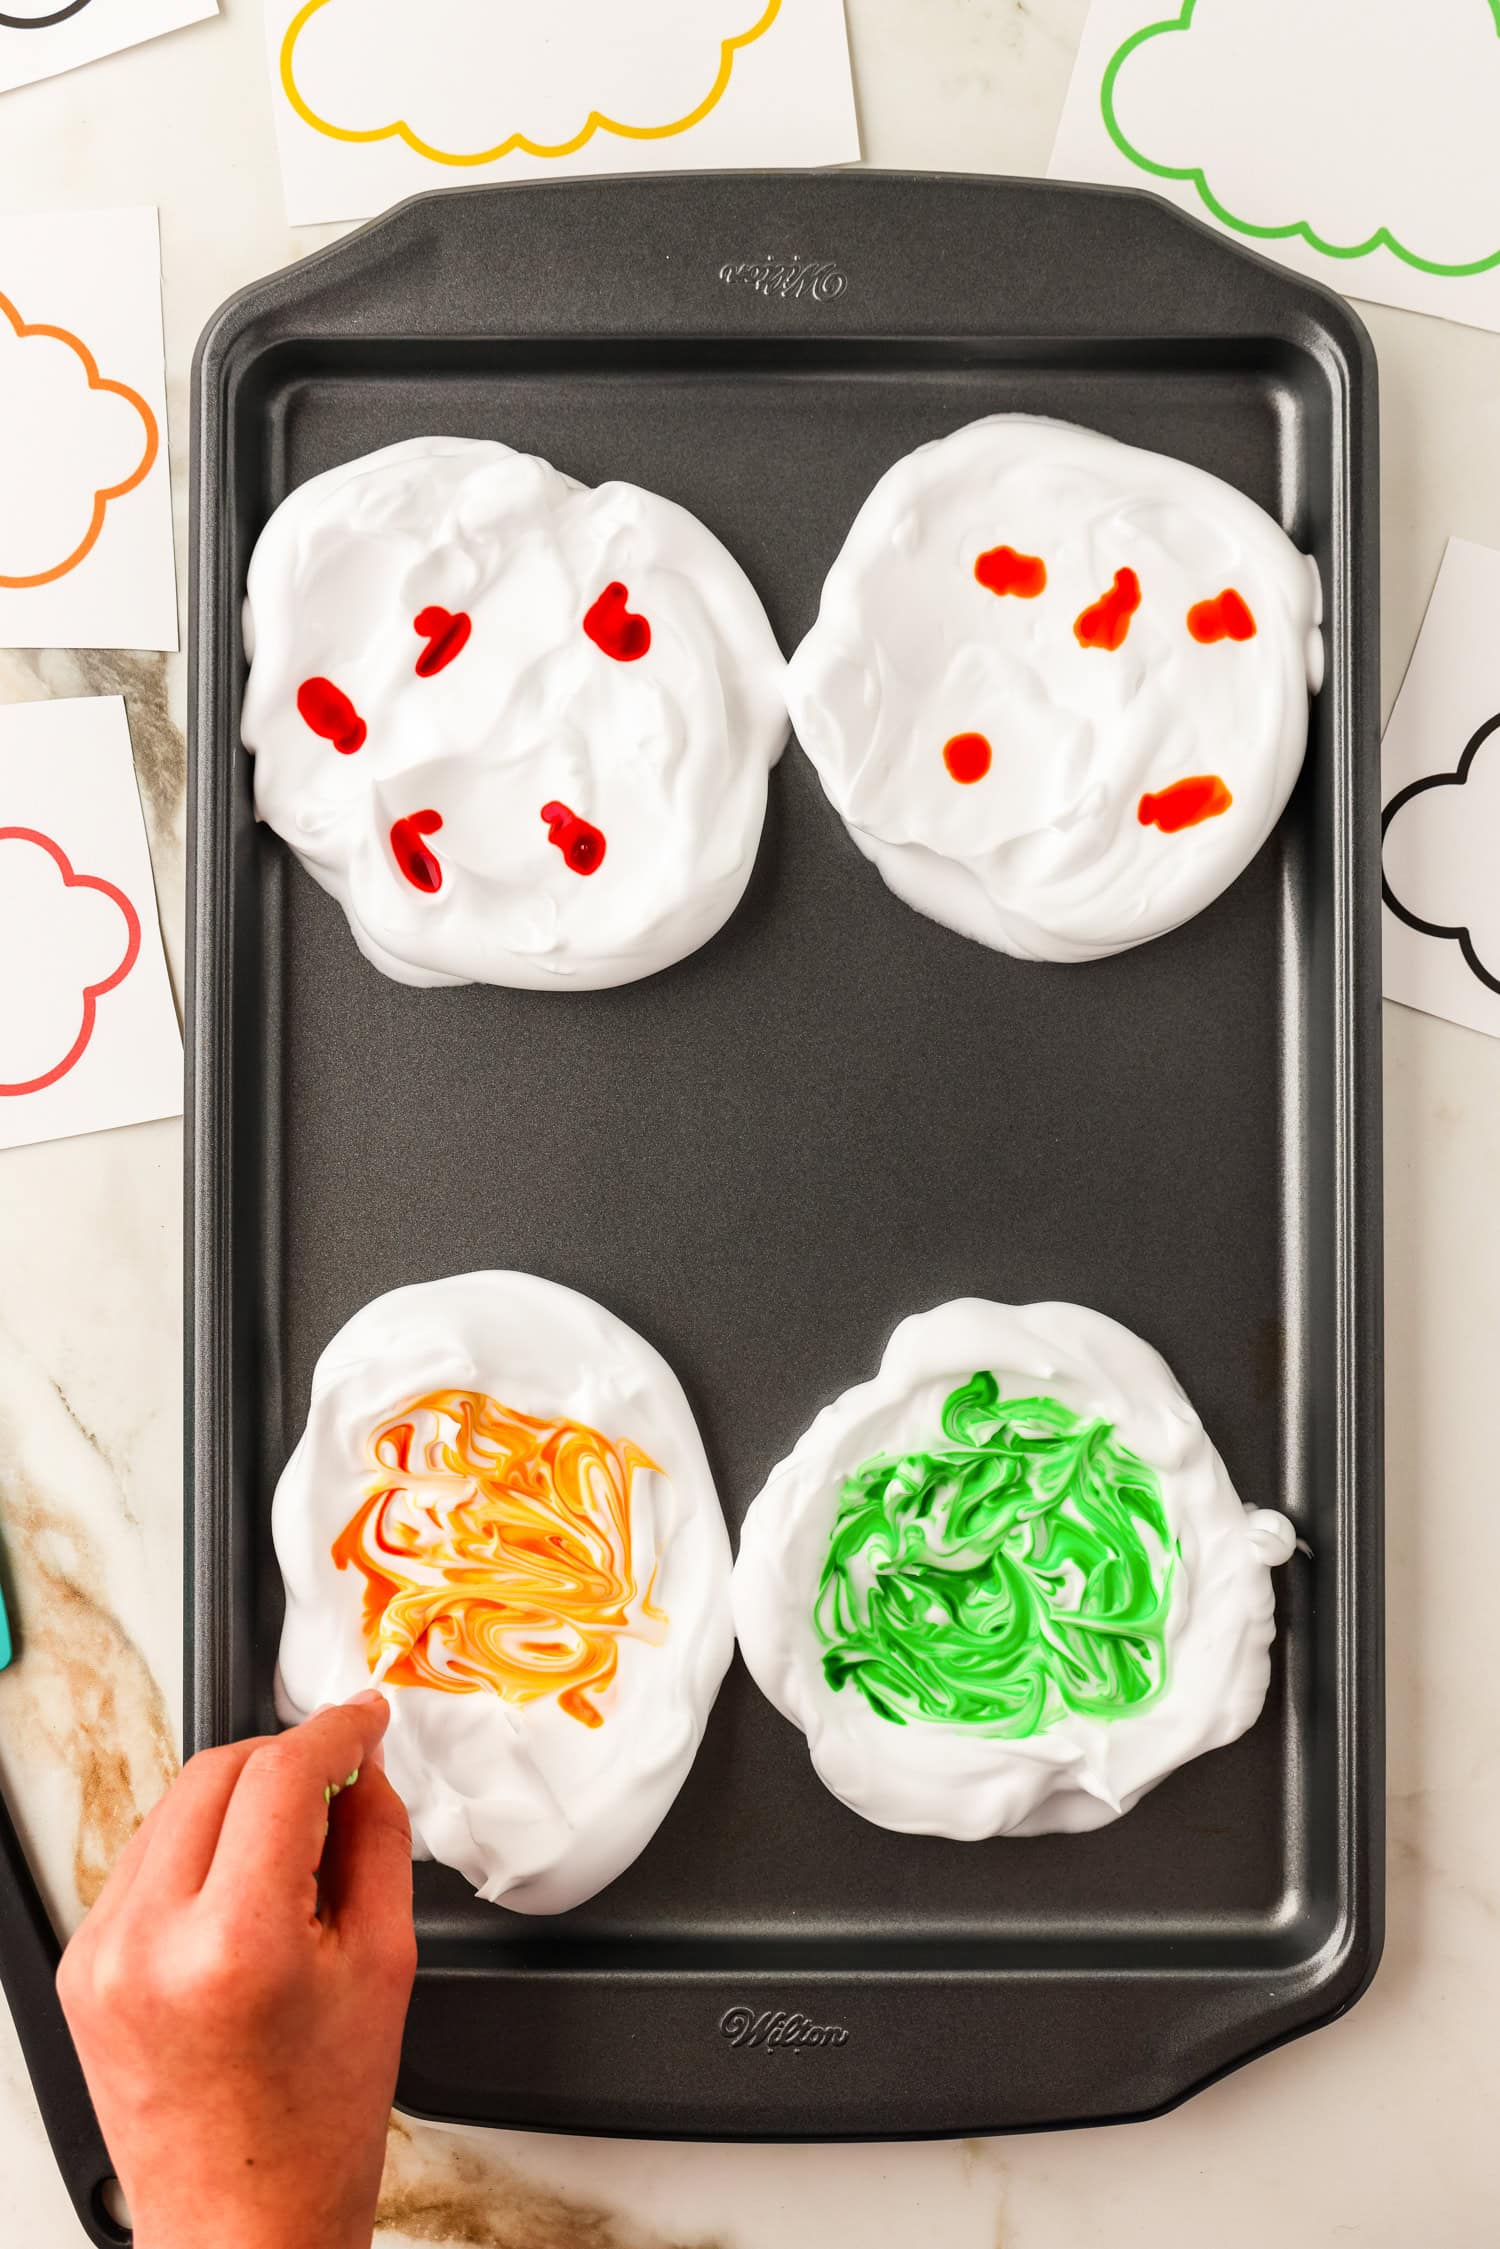
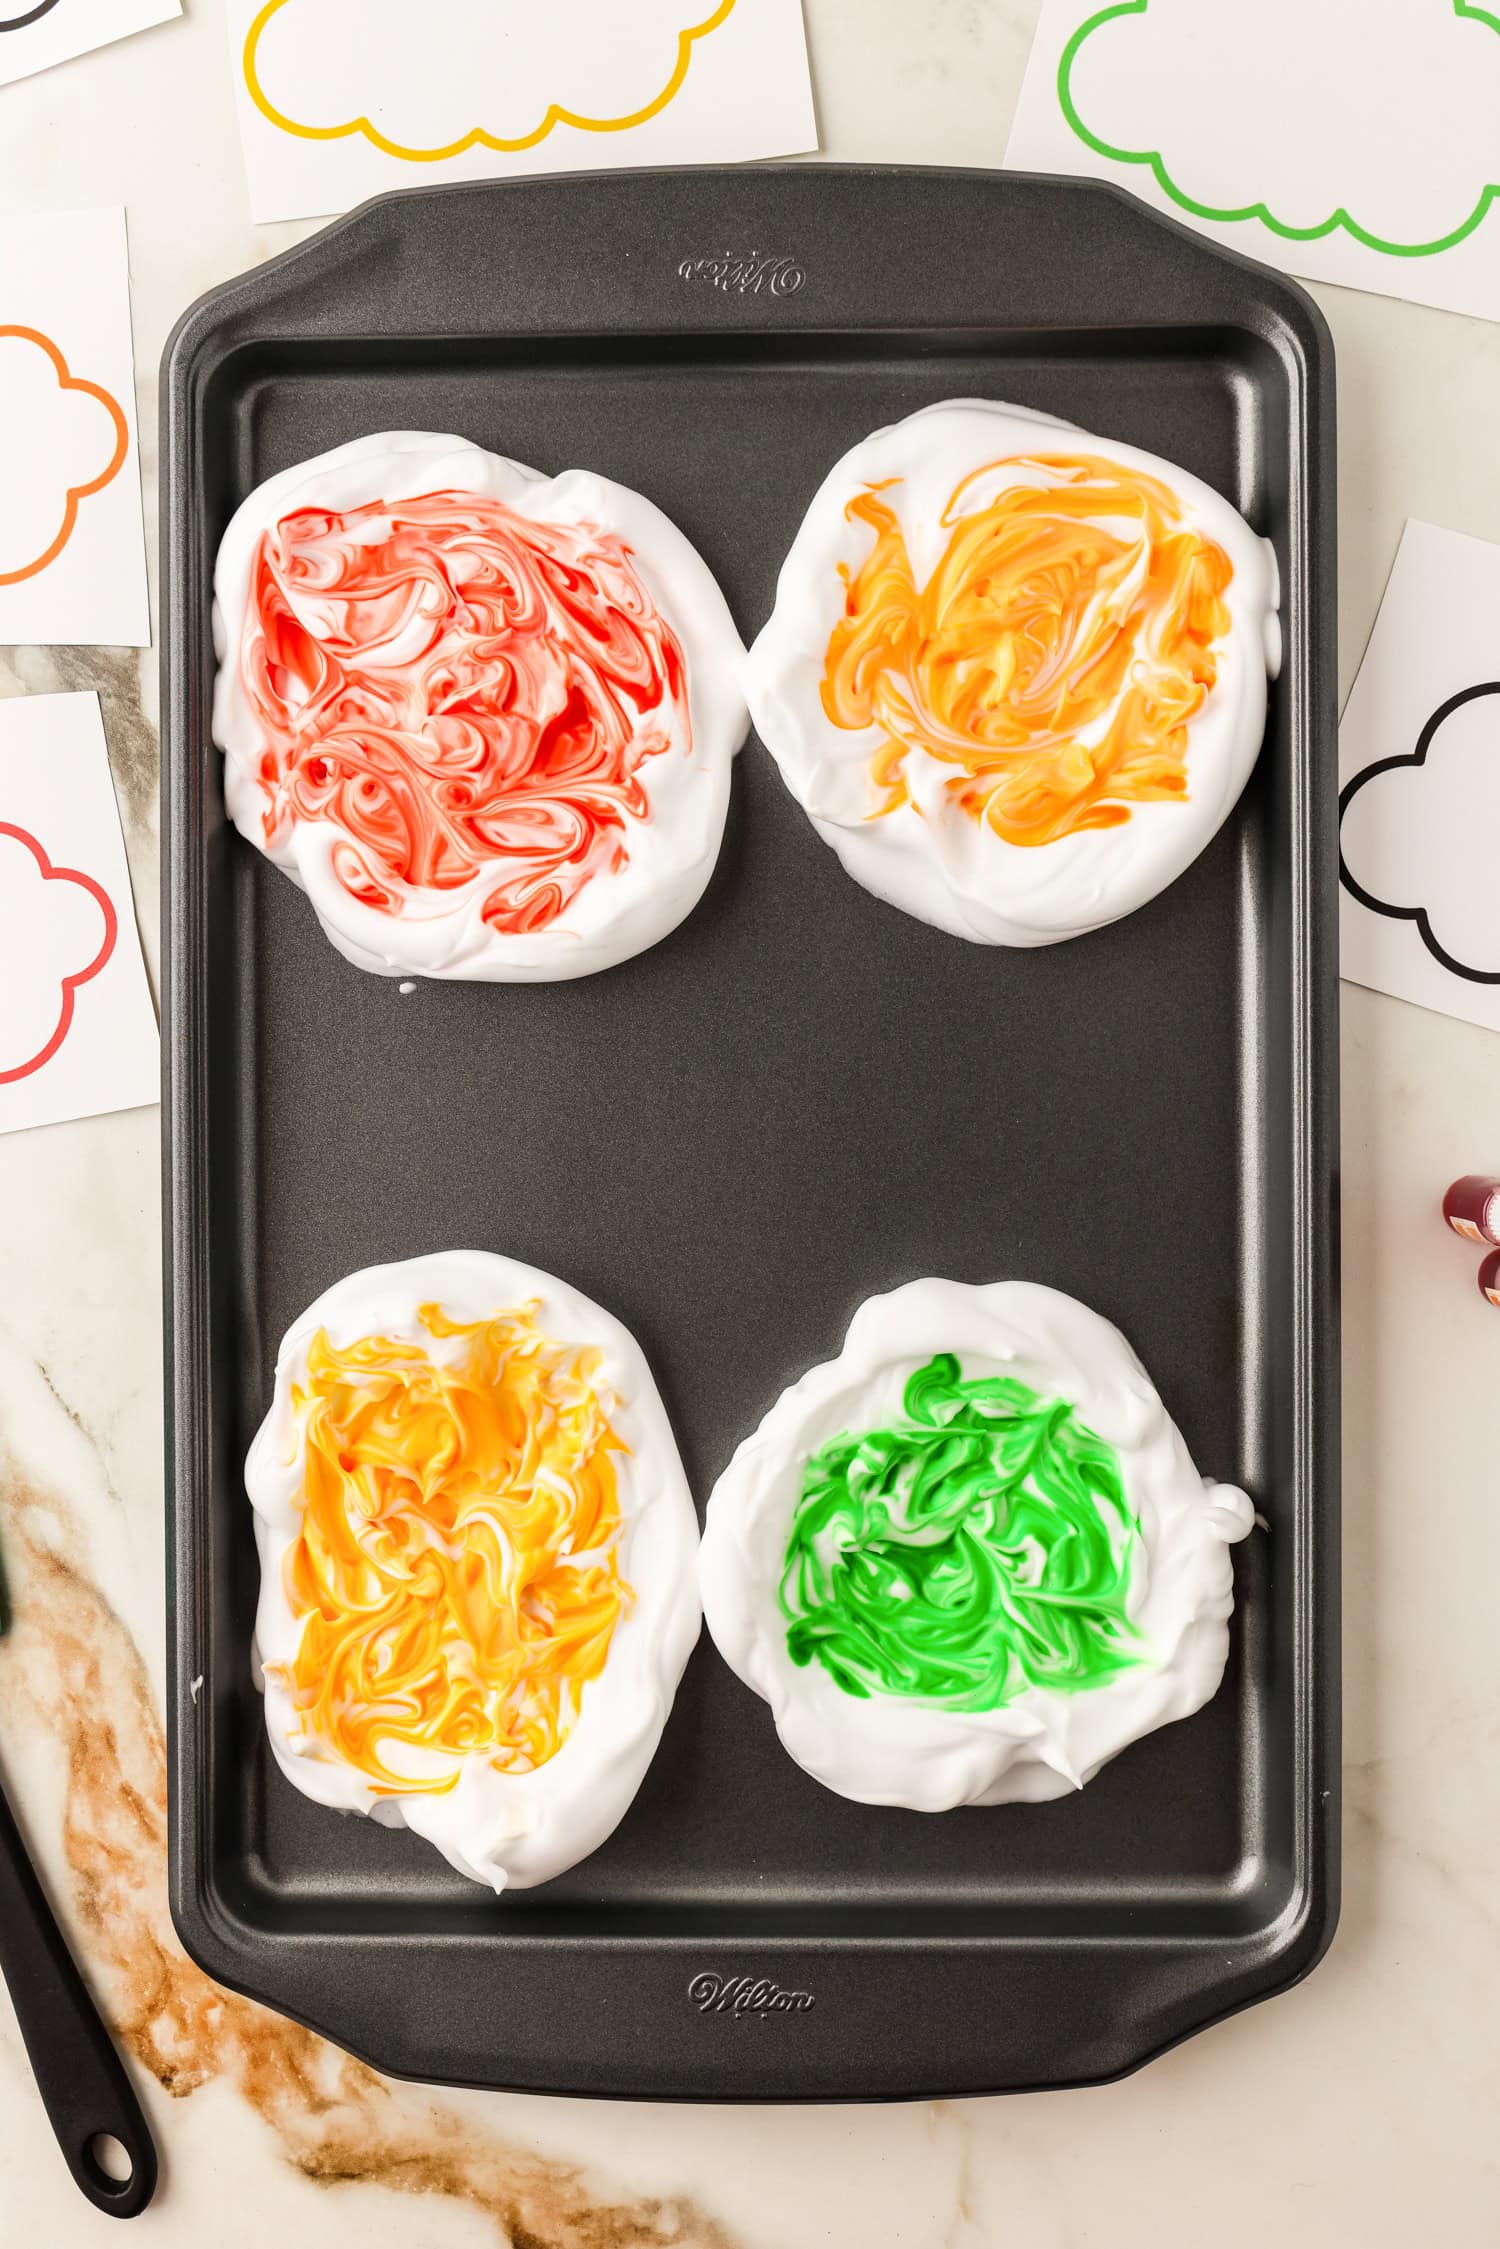
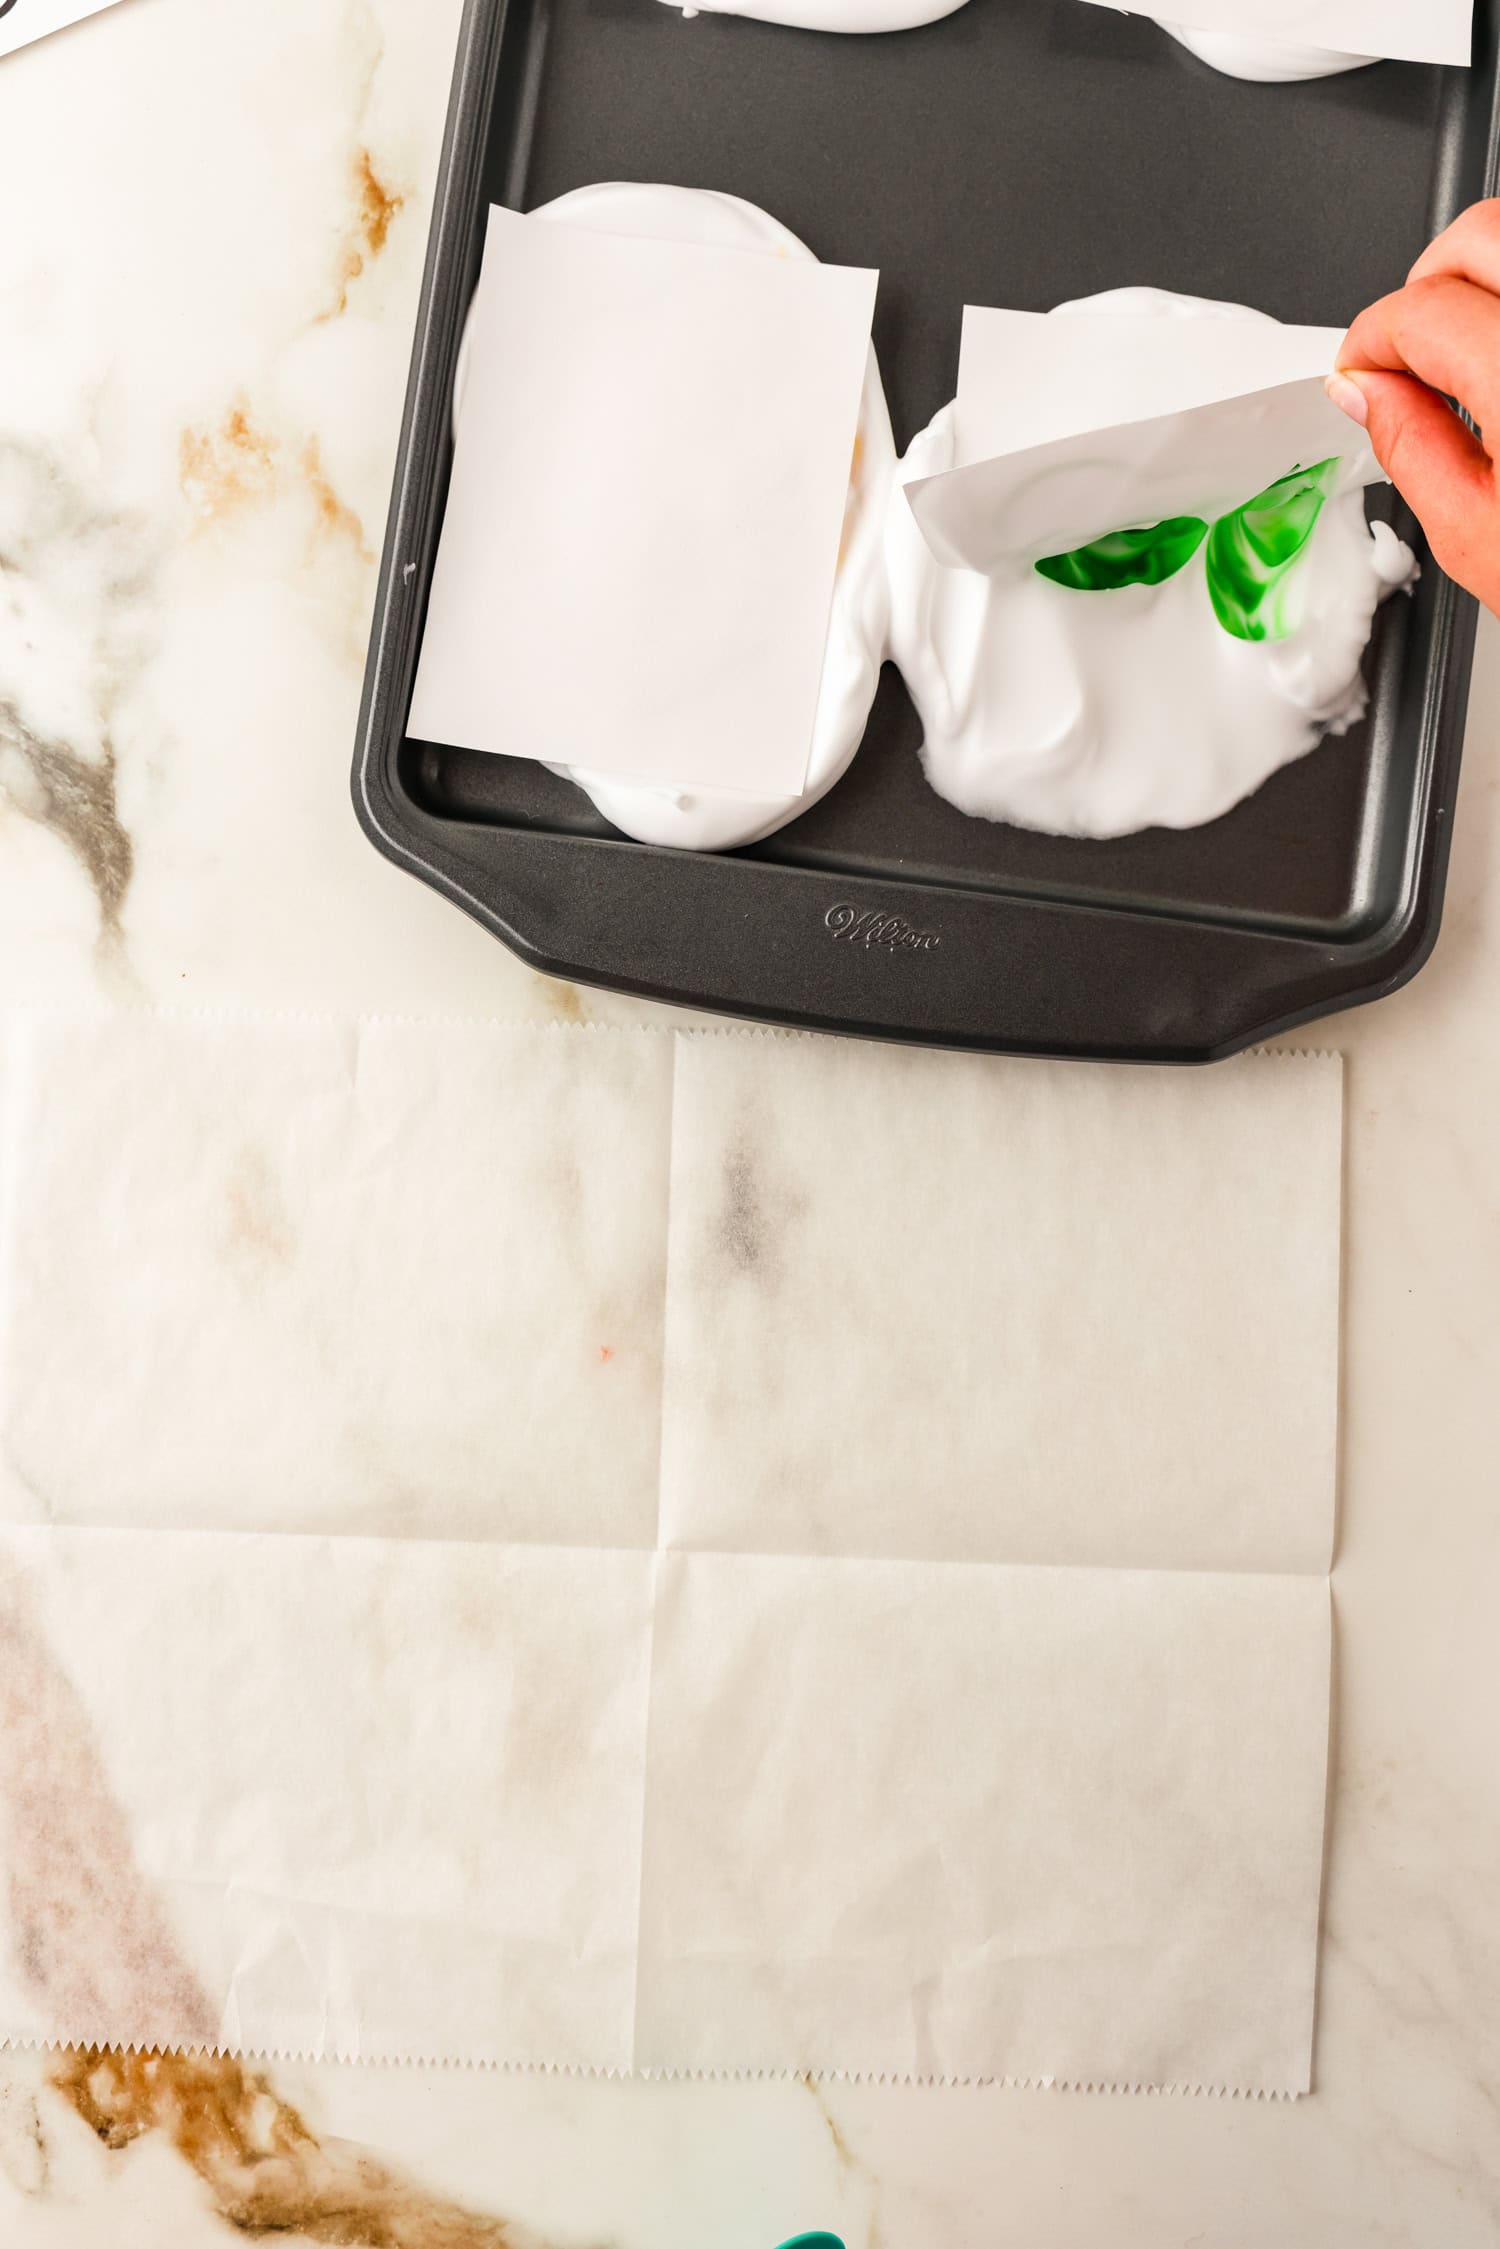
Squirt shaving cream onto your cookie sheet and then spread it out using a rubber spatula. Add a few drops of food coloring on top of the shaving cream then use a q-tip to swirl the food coloring into the shaving cream.
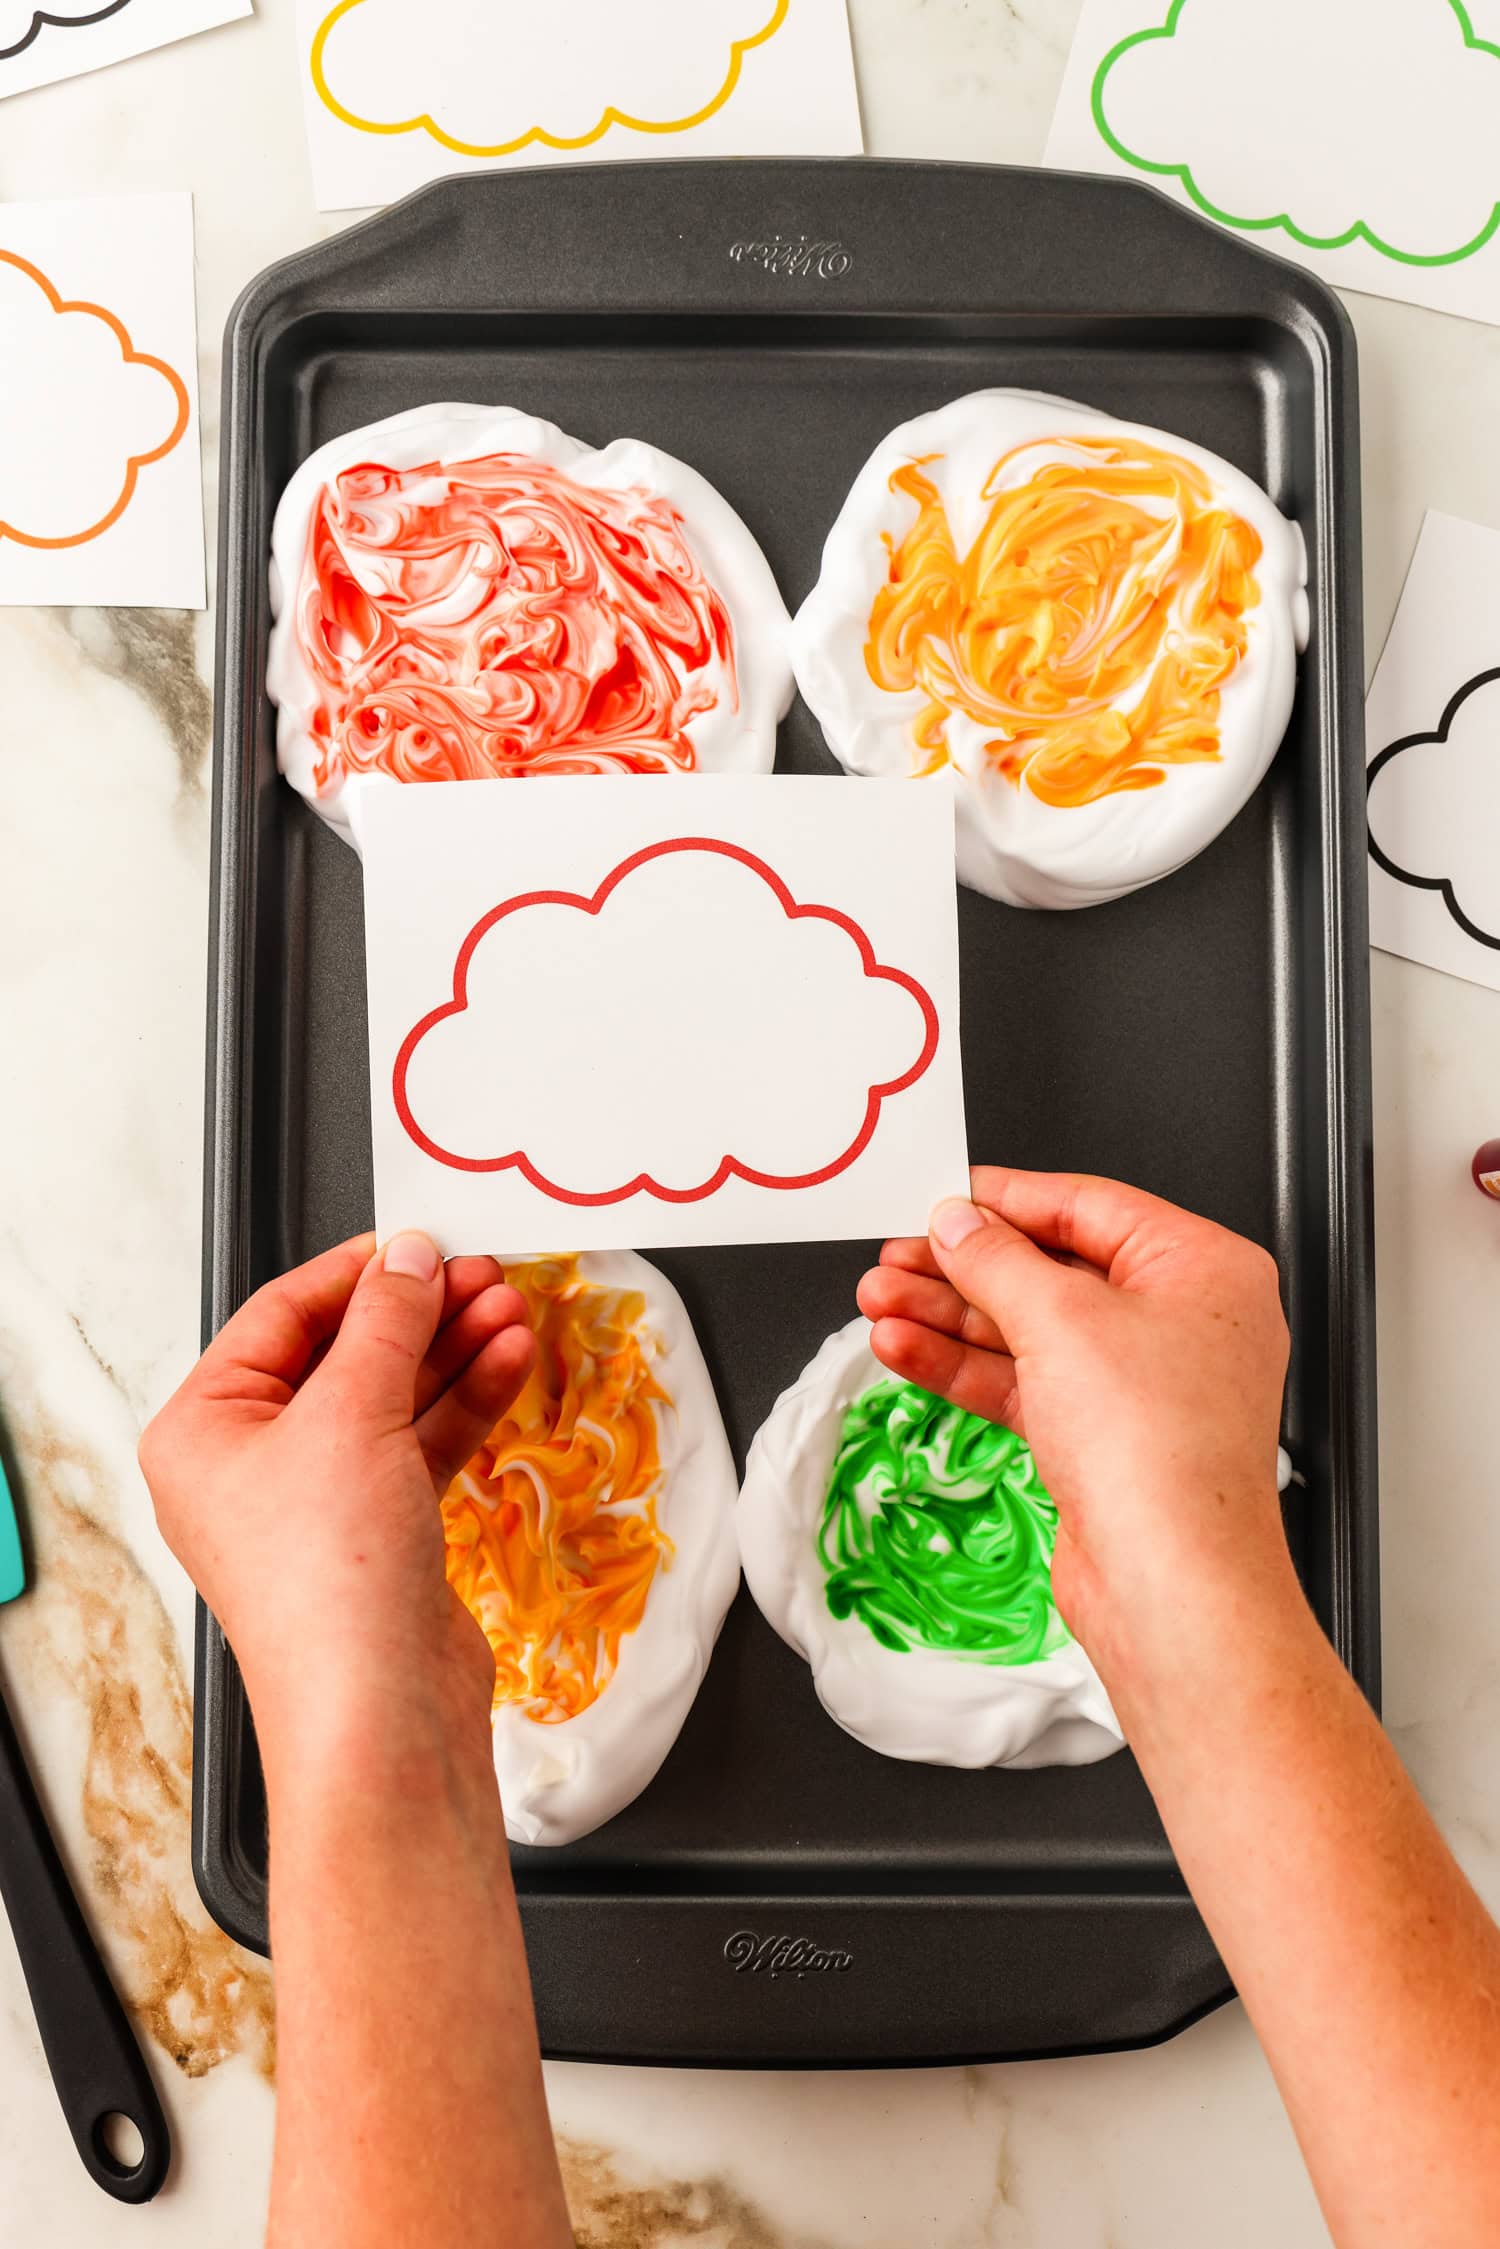
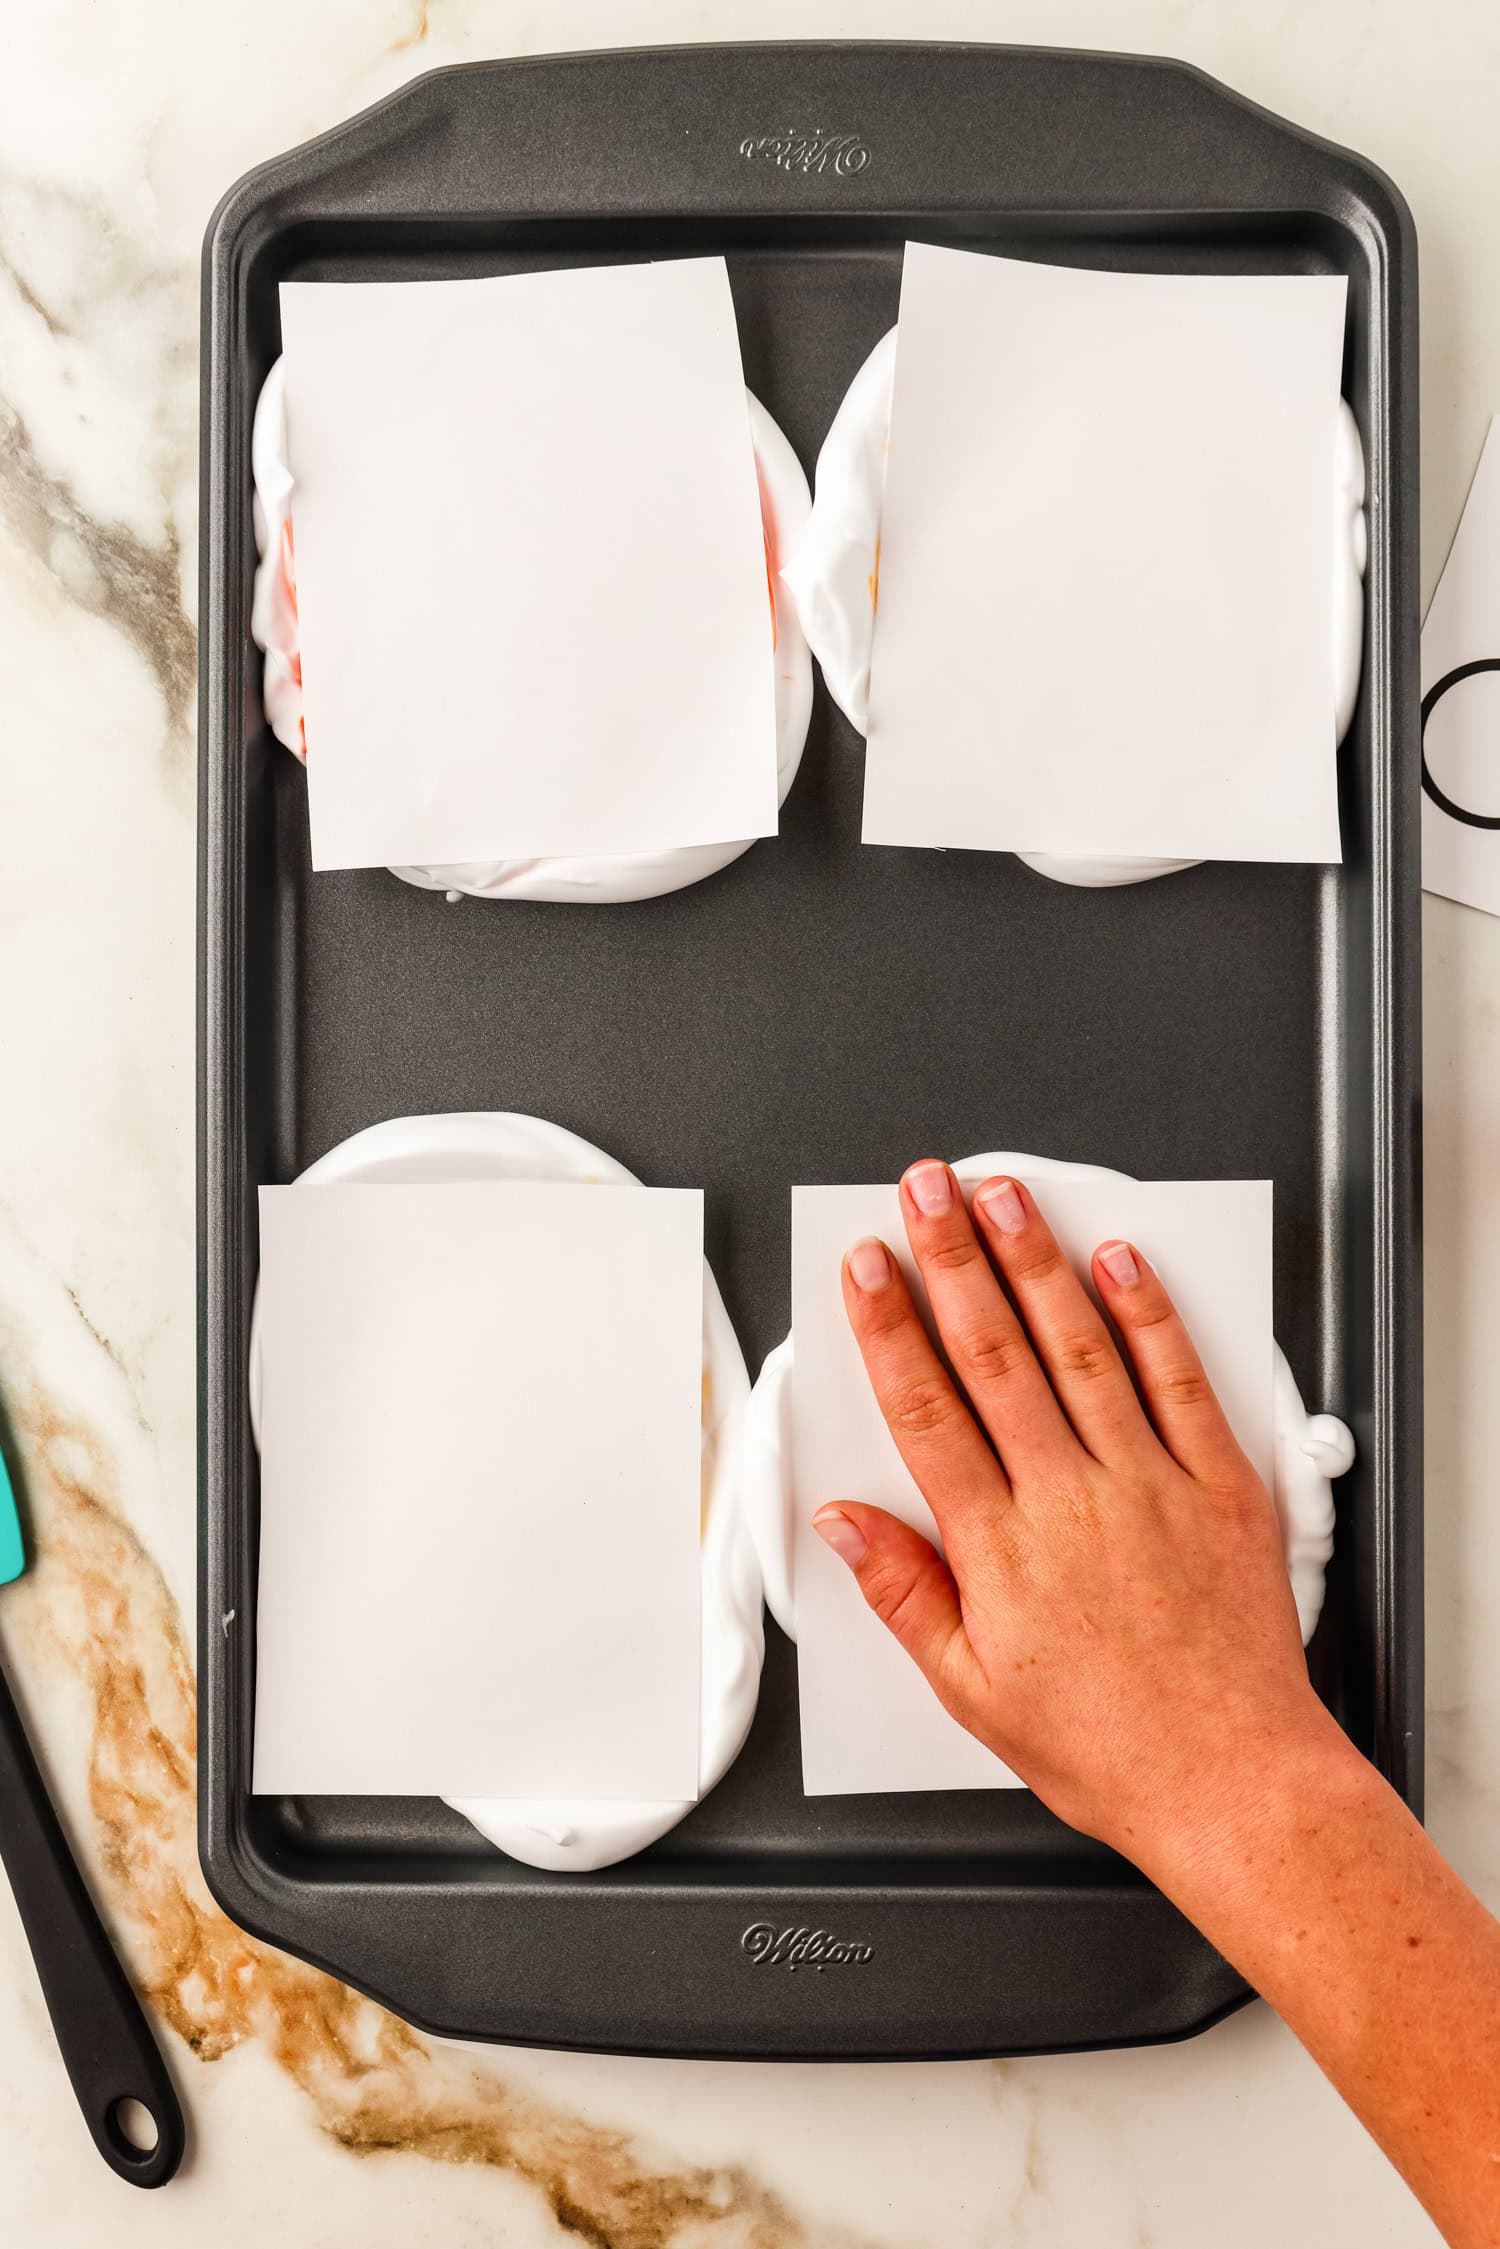
Press the tree tops, right side down, onto the shaving cream. Gently press over the whole piece of paper to ensure the whole tree top touches the shaving cream.
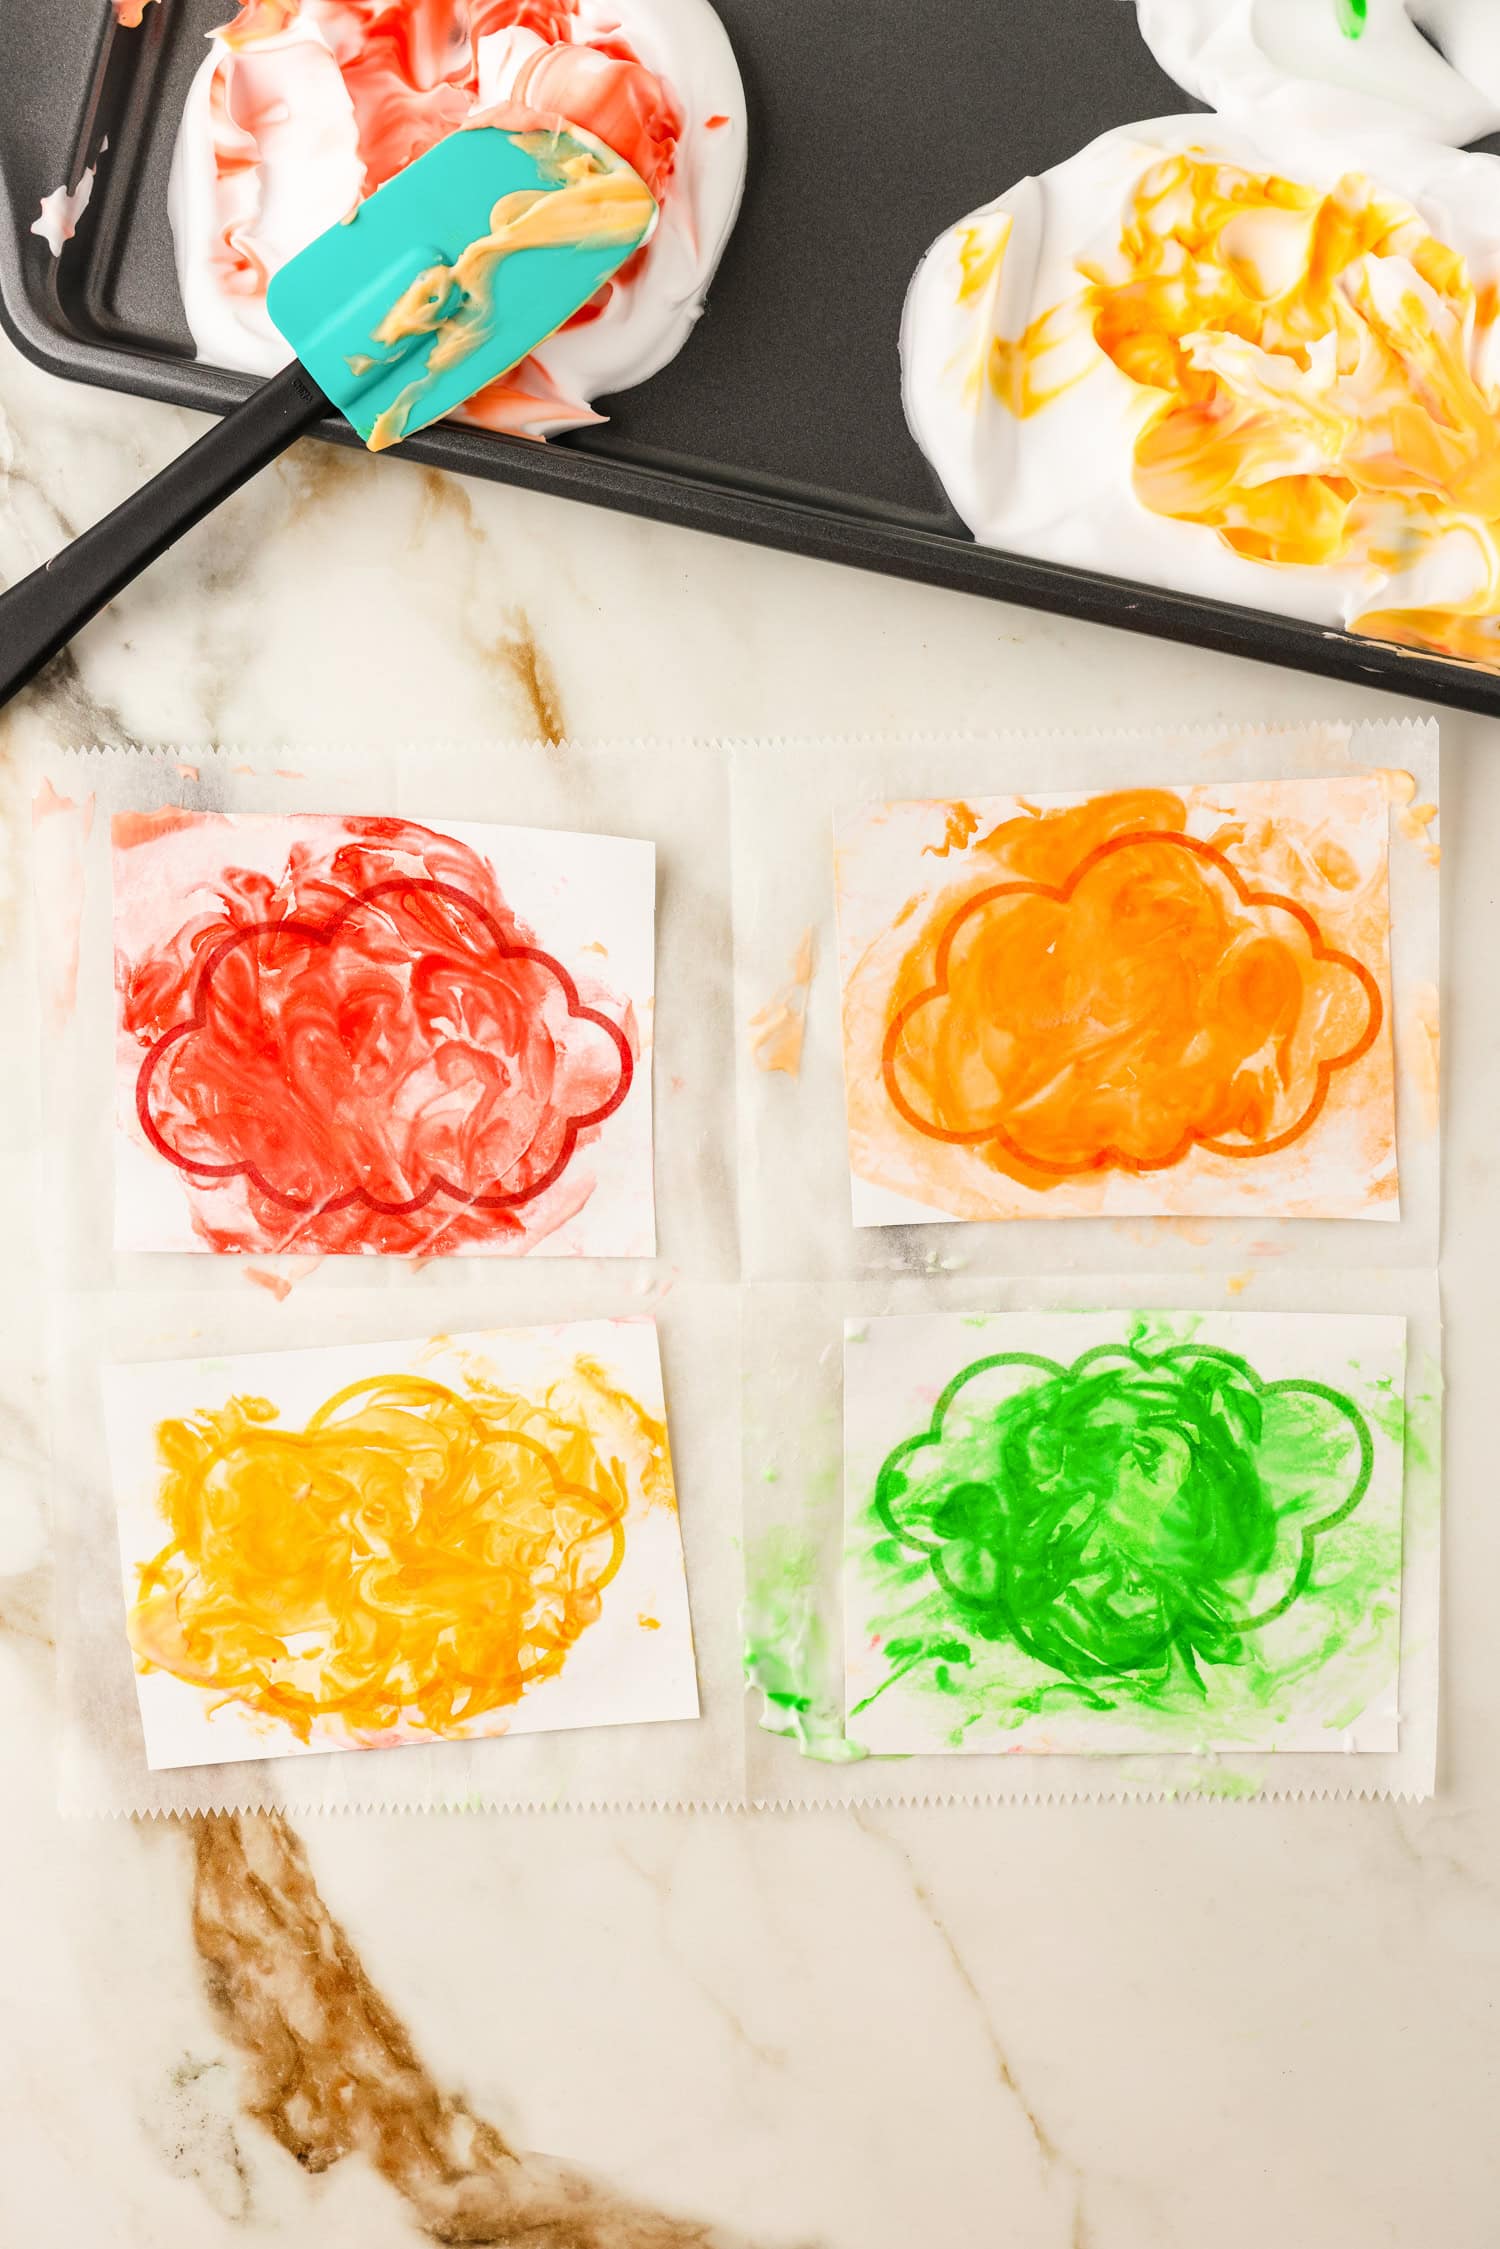
Lift the tree top up and flip it so that the side with the shaving cream is facing up, then lay it flat on your work space.
Gently wipe away the excess shaving cream using the rubber spatula to reveal your one-of-a-kind autumn leaves tree top!
Set aside to dry for 30 minutes. Once dry, you can cut around the design.
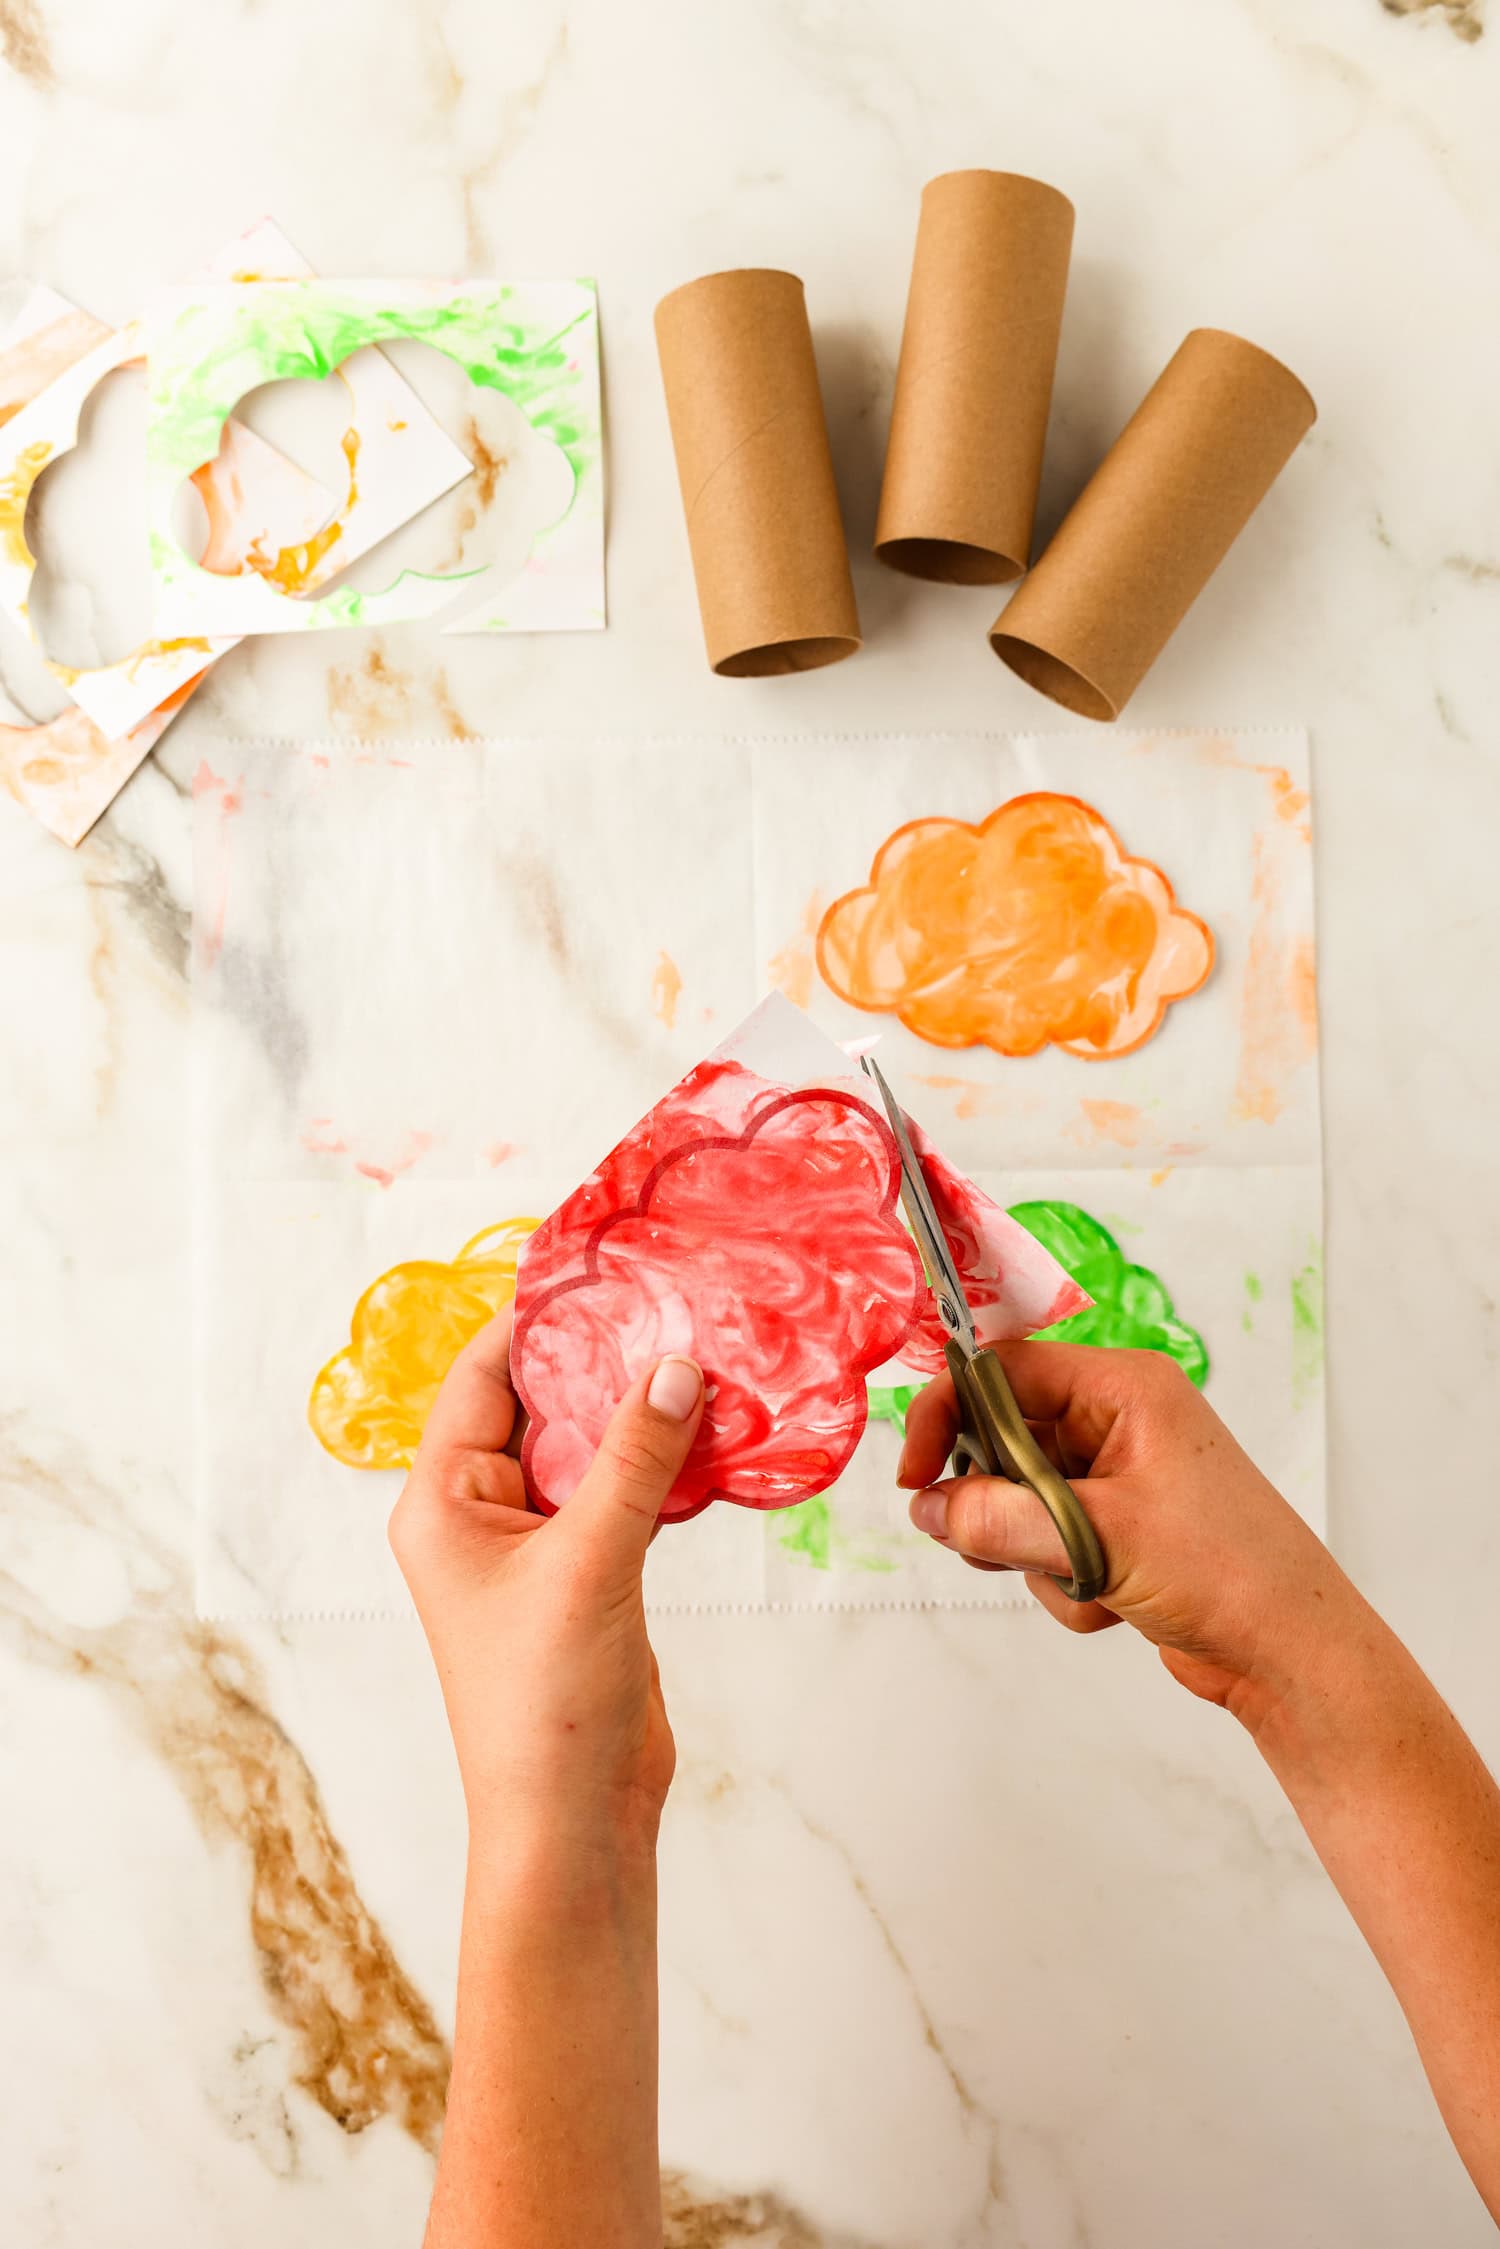
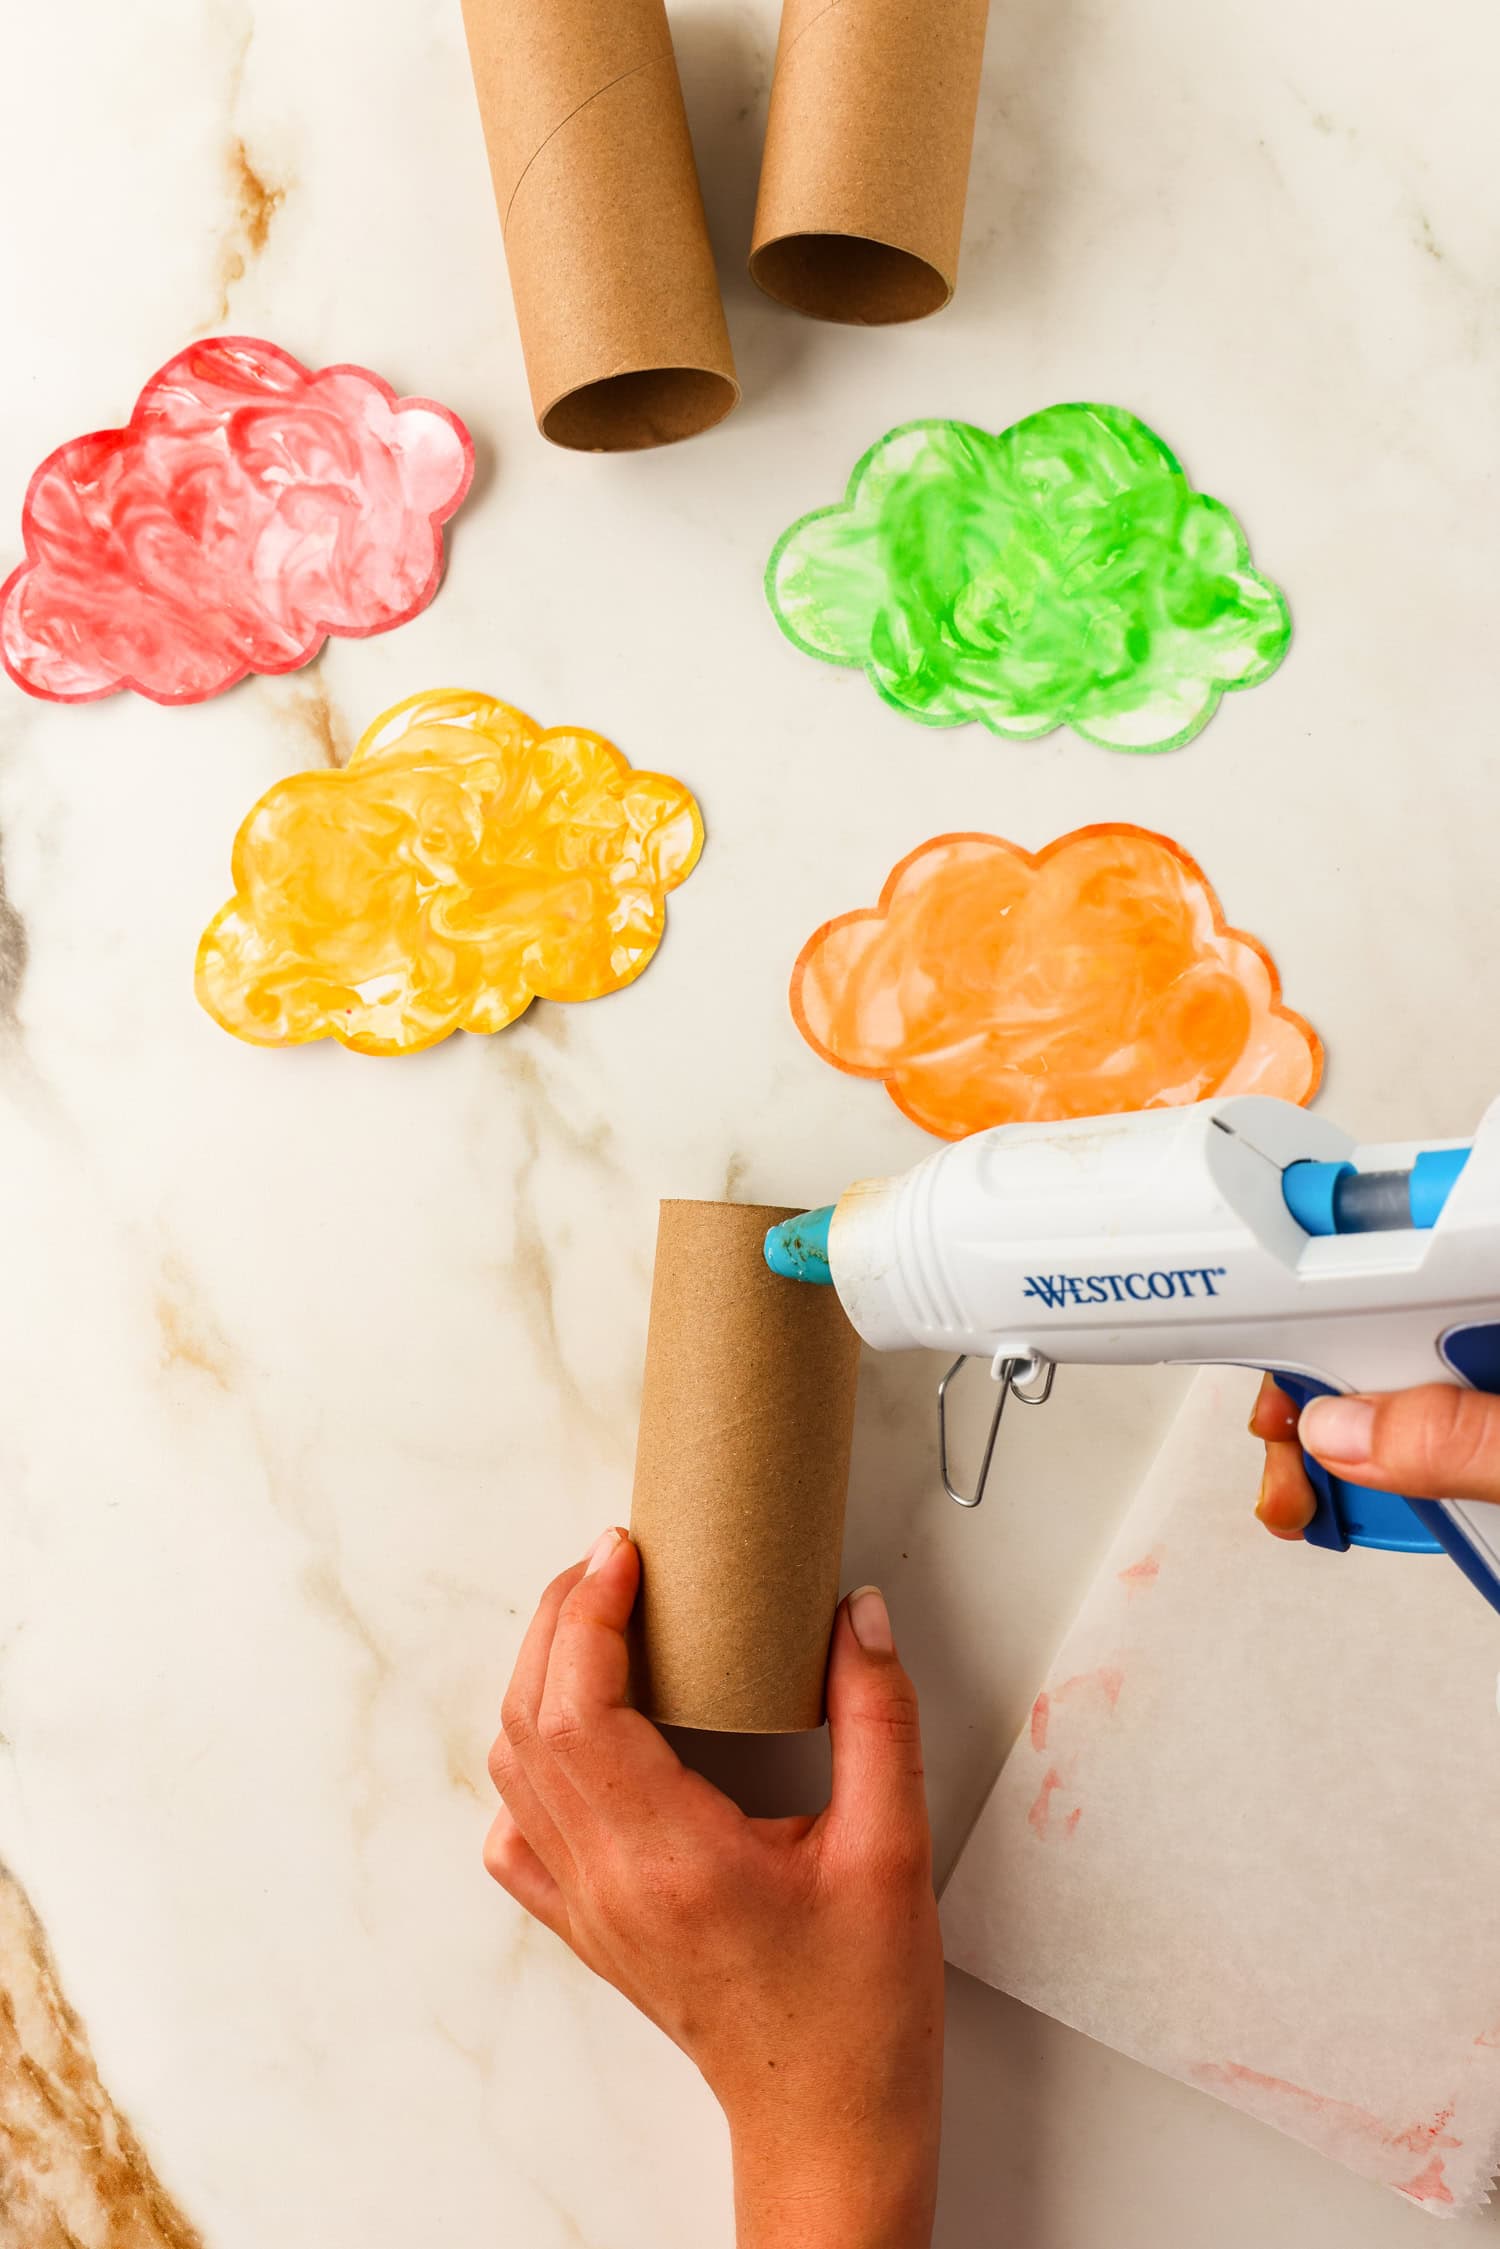
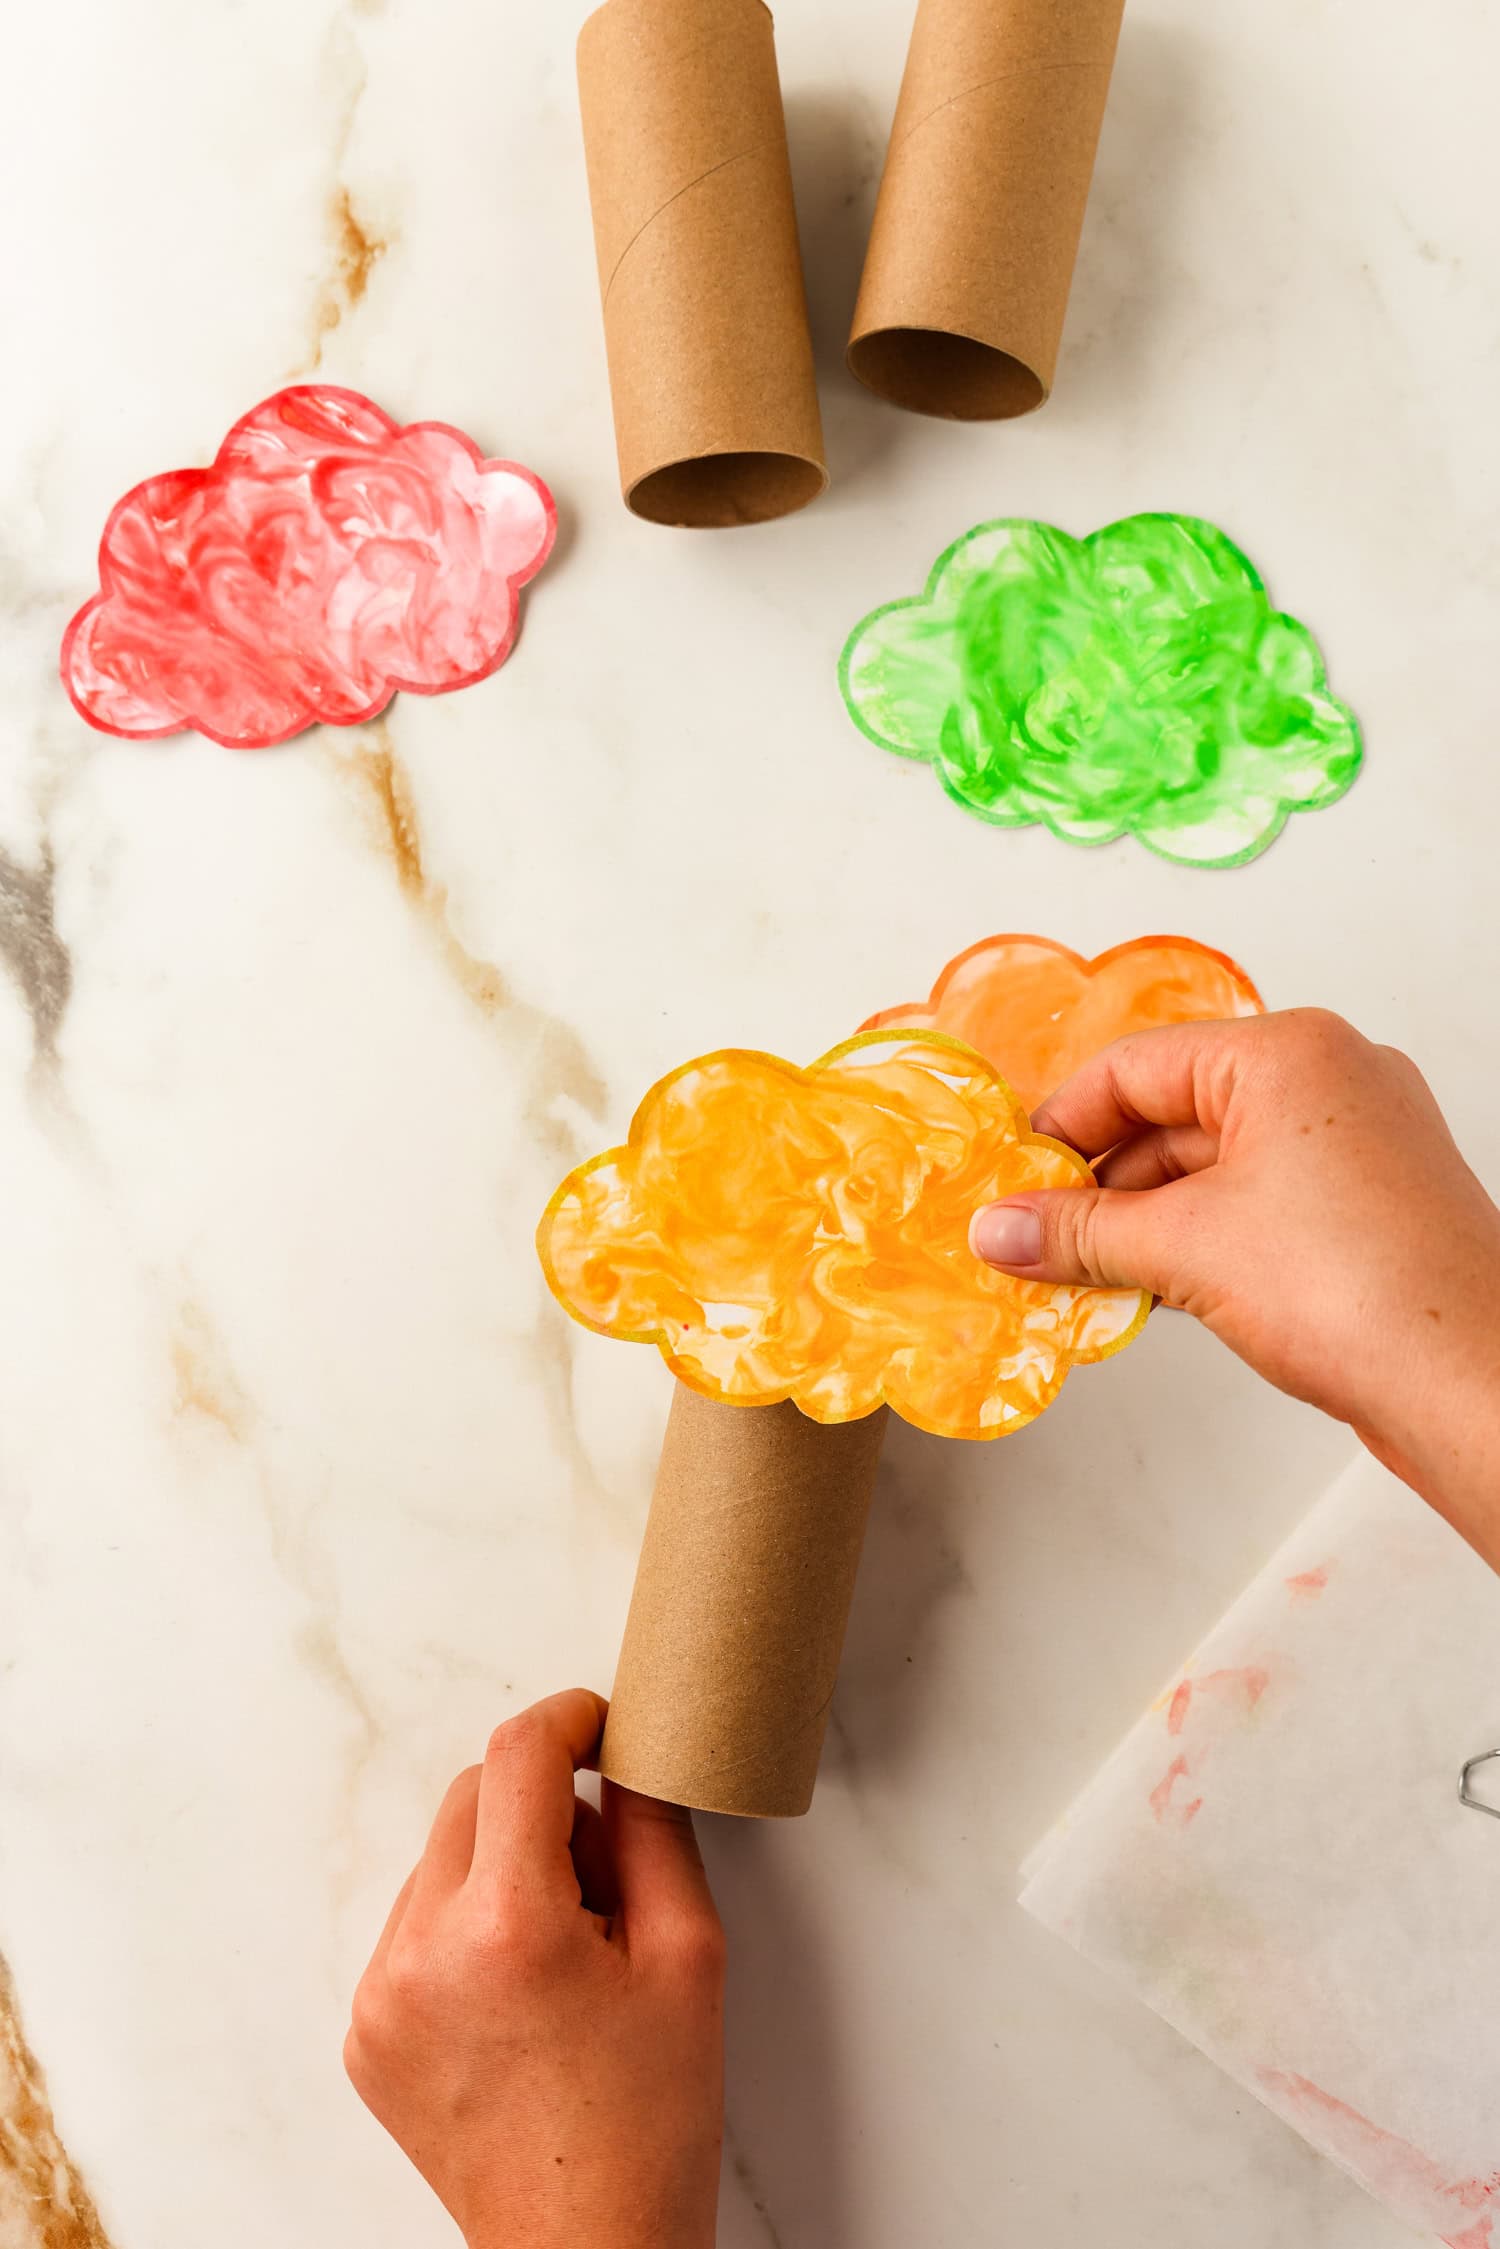
Use a hot glue gun or crafting glue to adhere your autumn leaves tree tops onto the cardboard tubes to finish your tree!
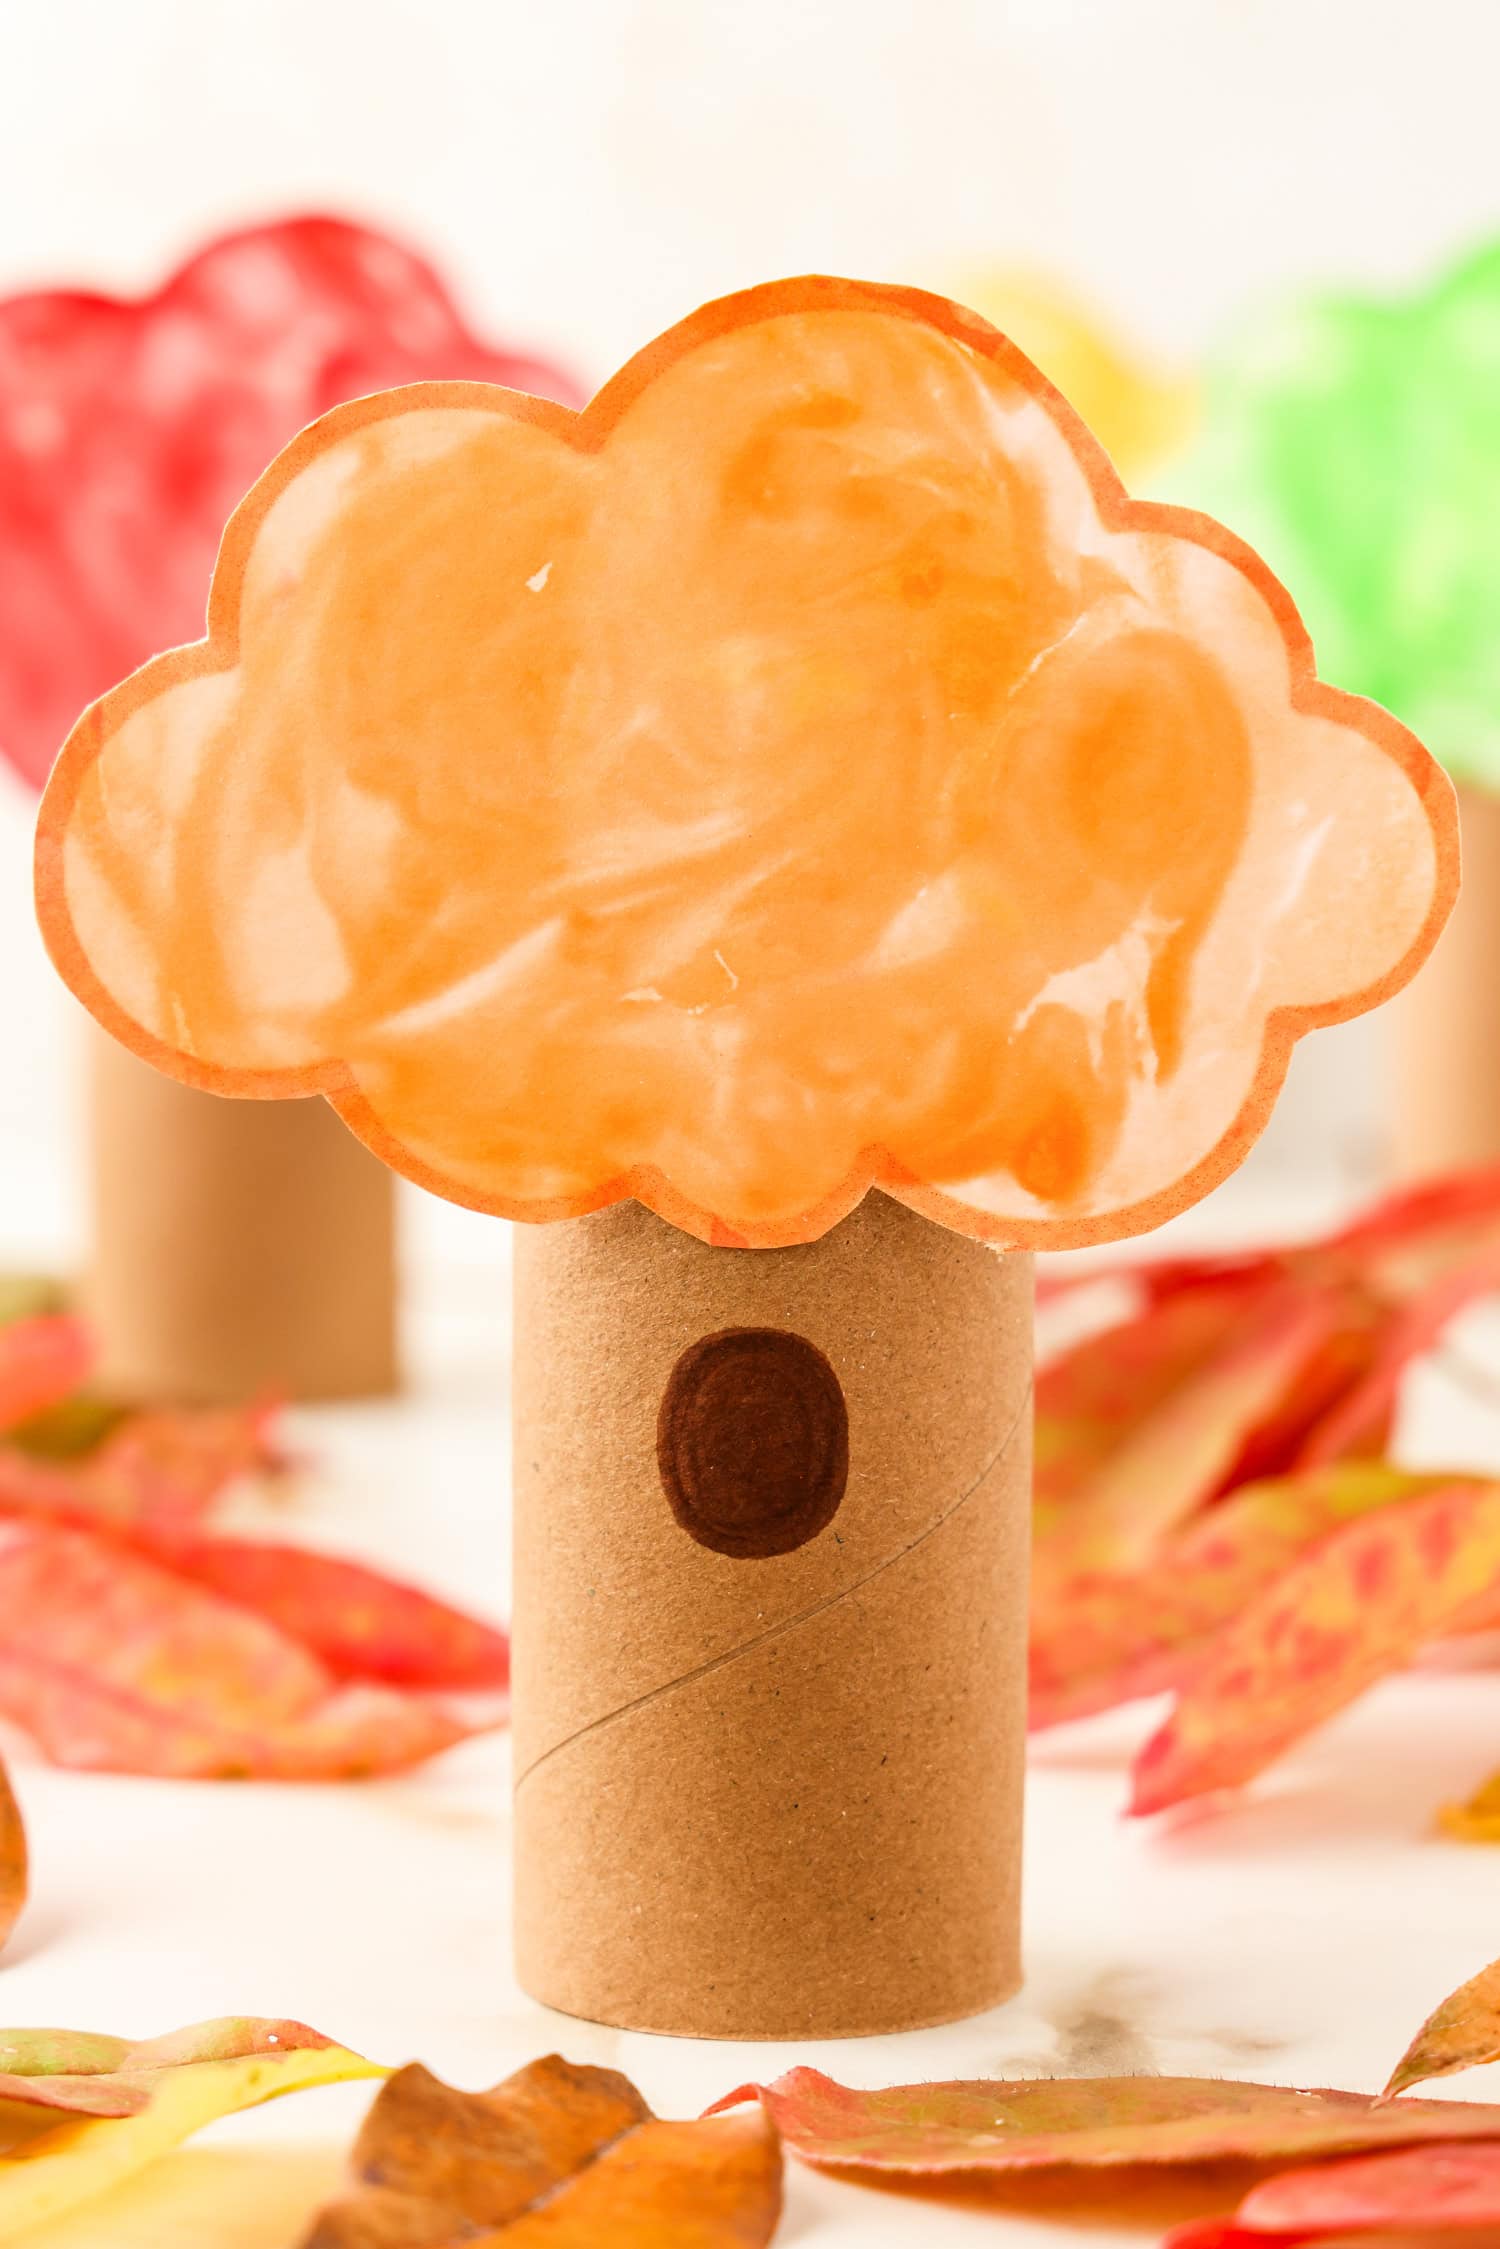
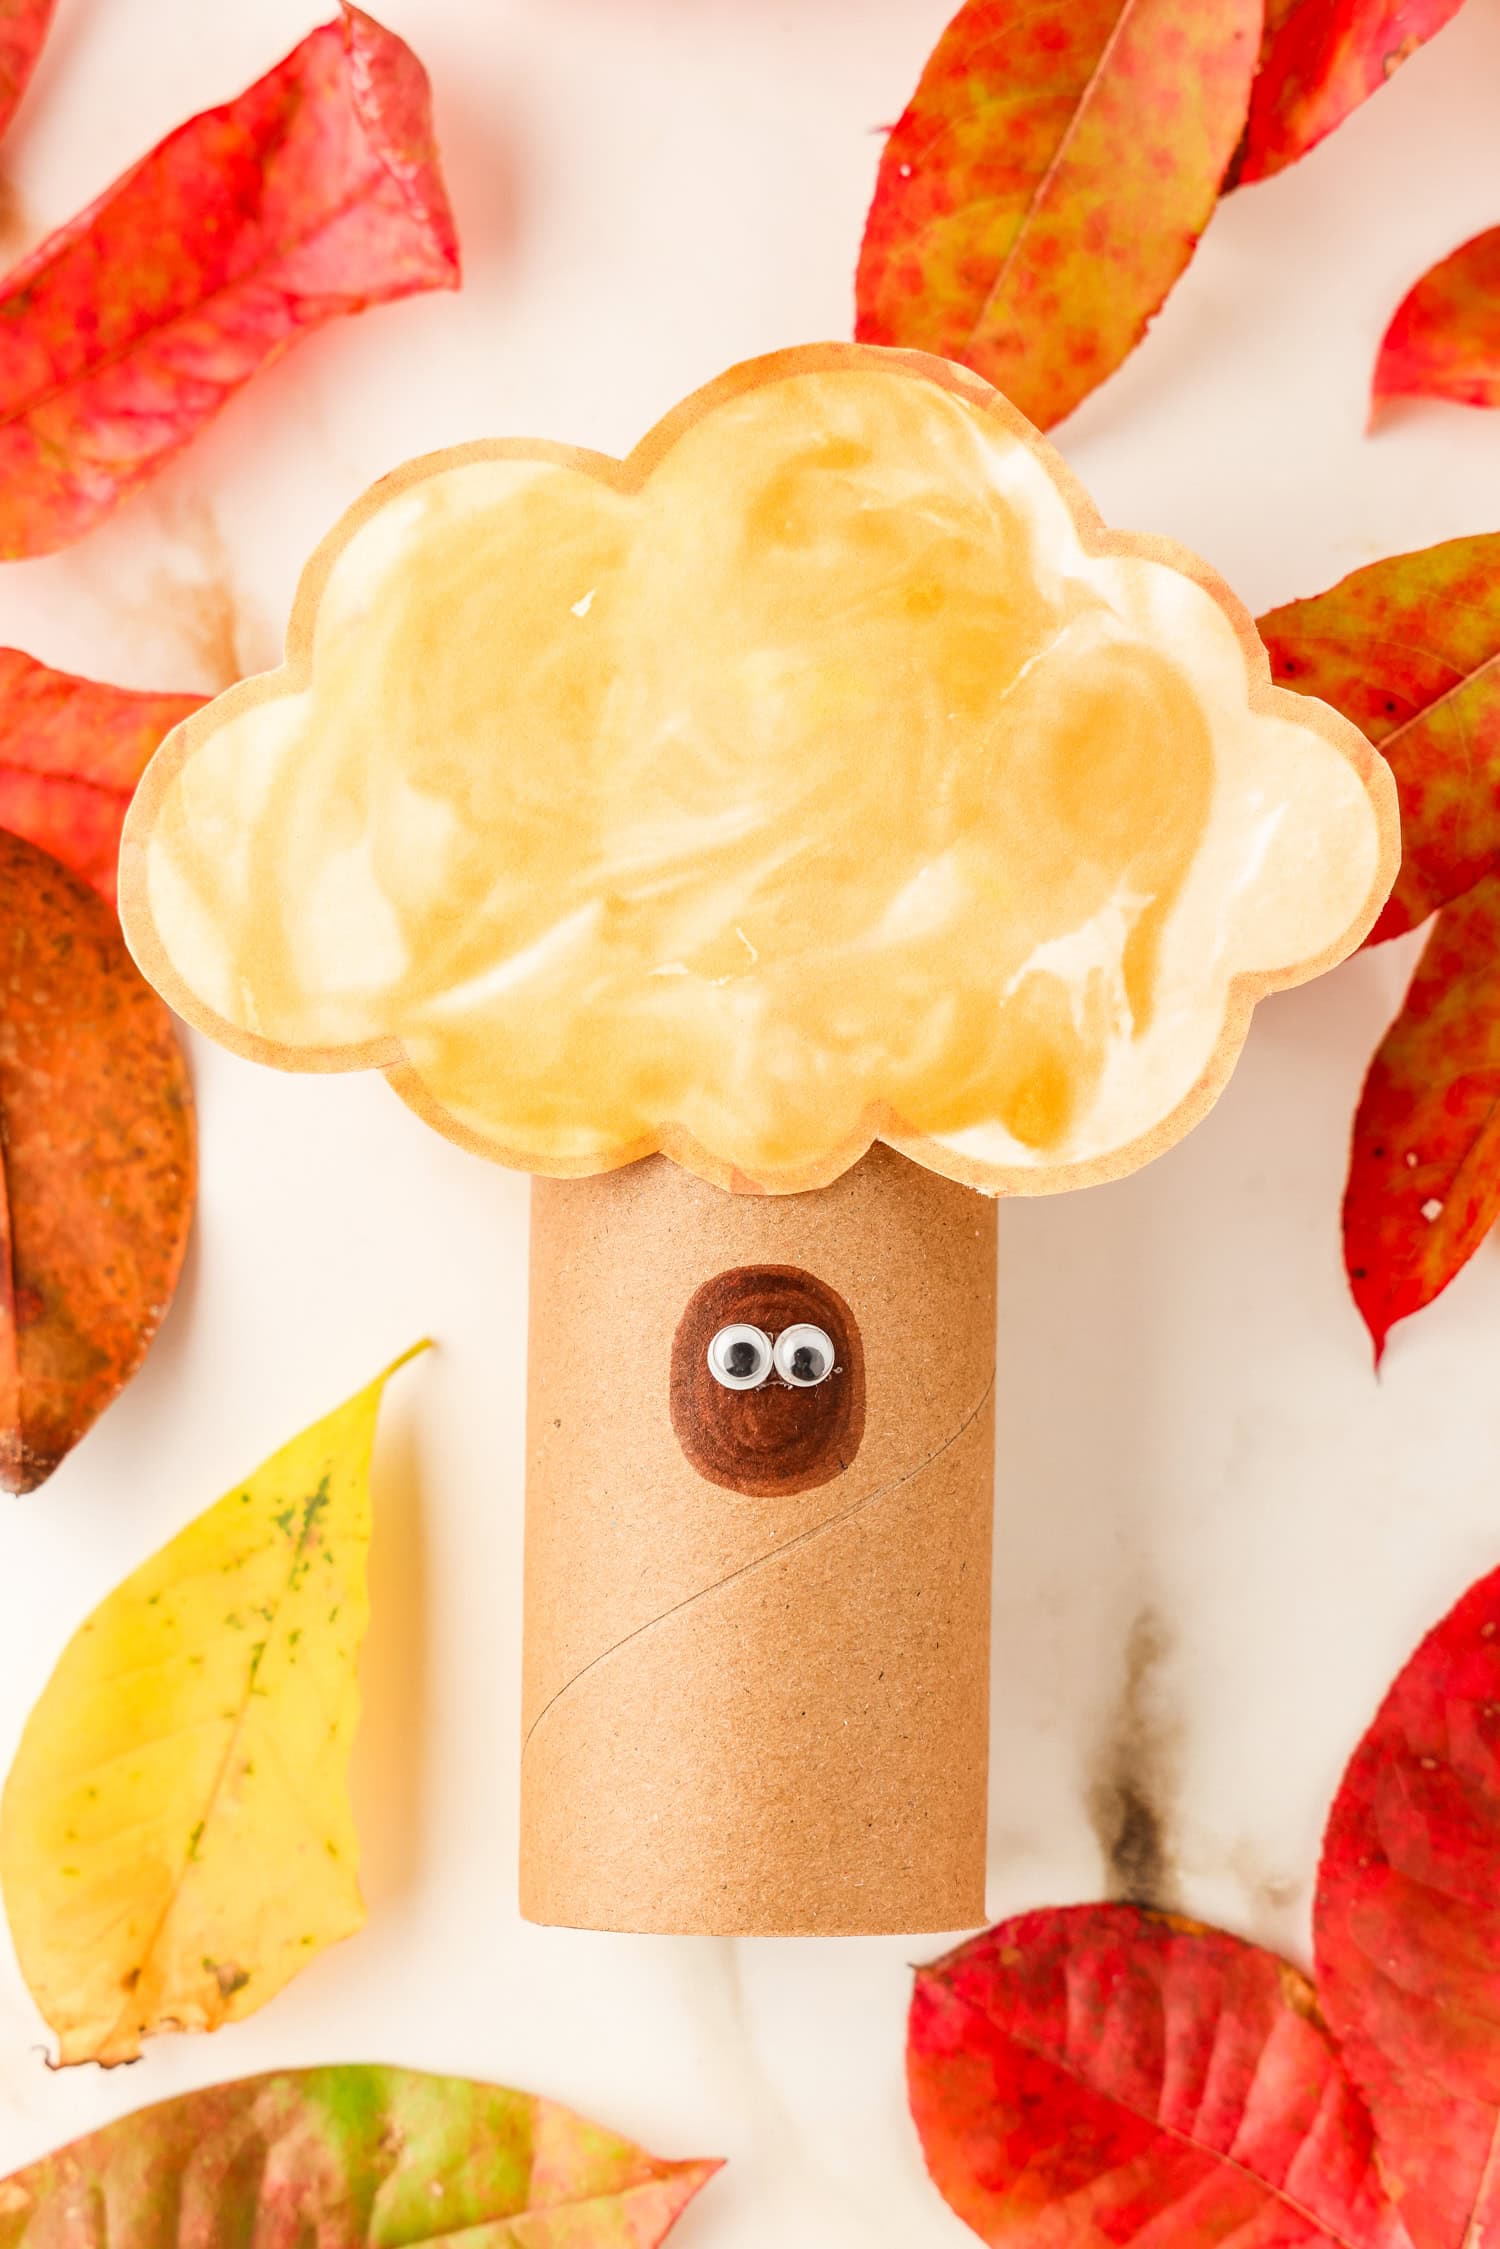
You can add little details to your trees by coloring a dark brown circle in the middle of the trunk and gluing some googly eyes to make it look like a critter is peeking out. Enjoy!
Pro Tips for the Best Craft Time!
- Grab whatever craft supplies you want for your tree. You can make it extra special with a little creativity and imagination. Use some real leaves as decor, or things like sequins, stickers, pom poms, and so much more.
- Want to stay away from hot glue? You can use some glue dots to adhere the tree top to the toilet paper roll instead. Double sided tape will also work great!
- If you don’t want to use shaving cream for your tree tops, add some acrylic paint to a cotton ball and then dab it across the tree tops to create a unique pattern similar to what the shaving cream does.
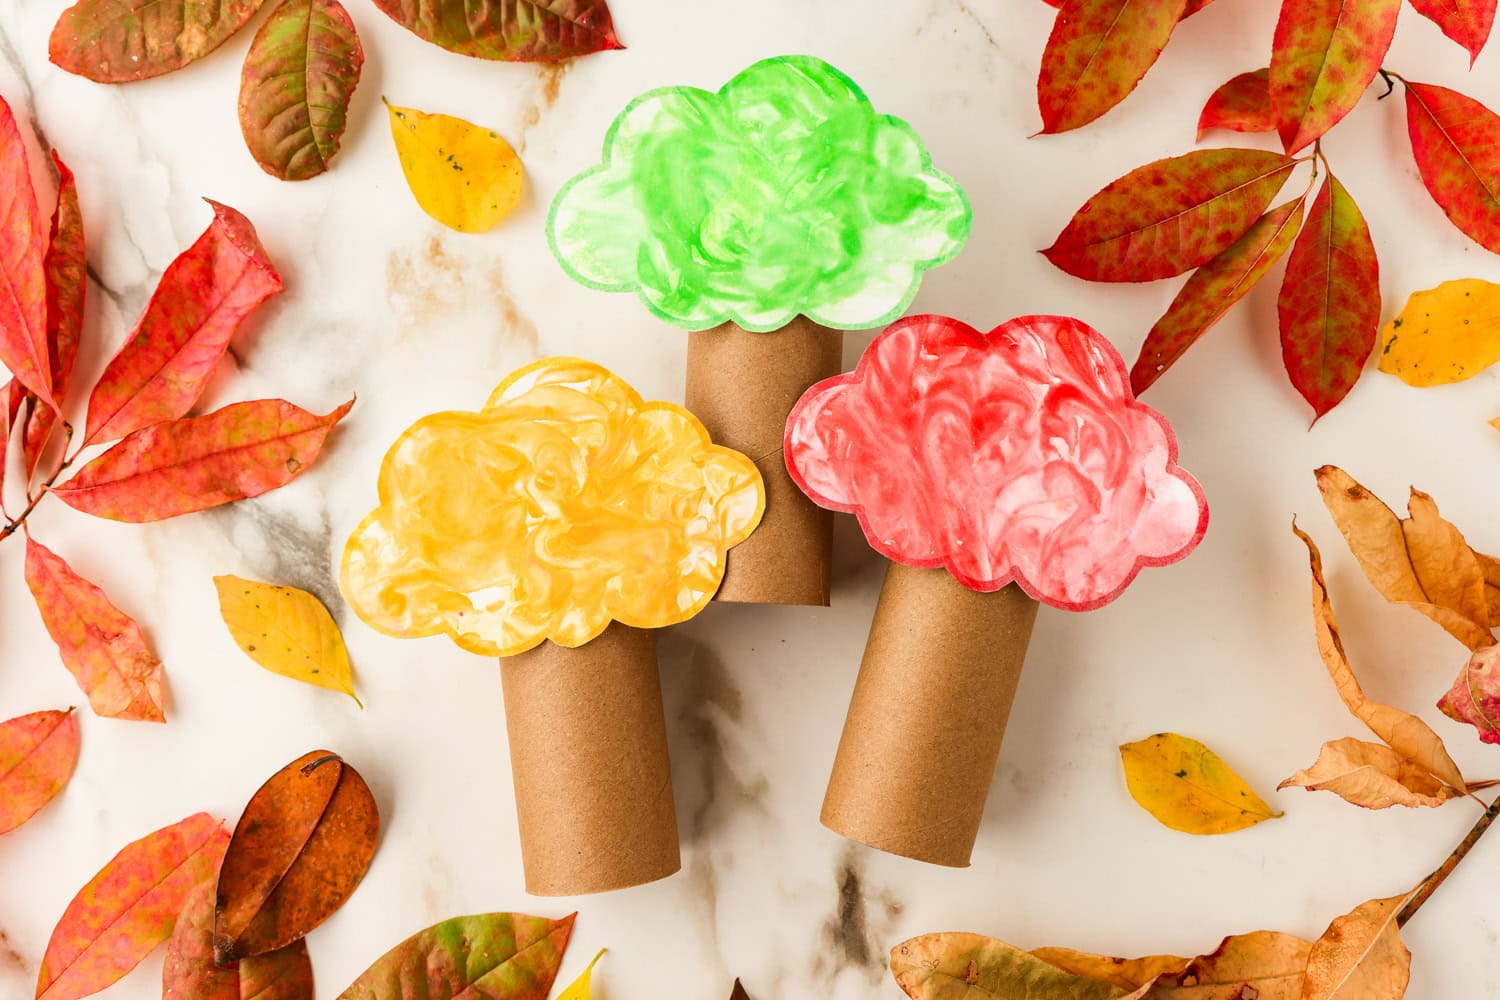
Toilet paper roll fall crafts are so much fun! This cutie little tree is a great simple craft for littles. Fill that craft time with an exciting activity like this one.
More Fall Craft Ideas You’ll Love!
- This Paper Bag Scarecrow Craft is just adorable. Grab some brown paper bags to get started.
- Make a fun Indian Corn Craft as a fun Thanksgiving craft that can also be included in educational lessons!
- Do your kiddos love to paint? Then check out these Fall Handprints and Thumbprints Activity.
- This Acorn Craft is probably one of the cutest fall crafts there is. It’s just adorable!

Toilet Paper Roll Fall Tree Craft
Ingredients
- Cookie sheet
- Shaving cream
- Toilet Paper Rolls
- Food coloring
- Rubber Spatula
- Tree printables
- White cardstock
- Scissors
- Hot glue gun
Optional supplies:
- Markers
- Googly eyes
Instructions
- Print the tree tops printable onto white cardstock. Choose black outlines to use any colors for the tree tops, or choose the colorful tree tops for a fun color matching activity!
- Cut tree tops into separate squares. Don’t worry about cutting the shapes out at this point. Set the tree tops aside.
- Squirt shaving cream onto your cookie sheet and spread it out using a rubber spatula.
- Add a few drops of food coloring on top of the shaving cream.
- Use a q-tip to swirl the food coloring into the shaving cream.
- Press the tree tops, right side down, onto the shaving cream. Gently press over the whole piece of paper to ensure the whole tree top touches the shaving cream.
- Lift the tree top up and flip it so that the side with the shaving cream is facing up. Lay it flat on your work space.
- Gently wipe away the excess shaving cream using the rubber spatula to reveal your one-of-a-kind autumn leaves tree top!
- Set aside to dry for 30 minutes.
- Once the tree tops are dry, you can cut around the design.
- Use a hot glue gun or crafting glue to adhere your autumn leaves tree tops onto the cardboard tubes to finish your tree!
- You can add little details to your trees by coloring a dark brown circle in the middle of the trunk and gluing some googly eyes to make it look like a critter is peeking out.