Footprint Butterfly Craft
This adorable footprint craft is the perfect way to welcome the spring and summer seasons! It would make an excellent rainy-day craft for kids to beat boredom. They will certainly become a sweet reminder of how much they’ve grown in years to come!

Looking for some new spring crafts to add to your plans? Then you’ve got to check out this footprint butterfly craft! I love little keepsake crafts that capture moments in time. It’s why I love crafts like this handprint flower pot and handprint butterfly. But this one involves your little one’s cutie footprints! I mean, what’s cuter than a little butterfly made from tiny footprints. This adorable craft is super easy to make and you’ll look back on it years later and be so grateful that you made keepsakes during craft time.
Not to mention, you can actually turn this craft into a lesson for spring time. Teach about the life cycle of butterflies! You could even get some caterpillars to raise into butterflies that you later release. There’s so much to learn about butterflies and having some cute crafts to go with it always makes things even more memorable. You’re going to love this footprint butterfly painting!
Why You’ll Love this Butterfly Footprint Craft
- This is the cutest homemade keepsake gift. Make it for Mother’s Day, grandparents day, or just because! You can customize it however you want to make it extra extra special.
- A paint footprint butterfly is really affordable to make. These supplies can be used for many different crafts too, so hang onto your leftovers.
- Open ended crafts like footprint butterfly painting are a great way for kids to express their creativity. Add as many fun decorations as their little heart’s desire and customize this craft any way you can think of!
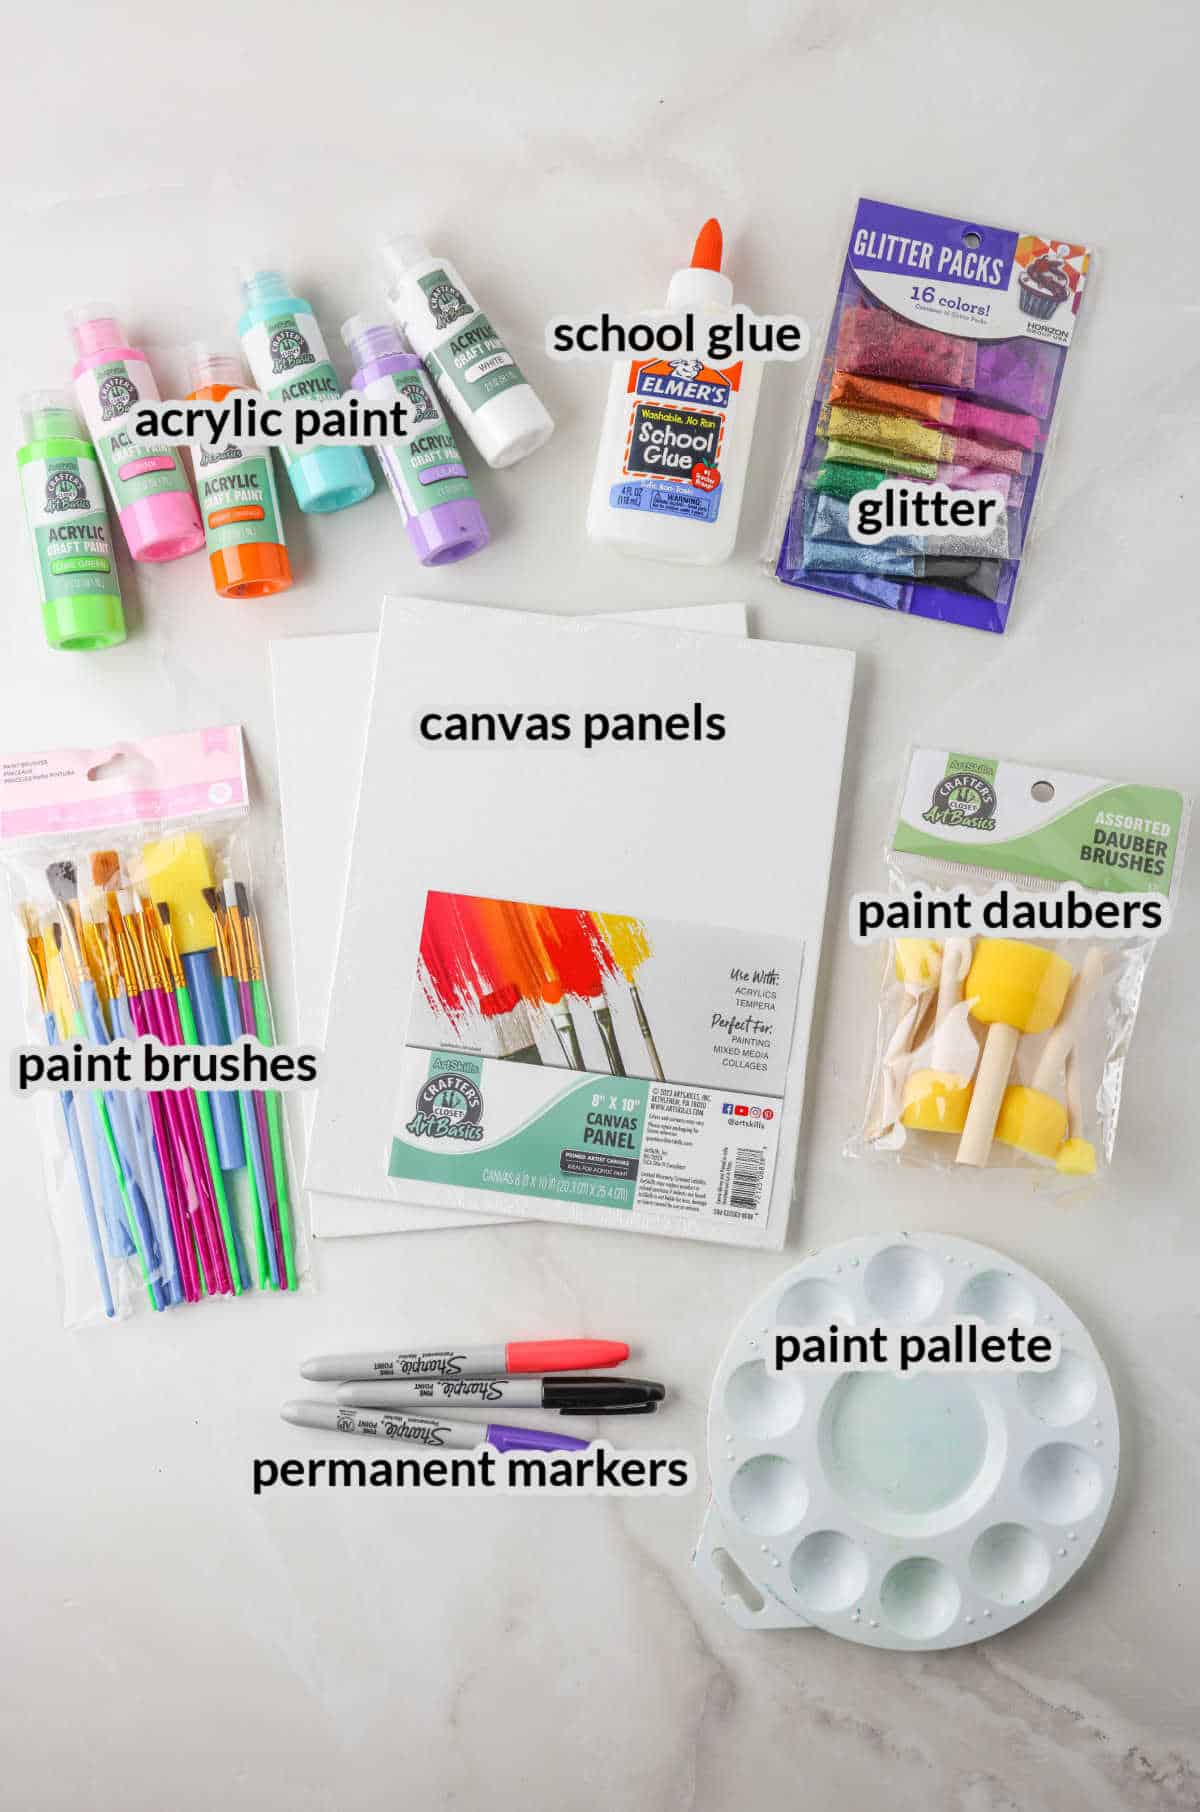
Supplies Needed
- Permanent markers – Use permanent markers to draw the body of your cutie little footprint butterfly.
- Paint pallete – Grab a disposable plastic paint pallet in the craft section of your local walmart or from your local craft store. If you don’t have a paint pallete, you can use a paper plate instead!
- Paint brushes – I like to have multiple different sizes of paint brushes just in case I need them. You can buy a really affordable pack of brushes at your local craft store.
- Canvas panels – I personally prefer to use canvas panels to use for this footprint butterfly keepsake, but you can also use cardstock.
- Paint daubers – Small, circular, foam brushes are very easy to add glue to the bottom of your children’s feet. You can use a regular paint brush if you want, but these little foam brushes are a bit easier to use.
- School glue – Liquid school glue will help you make a template of your child’s footprints so that you can easily paint them.
- Glitter – This is an optional material, but it really does add extra pizzaz to this craft. Feel free to sprinkle some glitter over the wet footprints to make them sparkly and special!
- Acrylic paint – Use any color you want. You could even do different colors for each butterfly wing if you want a silly little butterfly mix-up!
How to Make a Footprint Butterfly
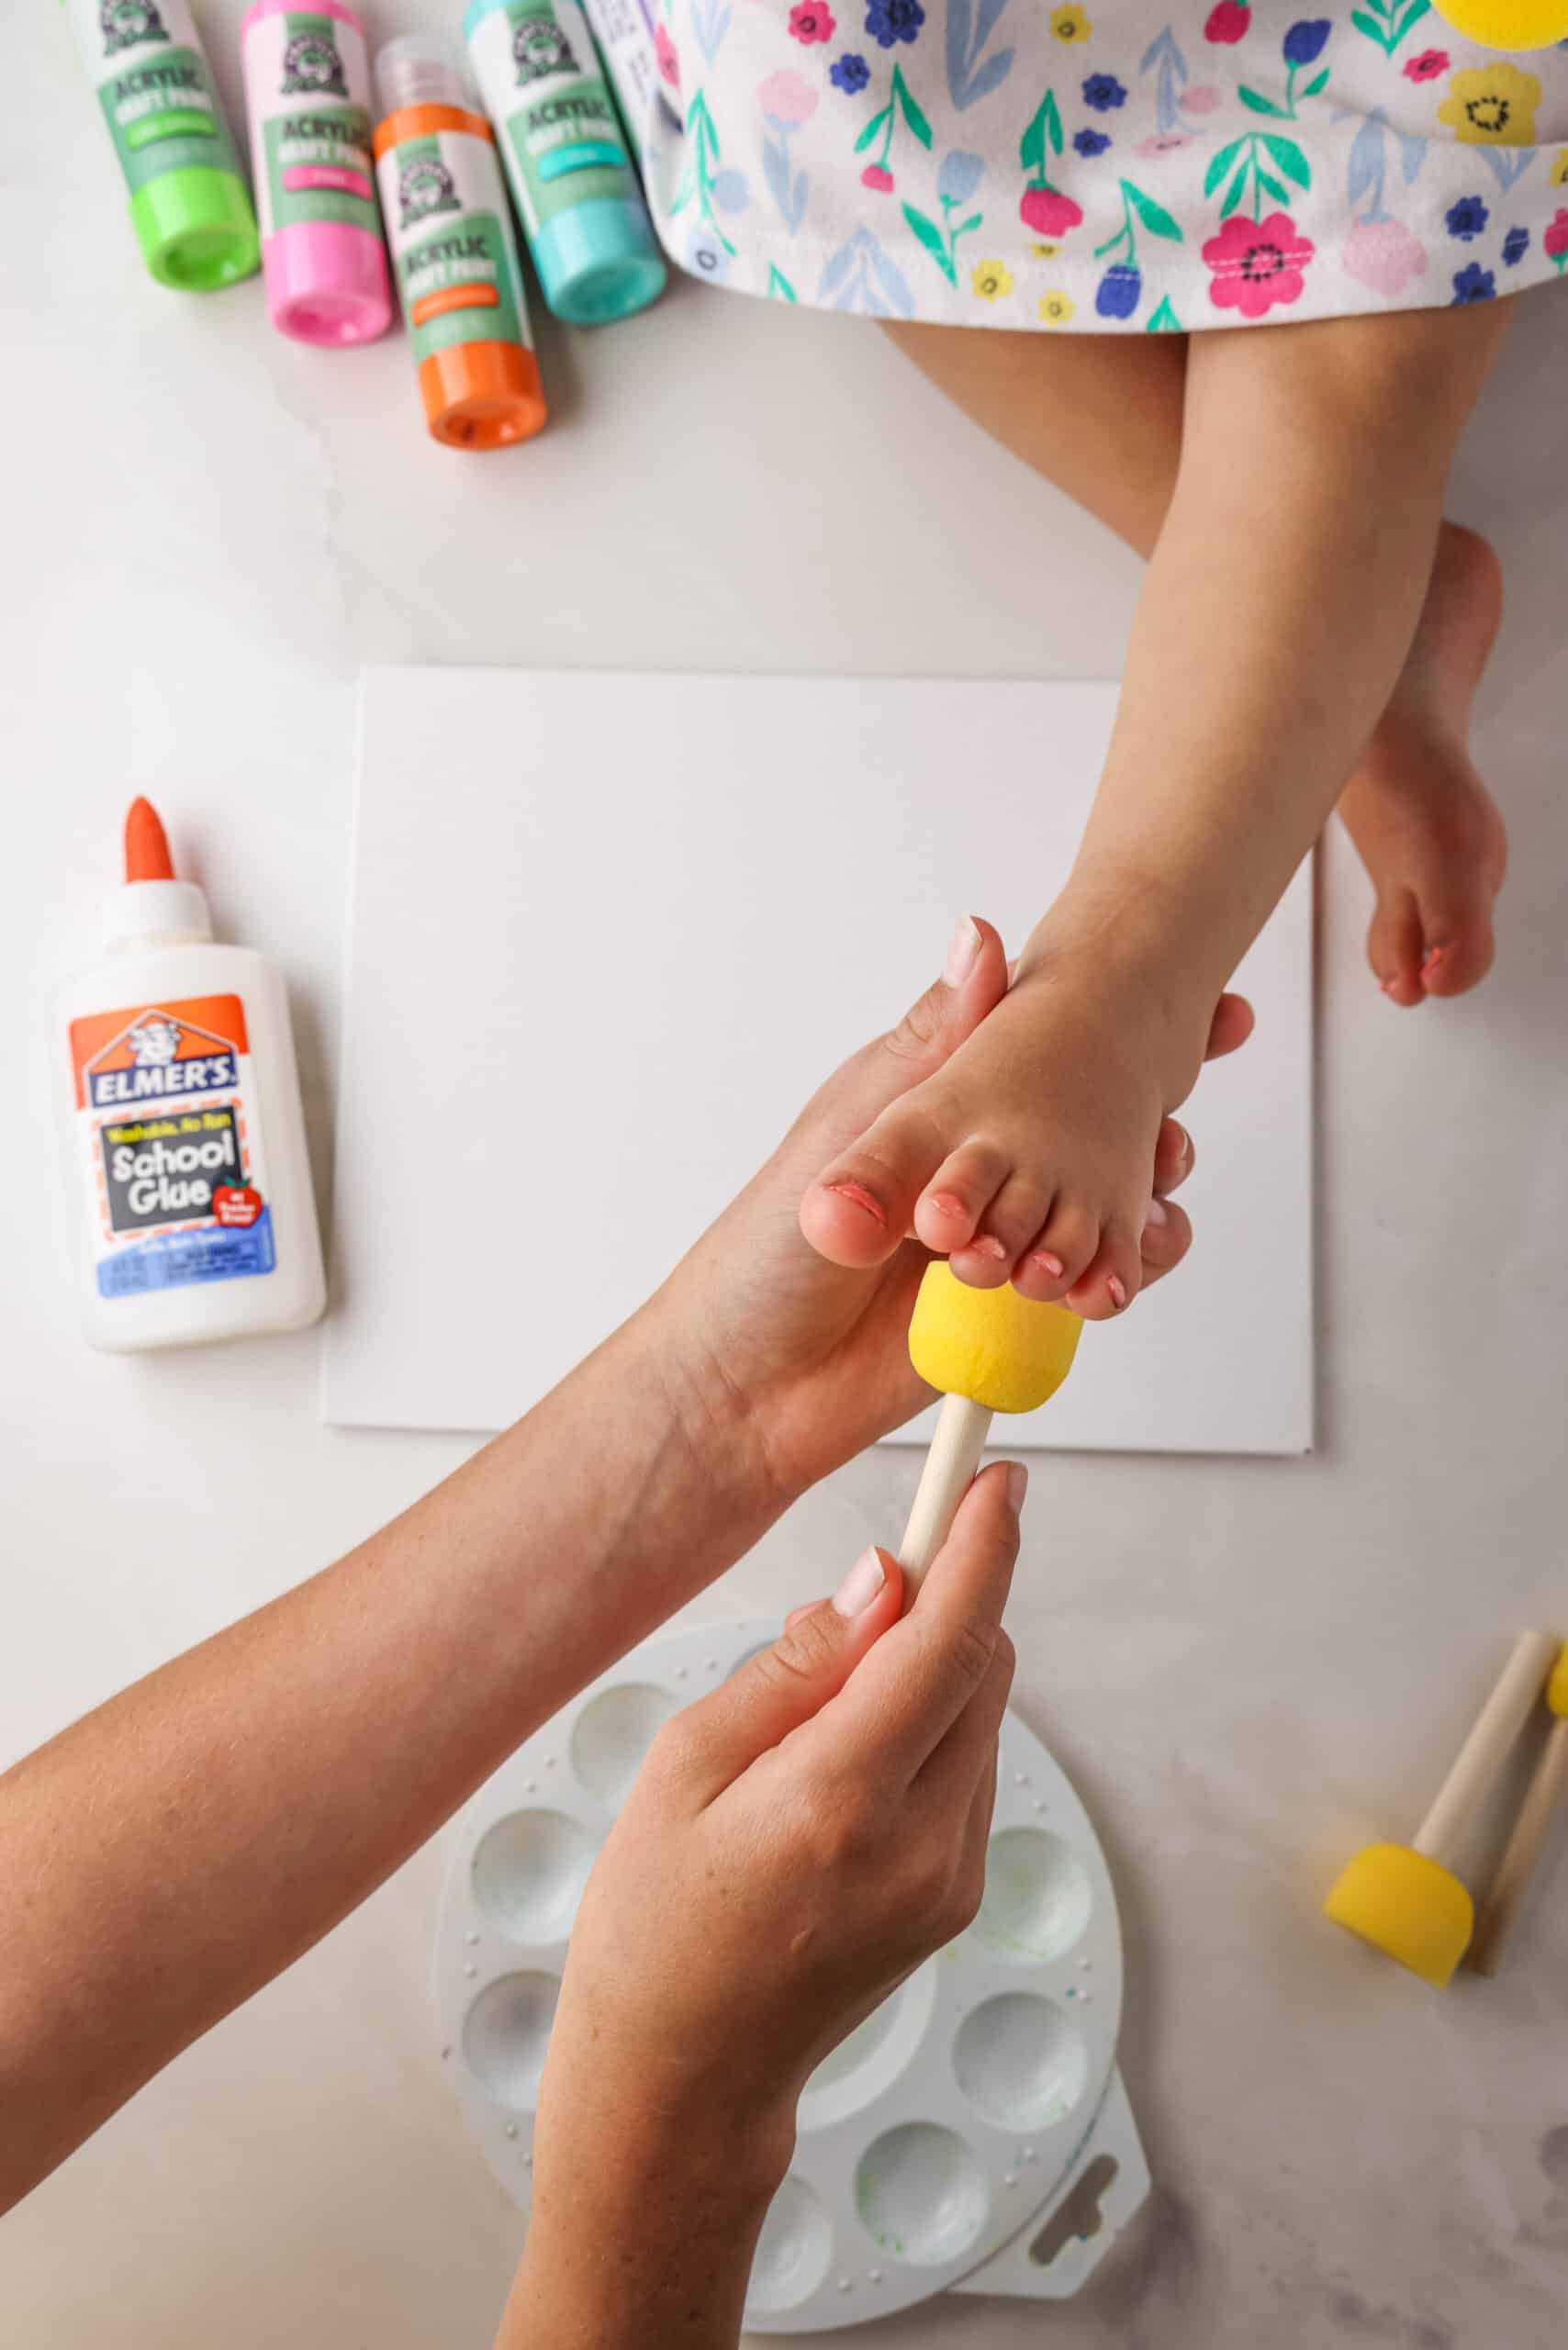
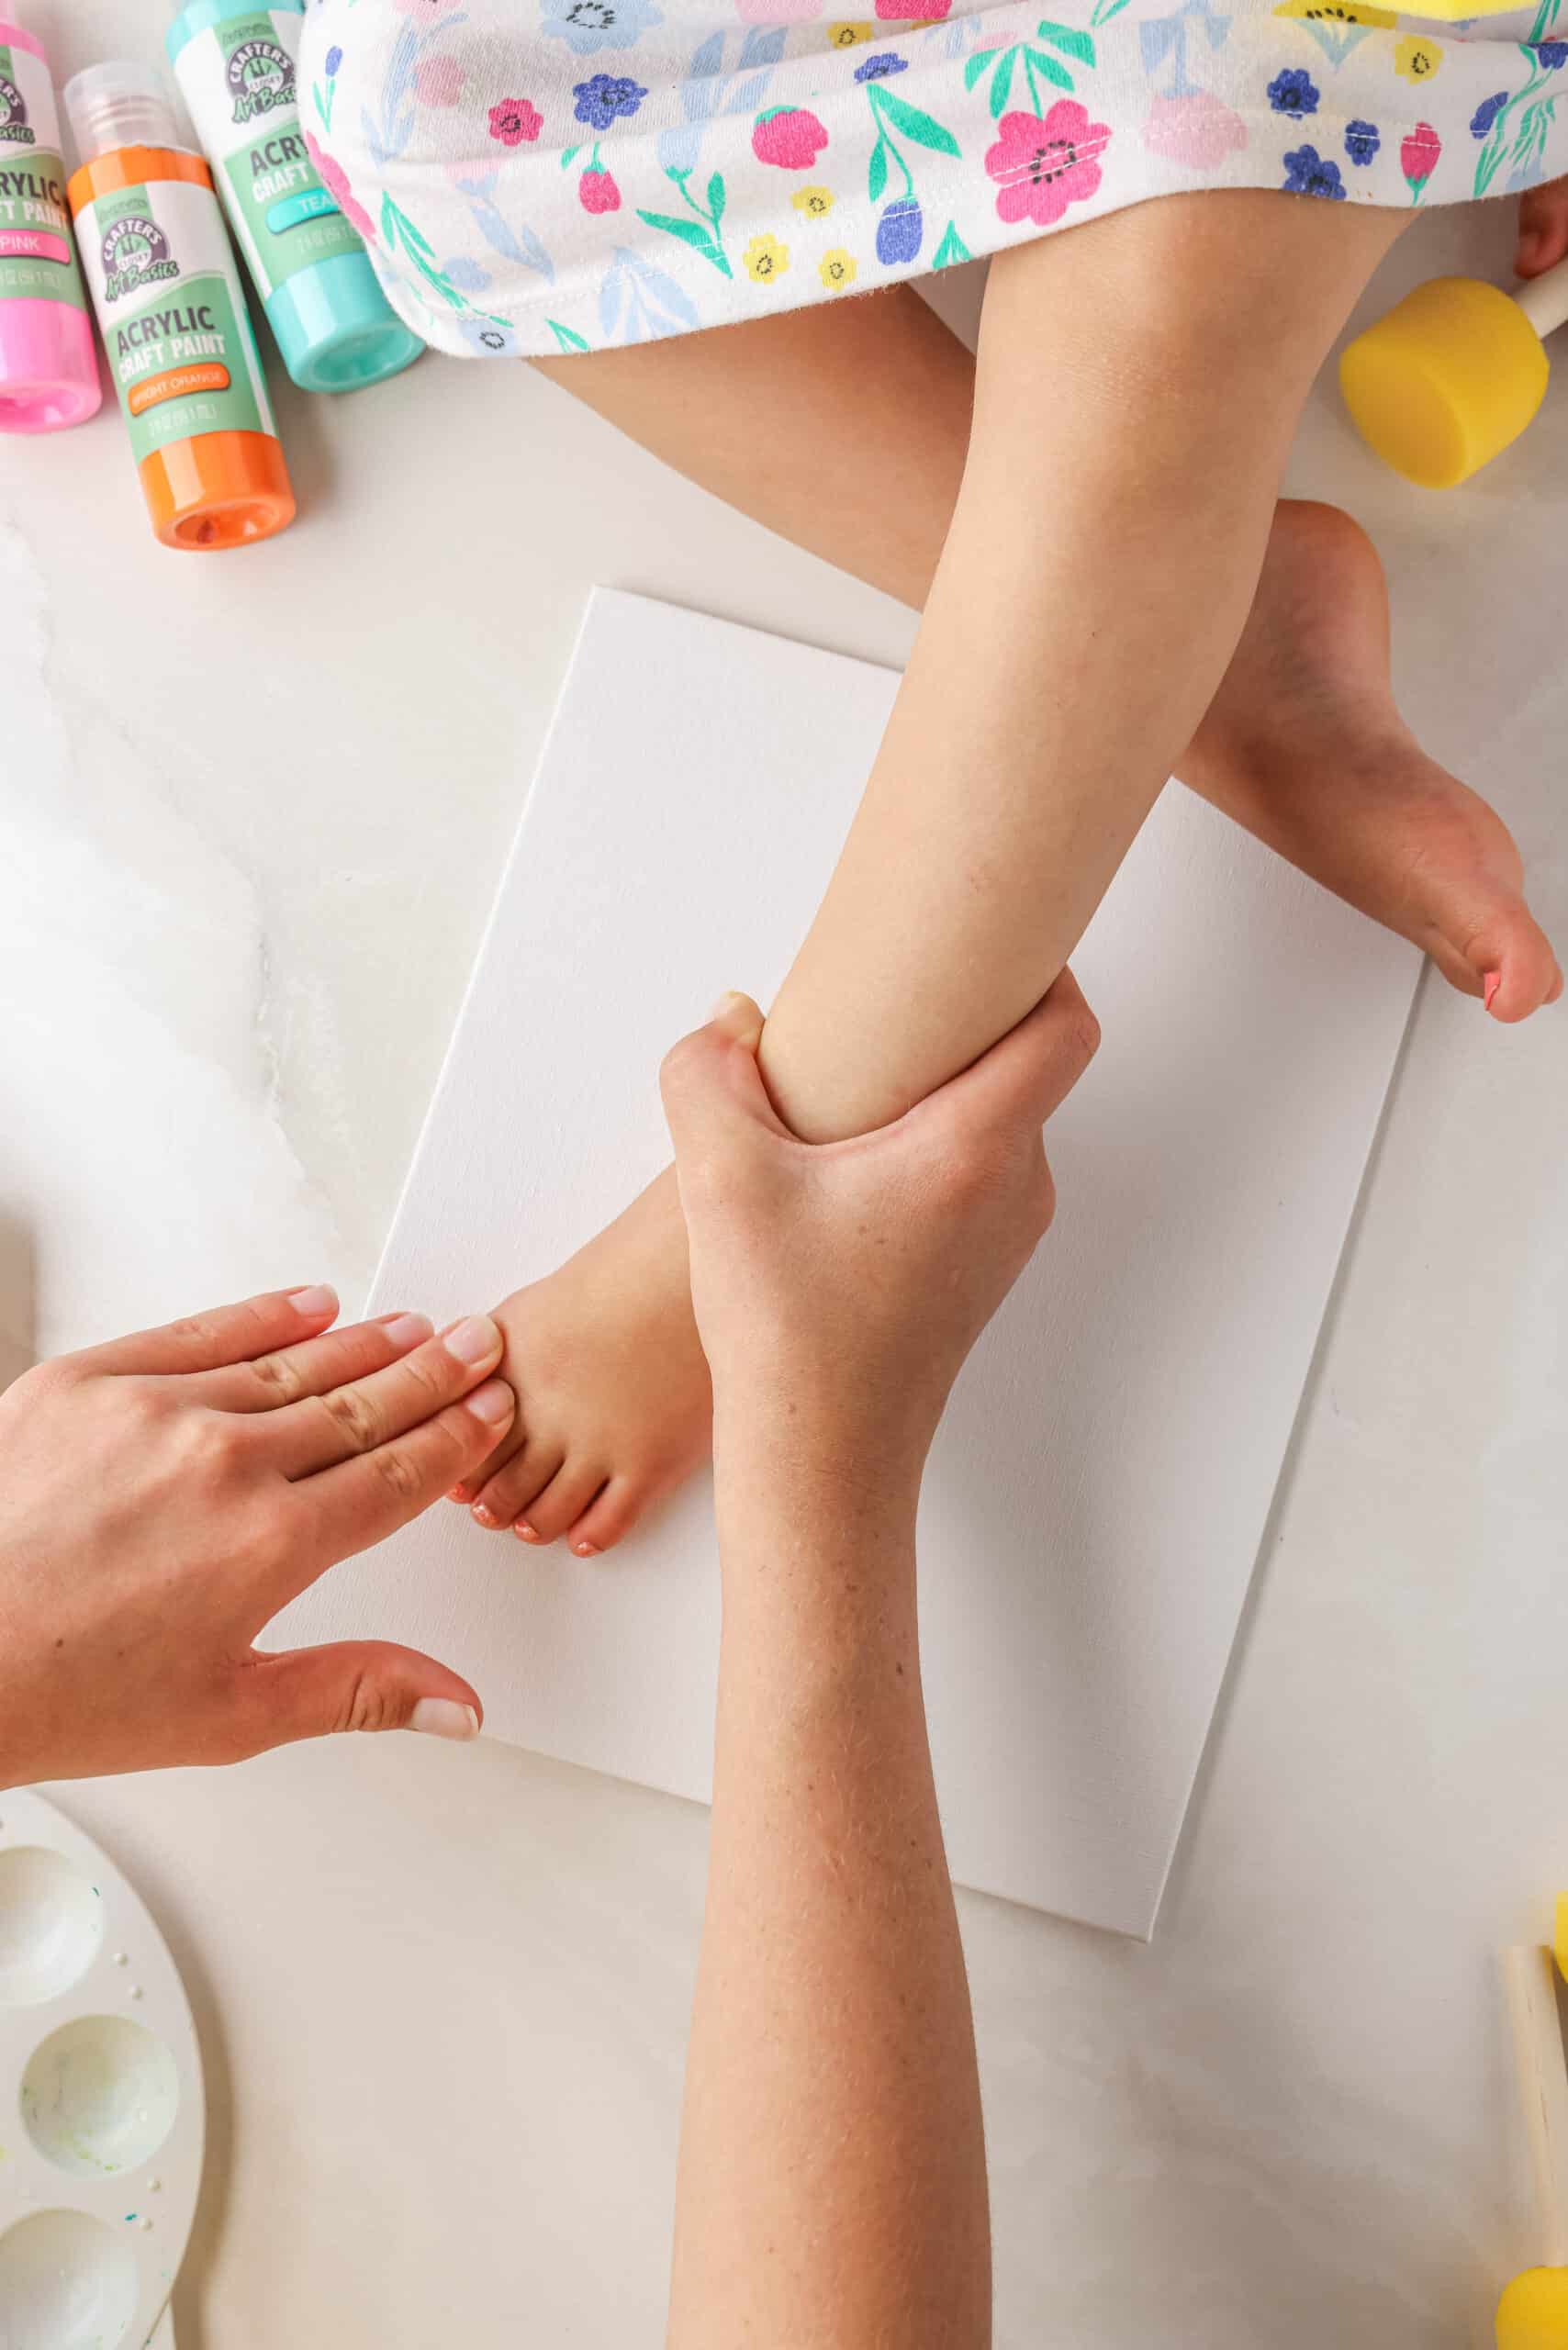
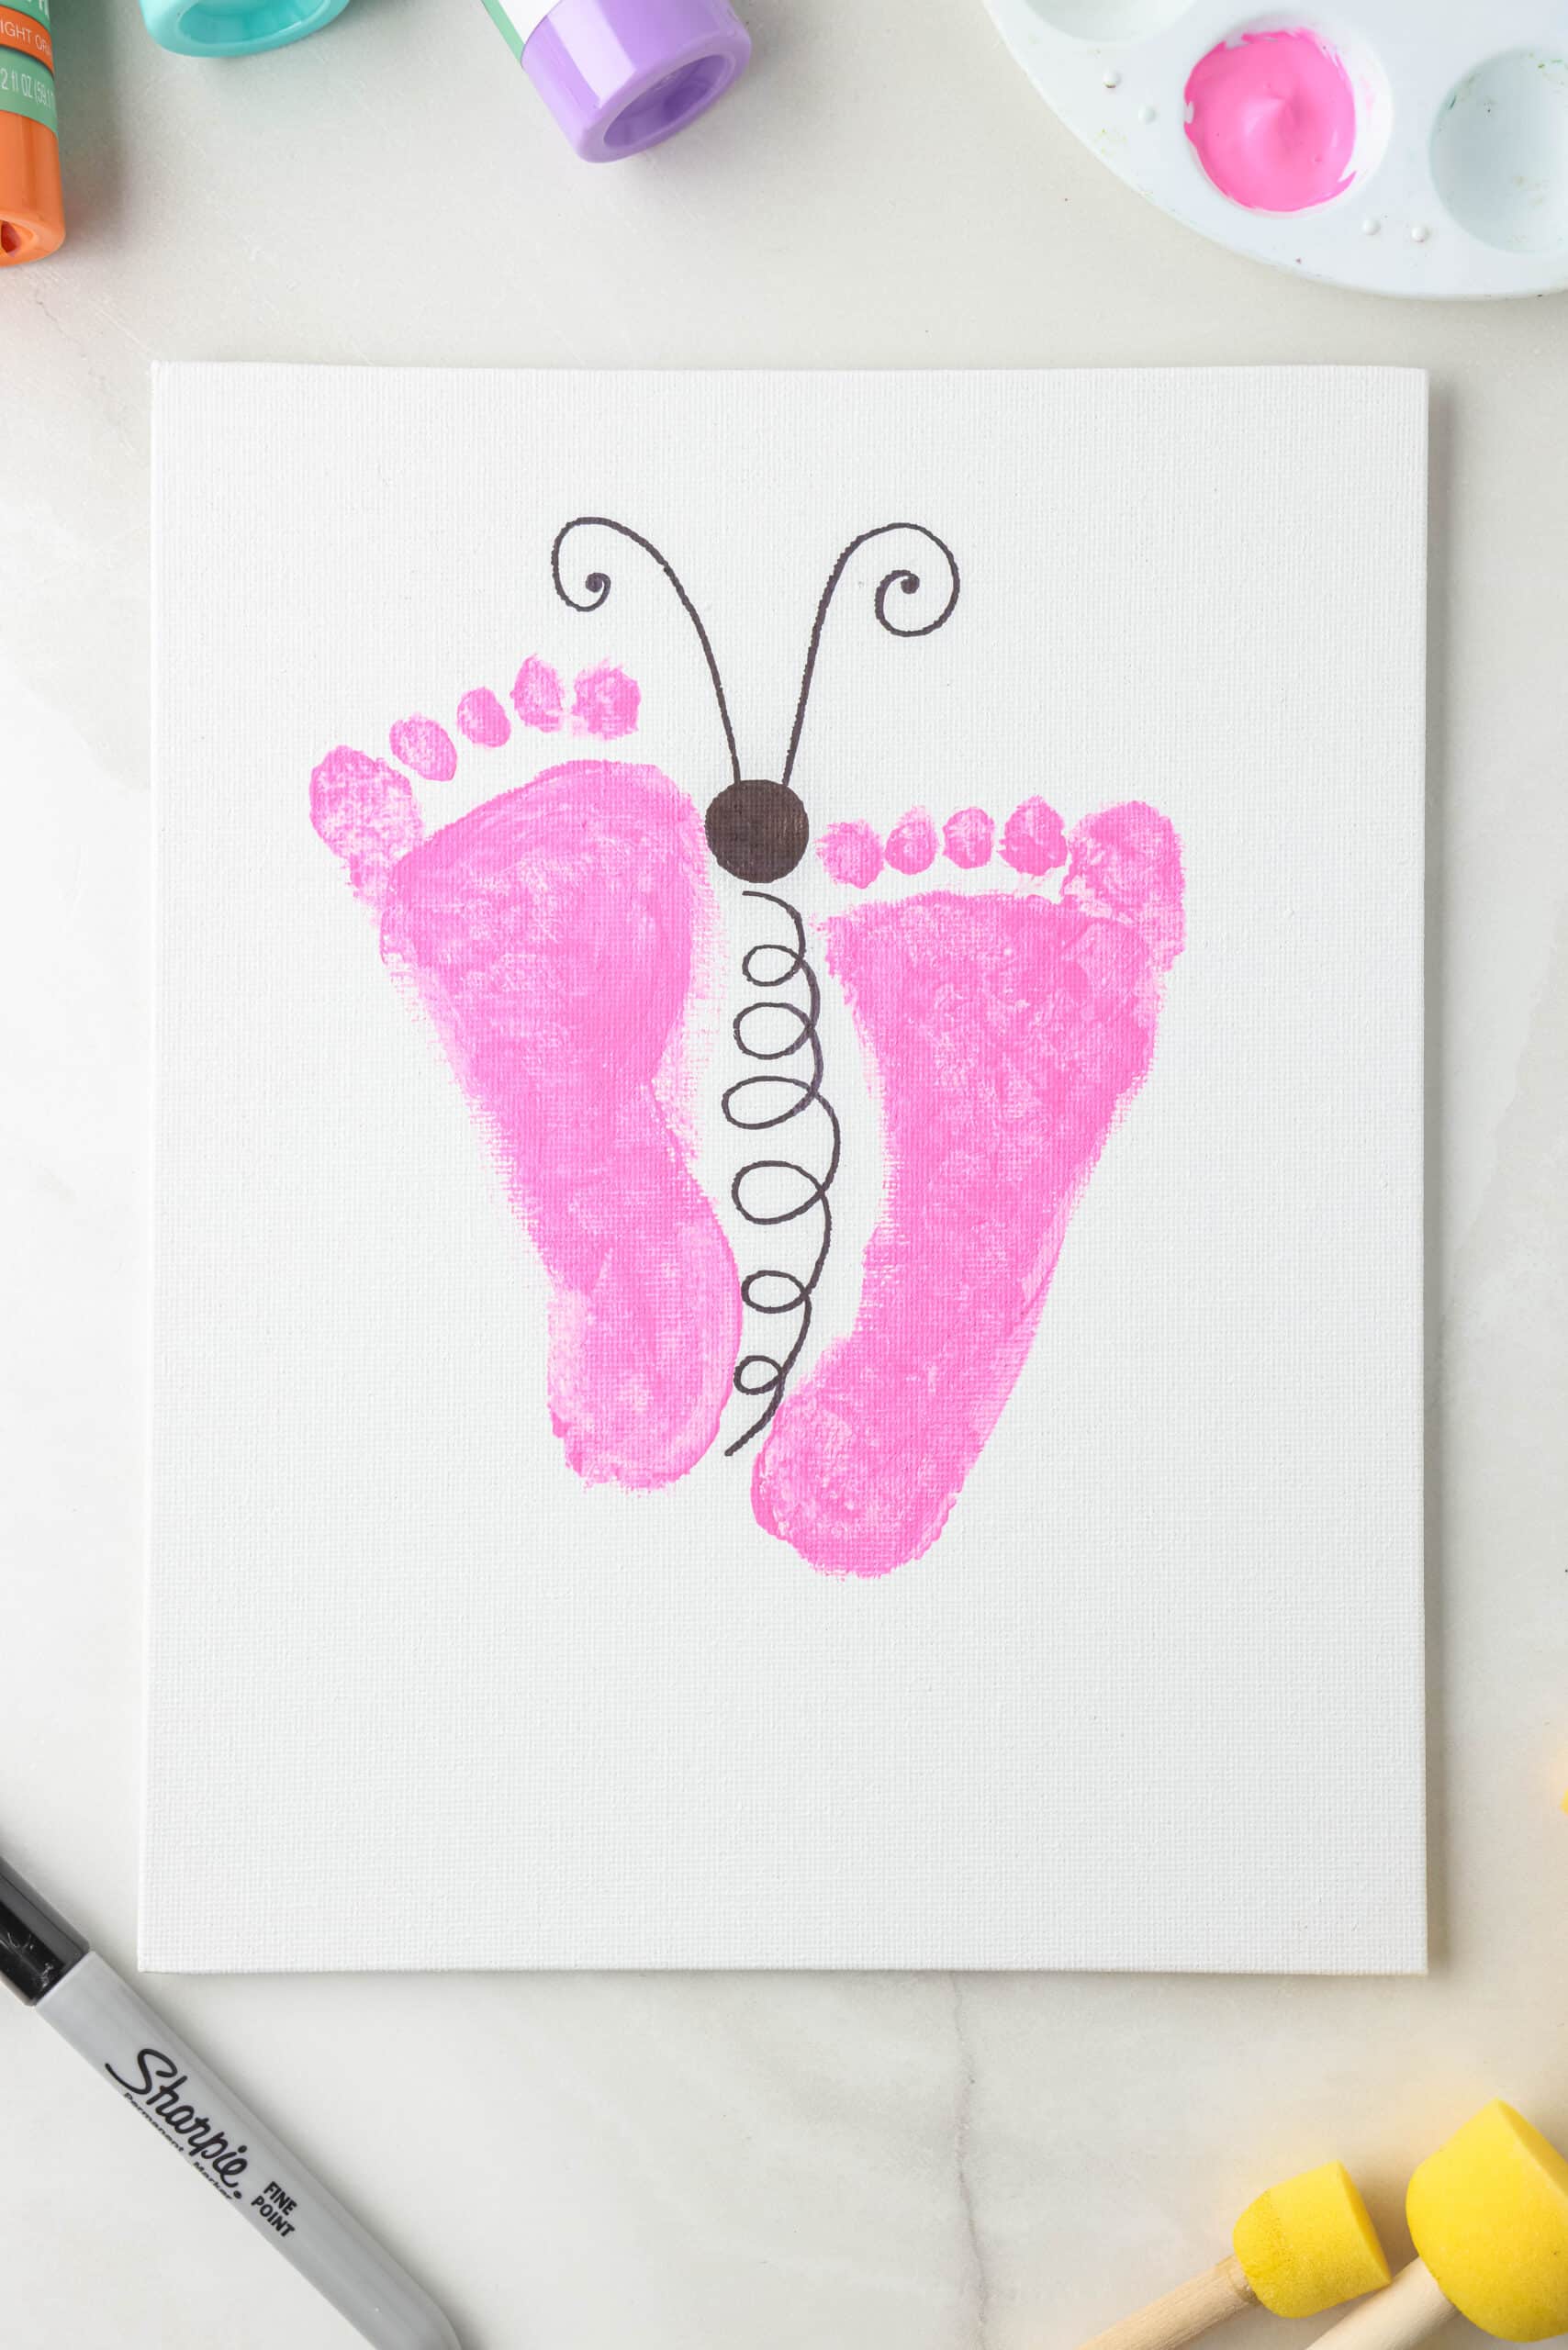
- To begin making this fun craft, paint a light coat of glue onto the bottom of your child’s left foot. Try to make it a nice even layer that isn’t too thick so that there are no globs of glue left on the canvas. This keeps the footprint nice and neat and easy to paint over.
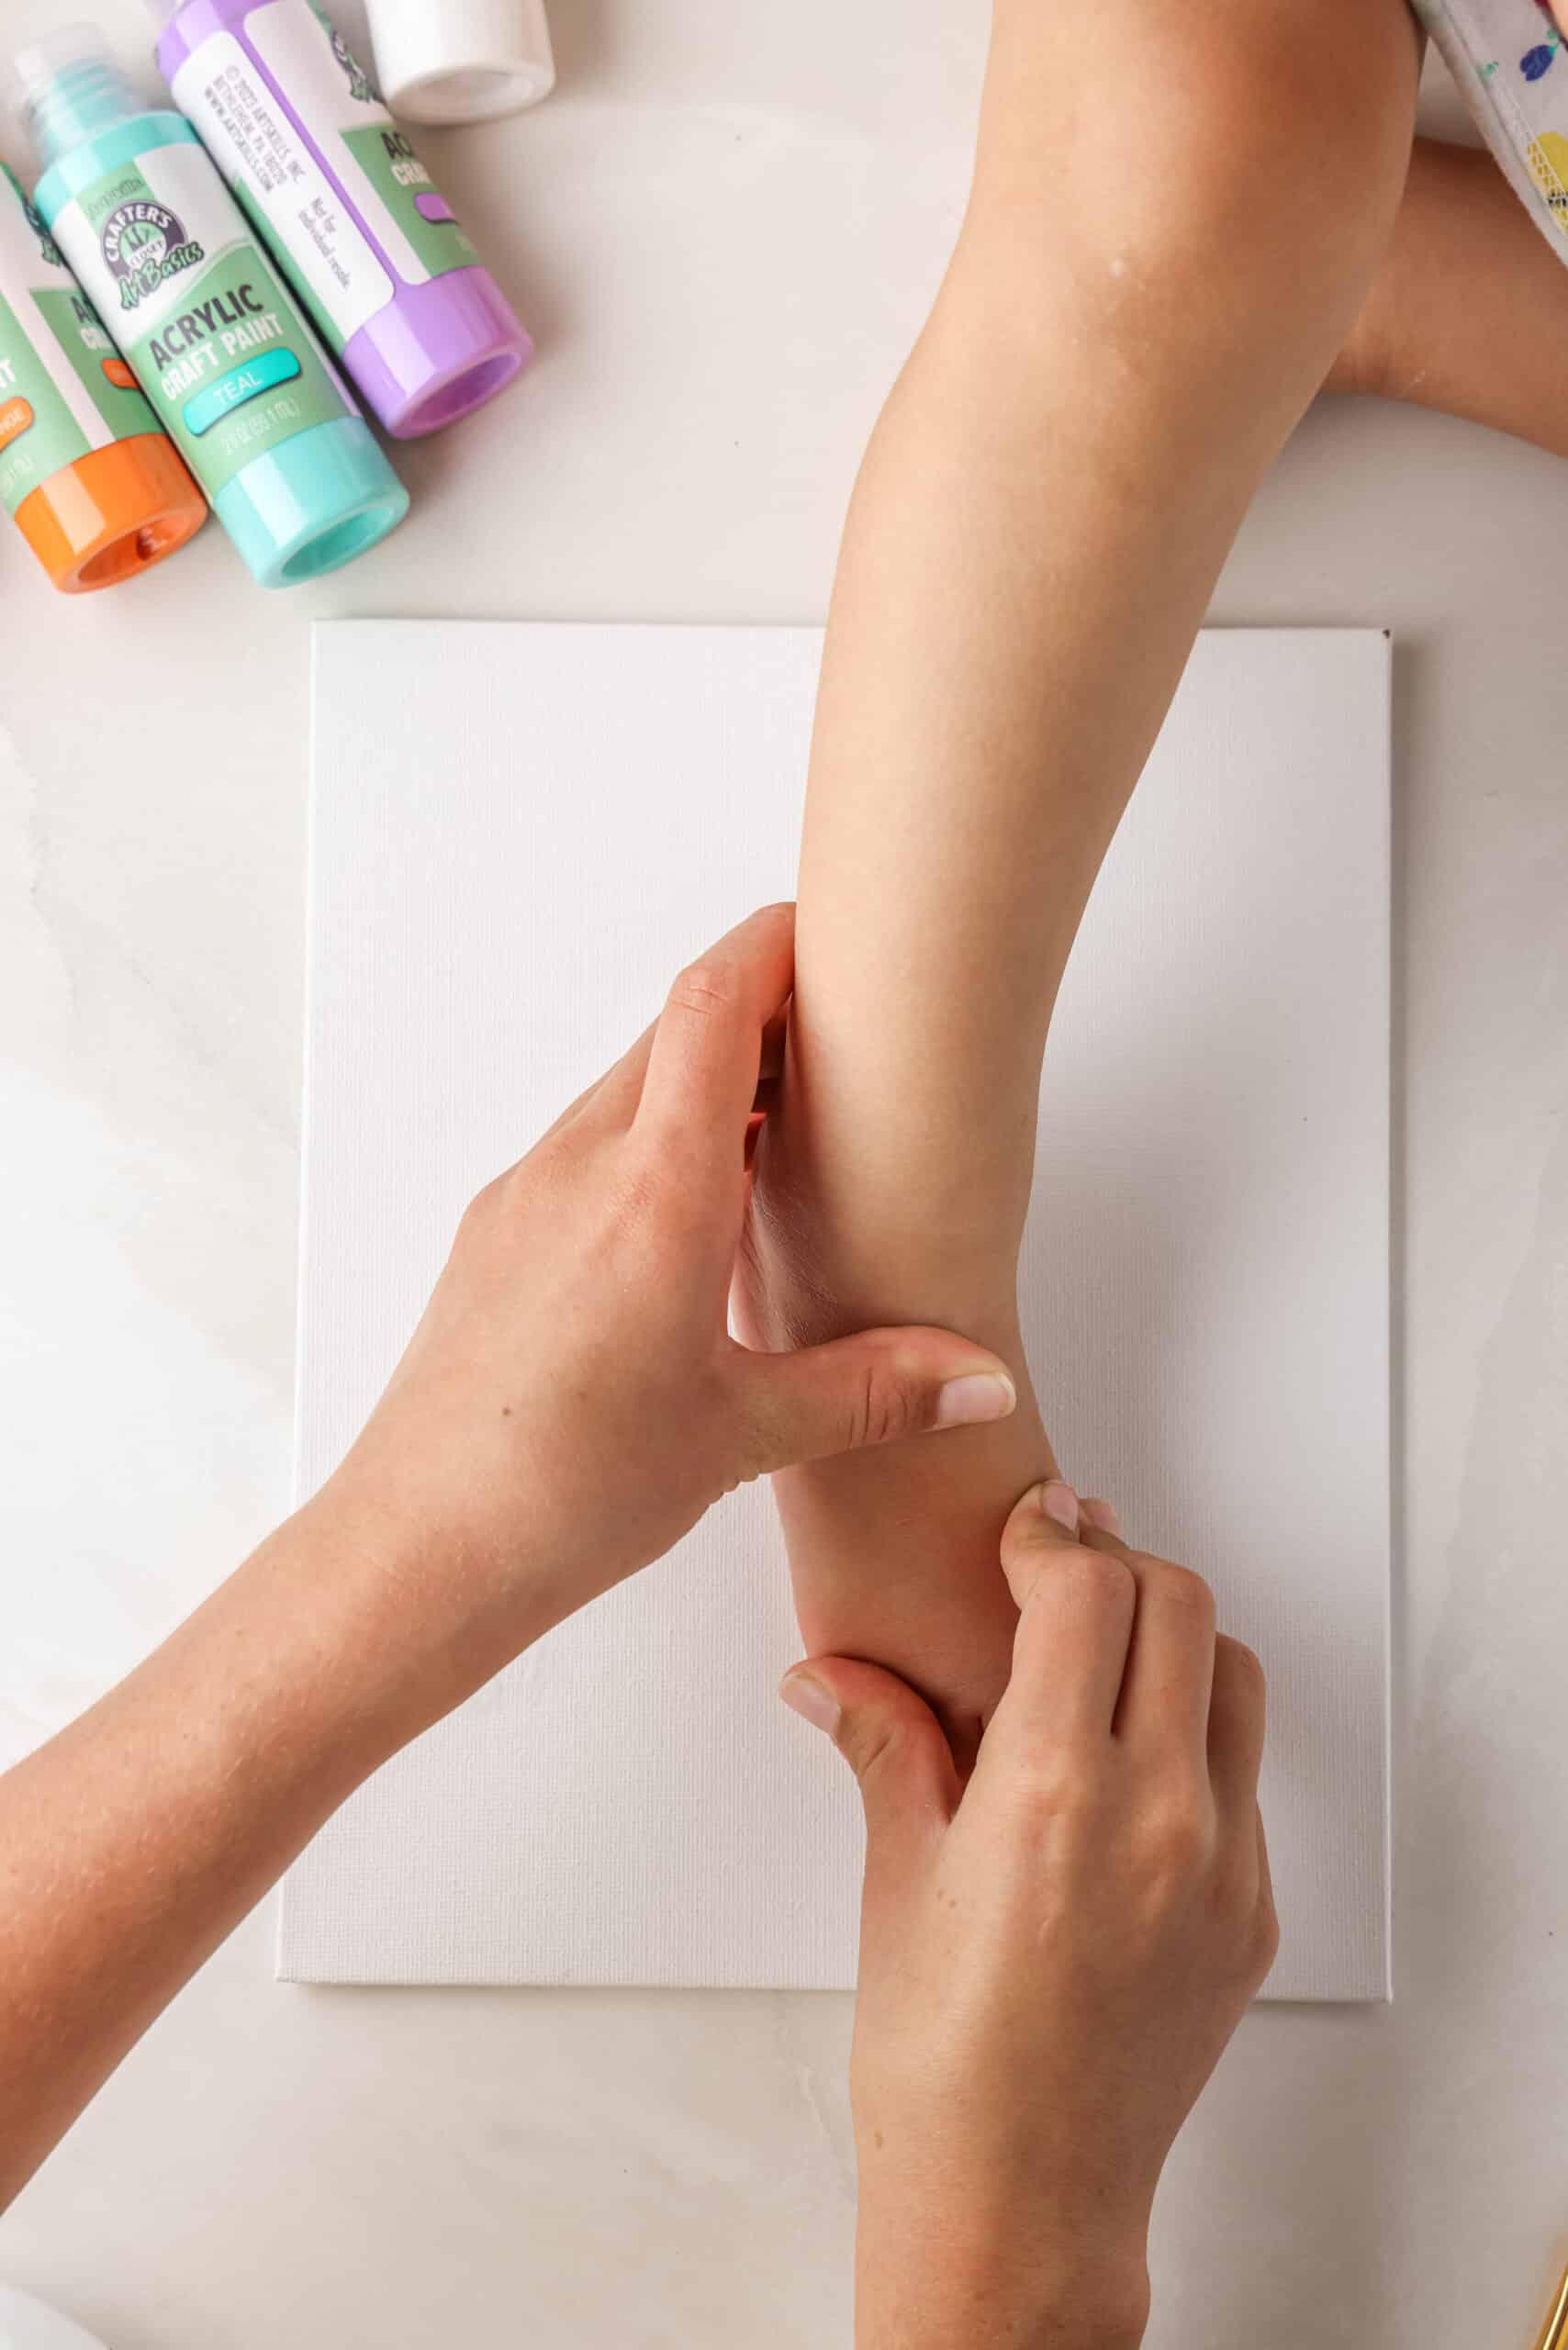
- Guide their little foot onto the canvas, the left foot will form the RIGHT butterfly wing. Working quickly so that the glue on the canvas does not completely dry, paint a nice layer of glue on the right foot then press it onto the canvas to make the LEFT butterfly wing.
- Once the glue footprints are placed, paint over the wings with acrylic paint, using a small paintbrush. The glue butterfly wings will be like your little template to follow!
- This method keeps the footprint art nice and neat, but if your kiddo isn’t too wiggly then feel free to skip the glue step and just paint their little feet with acrylic paint and press onto the canvas.
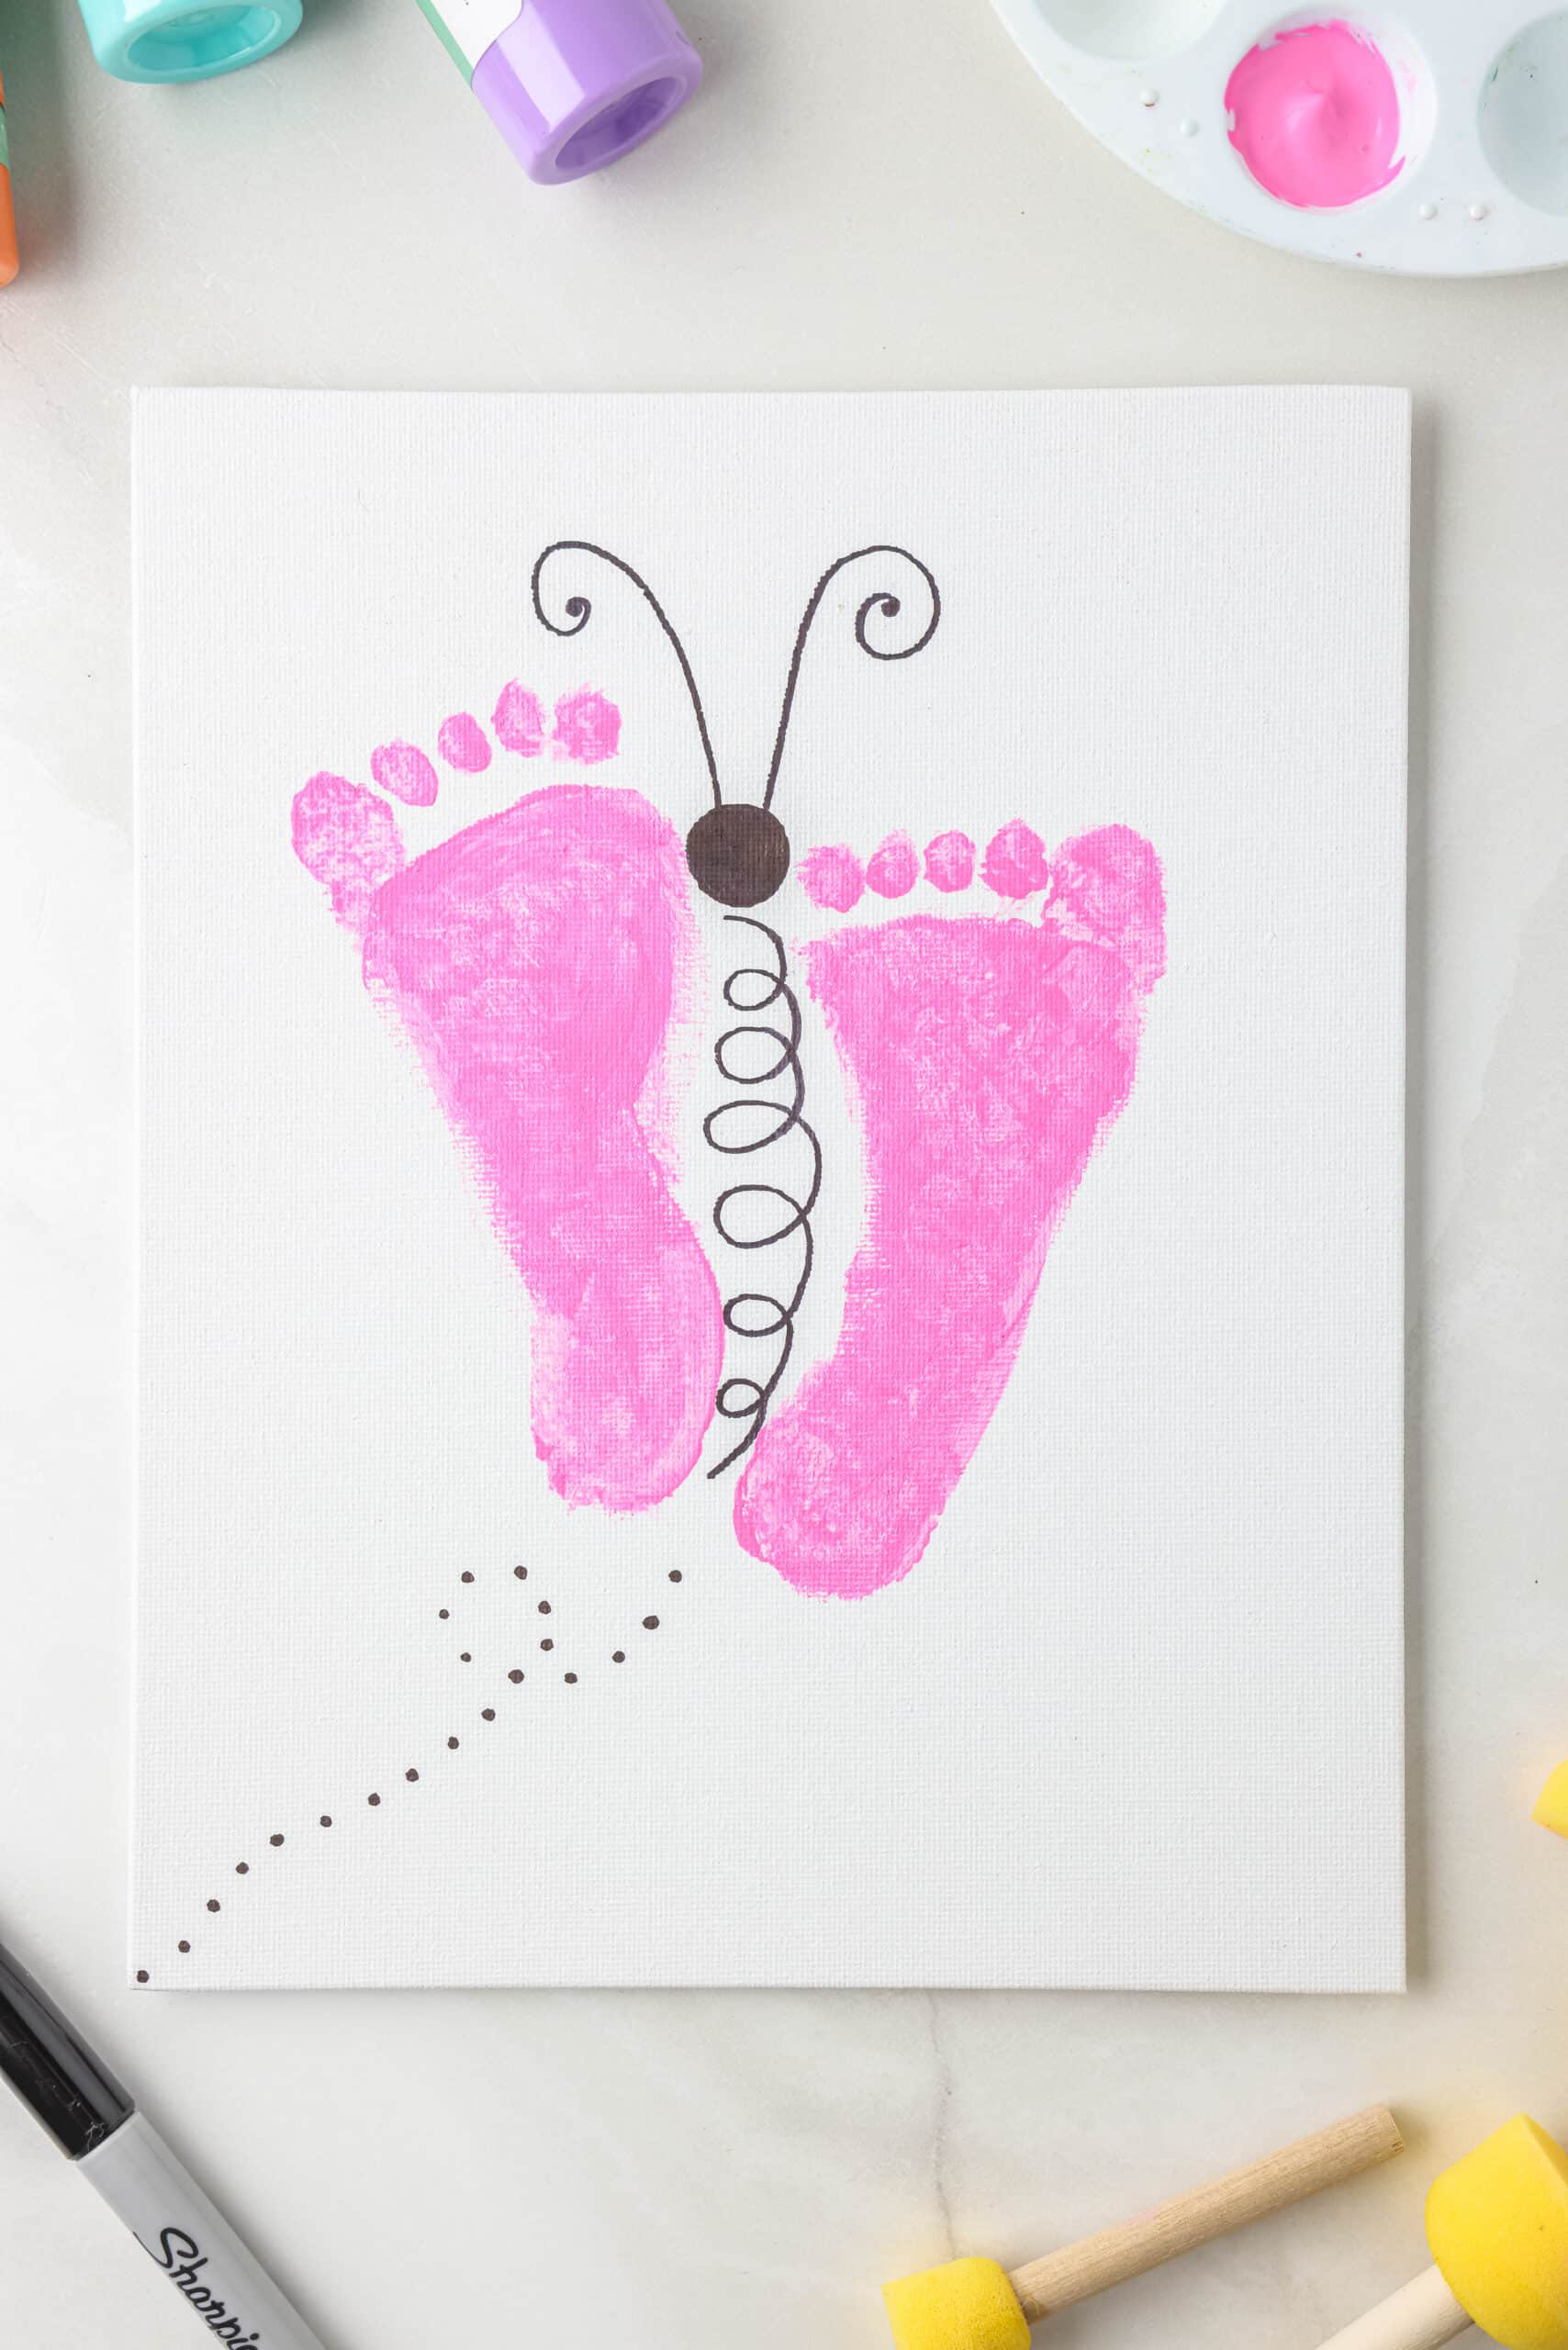
- Once your child’s footprints are painted as the cutest little butterfly wings, allow them plenty of time to dry. Then grab your permanent markers and add a body and antennae to your butterfly. You can add any extra designs and details that you want too, so don’t be afraid to get creative!
How do you get a good footprint?
In order to get a good footprint, make sure that you don’t press too hard on the canvas. This will make the glue from the footprint smoosh out and create a distorted image. Just roll their foot onto the canvas from heel to toe and then lift their foot straight up from the canvas.
Pro Tips for the Best Footprint Butterfly Craft
- You can add so many fun things to this cute butterfly footprint craft. Use your handprint to add a sun, add fingerprint flowers, or any other cute little additions you can think of. You can use different colored markers to draw too! Oh, and even add glitter to the wet glue or paint.
- Easily clean up your messy little monster with some baby wipes! They won’t track glue or paint through the house before you can wash their feet.
- Giving this as a gift to someone? Add their name or your child’s name and any other fun cute things that would make this extra special and meaningful.

This cute little footprint butterfly is sure to put a smile on your face! Happy crafting!
More Crafts You’ll Love
- Make all kinds of different keepsakes with this Salt Dough Recipe! You can create ornaments and so much more.
- Want a fun family craft? Then make this Thankful Tree around Thanksgiving and have everyone write down something that they are thankful for.
- Make reading extra exciting with this Rainbow Fish Craft that goes along with the book!
- Get your kiddos involved in the decorating for patriotic holidays with this Paper Plate Flag Craft.

Butterfly Footprint Craft
Ingredients
- Canvas panels 8×10 or 11×14 sizes work well
- School glue
- Acrylic paints or large colorful ink pads
- Paint palette
- Paint brushes and daubers
- Permanent markers
- Glitter
Instructions
- Begin by painting a light coat of glue on the bottom of the child’s left foot. Aim for a nice, even layer so that you do not leave big globs of glue on the canvas. This keeps the footprint nice and neat and easy to paint over. Once the foot is lightly coated, guide the child to place his or her foot on the canvas. The left foot will form the RIGHT butterfly wing.
- Working quickly so that the glue on the canvas does not completely dry, paint a nice, even layer of glue on the child’s right foot. Guide the child to make the footprint on the canvas. The right foot will form the LEFT butterfly wing.
- Once the glue footprints are placed, paint over the wings with acrylic paint using a small paintbrush. Use the glue as your guide. Using this method with little children helps to keep the footprints nice and neat, but you will need abundant light to be able to see the glue prints clearly as you paint over them. Feel free to skip the glue altogether and simply use acrylic paint for steps 1-2 if the child isn’t too wiggly!
- Once your butterfly is painted and has had time to dry, it is time to add those sweet little details. Using permanent markers, add a body and antennae.
- Add details and designs! The possibilities are endless! You can add details to the wings. A handprint can become a glittery, shining sun, and you can use your fingers to make fingerprint flowers! Add in some grass using oil pastel crayons or markers, if you’d like! Draw a dot-to-dot flight path underneath your butterfly to show where it has been! This part is the most fun because it is where your creativity can really shine!
- Prop up or hang your work of art for display! Don’t forget to add a name and date on the back so that you will remember the time you spent together crafting.