No-Bake Melting Snowman Cookies
Cute Melting Snowman Cookies are an easy no-bake Christmas Treat that everyone will love! A chocolate covered Oreo that’s topped with a marshmallow turned snowman face for an easy Christmas recipe. Perfect for making with the kids and gobbling up afterwards!
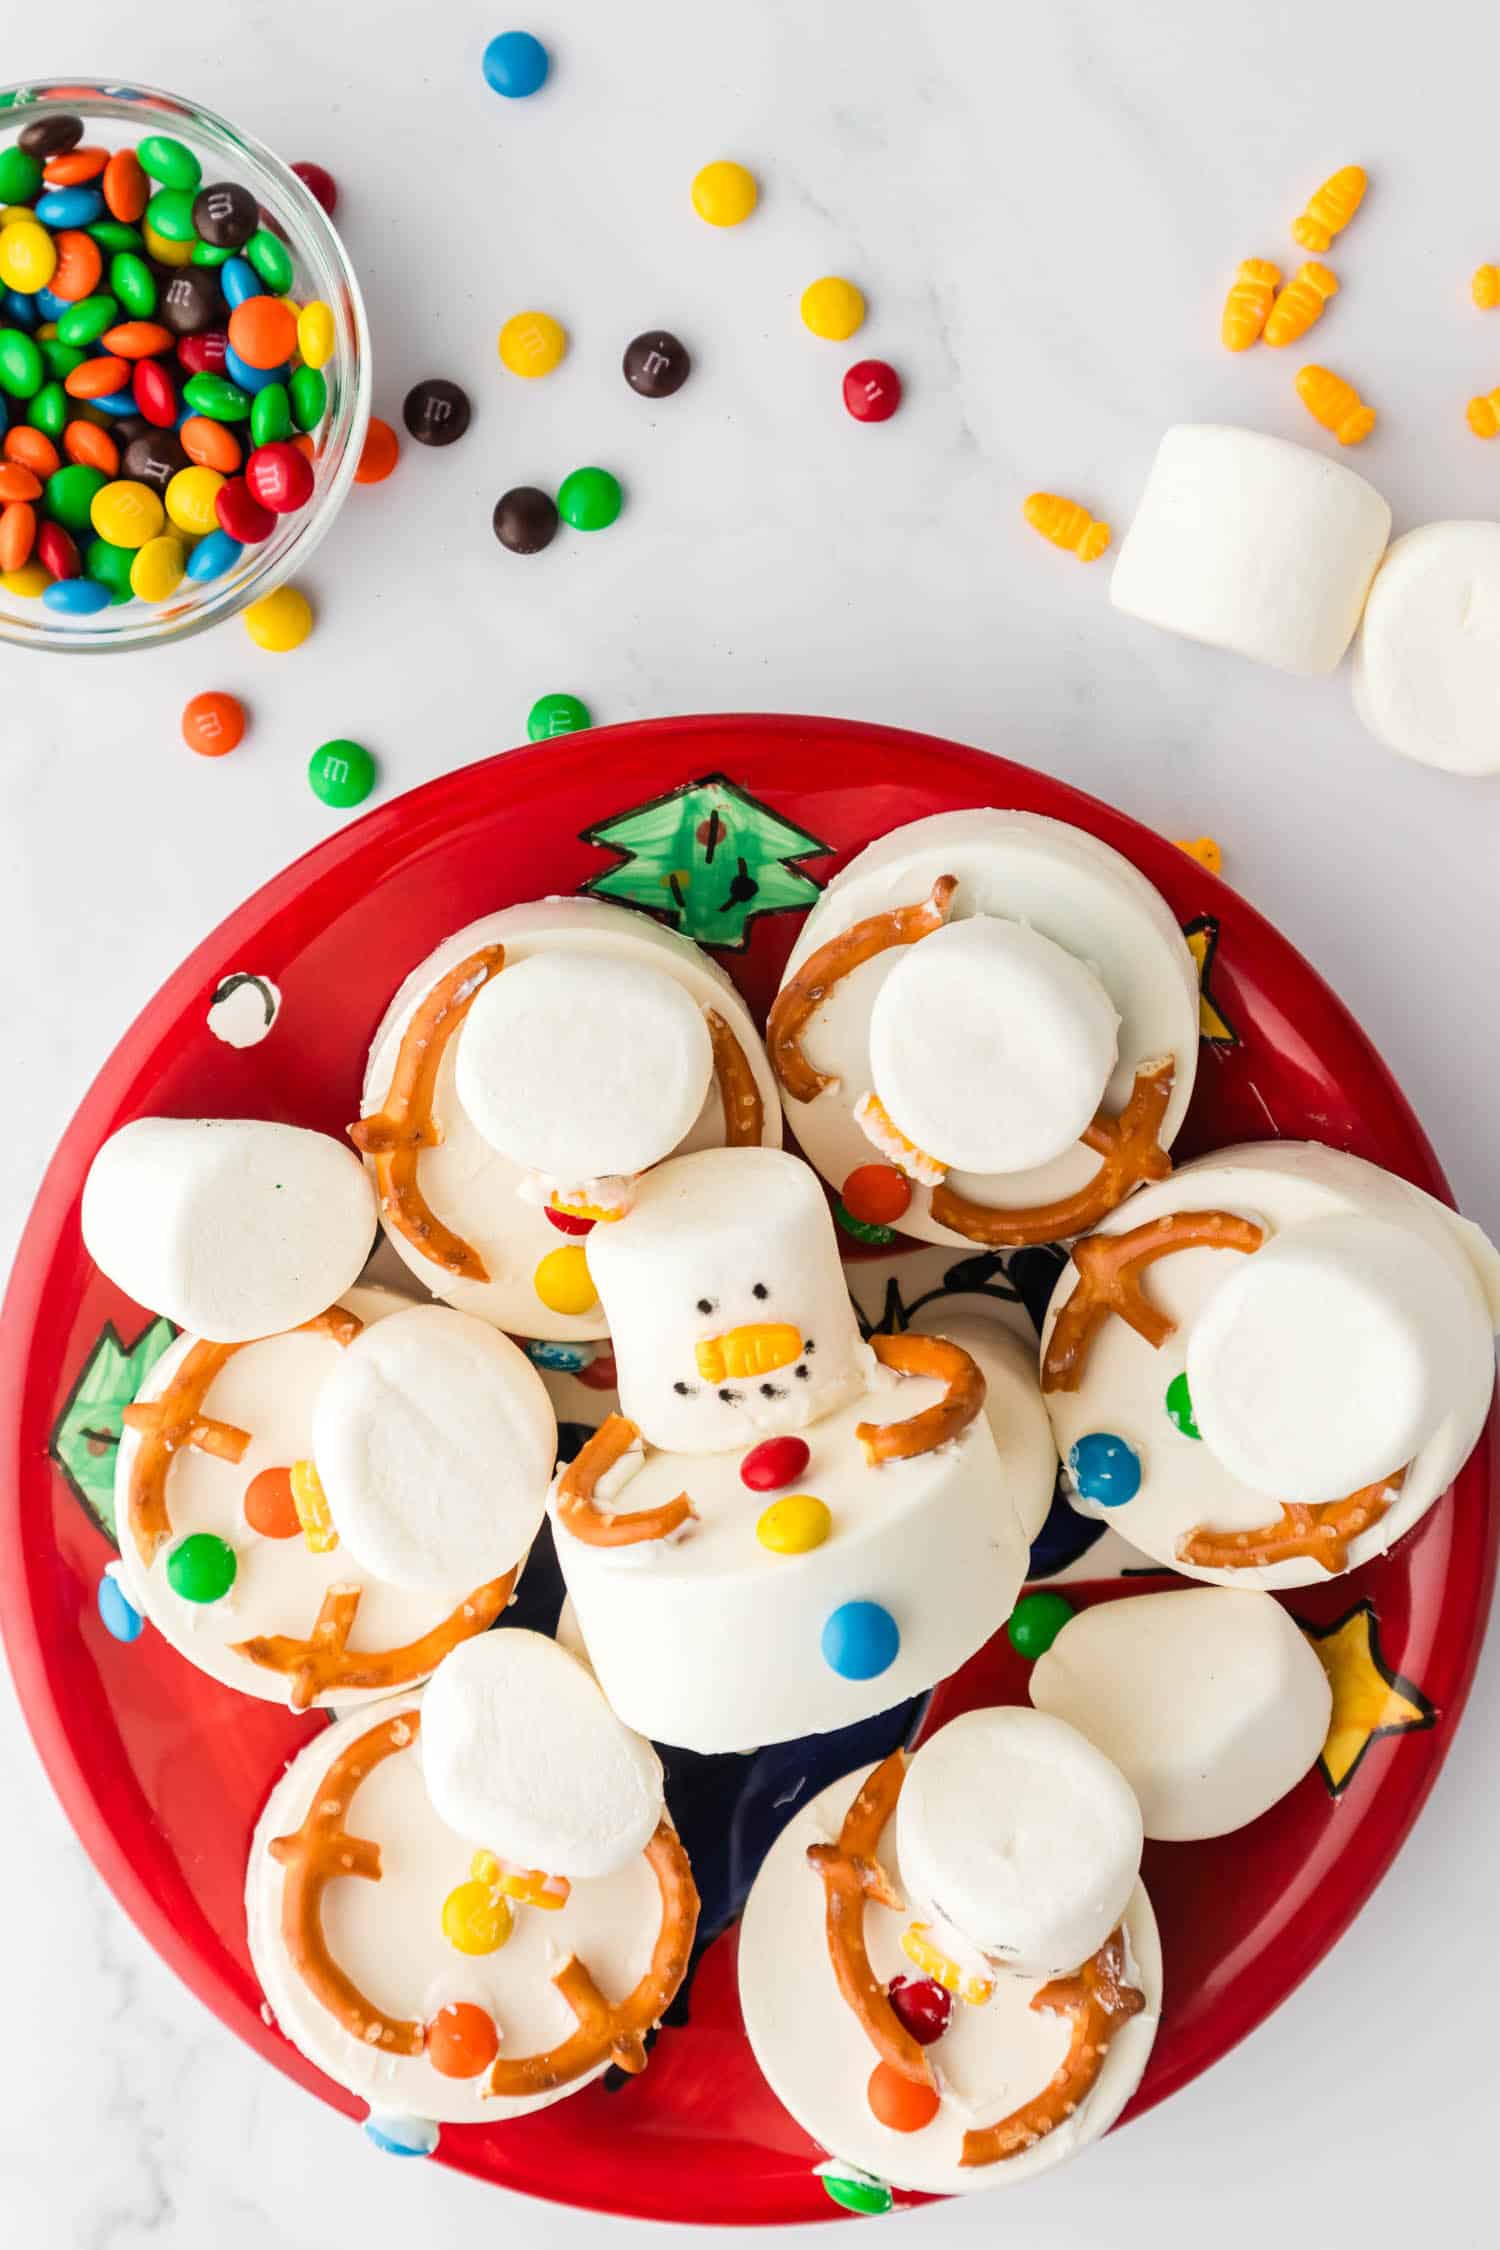
Your kids as going to LOVE these super easy no-bake melting snowman cookies. Who am I kidding…adults will love them too! This simple recipe makes the cutest and most festive dessert that taste even better than it looks. It’s kid-friendly and so easy to make, the kids may even be able to complete the recipe on their own.
Just picture, a holiday dessert table with cute little snowman cookies and mugs of grinch punch! How cute would that be? You could even make these festive dessert for a family movie night and watch a Christmas movie. Or even do a snowman craft time. Maybe even make it a Christmas tradition! There’s so much fun to be had baking for the holidays.
Why You’ll Love Easy Melting Snowman Cookies
- You only need 15 minutes to make a batch of six melting snowman cookies. Easy peasy…perfect to throw together for a last minute planned family movie night!
- This kid-friendly recipe can be made by kids and is perfect for kids. Get them working on their fine motor skills without them even recognizing it!
- Snowman cookies are a great bake sale creation, a unique cookie swap choice, and a fabulous sweet treat to give as a gift!
Ingredients for No Bake Melting Snowman Cookies
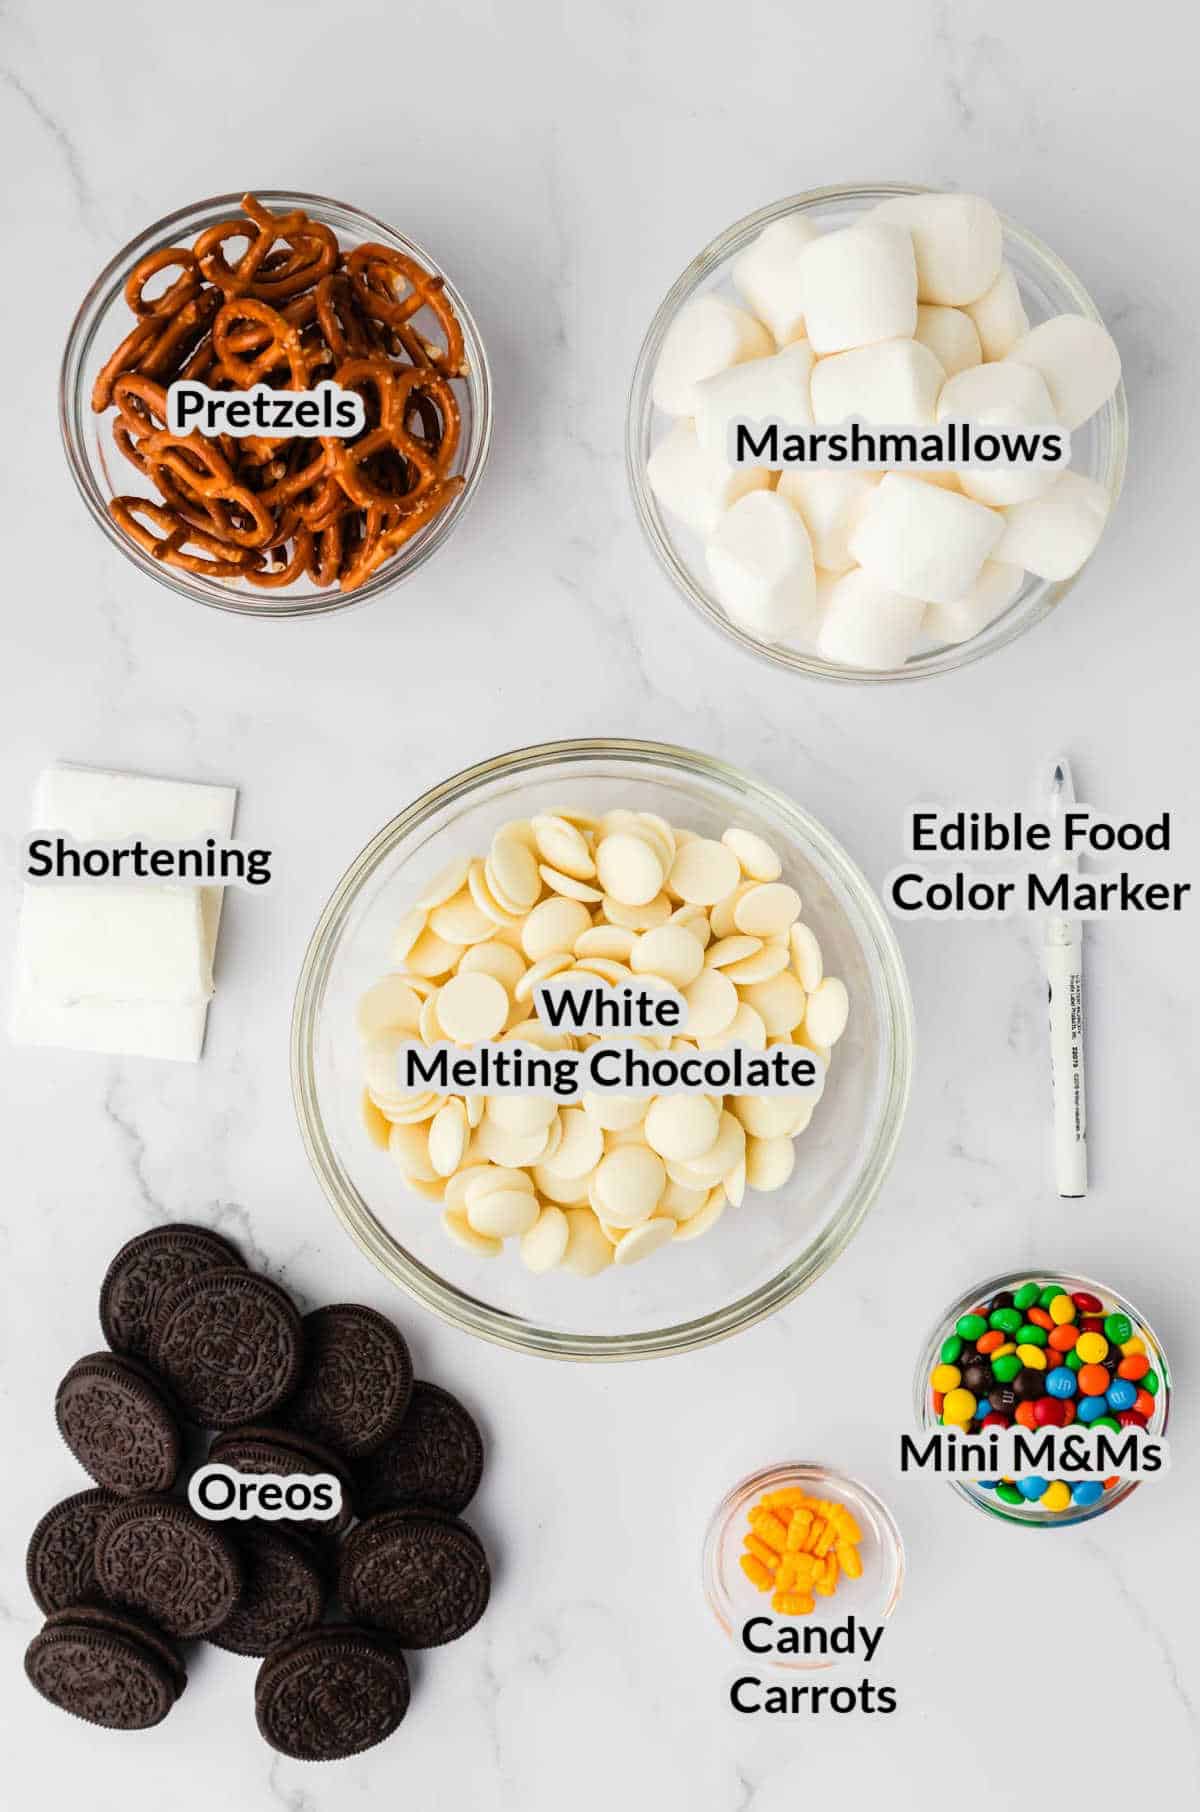
- Oreos – Oreos are the center of the chocolate covered snowman base. You can use any flavor you want too! Mint Oreos or golden Oreos would be really tasty.
- Candy carrots – If you have trouble finding candy carrots in store, order them online ahead of time.
- Mini M&Ms – To keep the proportions looking good, use mini sized M&Ms. Regular M&Ms will likely look way too big.
- Marshmallows – A large marshmallow will create the head of your snowman cookies.
- Pretzels – I used pretzel twists, but you can also you pretzel sticks to make straighter stick arms!
- Shortening – Shortening thins out the white melting chocolate and then helps to keep it a bit more stable after it sets.
- White melting chocolate – Make sure you have plenty of chocolate so that you can cover the Oreos and have leftovers to secure all of the pieces and decorations.
- Edible food color marker – The coolest baking tool…a marker with edible ink!
Helpful Tools

How to Make No Bake Melting Snowman Cookies
To begin, combine the white melting chocolates and shortening in a microwave-safe mixing bowl. Microwave the mixture for 1 minute at 50% power, then stir.
The mixture needs to be fully melted and smooth. If it isn’t, pop it back into the microwave and heat again at 30 second intervals. Stir in between each 30 second interval and heat until the mixture is creamy.
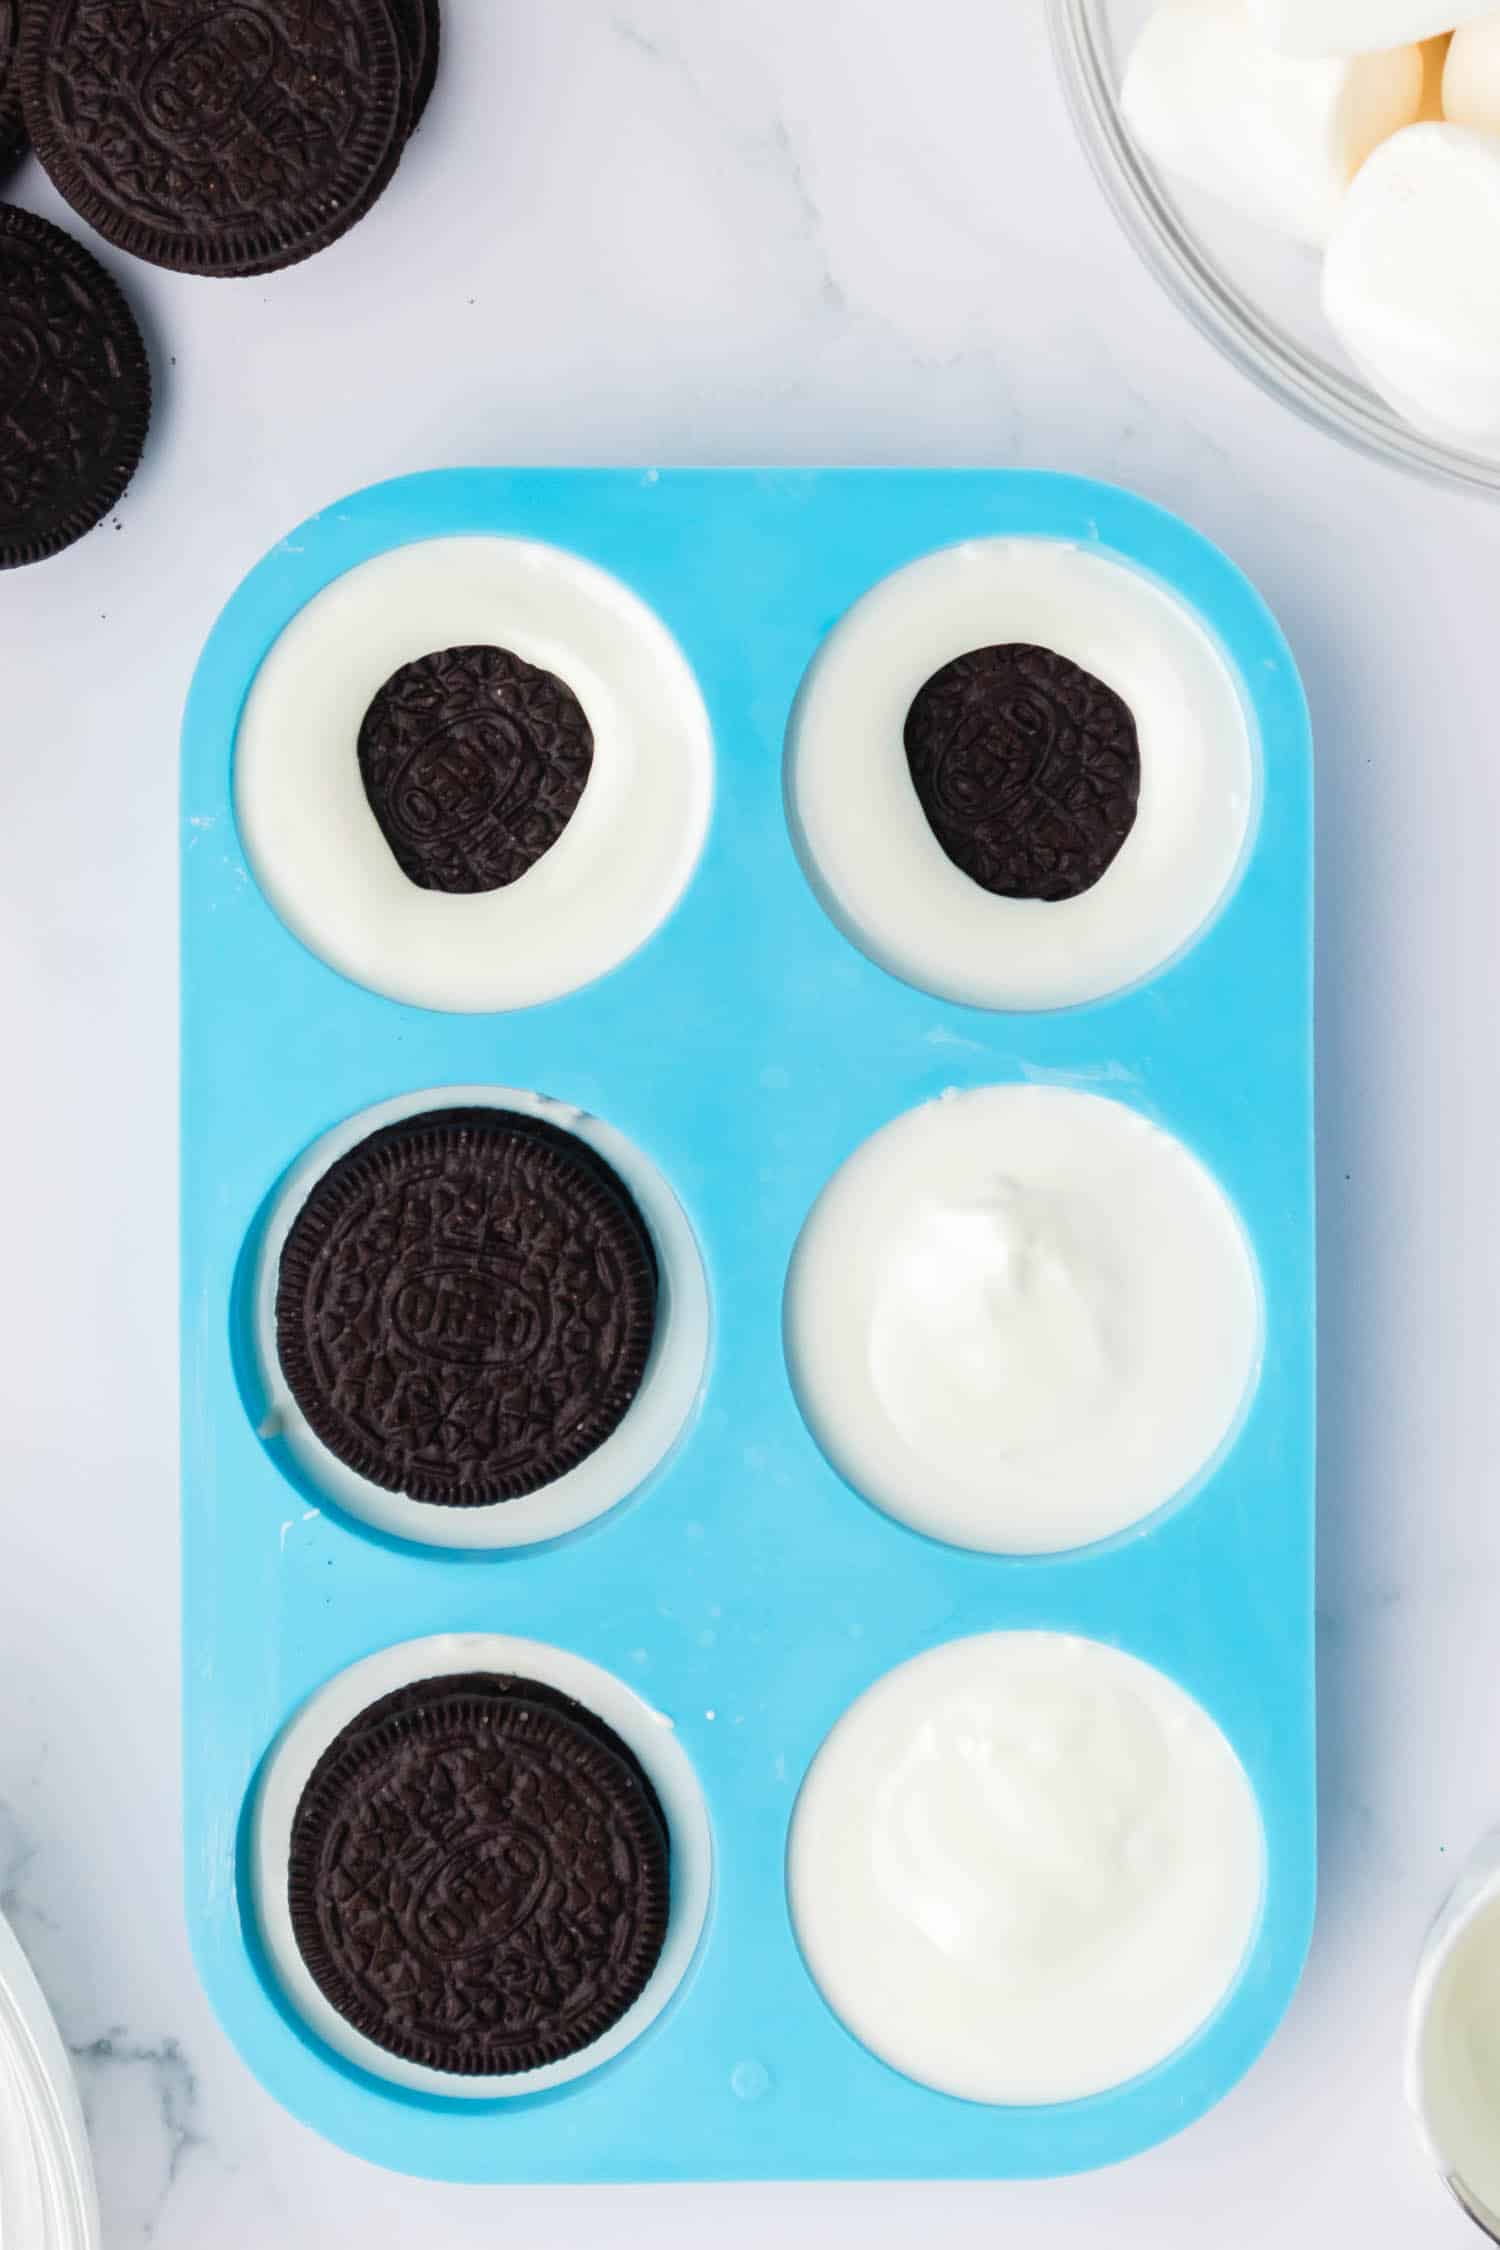
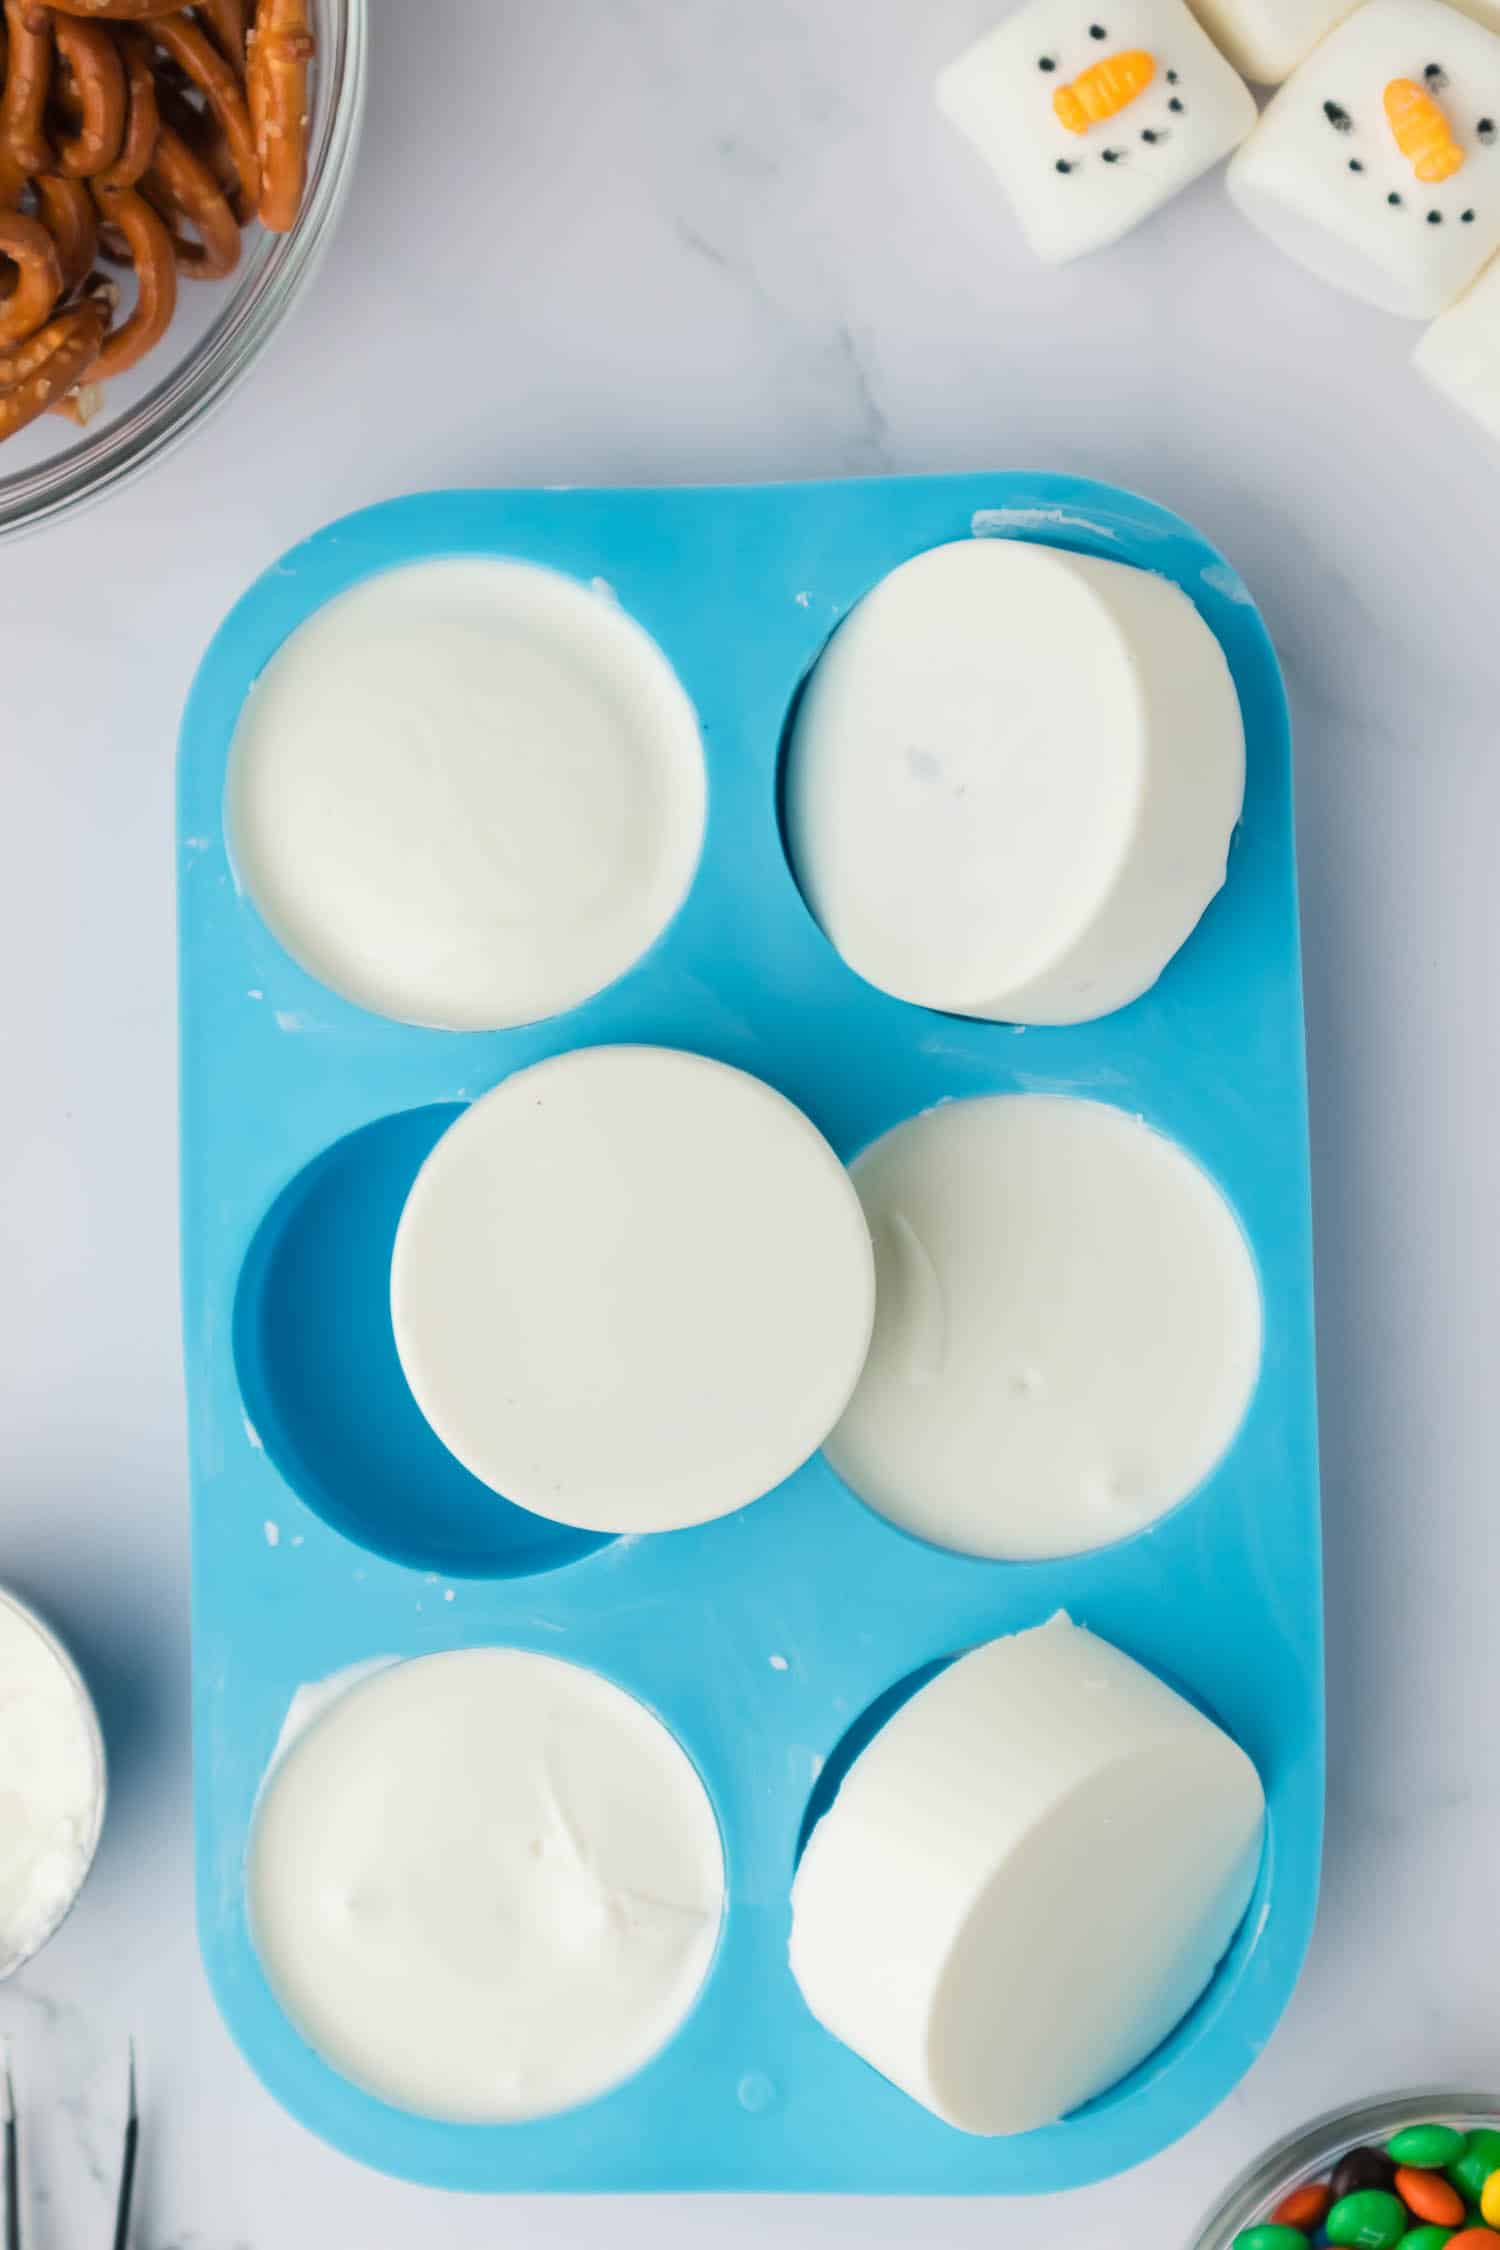
Pour ¼ cup of melted white chocolate into the each cup of the silicone cookie mold. Then push an Oreo down until it is completely covered. If needed, spoon a little more chocolate over until the cookies are fully submerged.
Set the silicone cookie mold aside and allow the chocolate to set.
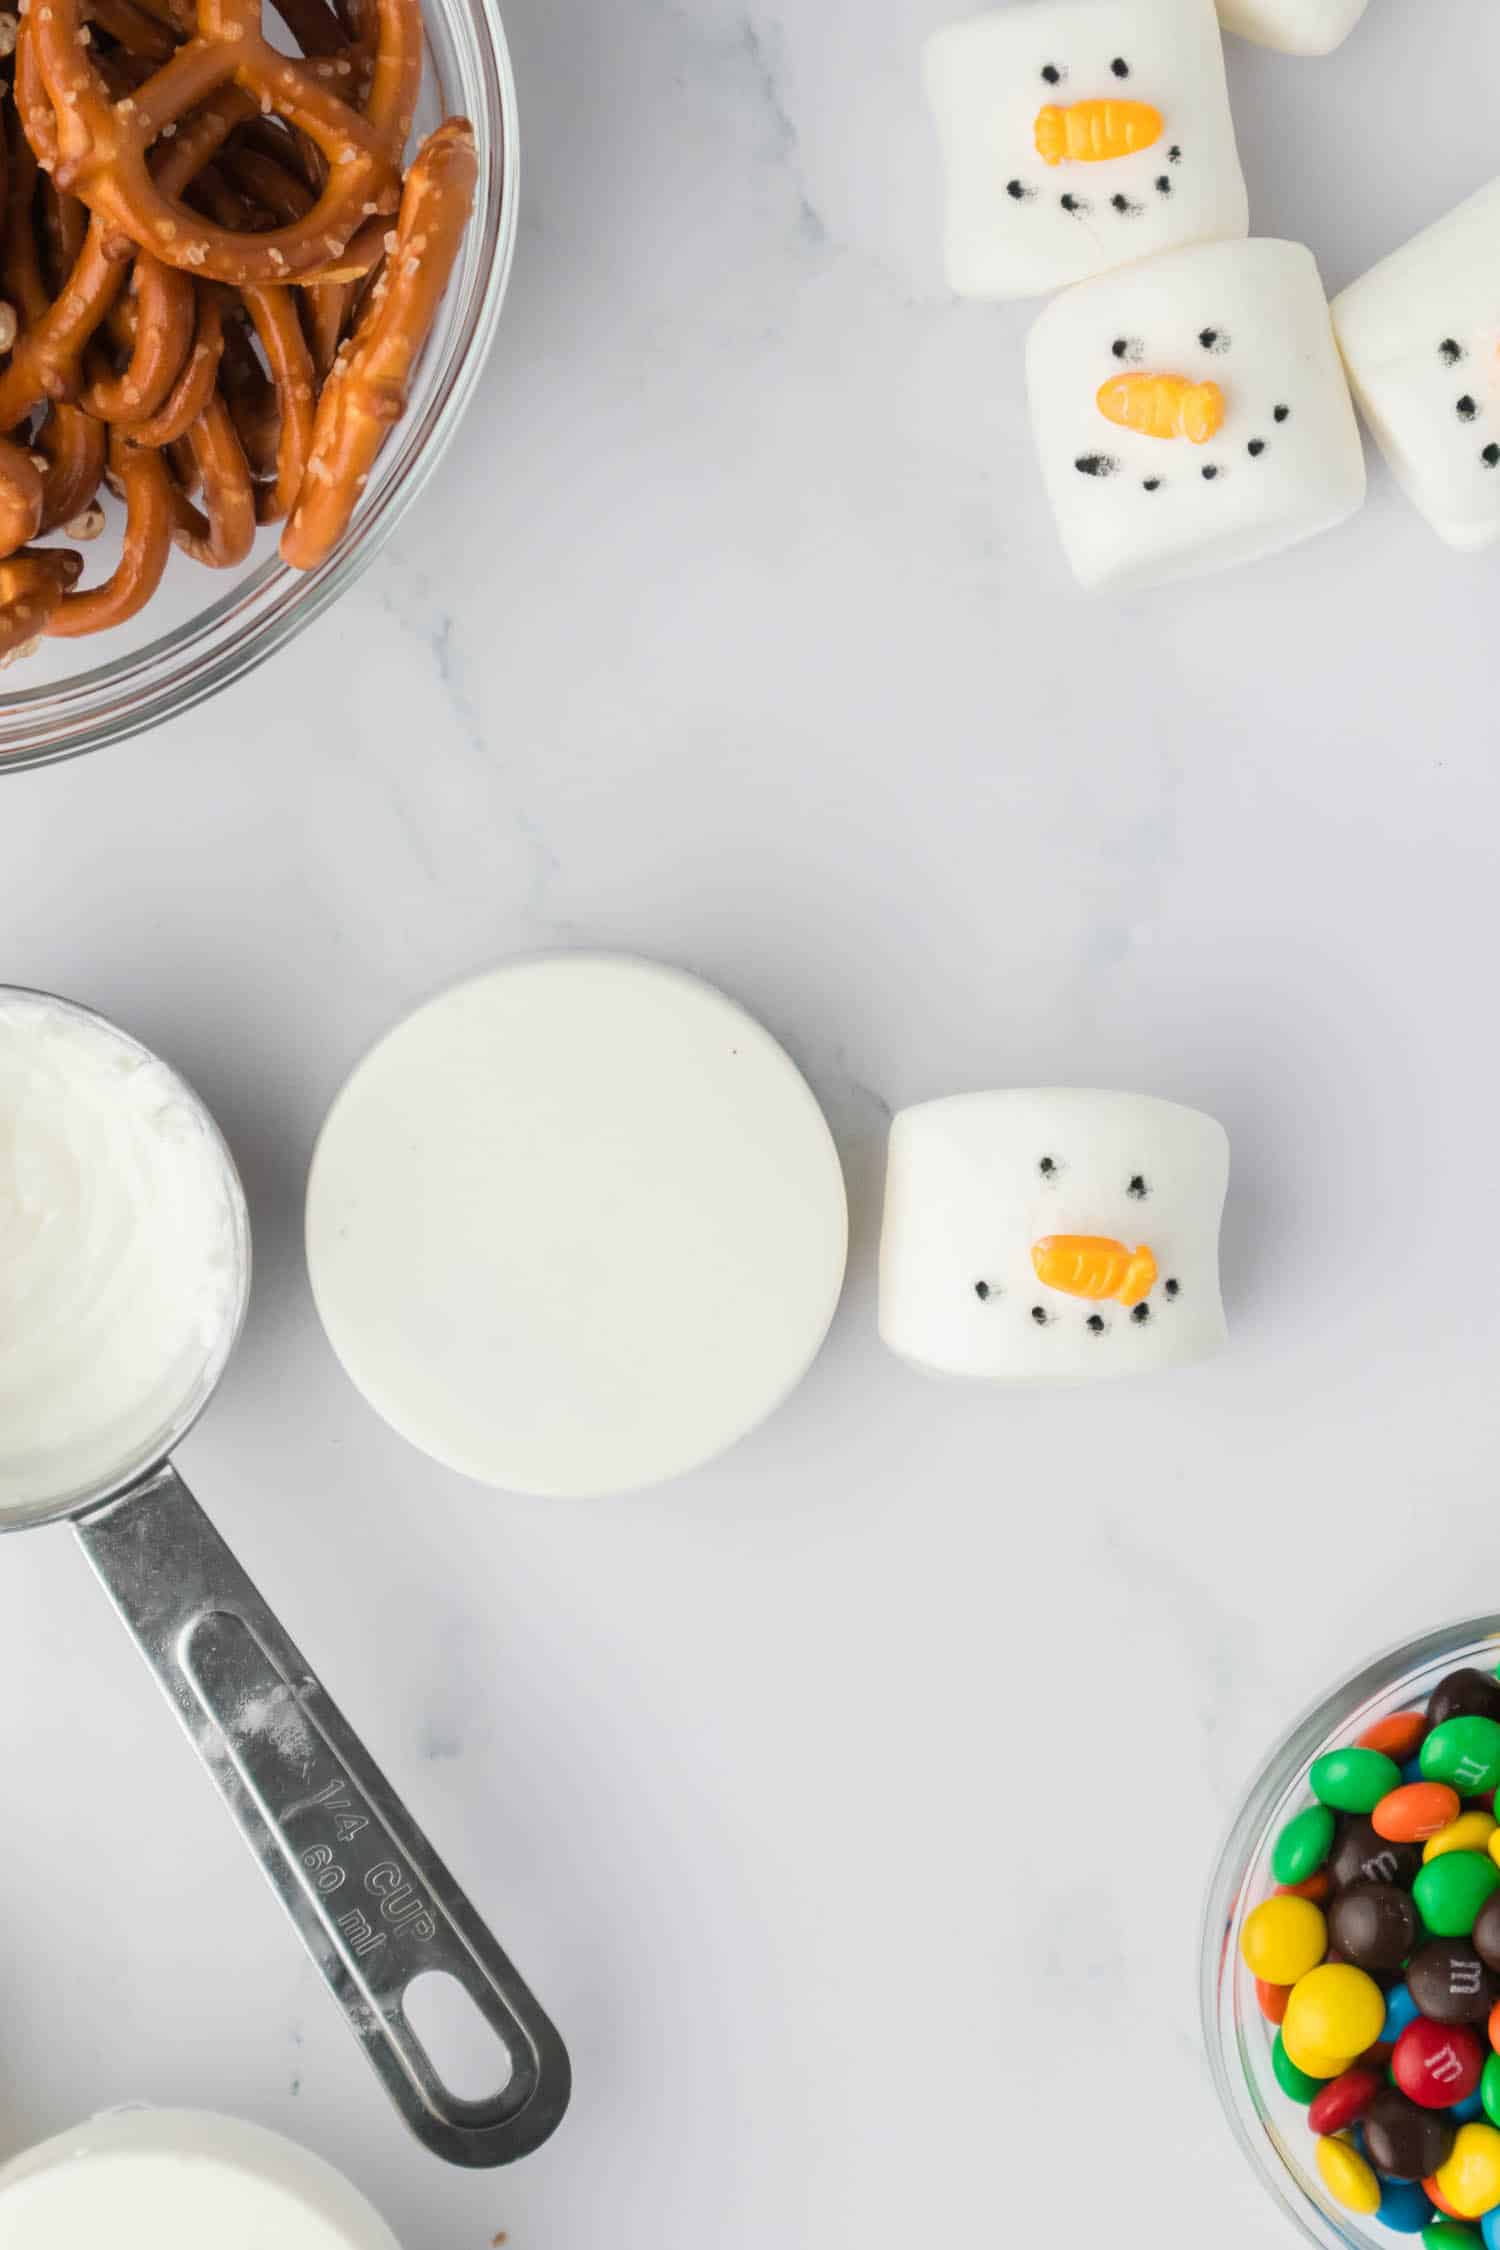
While you wait, draw a smile and eyes onto each marshmallow with the food color marker. Two dots for the eyes, and five dots in a half circle for the smile.

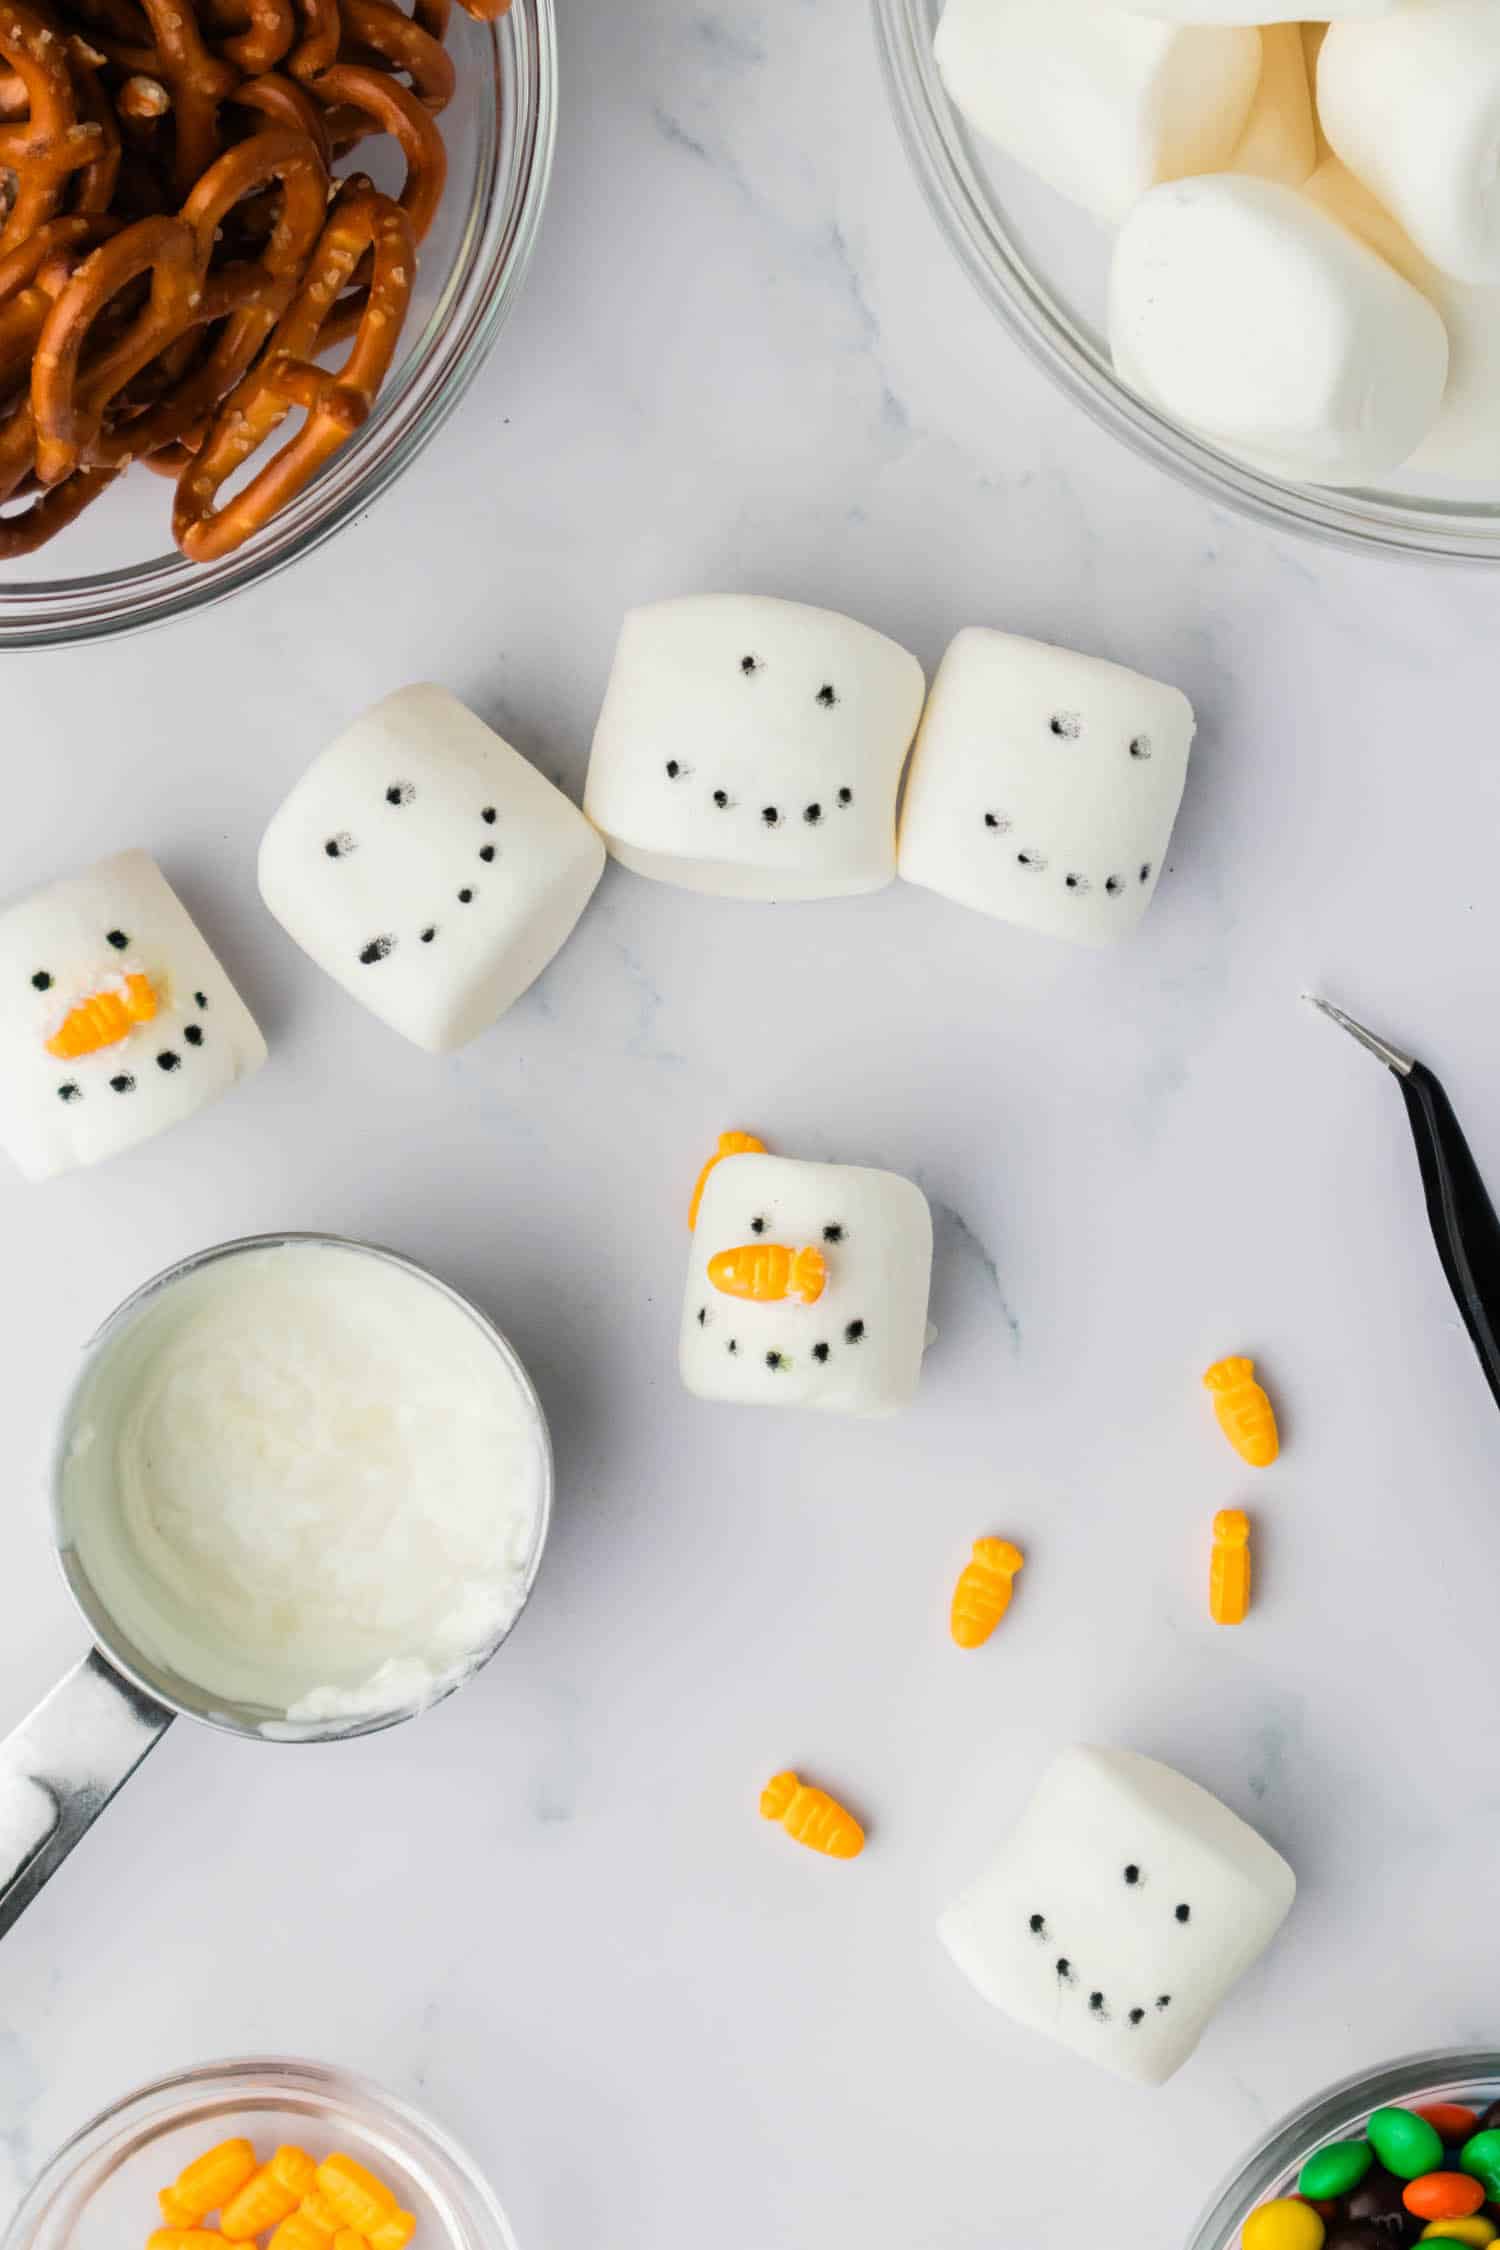
Using leftover chocolate, glue the candy carrot nose between the mouth and eyes.
Once the white chocolate covered Oreos have set, remove them from the silicone mold. Then use leftover melted chocolate to adhere the marshmallow head onto the top of the cookie.
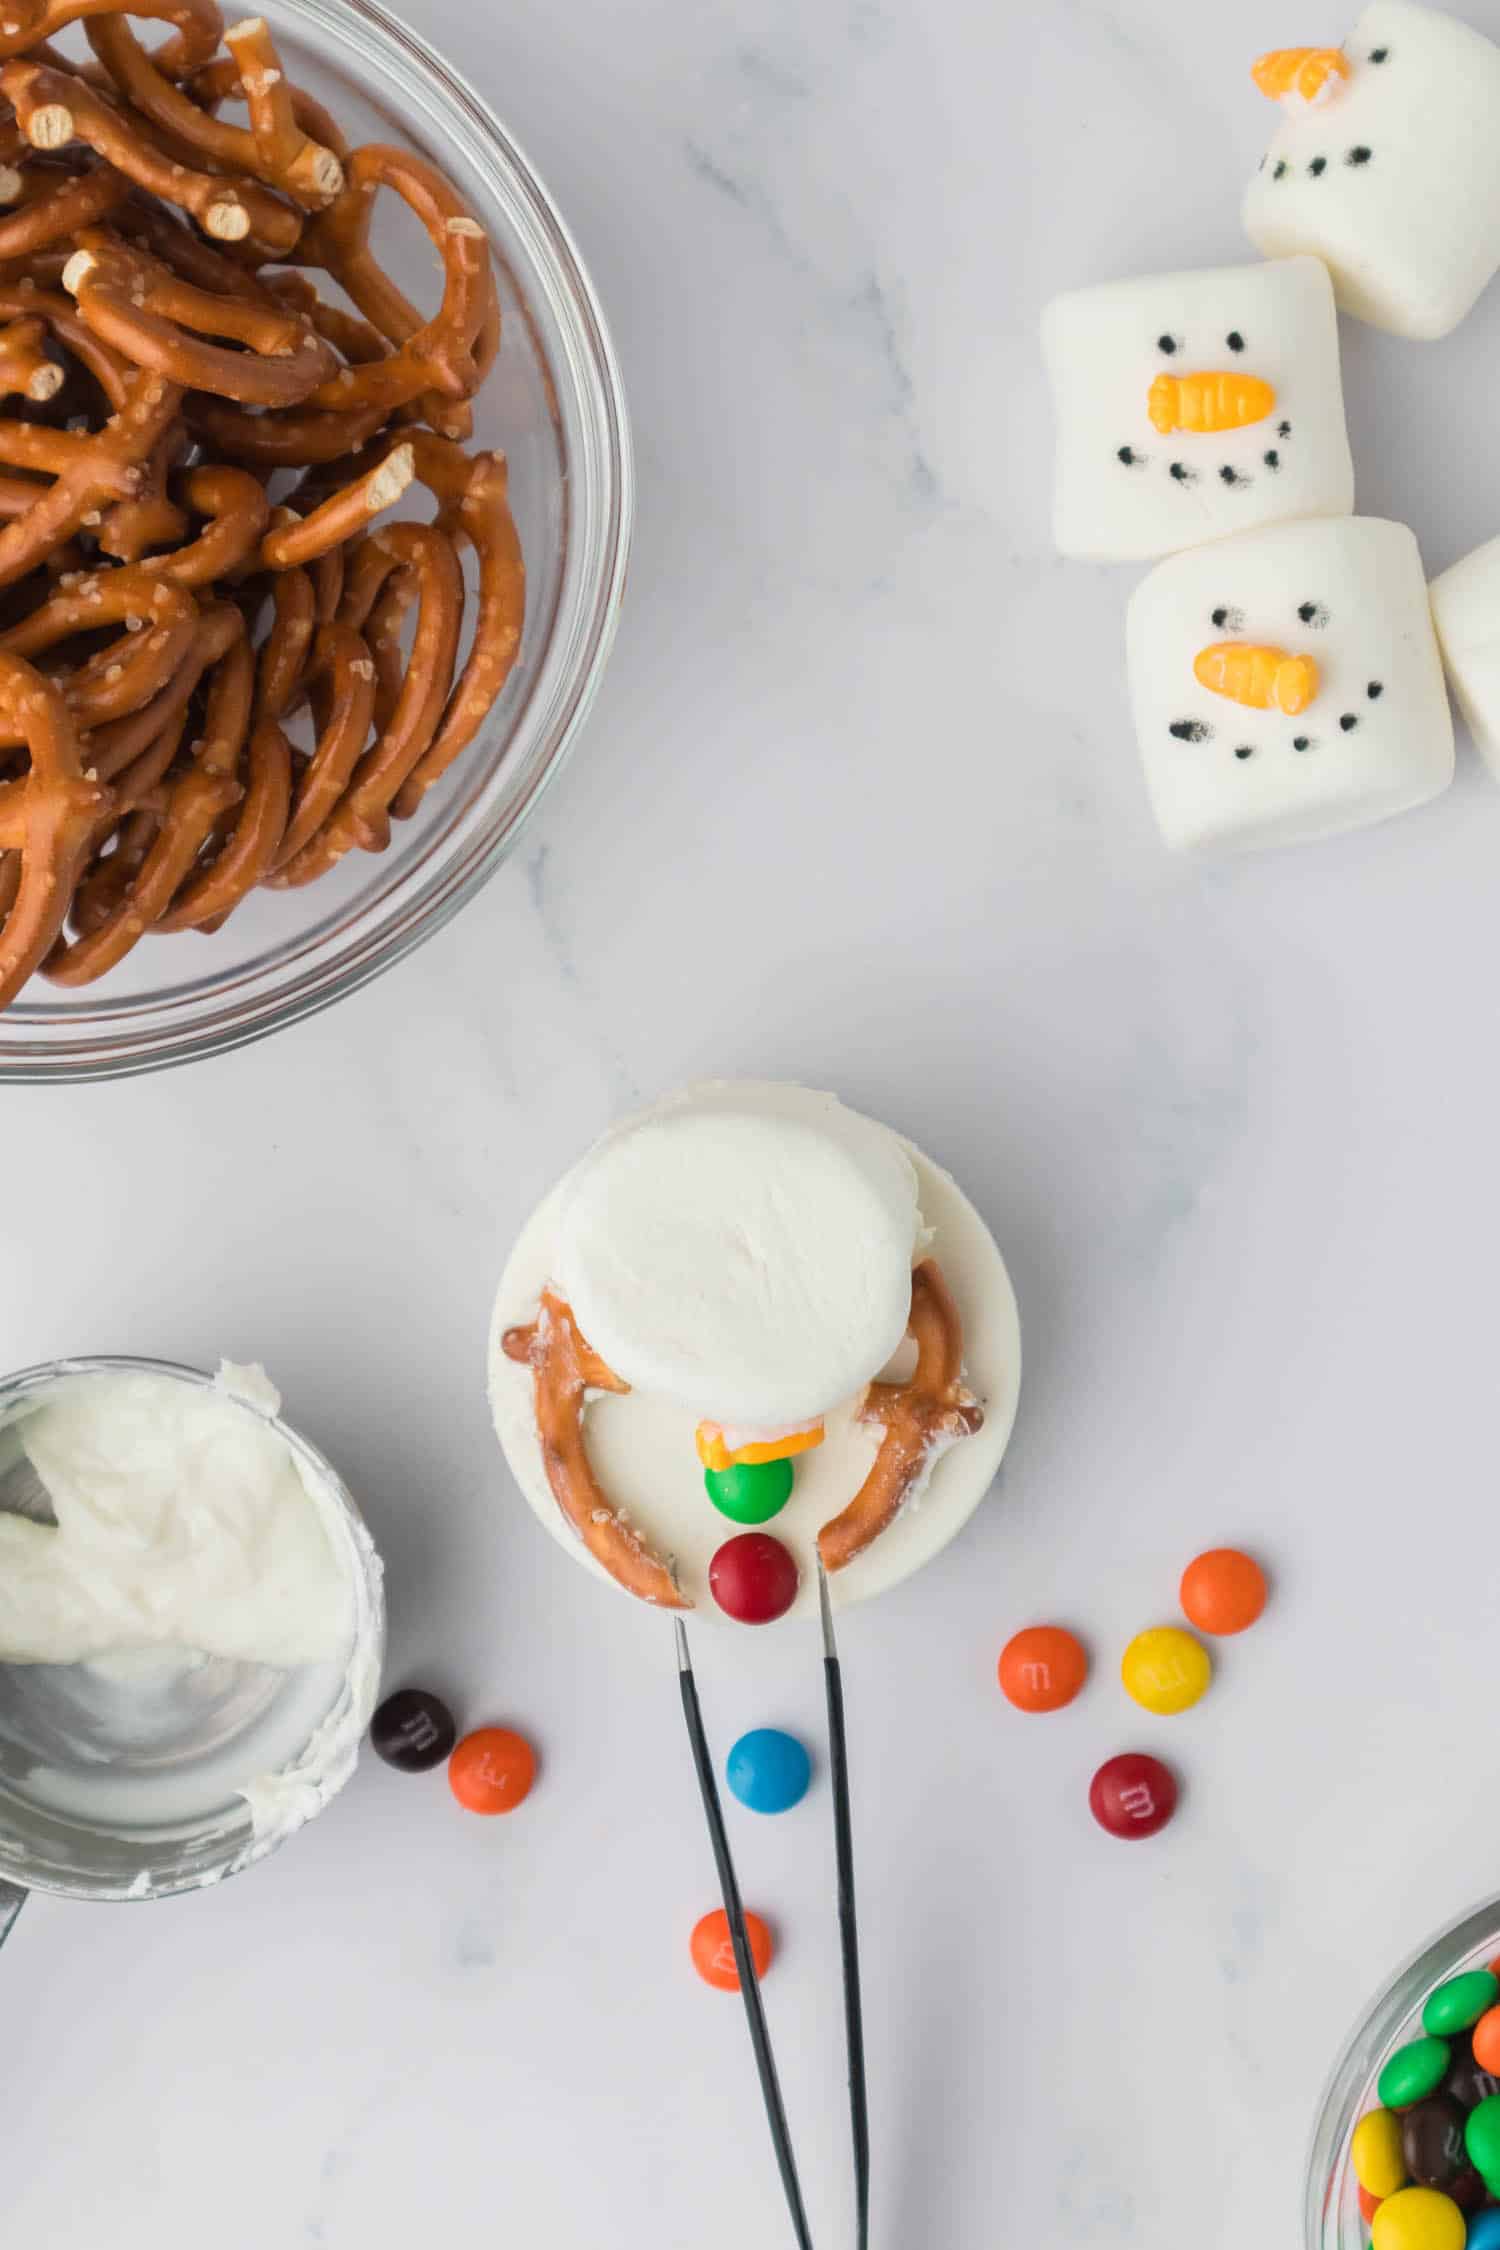
Break the pretzel twists to create curved arm-like shapes, then secure them in place with melted chocolate on either side of the snowman.
Lastly, secure three M&Ms to the chocolate covered cookies base and then let the cookies completely set.
Once the chocolate is set, serve and enjoy!


How to Store No Bake Melting Snowman Cookies
Place cookies into an airtight container that is tall enough to keep from squishing the marshmallows. Store in in a cool, dry place for up to 4 days.
I do not recommend storing these cookies in the fridge since the change in temperature can make the chocolate sweat. That will cause the pretzels to get soft and the color in the M&Ms to run.
Serving Easy Melting Snowman Cookies
These are kid-friendly and perfectly festive! If you want more cute desserts to serve alongside these easy no-bake cookies, there are plenty of fun options. Grinch cookies and brownie mix reindeer cookies are both really easy to make. Not to mention, they would look so cute on a platter full of no-bake melting snowman cookies!
If you plan to hand these out as gifts, just wrap them up in a cellophane bag and tie it with ribbons. So cute! You could even make a melted peppermint ornament to tie onto the bag so those who receive it get a two-in-one gift.
What do I do if I don’t have a silicone cookie mold?
No silicone mold? No worries! Grab you muffin pan and grease it really well. Make the white chocolate covered Oreo in the muffin cup slots and then pop them out once set.
You can also grease plastic cups and make the easy melting snowman cookies base in that. Then, once the chocolate is set just cut the plastic cup away and you’re good to go!
What can I use in place of a candy carrot nose?
If you didn’t get a chance to order candy carrots noses online and are having trouble finding them in-store, there are a few other options. The easiest would be to color some melting chocolate orange. Then dip a toothpick into it and draw a nose on! You could also draw a nose with an orange colored edible food color marker.
Candy corn, cut into small pieces, would also be a good replacement for a candy carrot nose. If you have some orange fondant, just make some carrots from that and secure them with melting chocolate!
Pro Tips!
- If you want to make these extra special, make white chocolate covered cake balls or brownie balls and use them as the head!
- Try to work quickly so that the white melting chocolate doesn’t set before you’re finished. Assembly would be the perfect way for kiddos to help out.
- Feel free to adapt this recipe for melting snowman cookies however you want. Use a different cookie in the center, use different candies for buttons, find an alternative to pretzels for arms, etc.

No-bake melting snowman make me so excited for the Christmas baking season! So many things to bake, so many memories to make, so little time!
More Christmas Recipes You’ll Love
- Have leftover pretzels? Use the them in this recipe for Reindeer Cupcakes.
- Grinch Rice Krispies Treat Pops are a fun way to throw a festive dessert into the mix.
- You’ve had puppy chow, but now it’s time to try Reindeer Chow!
- Use you leftover oreos to make Reindeer Oreo Pops.

No-Bake Melting Snowman Cookies
Ingredients
- 10 ounces white melting chocolate
- 1 Tablespoon shortening
- 6 Oreos
- 6 regular-size marshmallows
- 6 mini pretzels broken into pieces
- Mini M&Ms
- Candy carrots
- Edible black food color marker
Instructions
- Combine chocolate and shortening in a microwave-safe bowl, and microwave for 1 minute at 50% power. Remove from the microwave and stir. If additional time is needed, continue to microwave chocolate in 30-second intervals at 50% power, stirring in between until the chocolate is completely melted.
- Next, place the silicone cookie mold on a flat surface. Pour about a ¼ cup of melted chocolate into each cavity.
- Place a cookie into the chocolate and lightly push down until the chocolate covers the cookie. If needed spoon additional chocolate over the cookie until completely covered. Set aside to harden.
- While the chocolate is set, use a food color marker to place two dots for the eyes and five dots for the mouth to make a smile on the marshmallows.
- Using leftover chocolate, adhere the carrot candy nose below the eyes and above the mouth on the marshmallow.
- Once chocolate-covered Oreos have set completely, remove the cookies from the mold and adhere the marshmallow head to the cookie with leftover chocolate.
- Next, take the broken pretzels and secure them in place, with chocolate, on either side of the marshmallow to resemble arms.
- Finally, use a little of the extra chocolate to stick three mini M&Ms to the base of the cookie to resemble buttons.
- Let the cookies set completely and then they will be ready to serve.
Notes
- Special equipment: Silicone Round Cookie Mold
- You can make these without the mold by simply dipping the Oreos directly into the chocolate and placing them on wax paper or parchment paper to set. The mold does take more chocolate than simply dipping the Oreos so you may end up with more than 6 cookies.
- Place cookies into an airtight container that is tall enough to keep from squishing the marshmallows. Store in in a cool, dry place for up to 4 days.