DIY Garden Stepping Stones
Looking for a fun and creative activity to do with your kids? Learn how to make your own garden stepping stones using simple materials and enjoy the process of creating outdoor decorations together. Then place them in your garden!

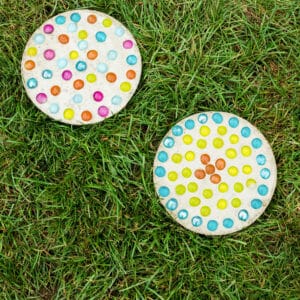
Skip the boring grey backyard stones, and turn to this super cool DIY project instead! With just a few simple tools and supplies, you can learn how to make stepping stones with your kids. This project is actually incredibly easy and is so much fun to create. You can make just one or two stones, or make enough for an entire stepping stone path. It’s totally up to you!
Once you’re done making garden stones, then you can make some DIY bird feeders for your backyard too! Before you know it, you’ll have a beautiful nature scene right outside your door. These stepping stones for a garden are just the cutest way to get little hands involved in big projects. They’ll have so much fun creating their own designs with rocks, glass stones and mosaic tiles! Then just watch for the grin on their face every time they see their masterful creation in the garden.
Why You’ll Love Making DIY Garden Stepping Stones
- These actually make a fabulous gift! If dad has worked hard at making the landscaping look great, gift him some stepping stones for Father’s Day. You could also gift them to grandparents, friends, and other family members!
- Your kids can get as creative as they want with this simple project. Add handprints, different stones, fun designs and anything else your creative mind can come up with!
- This activity is a great way to get your kids involved in the garden. It’s a great project to make them feel like they played a big part in getting a garden together! Then when you go to place the stepping stones, teach them about how to plant and grow things!
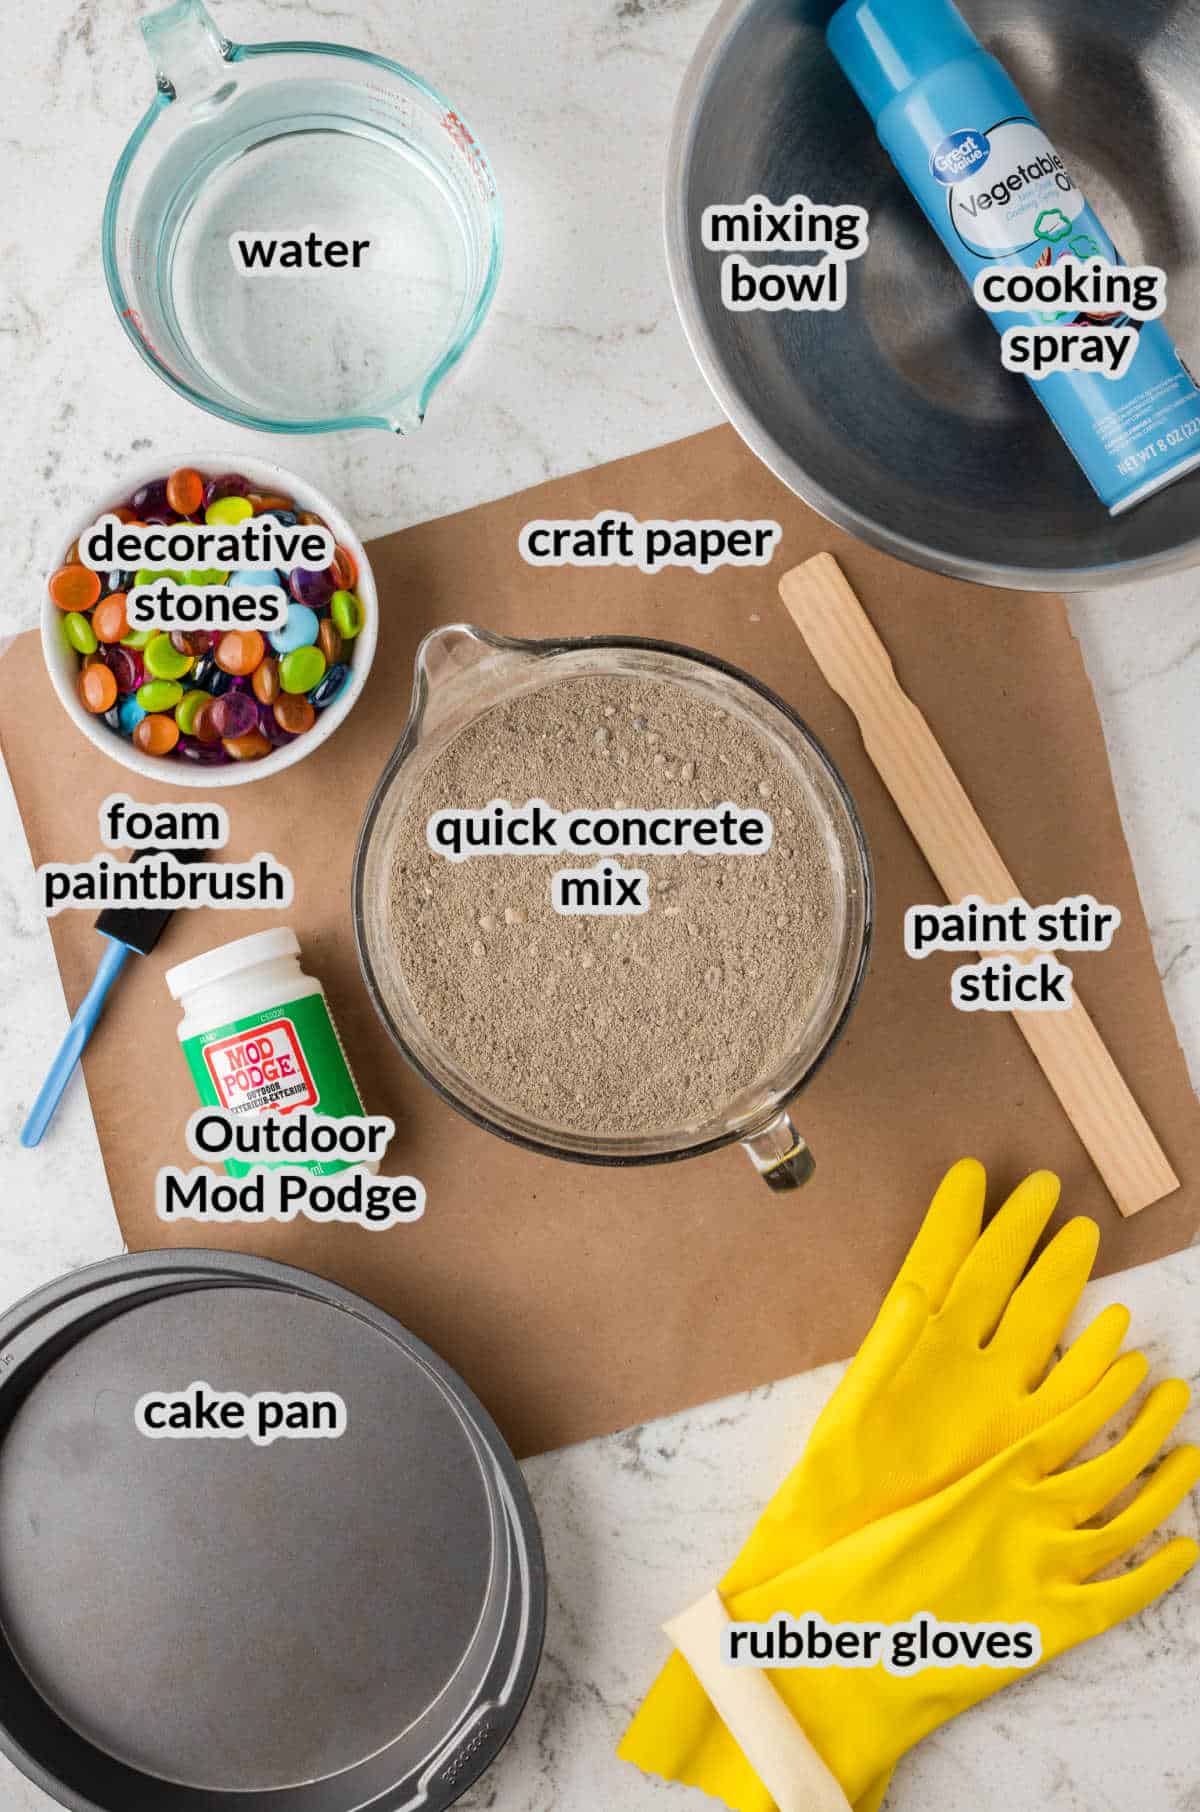
Supplies Needed
- Craft paper or Newspaper – You’ll want to lay down some heavy duty craft paper or plenty of newspaper to protect your workspace. Nobody wants a concrete mess all over the place!
- Rubber gloves – Some rubber work gloves are an essential safety component to making DIY concrete garden stepping stones.
- Cooking spray – Use some nonstick spray on the pan before pouring the concrete. It will help make them more easily removable once they are set.
- 8 or 9-inch non-stick cake pan – Yes, a simple cake pan is all you need to shape these garden stones! Isn’t that cool? I highly recommend you use a cake pan that you don’t mind trashing once the project is complete.
- Mixing bowl/bucket – Grab a giant bucket from the hardware store or a large mixing bowl that you don’t mind getting messy.
- Quick concrete mix – You’ll need about 8 – 10 cups of concrete mix, so make sure you purchase a large enough package.
- Water – Follow the instructions on your concrete mix and make sure to use the amount of water that it calls for.
- Paint stir stick – This is the easiest option to thoroughly mix the cement ingredients together.
- Decorative glass gems/stones – I think we used about 1 – 2 cups of small stones. However, you can use whatever you want — add your personal touch to these concrete stepping stones!
- Outdoor Mod Podge – An easy way to seal the mosaics that you create on top of each of the stepping stone for a garden.
- Foam paintbrush – Use this to paint the mod podge evenly across the DIY stepping stones!
How to Make DIY Garden Stepping Stones
Before you begin, lay down several sheets of newspaper or heavy craft paper to protect your workspace. Then put on some rubber gloves to protect your hands.
Spray the inside of the non-stick cake pan with cooking spray to ensure that the stone can be easily remove once dried and set.
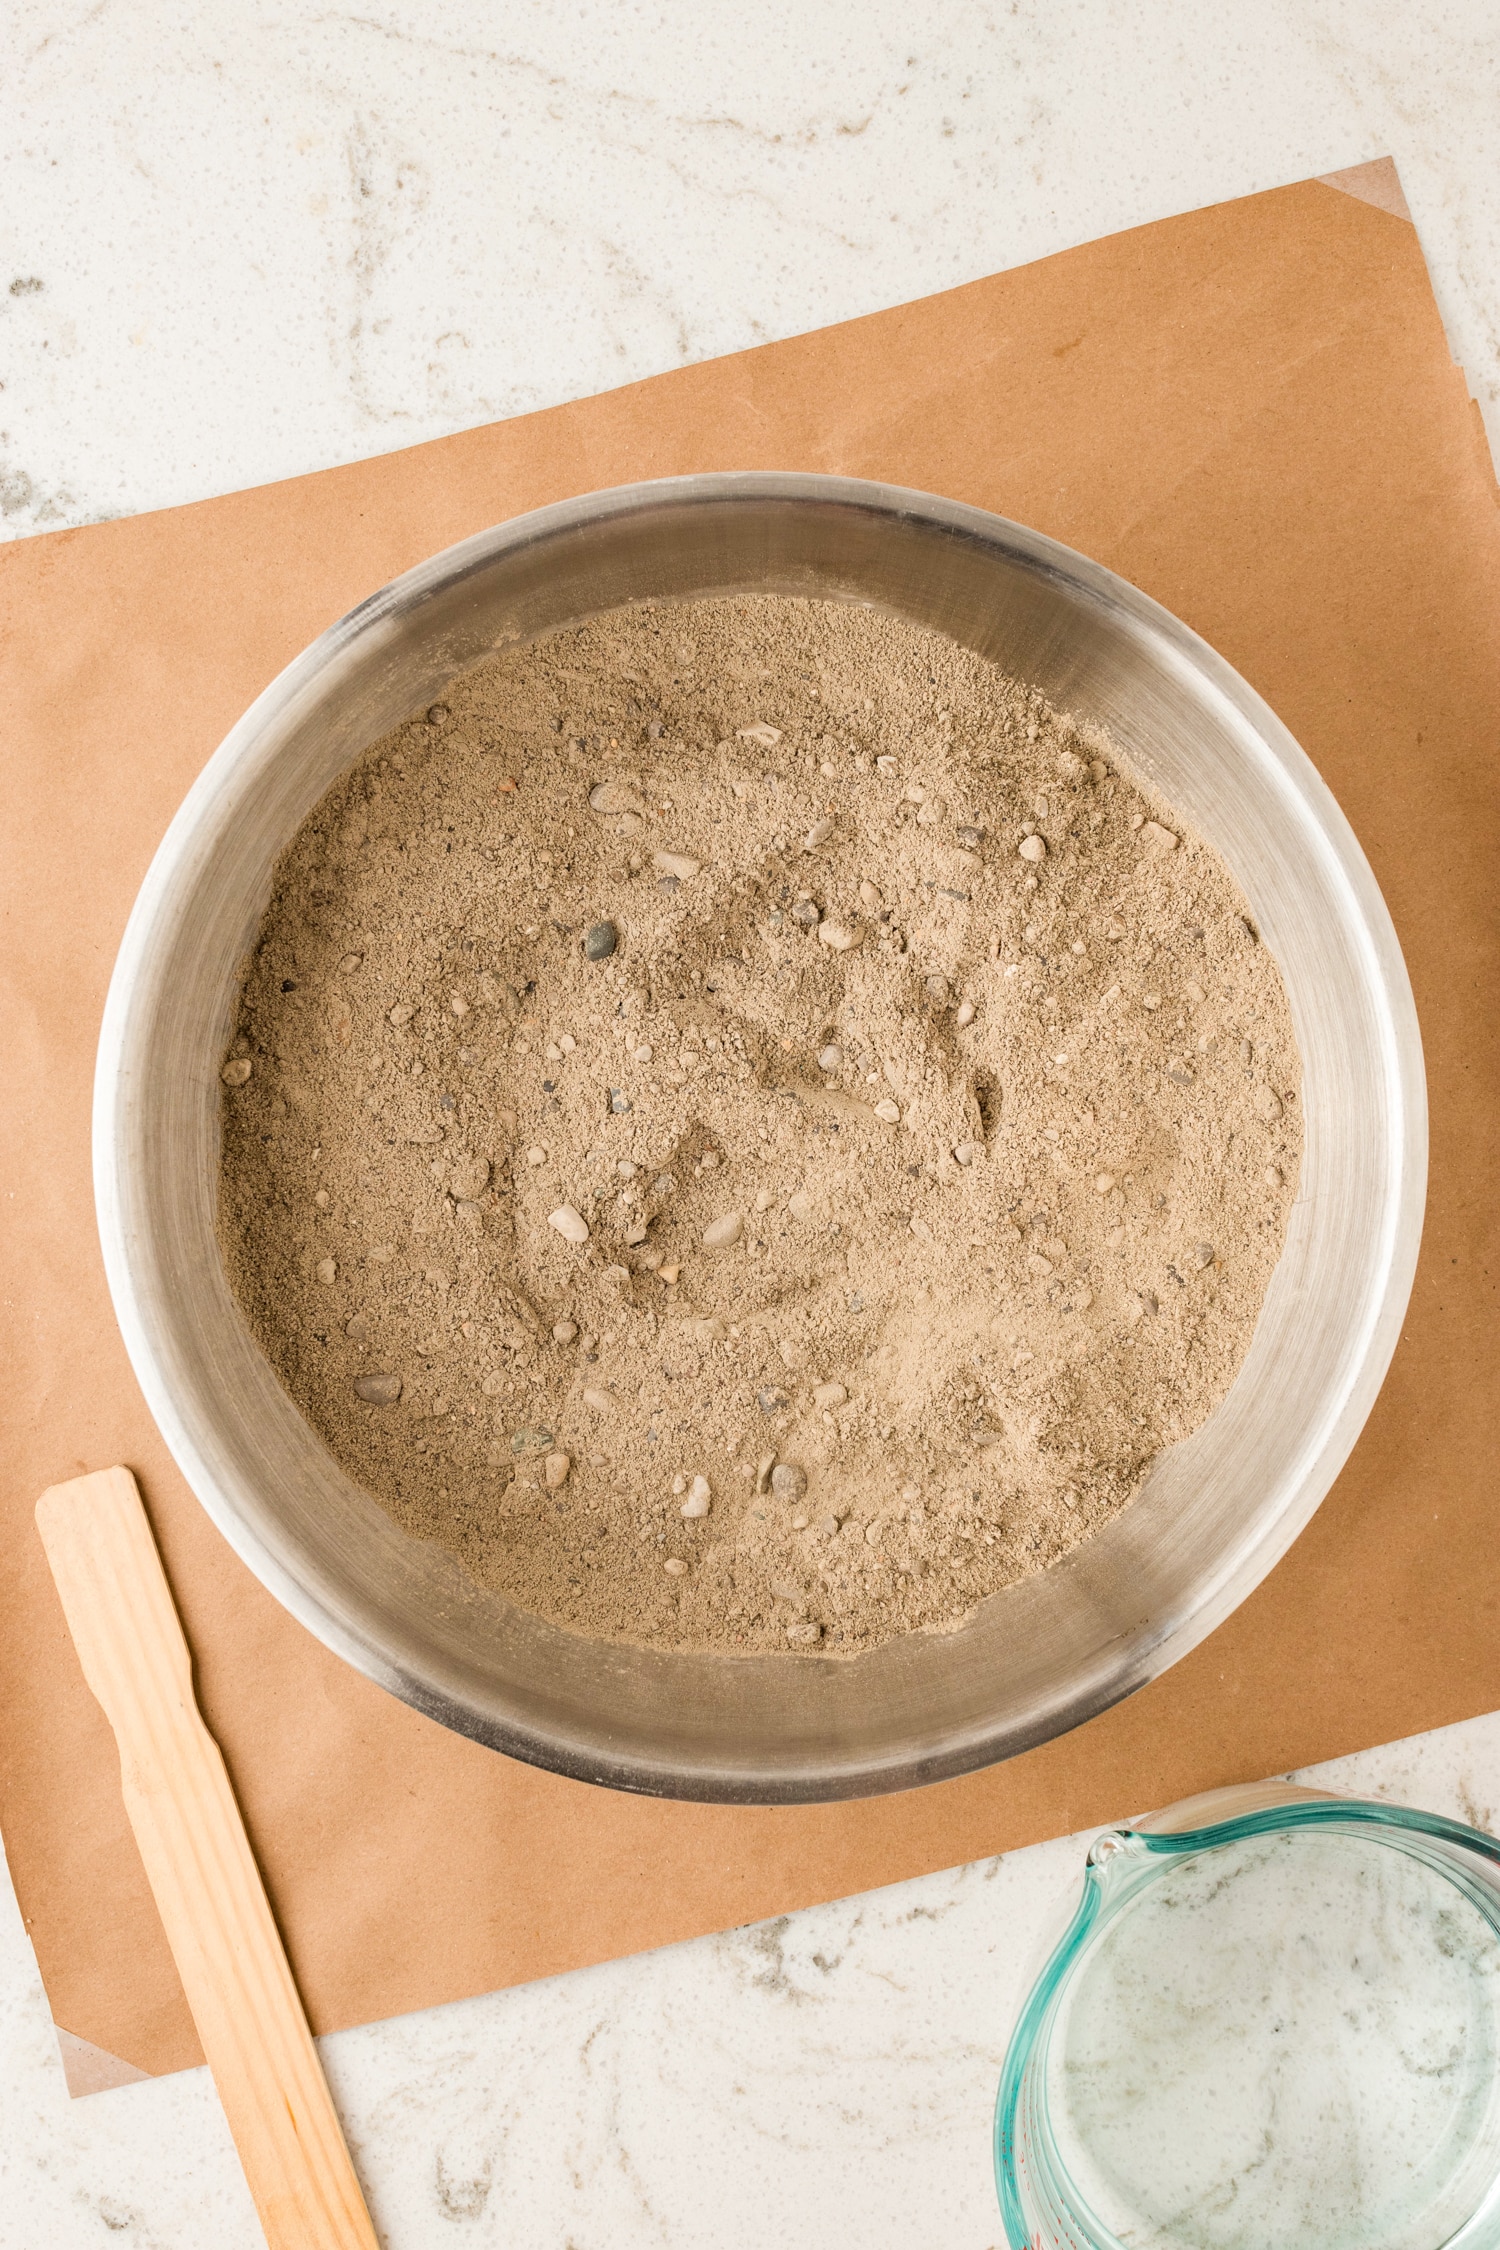
Now you can get started on mixing up the concrete! Add about 8 – 10 cups of quick concrete to a mixing bucket and follow the instructions on the quick concrete mix bag to mix it up. Typically, this involves adding 1 – 2 cups of water to the mix. Stir thoroughly with a paint stir stick or large spoon until the mixture reaches a smooth, pancake batter-like consistency.
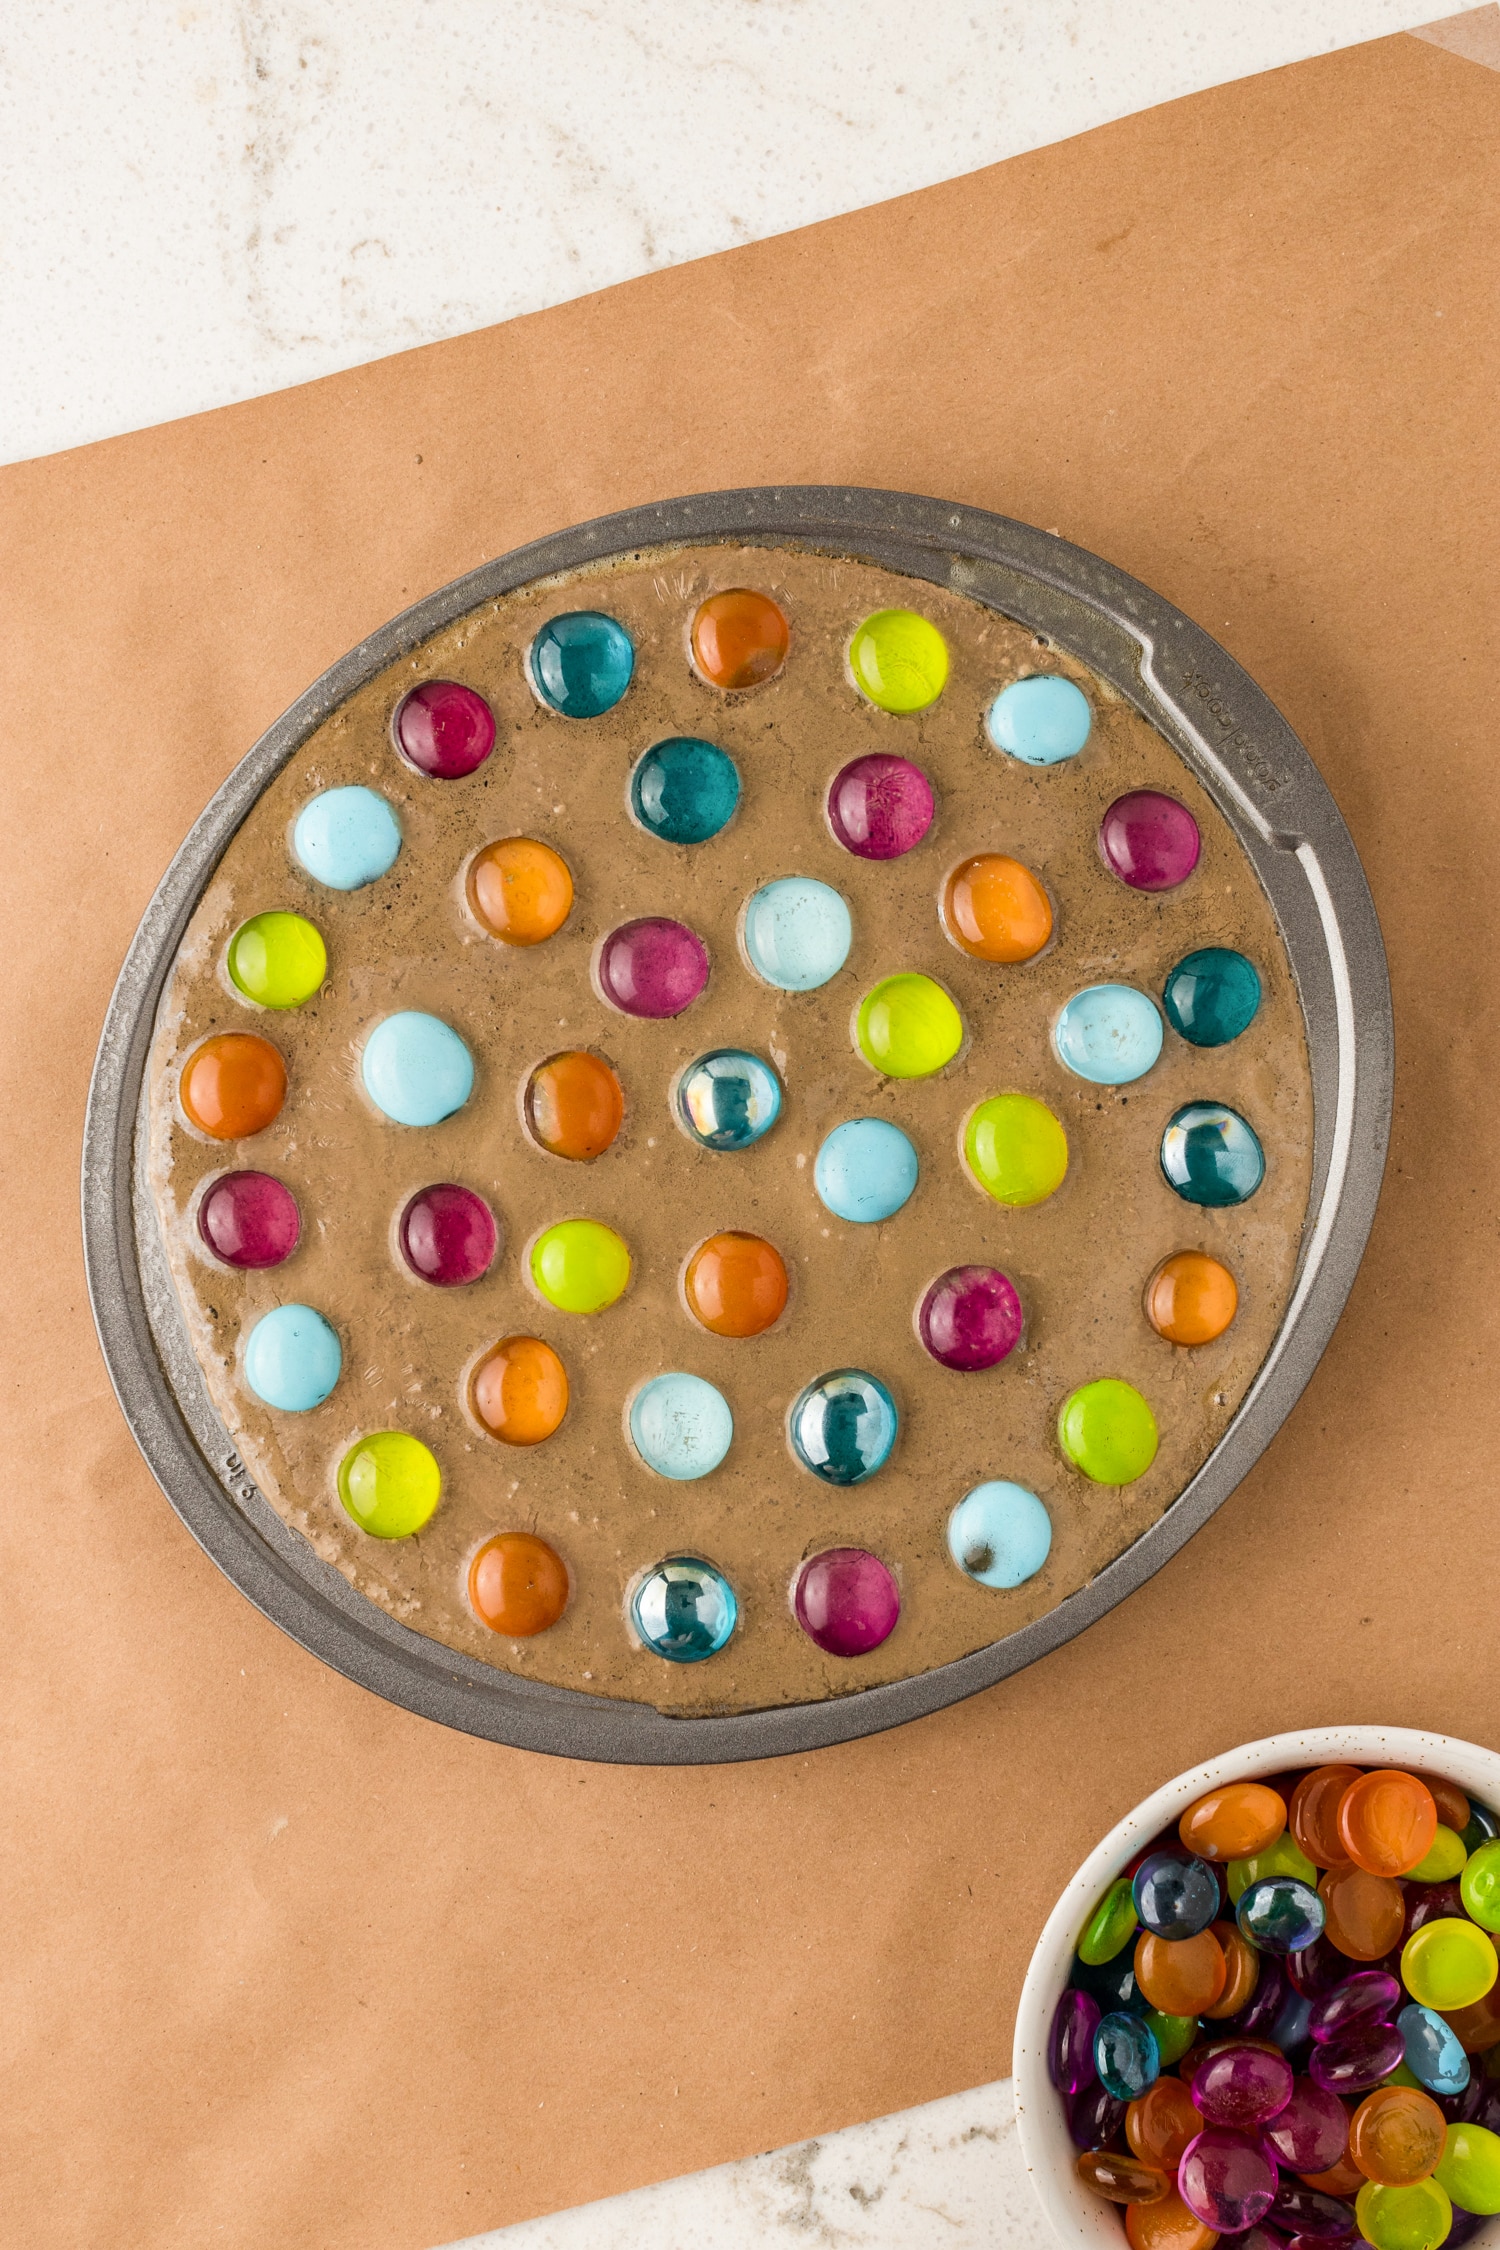
Very carefully pour the mixed concrete into the prepared cake pan, filling it to about 1 – 2 inches thick. Then tap the sides of the pan gently to remove any air bubbles and ensure an even and level surface.
While the concrete is still wet, press the decorative glass gems or stones into the surface. Arrange them in any pattern or design you like. Ensure the gems are securely embedded in the concrete but make sure they are not fully submerged.
Allow the concrete to set and dry undisturbed. This can take 24 – 48 hours, depending on the concrete mix and environmental conditions.
Once dry, gently flip the cake pan over onto a flat surface to release the stepping stone. If it doesn’t come out easily, gently tap the pan’s bottom or run a plastic knife around the edge.
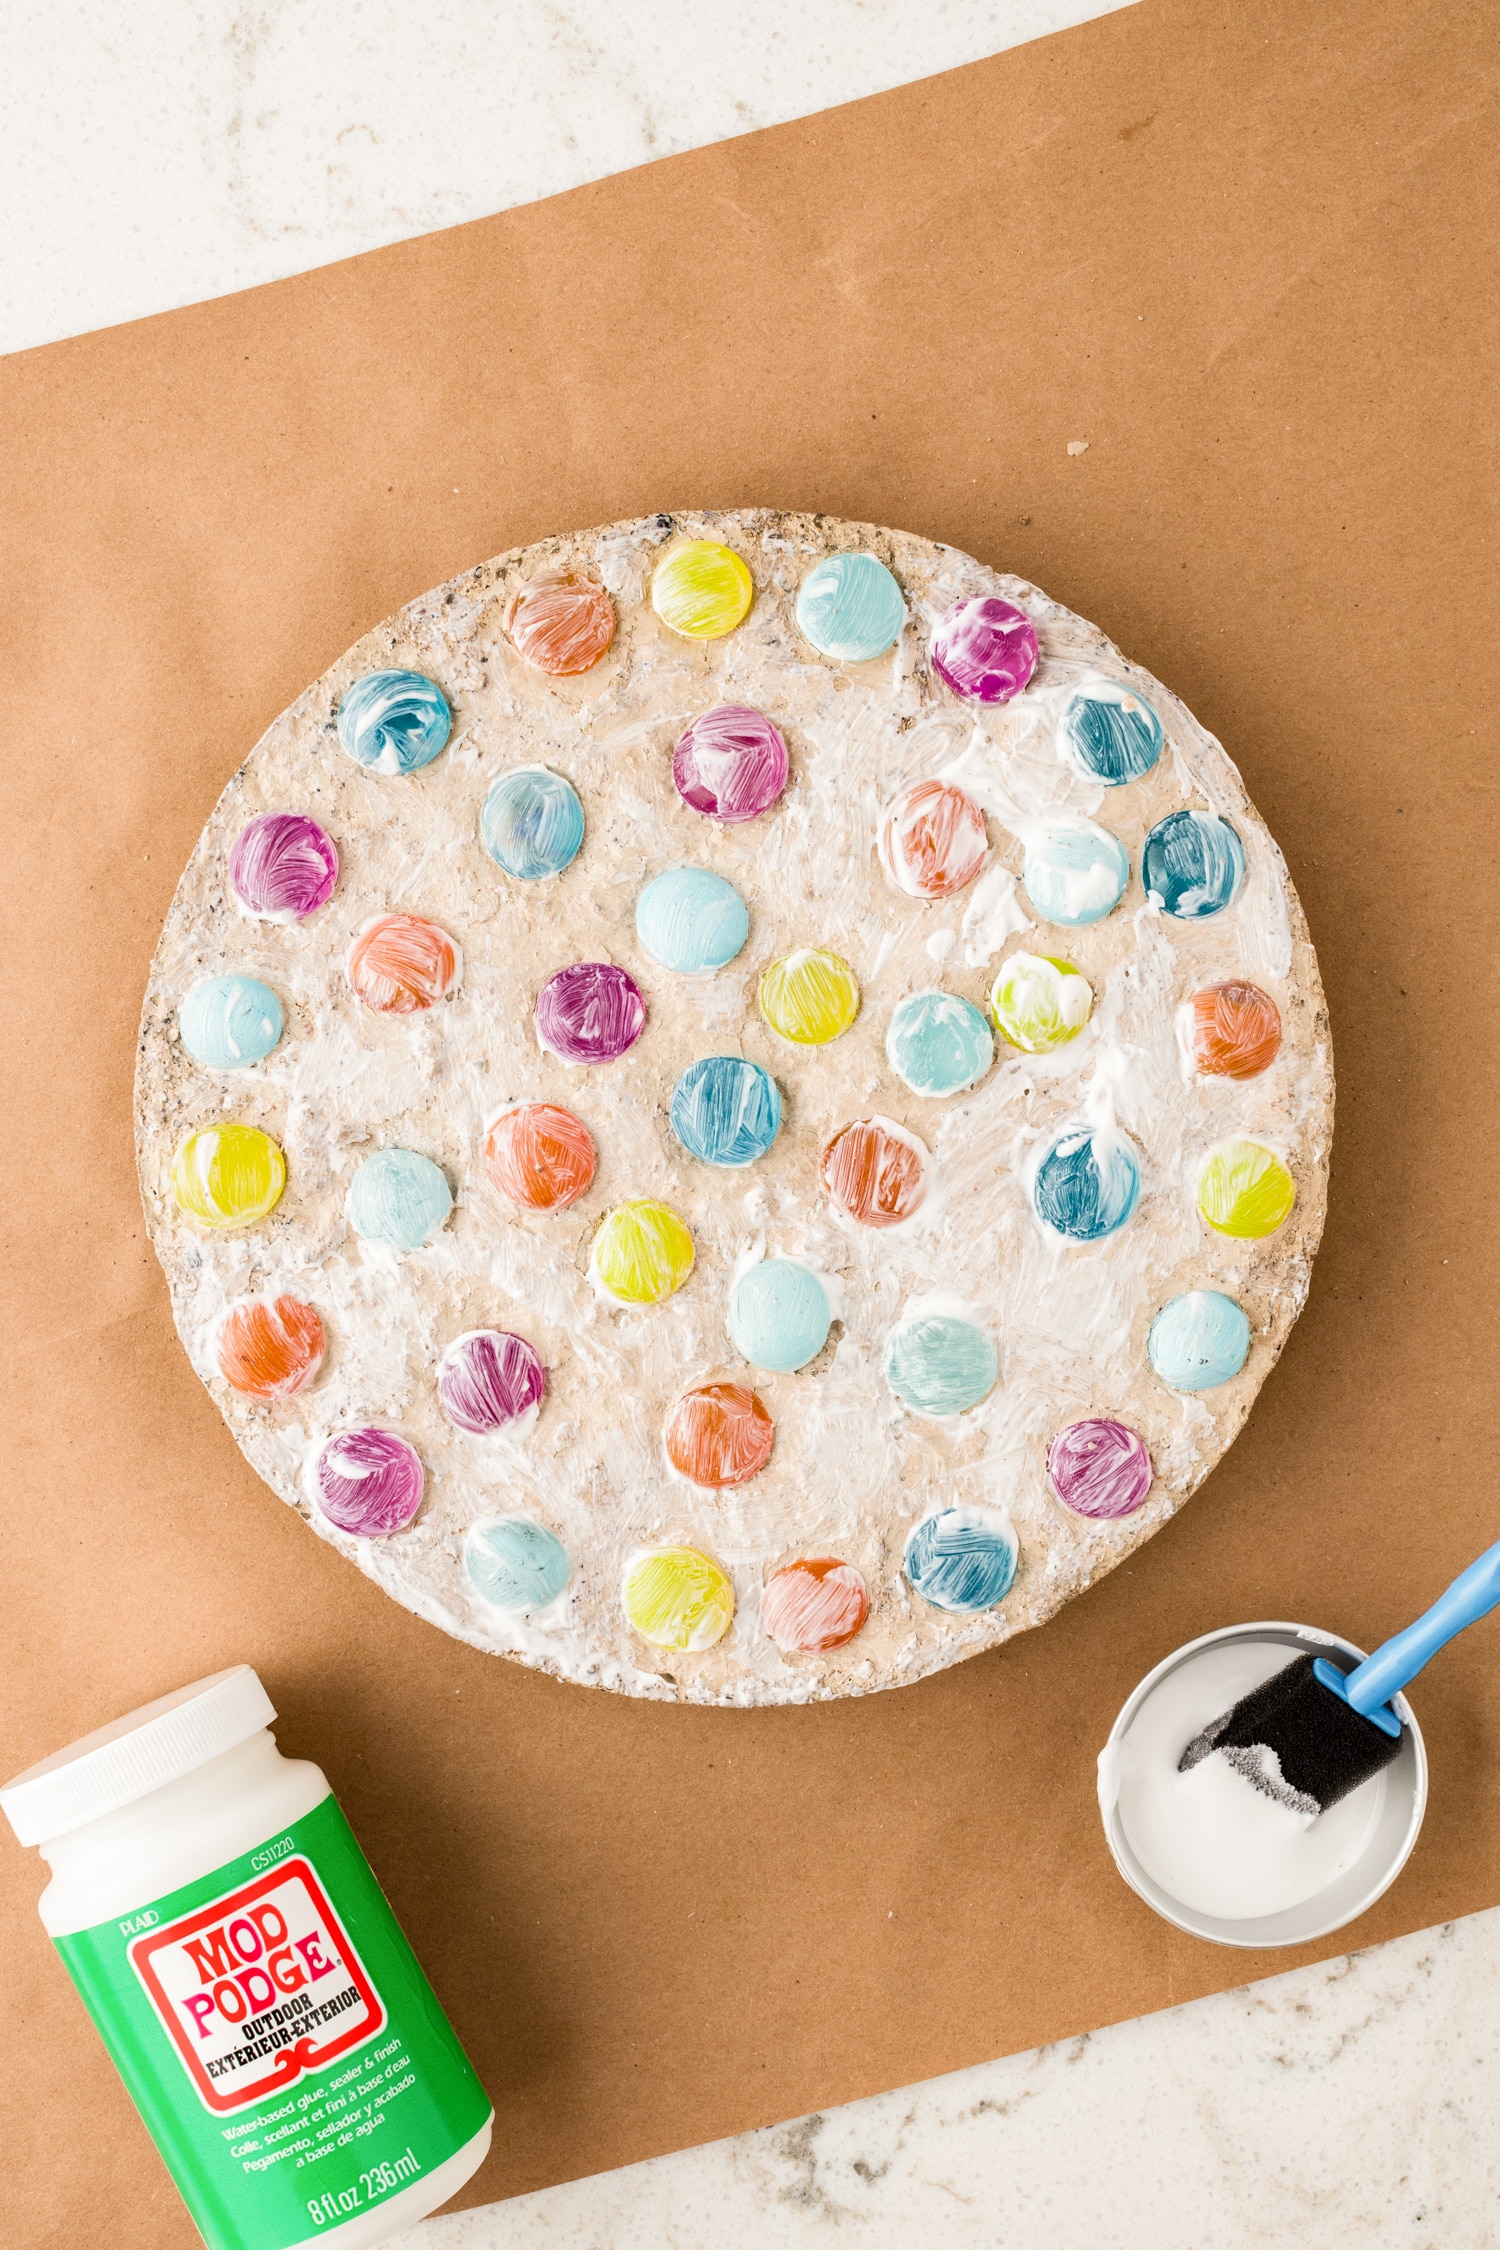
Lastly, apply a coat of Outdoor Mod Podge over the entire surface of the stepping stone. Then allow the Mod Podge to dry completely before placing the stepping stone in your garden!


Safety Tips
- Choose a day with mild weather to make your stepping stone, as extreme temperatures can affect drying.
- Always work in a well-ventilated area when using concrete and Mod Podge.
- When releasing the stone from the pan, watch your fingers and toes. If the stone falls on them, you could get seriously hurt. I like to flip the pan over on the grass so that the concrete stone doesn’t break if it decides to slide out of the pan quickly!
- It could be helpful to use a dust mask and goggles when pouring the concrete mix into the bucket before mixing.
- If wet concrete gets on your skin, stop and wash it off immediately! Trust me, you don’t want concrete drying on your skin.
What do you put under stepping stones?
While you can lay stepping stones directly on grass, it is best practice to have something underneath. Gravel and sand are the most commonly used options. Landscape stone will also work!
Is DIY concrete mix safe for kids?
Under adult supervision, you can create many different fun project with concrete mix. However, if your children are still in the stage of discovering things through eating them, then this may not be the best project for them! Concrete mix must ALWAYS be used under adult supervision as well.
Pro Tips for Extra FUN!
- Before adding the gems, draw designs or write messages on the wet concrete with a stick or a skewer. You can create any kind of fun design that you want!
- Clean all tools and the cake pan immediately after use to prevent the concrete from hardening on them.
- If there are some sharp edges on your stone, take coarse sandpaper and sand them down to avoid injury in the future.
- Use different shaped cake pans to create really cool and unique stepping stones!
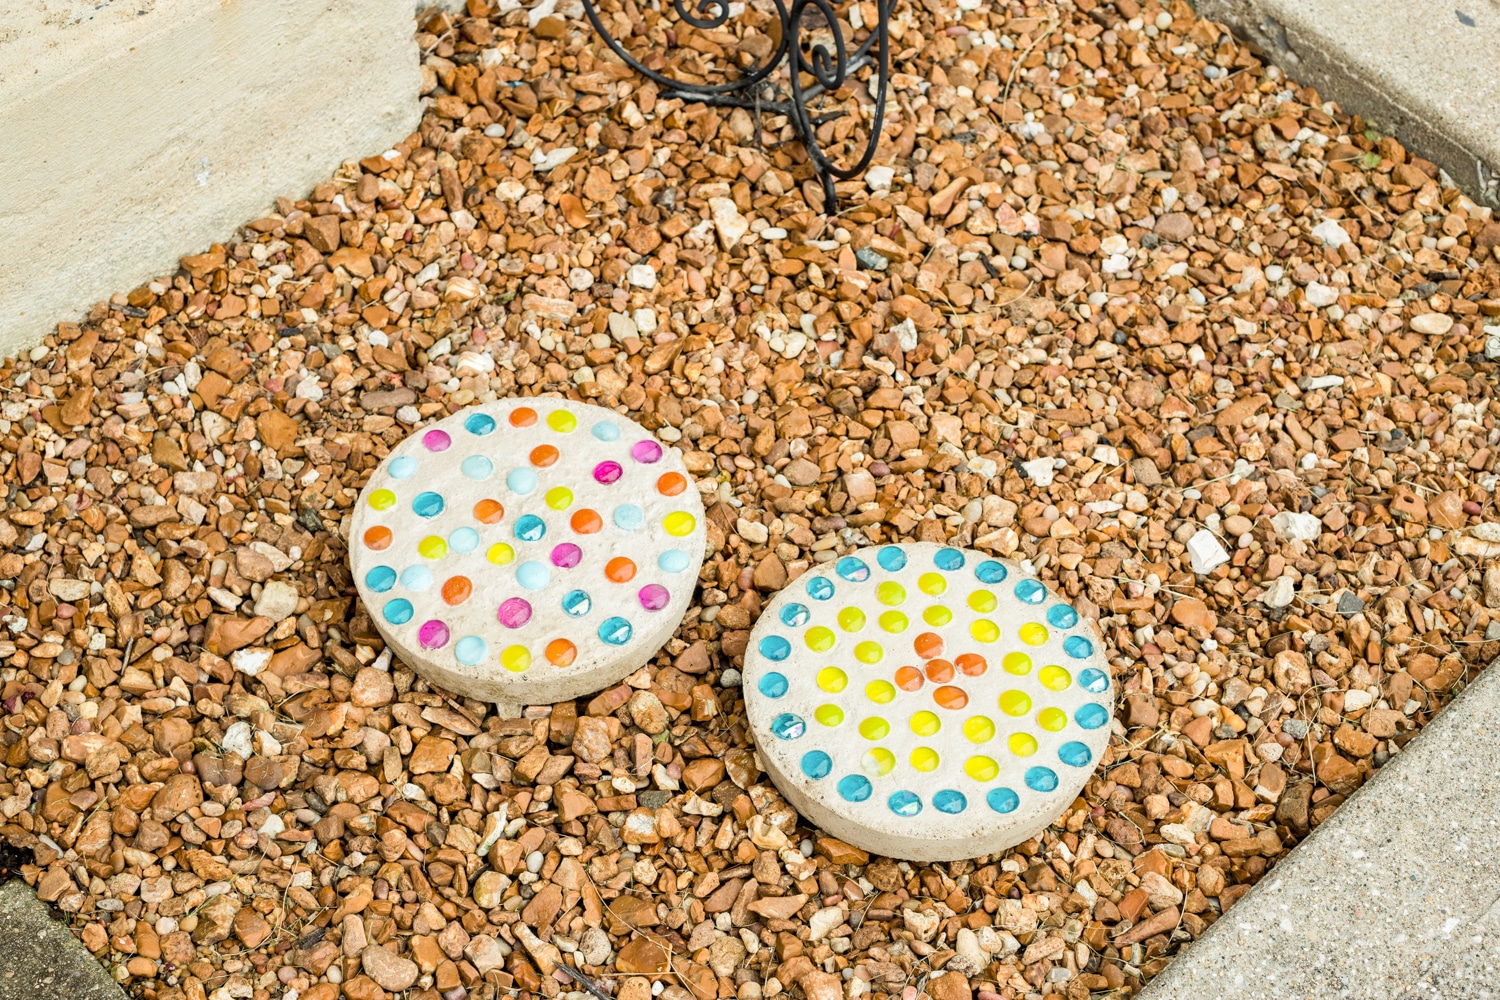
These DIY garden stepping stone are so cute and creative! I can’t wait to see what kind of designs you create.
More DIY Activities for Kids
- Want a really cool Mother’s Day gift? Then make these DIY Photo Candles to display Mom’s favorite photos!
- Yes, you can make homemade slime. And this Fluffy Slime recipe is so much fun!
- Make your own Salt Dough Ornaments at Christmas time and decorate your tree with these special creations.
- Skip the store-bought bath bombs and make your own DIY Bath Bombs with this easy recipe.
DIY Garden Stepping Stones
Ingredients
- Craft paper or Newspaper
- Rubber gloves
- Cooking spray
- 8 or 9-inch Non-stick cake pan
- Mixing bowl/bucket
- Quick concrete mix about 8 – 10 cups
- Water as per concrete mix instructions
- Paint stir stick
- Decorative glass gems/stones about 1 – 2 cups
- Outdoor Mod Podge
- Foam paintbrush
Instructions
- Lay down several sheets of newspaper to protect your work surface. Put on rubber gloves to protect your hands.
- Spray the inside of the non-stick cake pan with cooking spray to ensure easy removal of the concrete once it dries. Set aside.
- Add about 8 – 10 cups of quick concrete to a mixing bucket (follow the instructions on the quick concrete mix bag). Typically, this involves adding 1 – 2 cups of water to the mix. Stir thoroughly with a paint stir stick or large spoon until the mixture reaches a smooth, pancake batter-like consistency.
- Carefully pour the mixed concrete into the prepared cake pan, filling it to about 1 – 2 inches thick. Tap the sides of the pan gently to remove any air bubbles and ensure an even surface.
- While the concrete is still wet, press the decorative glass gems/stones into the surface. Arrange them in any pattern or design you like. Ensure the gems are securely embedded in the concrete but not fully submerged. Allow the concrete to set and dry undisturbed. This can take 24 – 48 hours, depending on the concrete mix and environmental conditions.
- Once dry, gently flip the cake pan over onto a flat surface to release the stepping stone. If it doesn’t come out easily, gently tap the pan’s bottom or run a plastic knife around the edge.
- To seal and protect the stepping stone, apply a coat of Outdoor Mod Podge over its entire surface. Allow the Mod Podge to dry completely before placing the stepping stone in your garden.
Notes
- Before adding the gems, draw designs or write messages on the wet concrete with a stick or a skewer.
- Choose a day with mild weather to make your stepping stone, as extreme temperatures can affect drying.
- Always work in a well-ventilated area when using concrete and Mod Podge.
- Clean all tools and the cake pan immediately after use to prevent the concrete from hardening on them.