Tape Resist Snowflakes Craft
The Tape Resist Snowflakes Craft is a fun and easy winter activity for kids! Using tape, paint and paper, kids can create beautiful snowflake designs that look like magic when the tape is removed. It’s a great way to get creative, practice fine motor skills, and make colorful winter art to display at home. Perfect for kids of all ages!
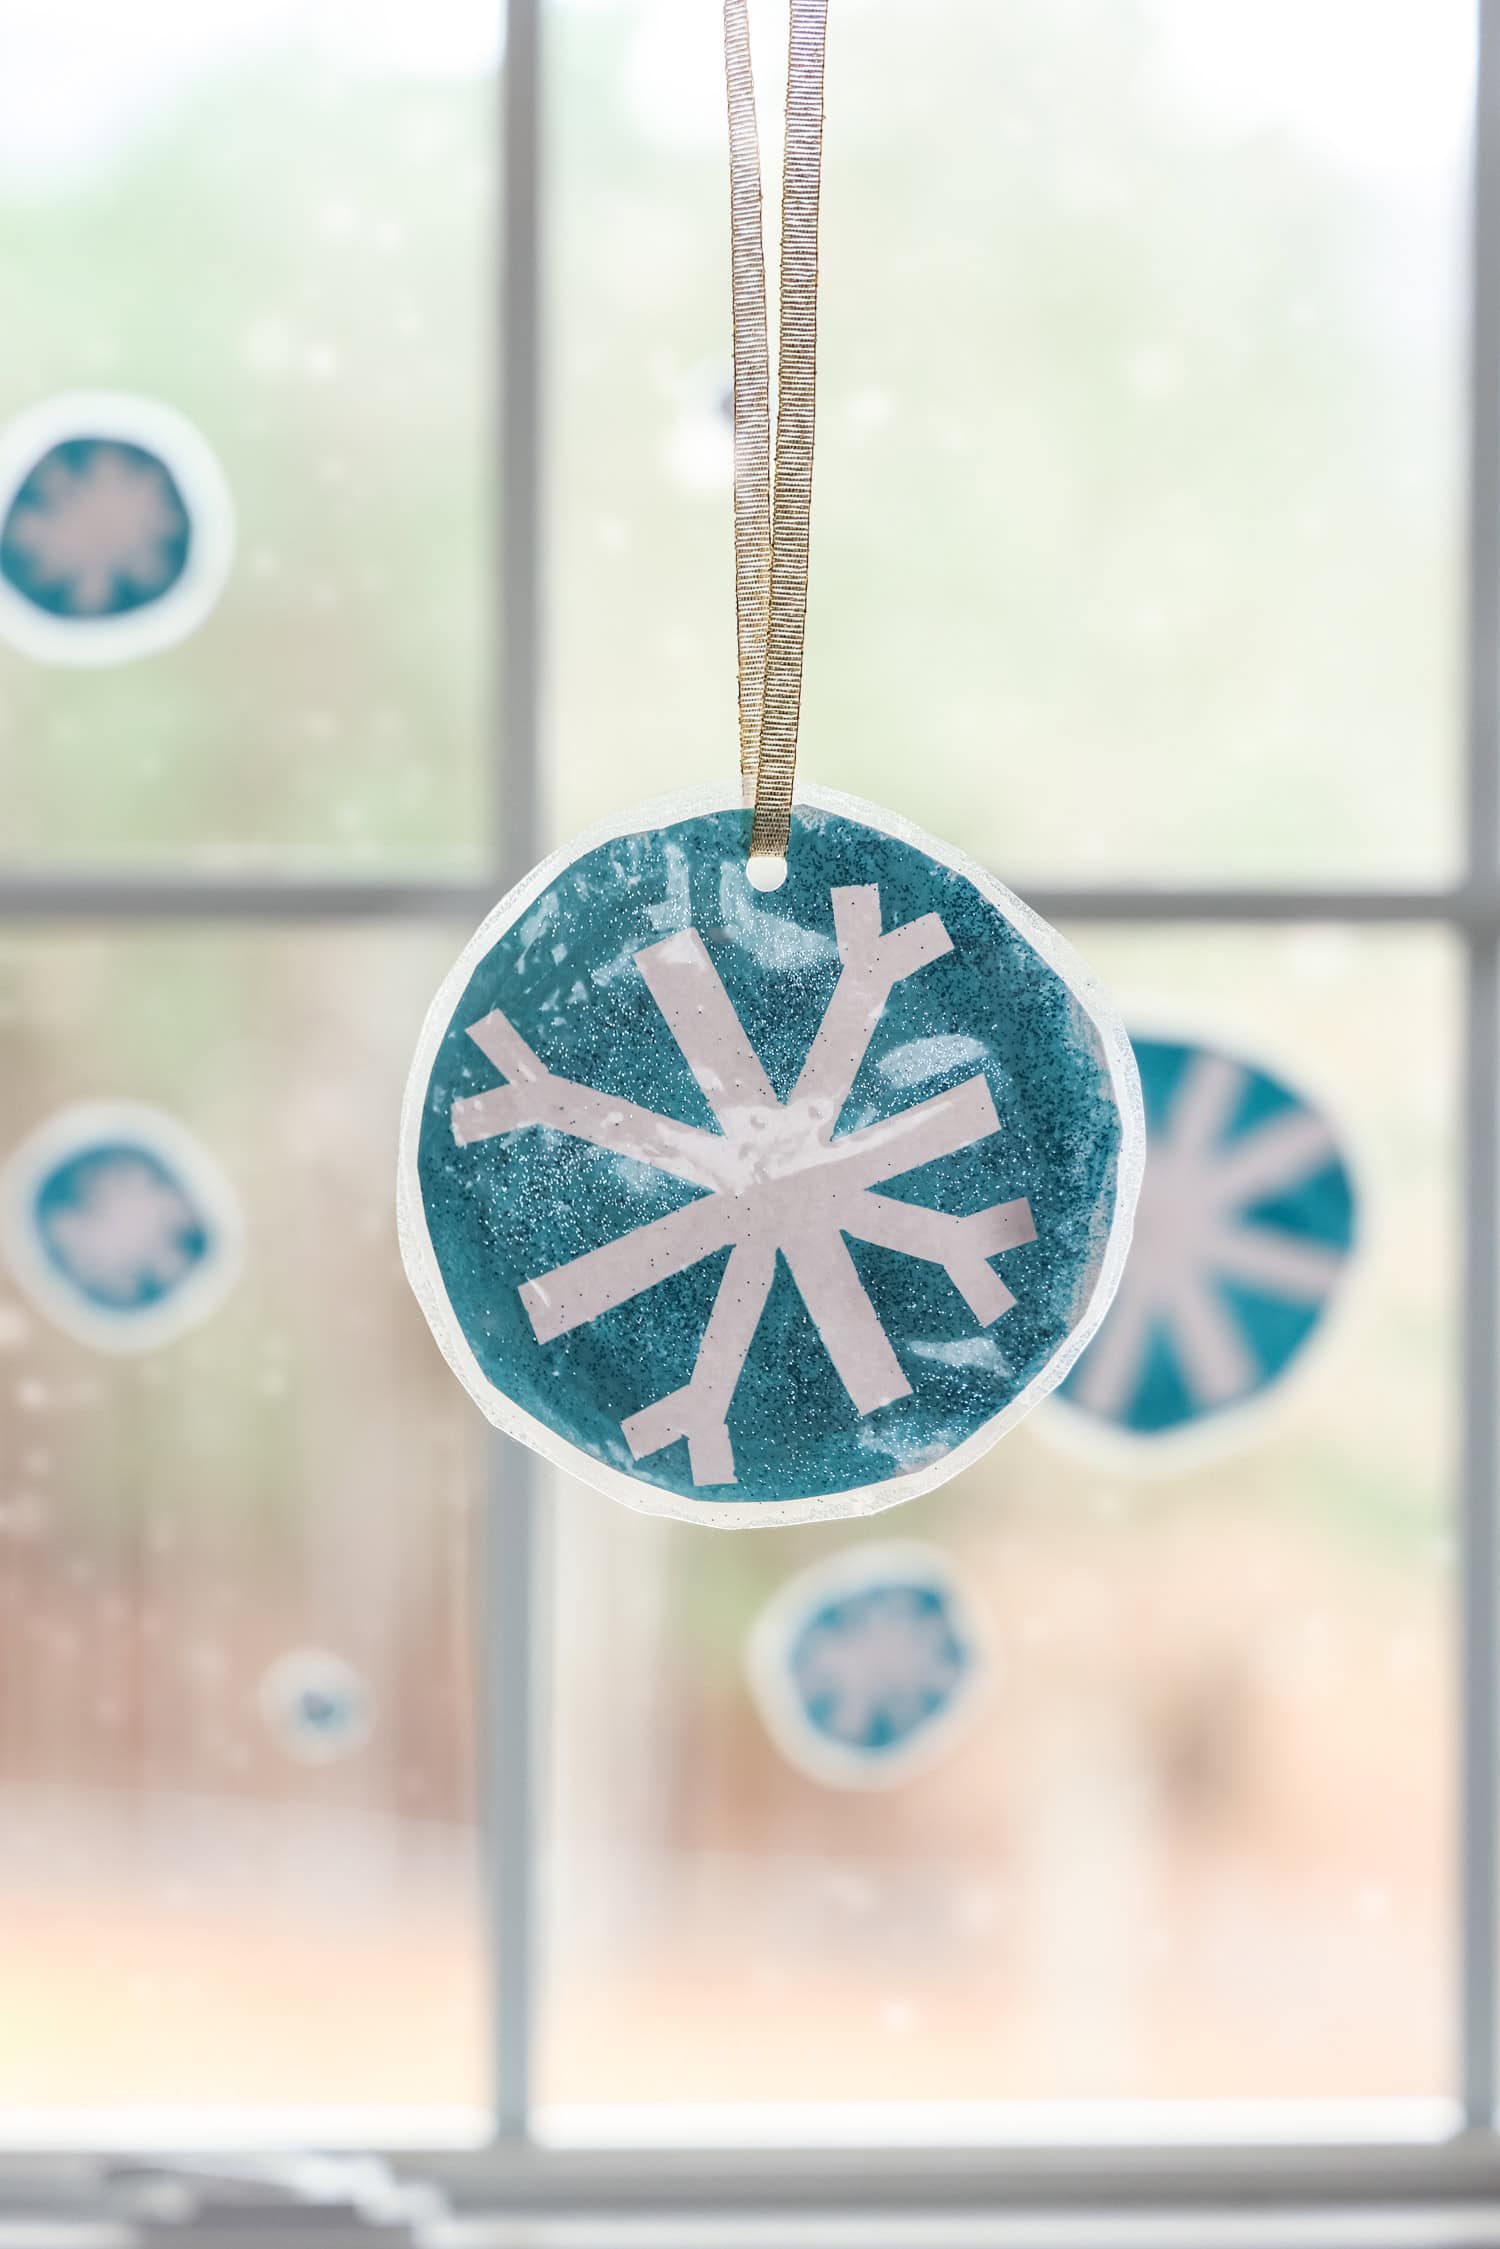
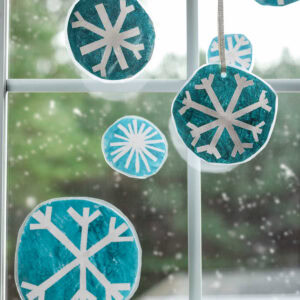
It is great to get outside and play in the snow, but not when it is super cold! Tape resist snowflake art is a great indoor activity for the whole family on a cold day. This super easy snowflake art looks great hanging on your windows and is covered with contact paper so you can put them away in the spring and hang them back up again next winter.
If you have never tried tape resist art before, all of the supplies are probably already in your art closet which means you can get right to it. The snowflakes look great hanging in a window throughout the whole winter season. At this time of year, it is so nice to have great indoor art activity options and I know you will love these snowflakes.
Why You’ll Love This Craft
- This is a really easy craft that kids of all ages can have so much fun with.
- Holding a paint brush and scissors help toddlers and preschoolers work on their fine motor skills.
- Really show some creativity with different sizes and shapes of snowflakes.
What is tape resist art?
Tape resist is a really neat art technique where you stick tape down to make a design, in this case it is a snowflake. You paint or colour all over the art surface including on top of the tape and then peel the tape when you are all done to reveal the wonderful design.
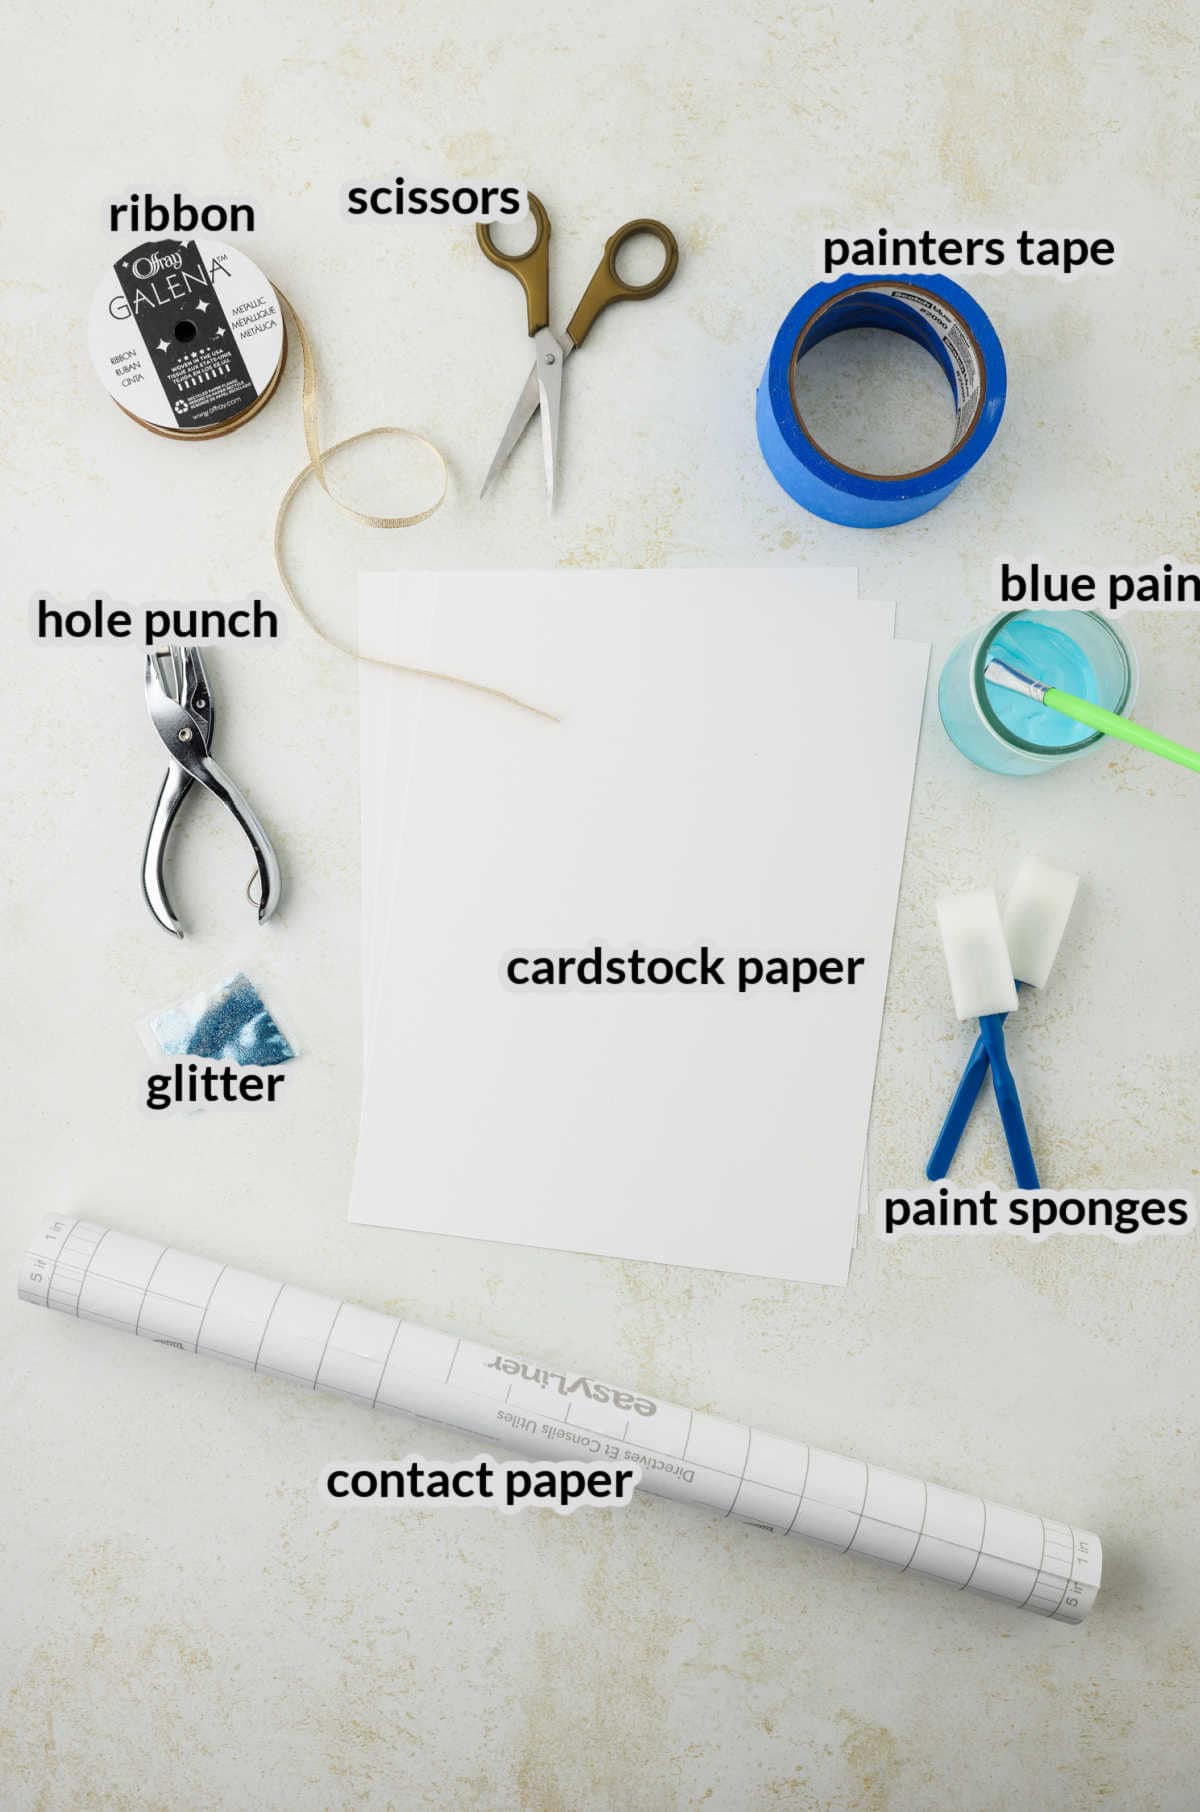
What You Need For Tape Resist Snowflakes
- Blue paint – Use blue to reflect the color of the sky around the falling snow.
- Painter’s tape – This is better to use than any other tape because it will peel off of the cardstock without ripping the paper underneath it and will not cause the paint to bleed underneath it.
- Paint sponges – The sponge offers good coverage and
- Glitter – Who doesn’t love a sparkly background?
- Cardstock – Use white so it looks like a real snowflake. You can even use white glitter card stock.
- Hole puncher – A single whole puncher helps to turn these into window ornaments.
- Contact paper – This is a great way to keep the snowflakes looking like new and to keep the glitter from flaking off onto the floor.
- Ribbon or yarn – Use a fun color to hang up your snowflakes for display!
- Scissors – This is a good craft for young kids to practice their cutting skills because they are cutting out a simple circle.
What tape is best for tape resist art?
Painter’s tape is the best kind of tape for this craft. You can also use masking tape if that is what you have on hand. These types of tape are easiest to peel off and won’t allow paint to bleed.
Would regular white printer paper work for this craft?
I suggest using a thicker paper like cardstock so that the snowflakes do not wrinkle when paint is applied. Watercolor paper would also be a good option!
How to Make Tape Resist Snowflakes
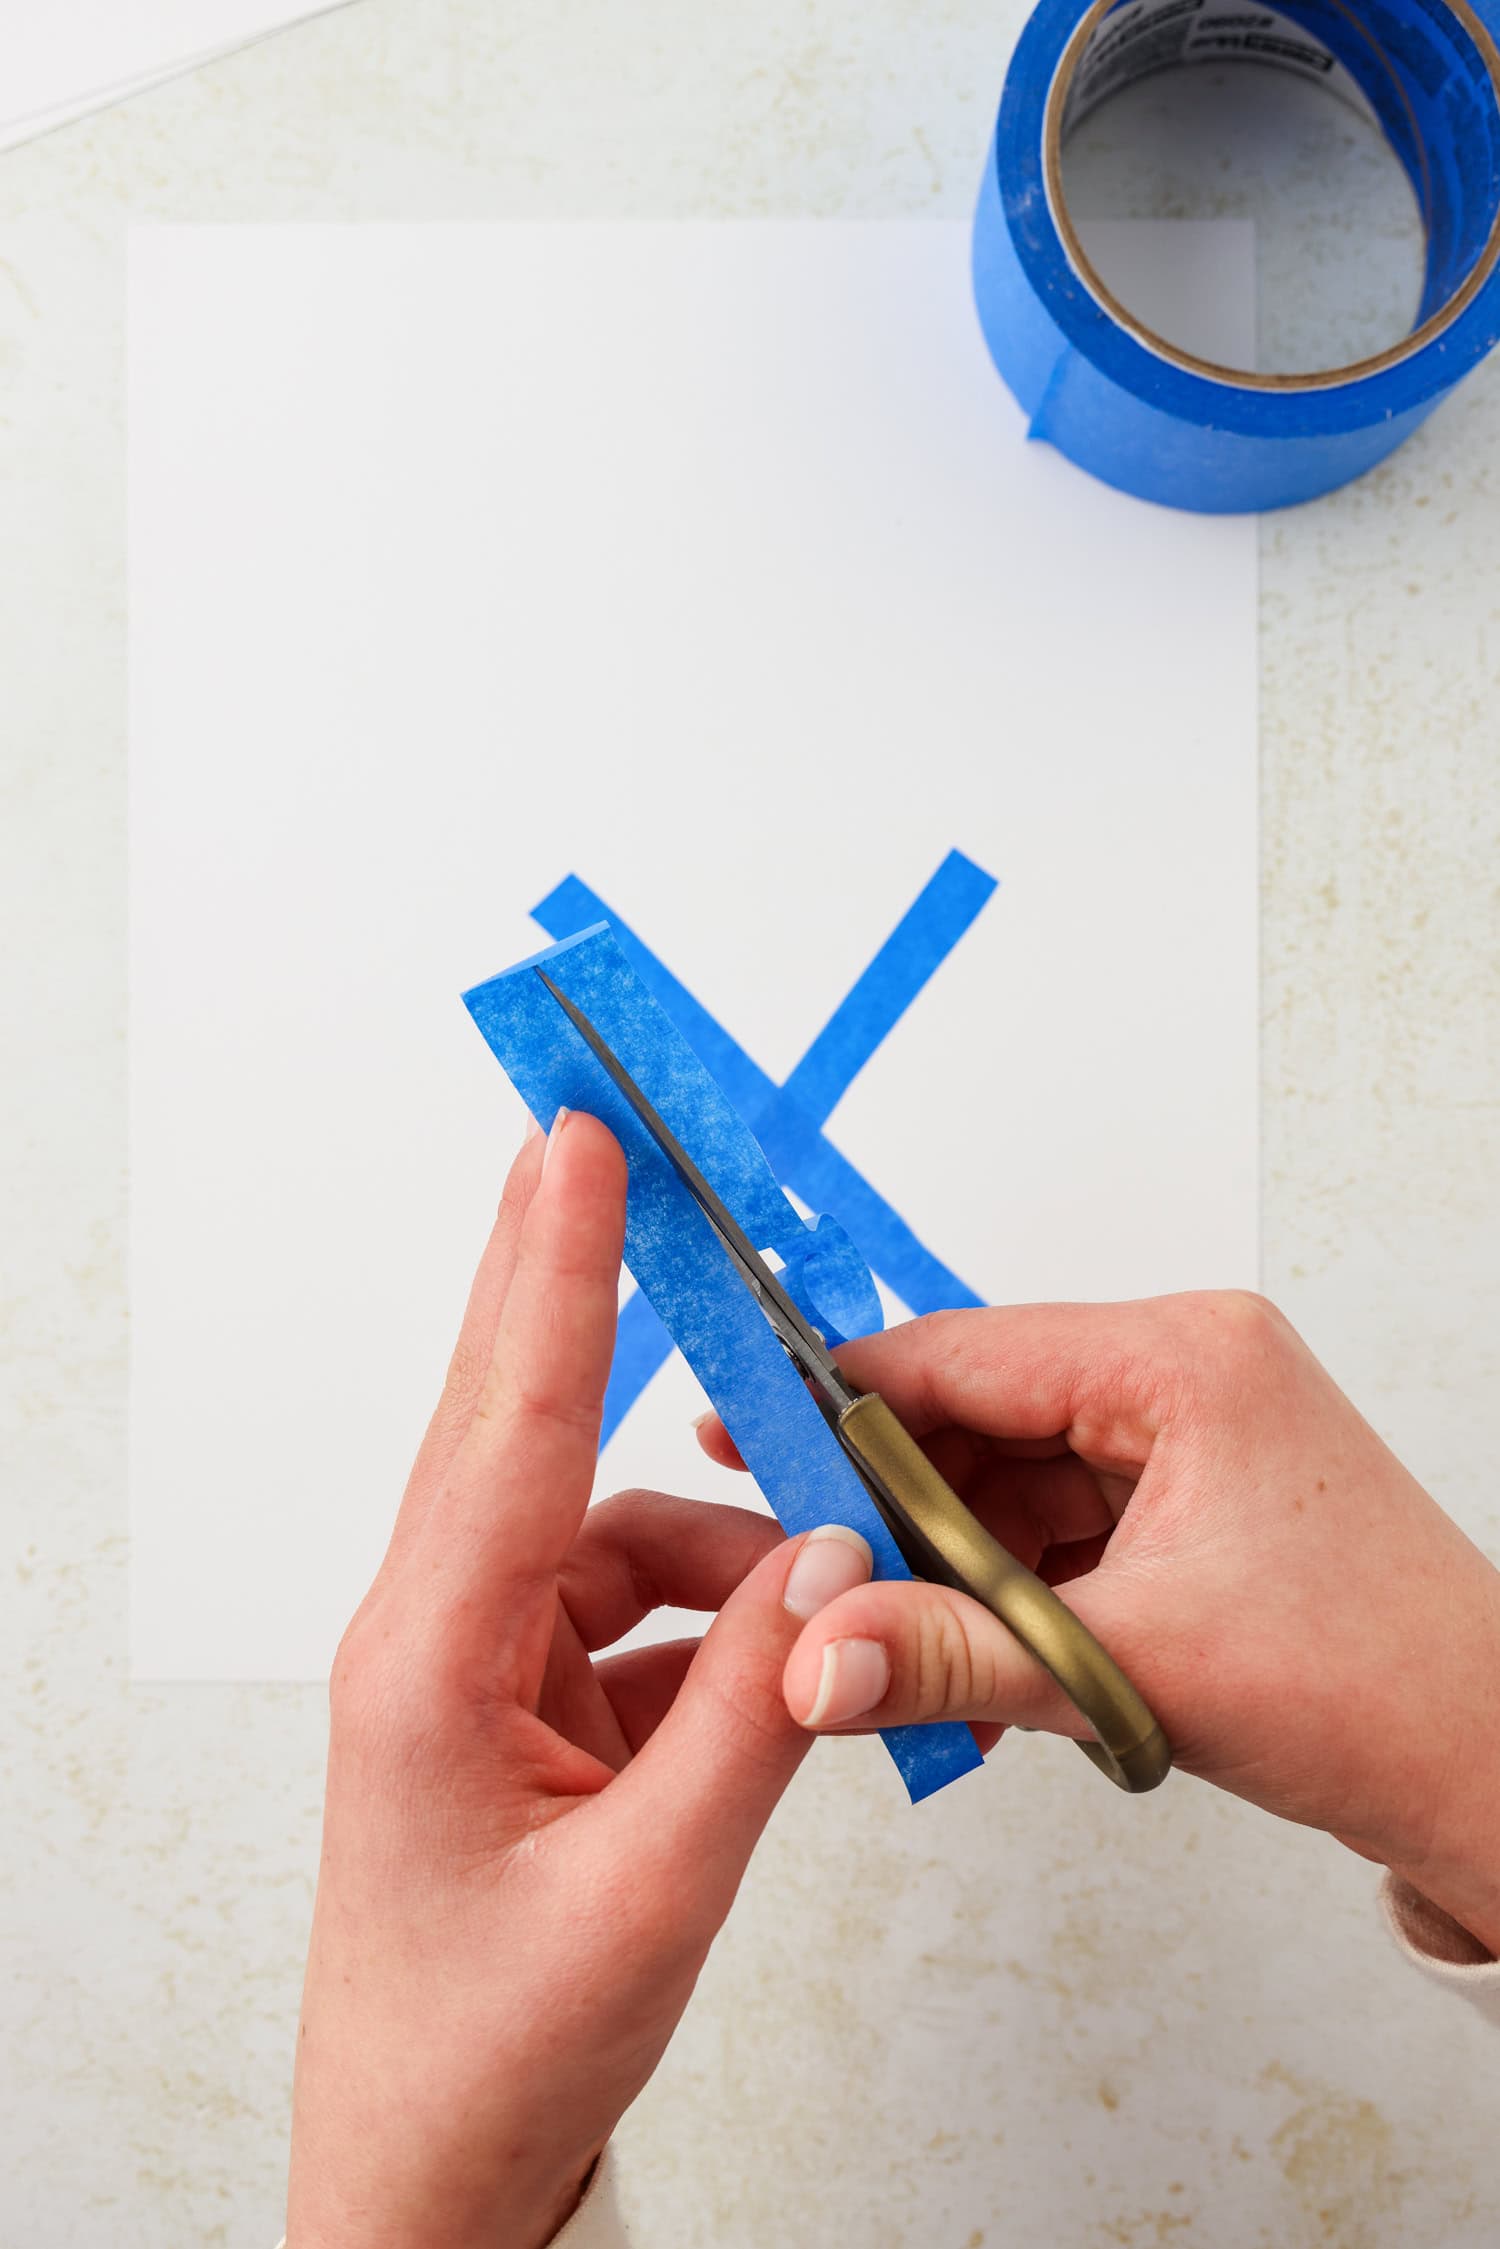
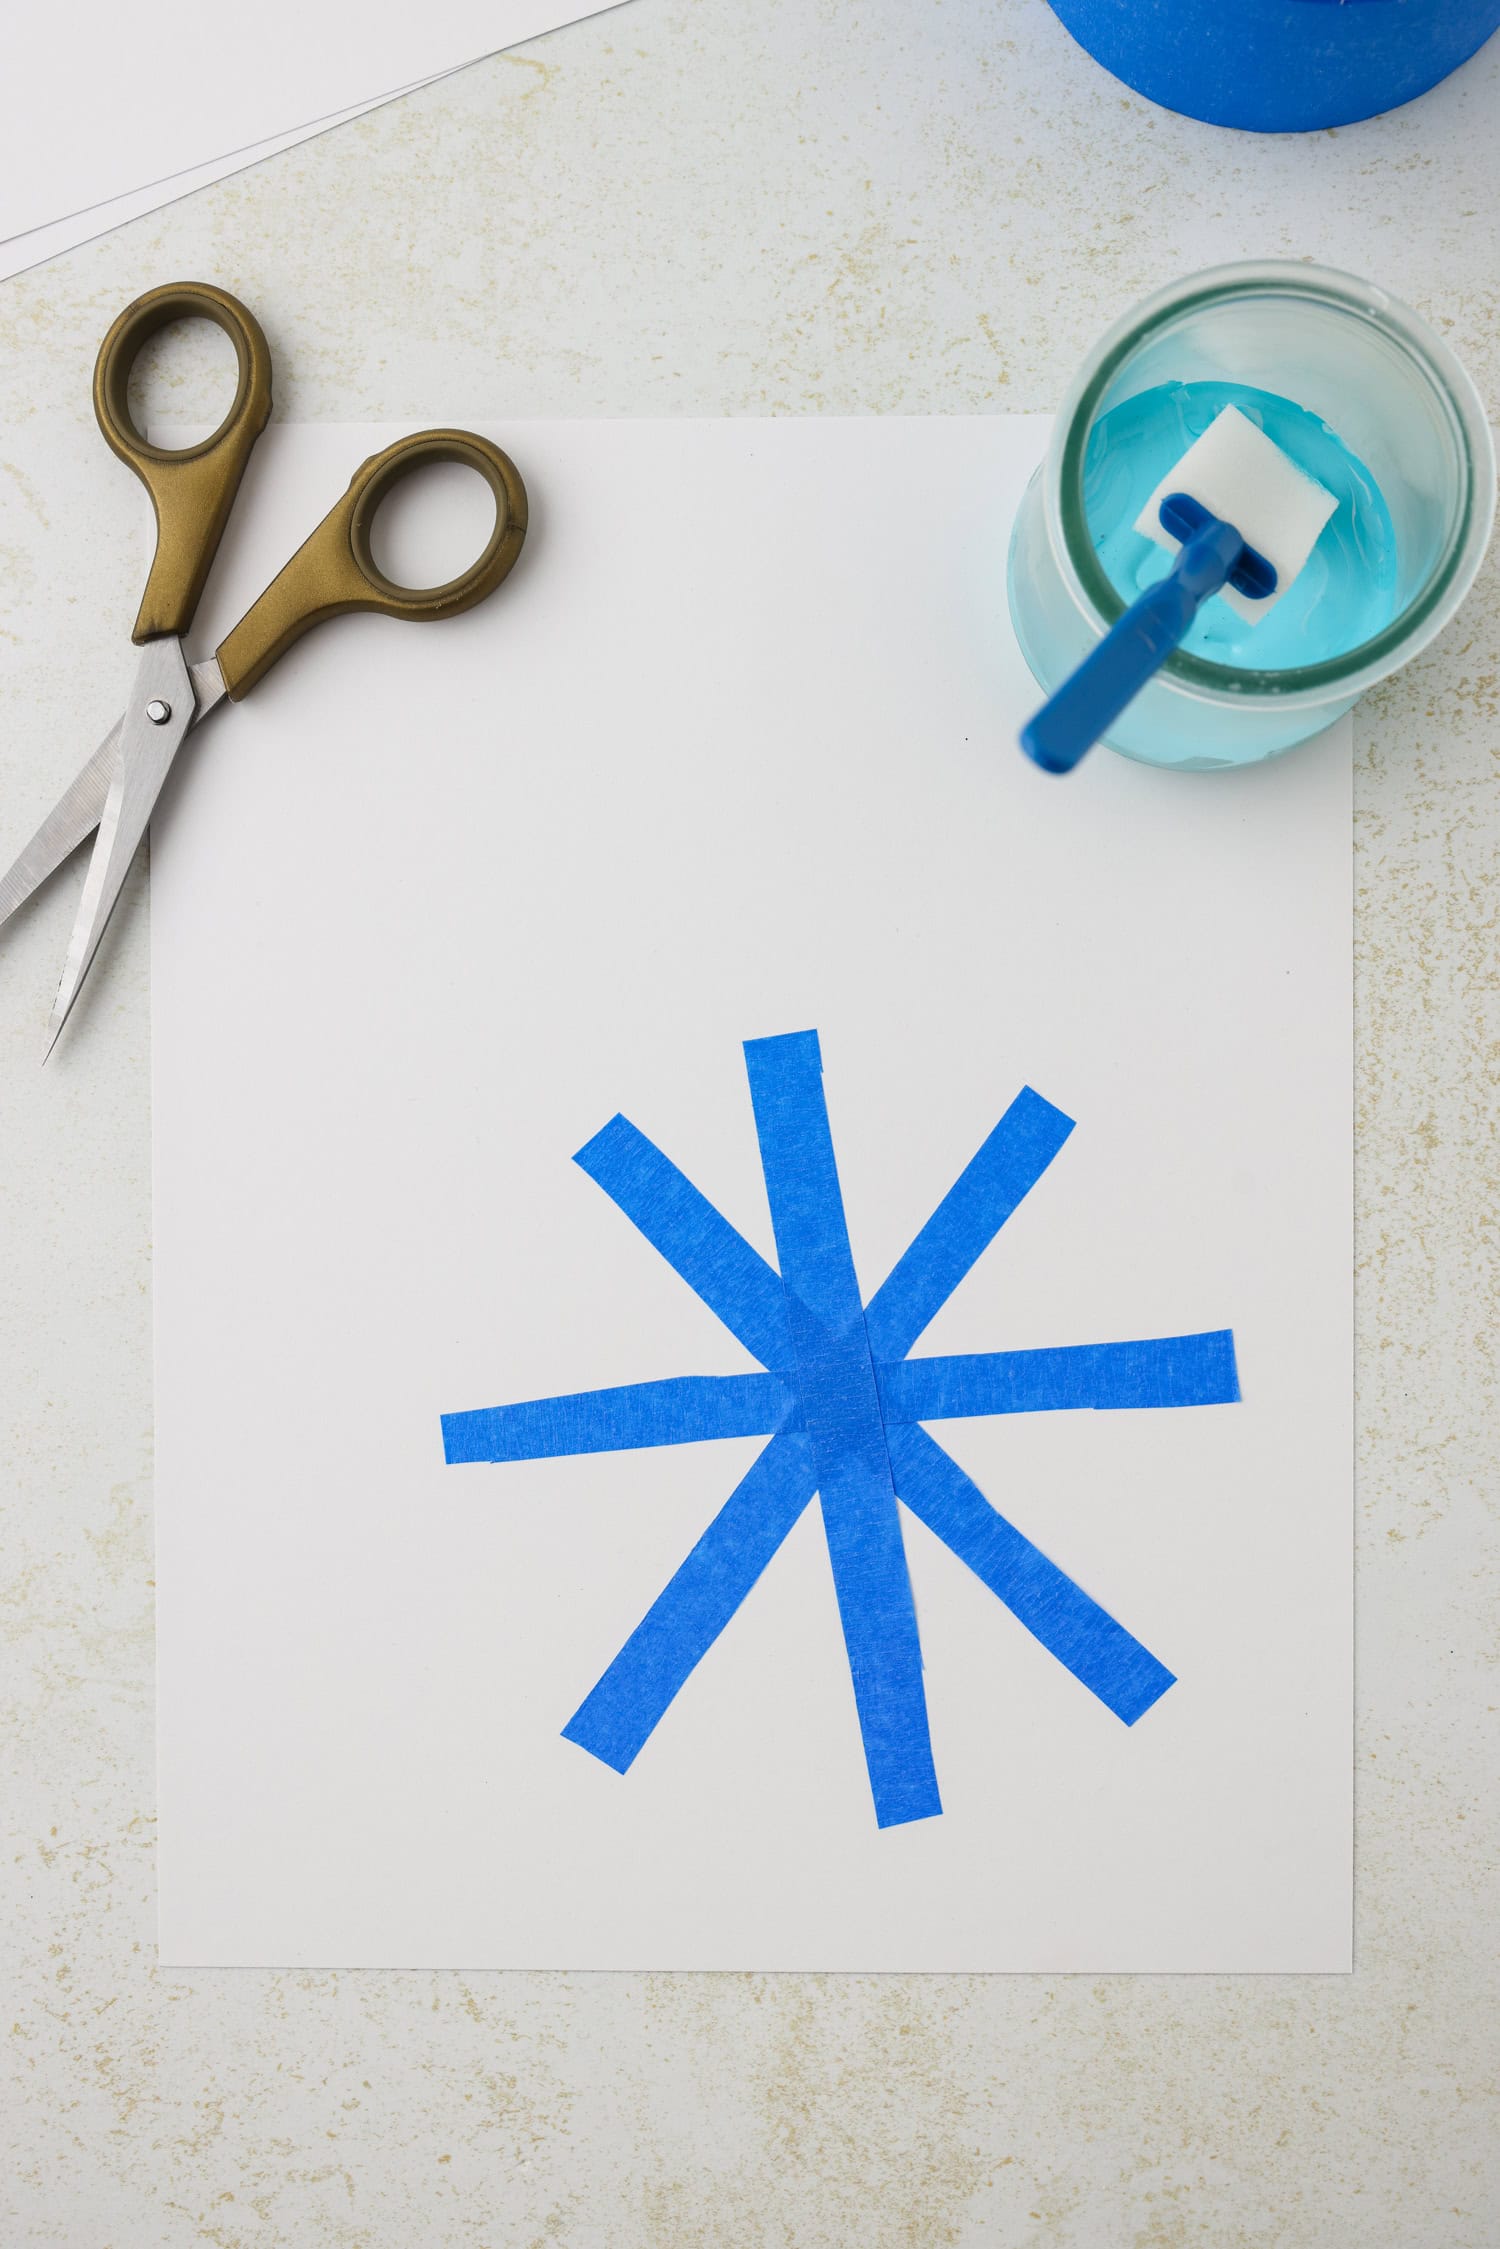
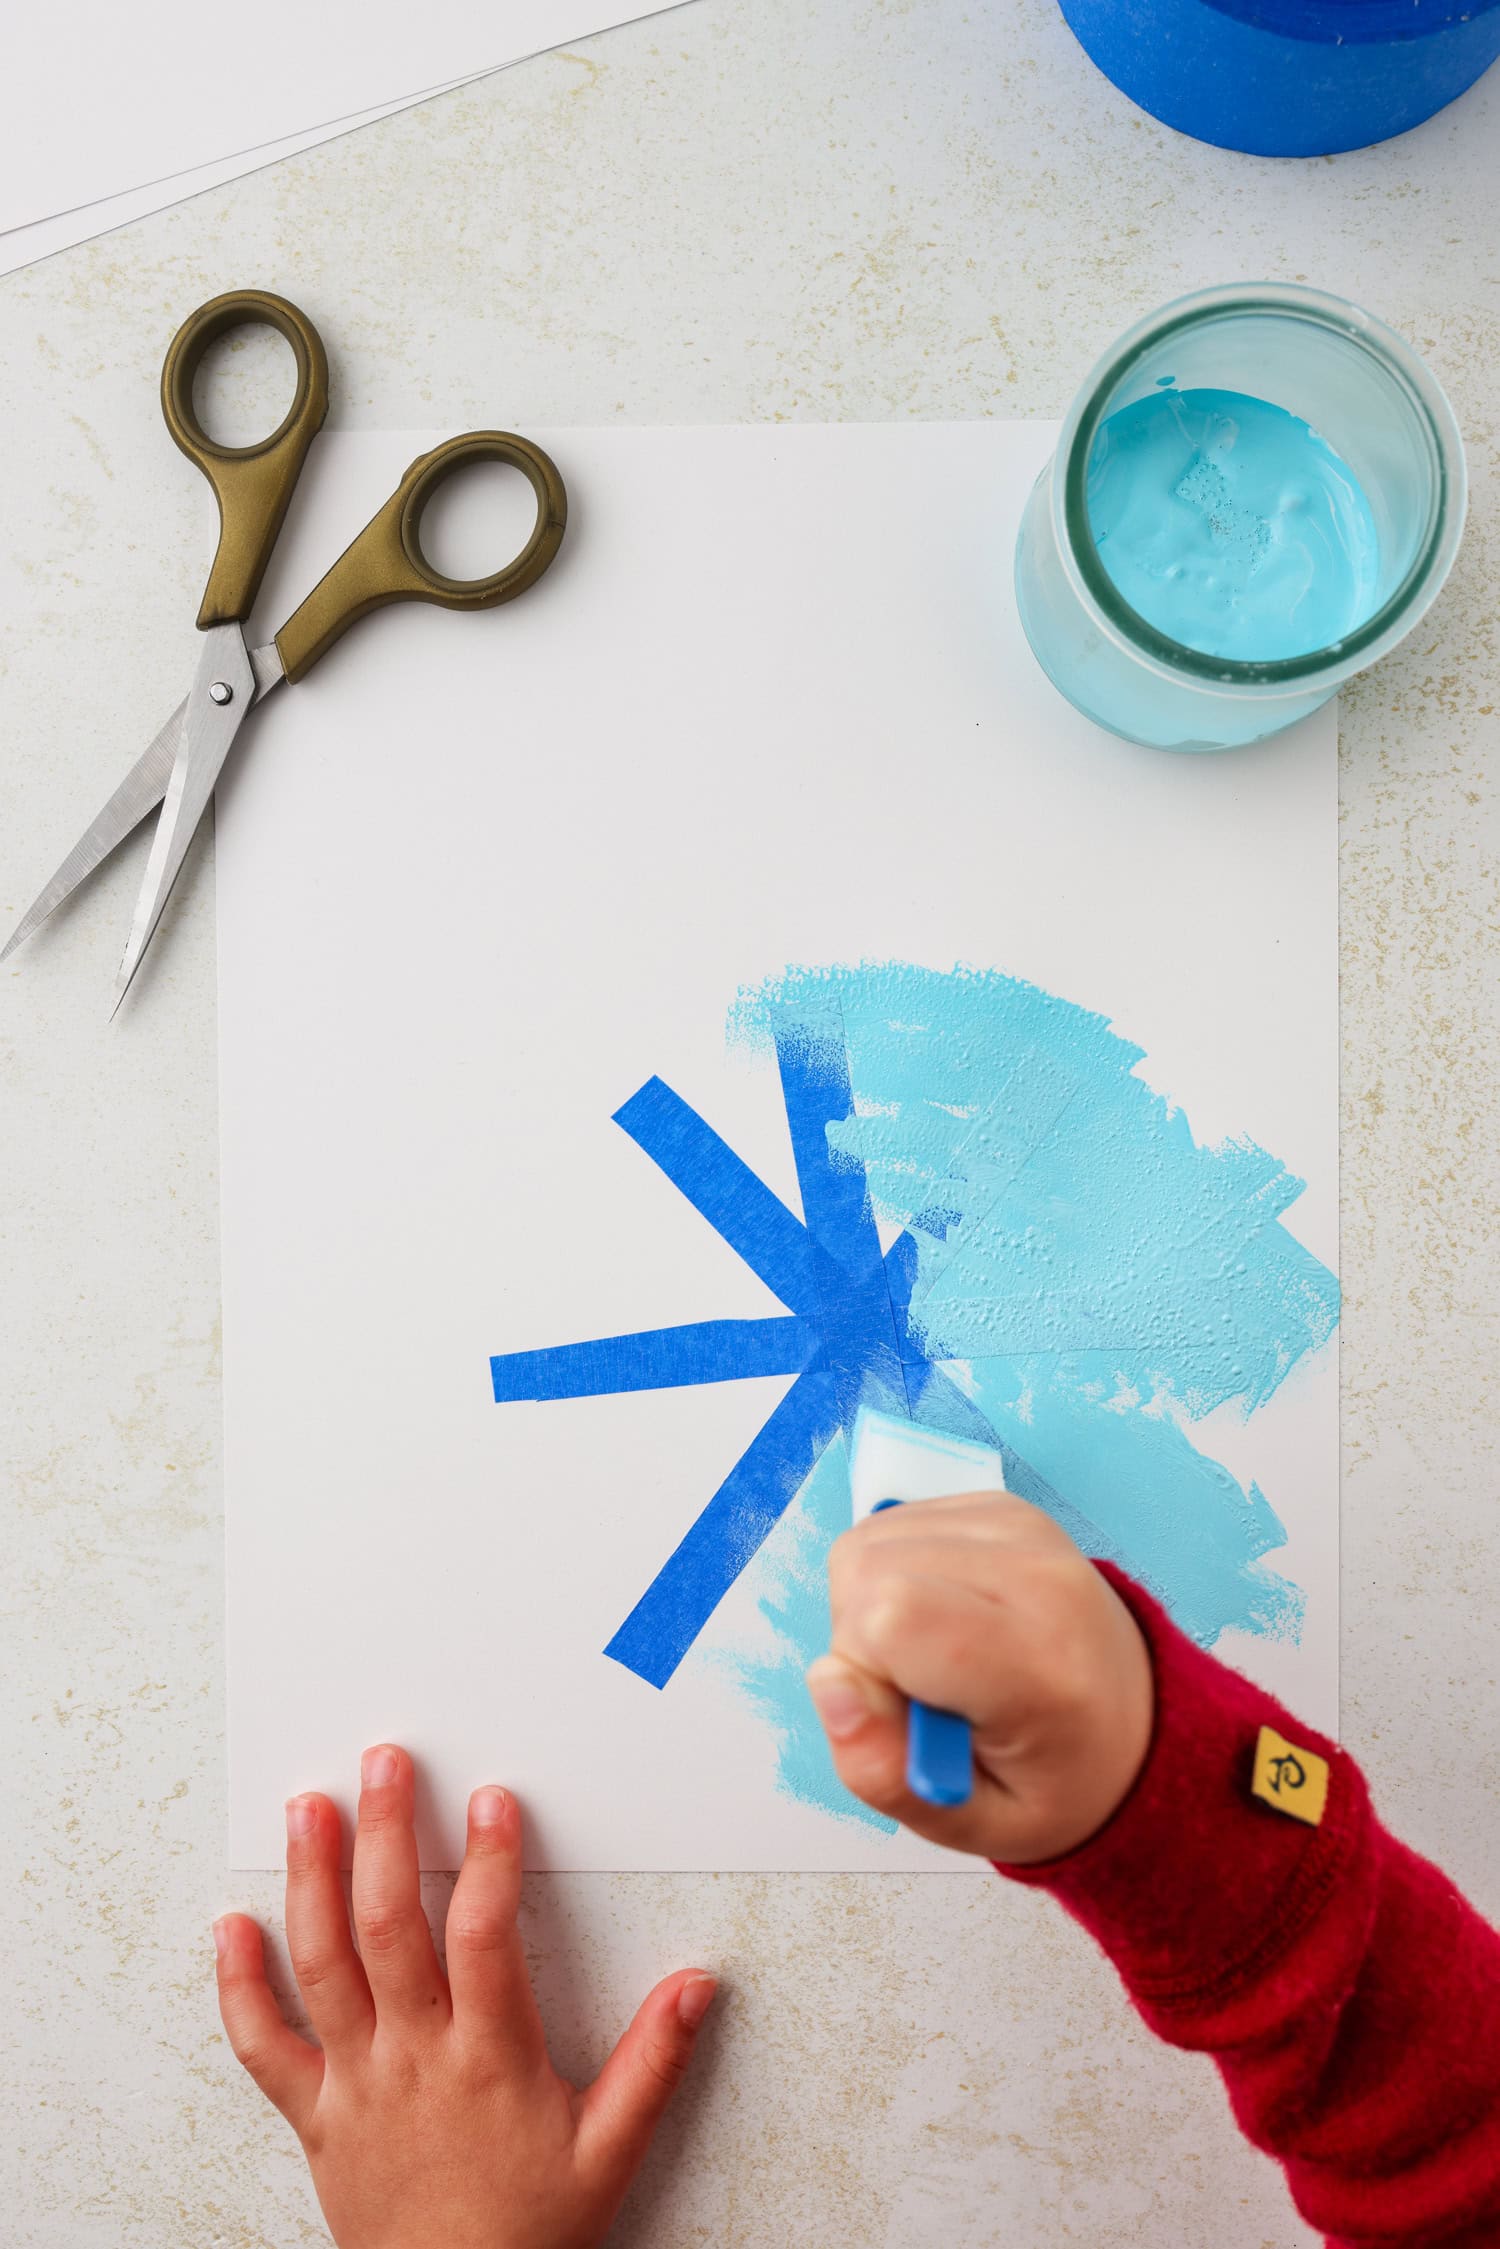
Cut painter’s tape into strips and add them to your cardstock in a snowflake shape.
Using a paint sponge, dab a thin layer of blue paint all over each snowflake.
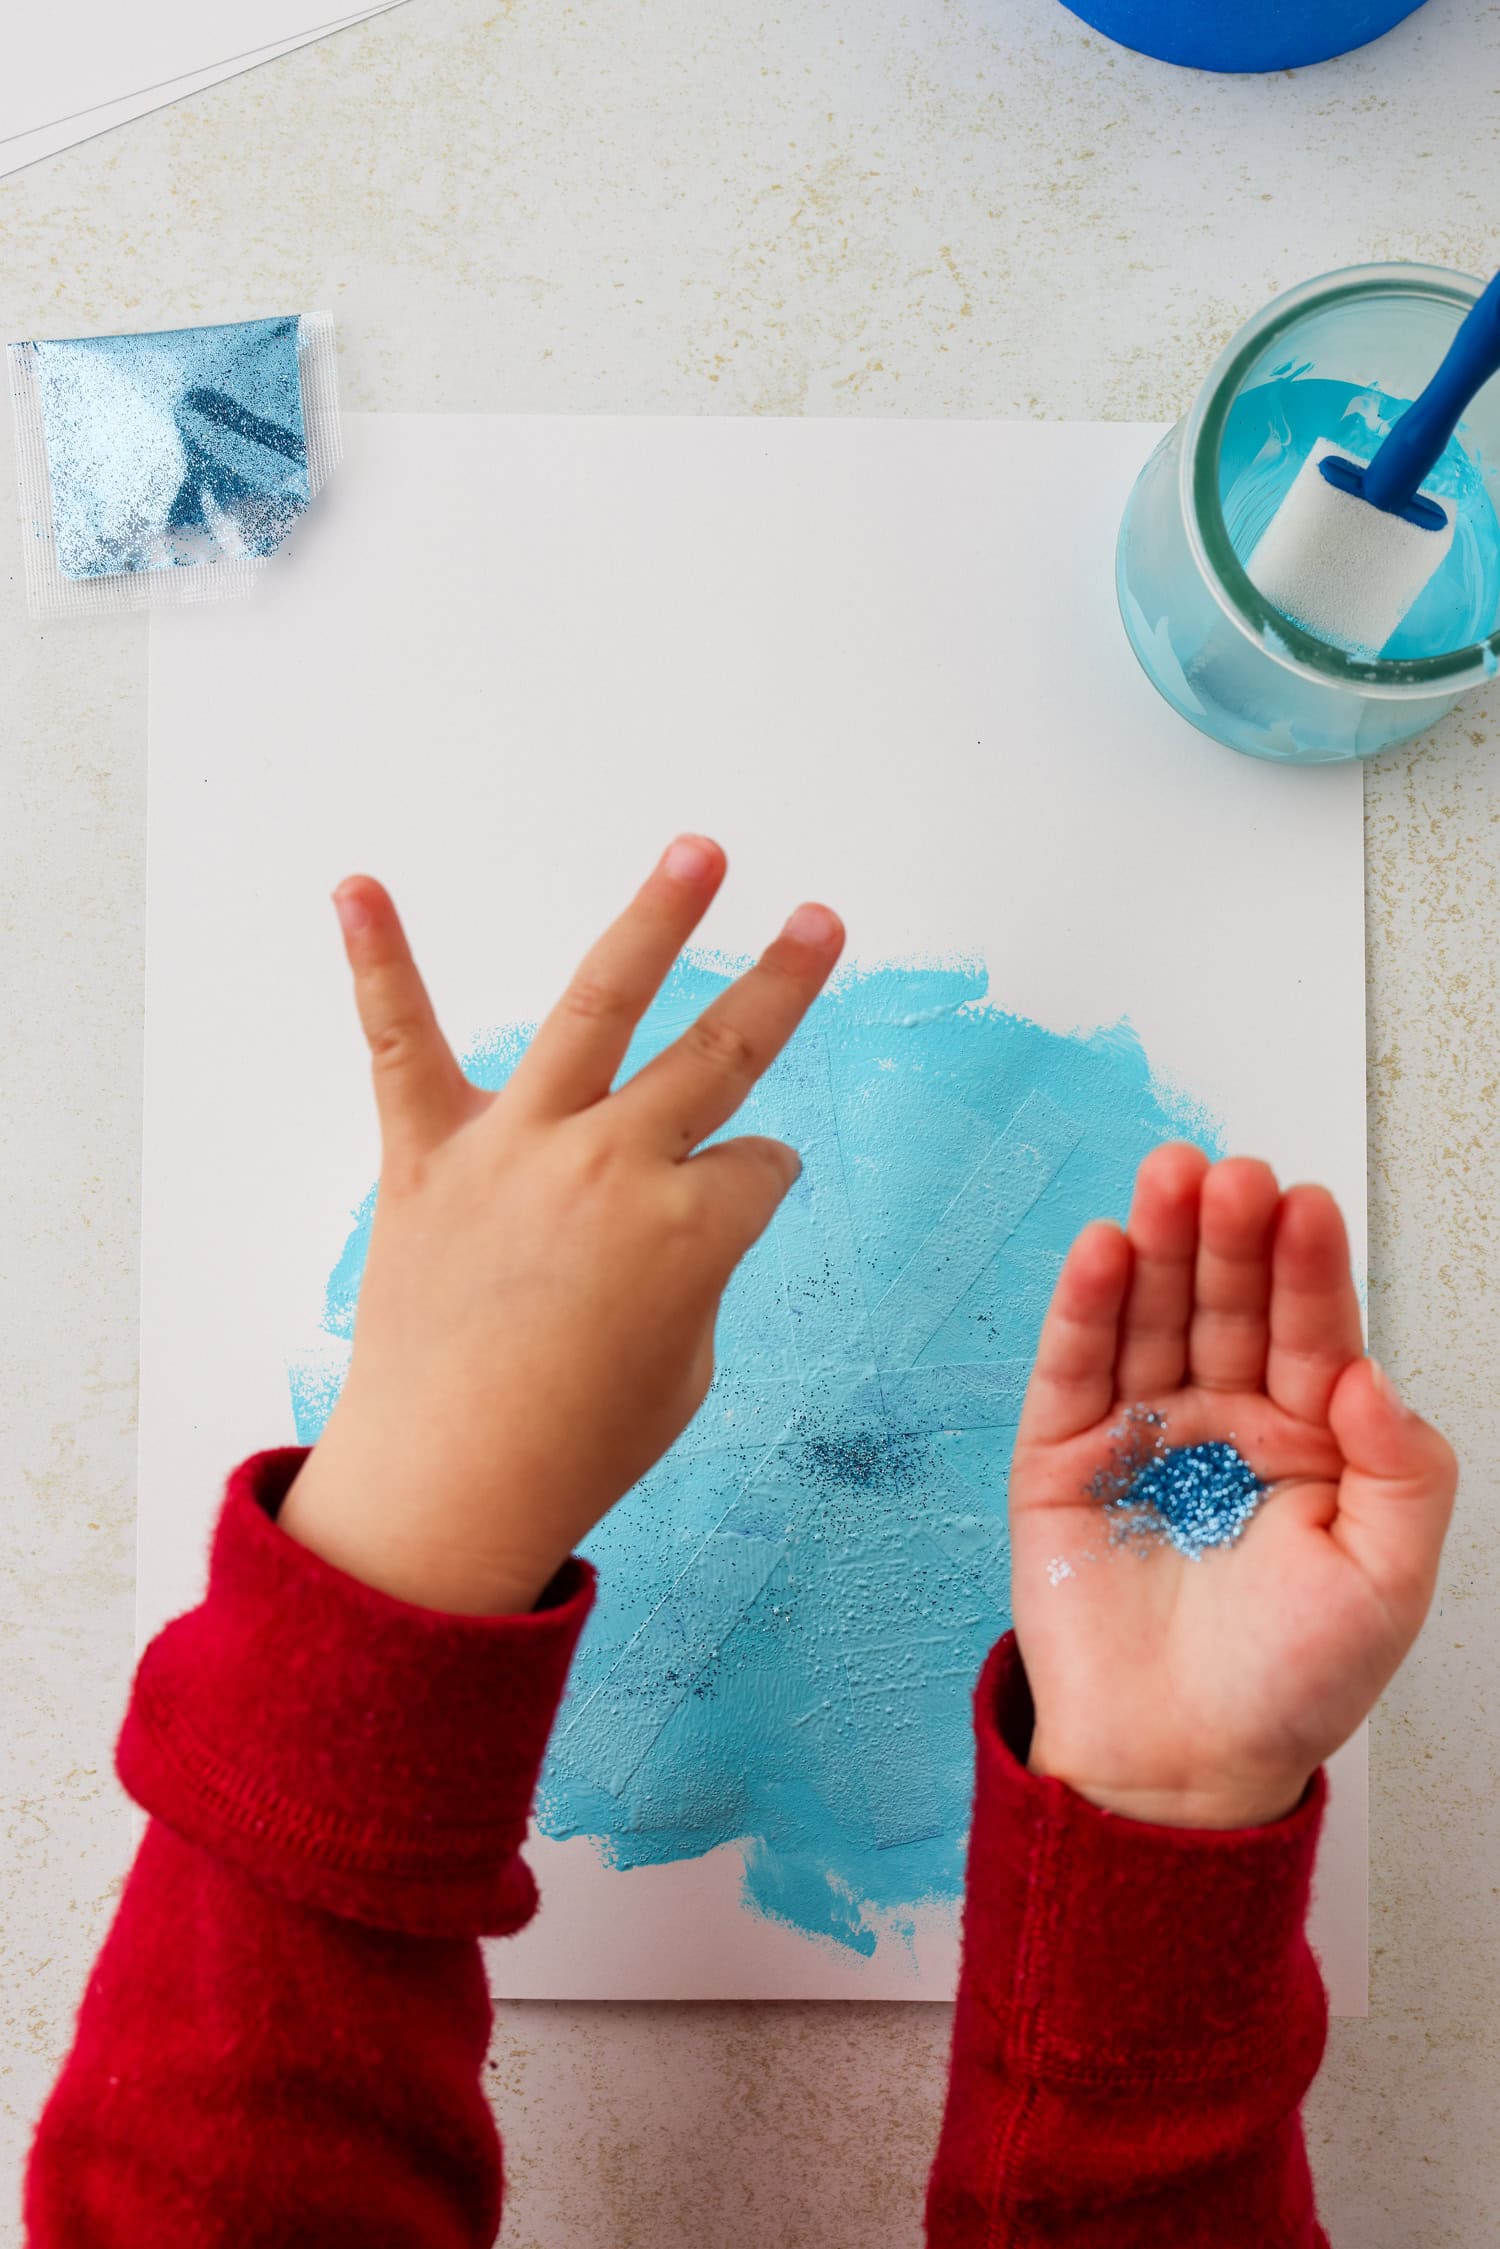
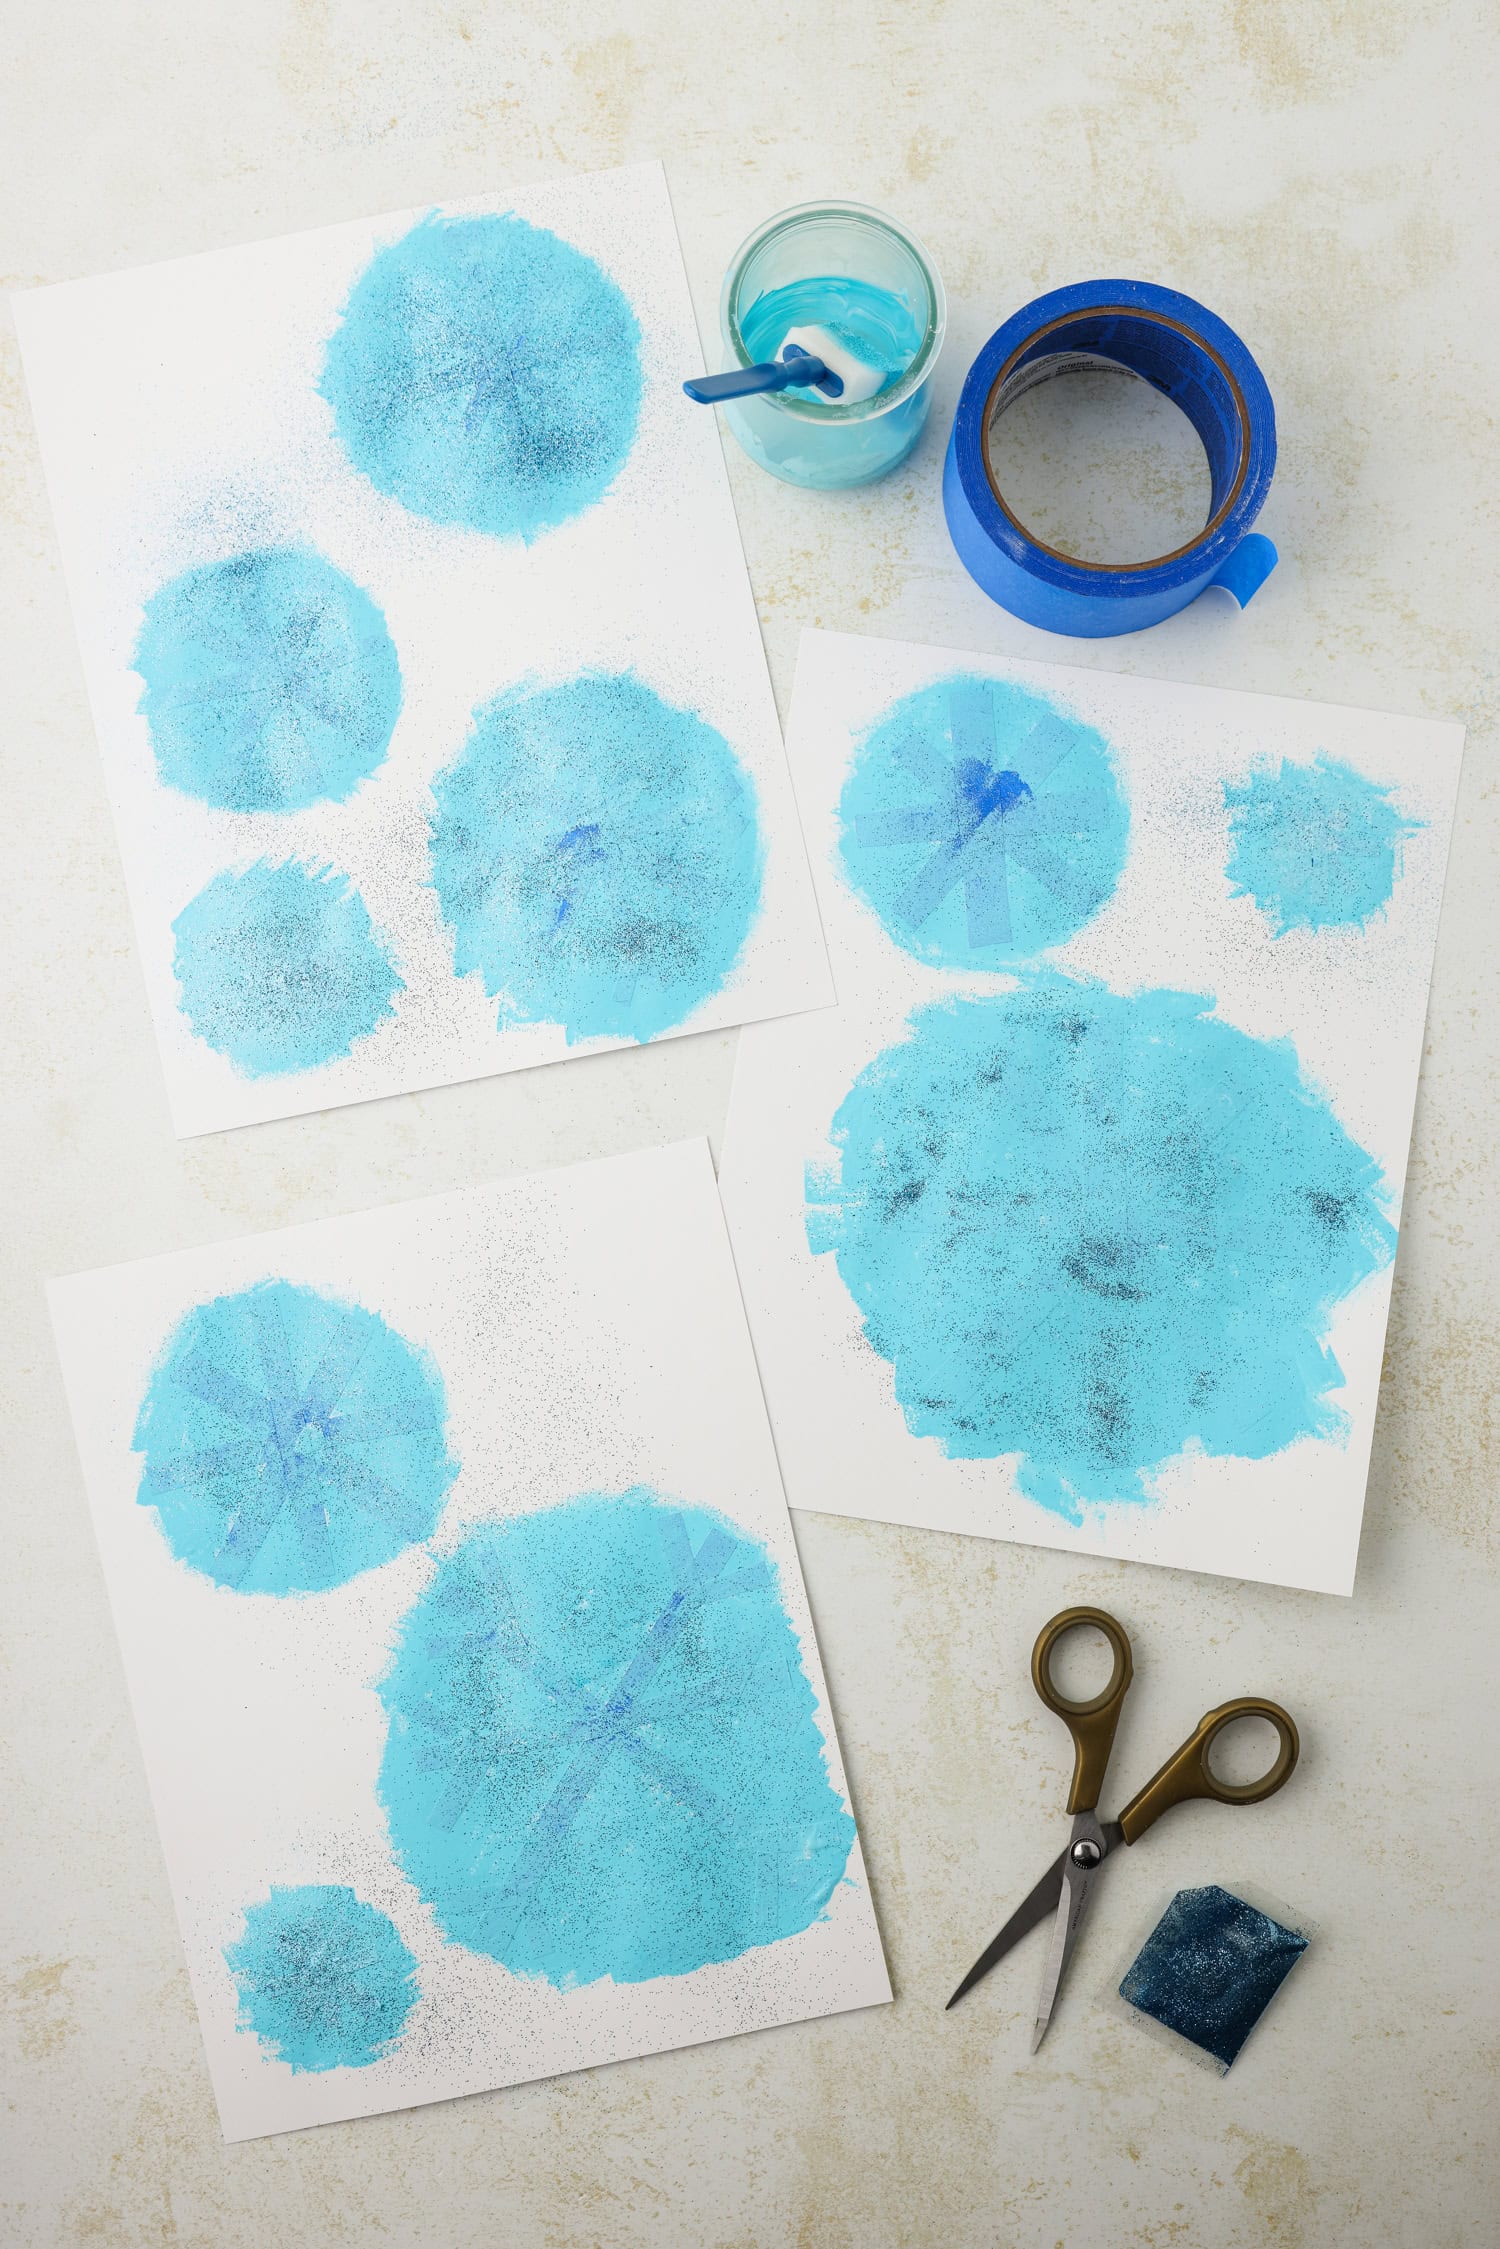
Sprinkle glitter all over the wet paint and allow the paint to dry.

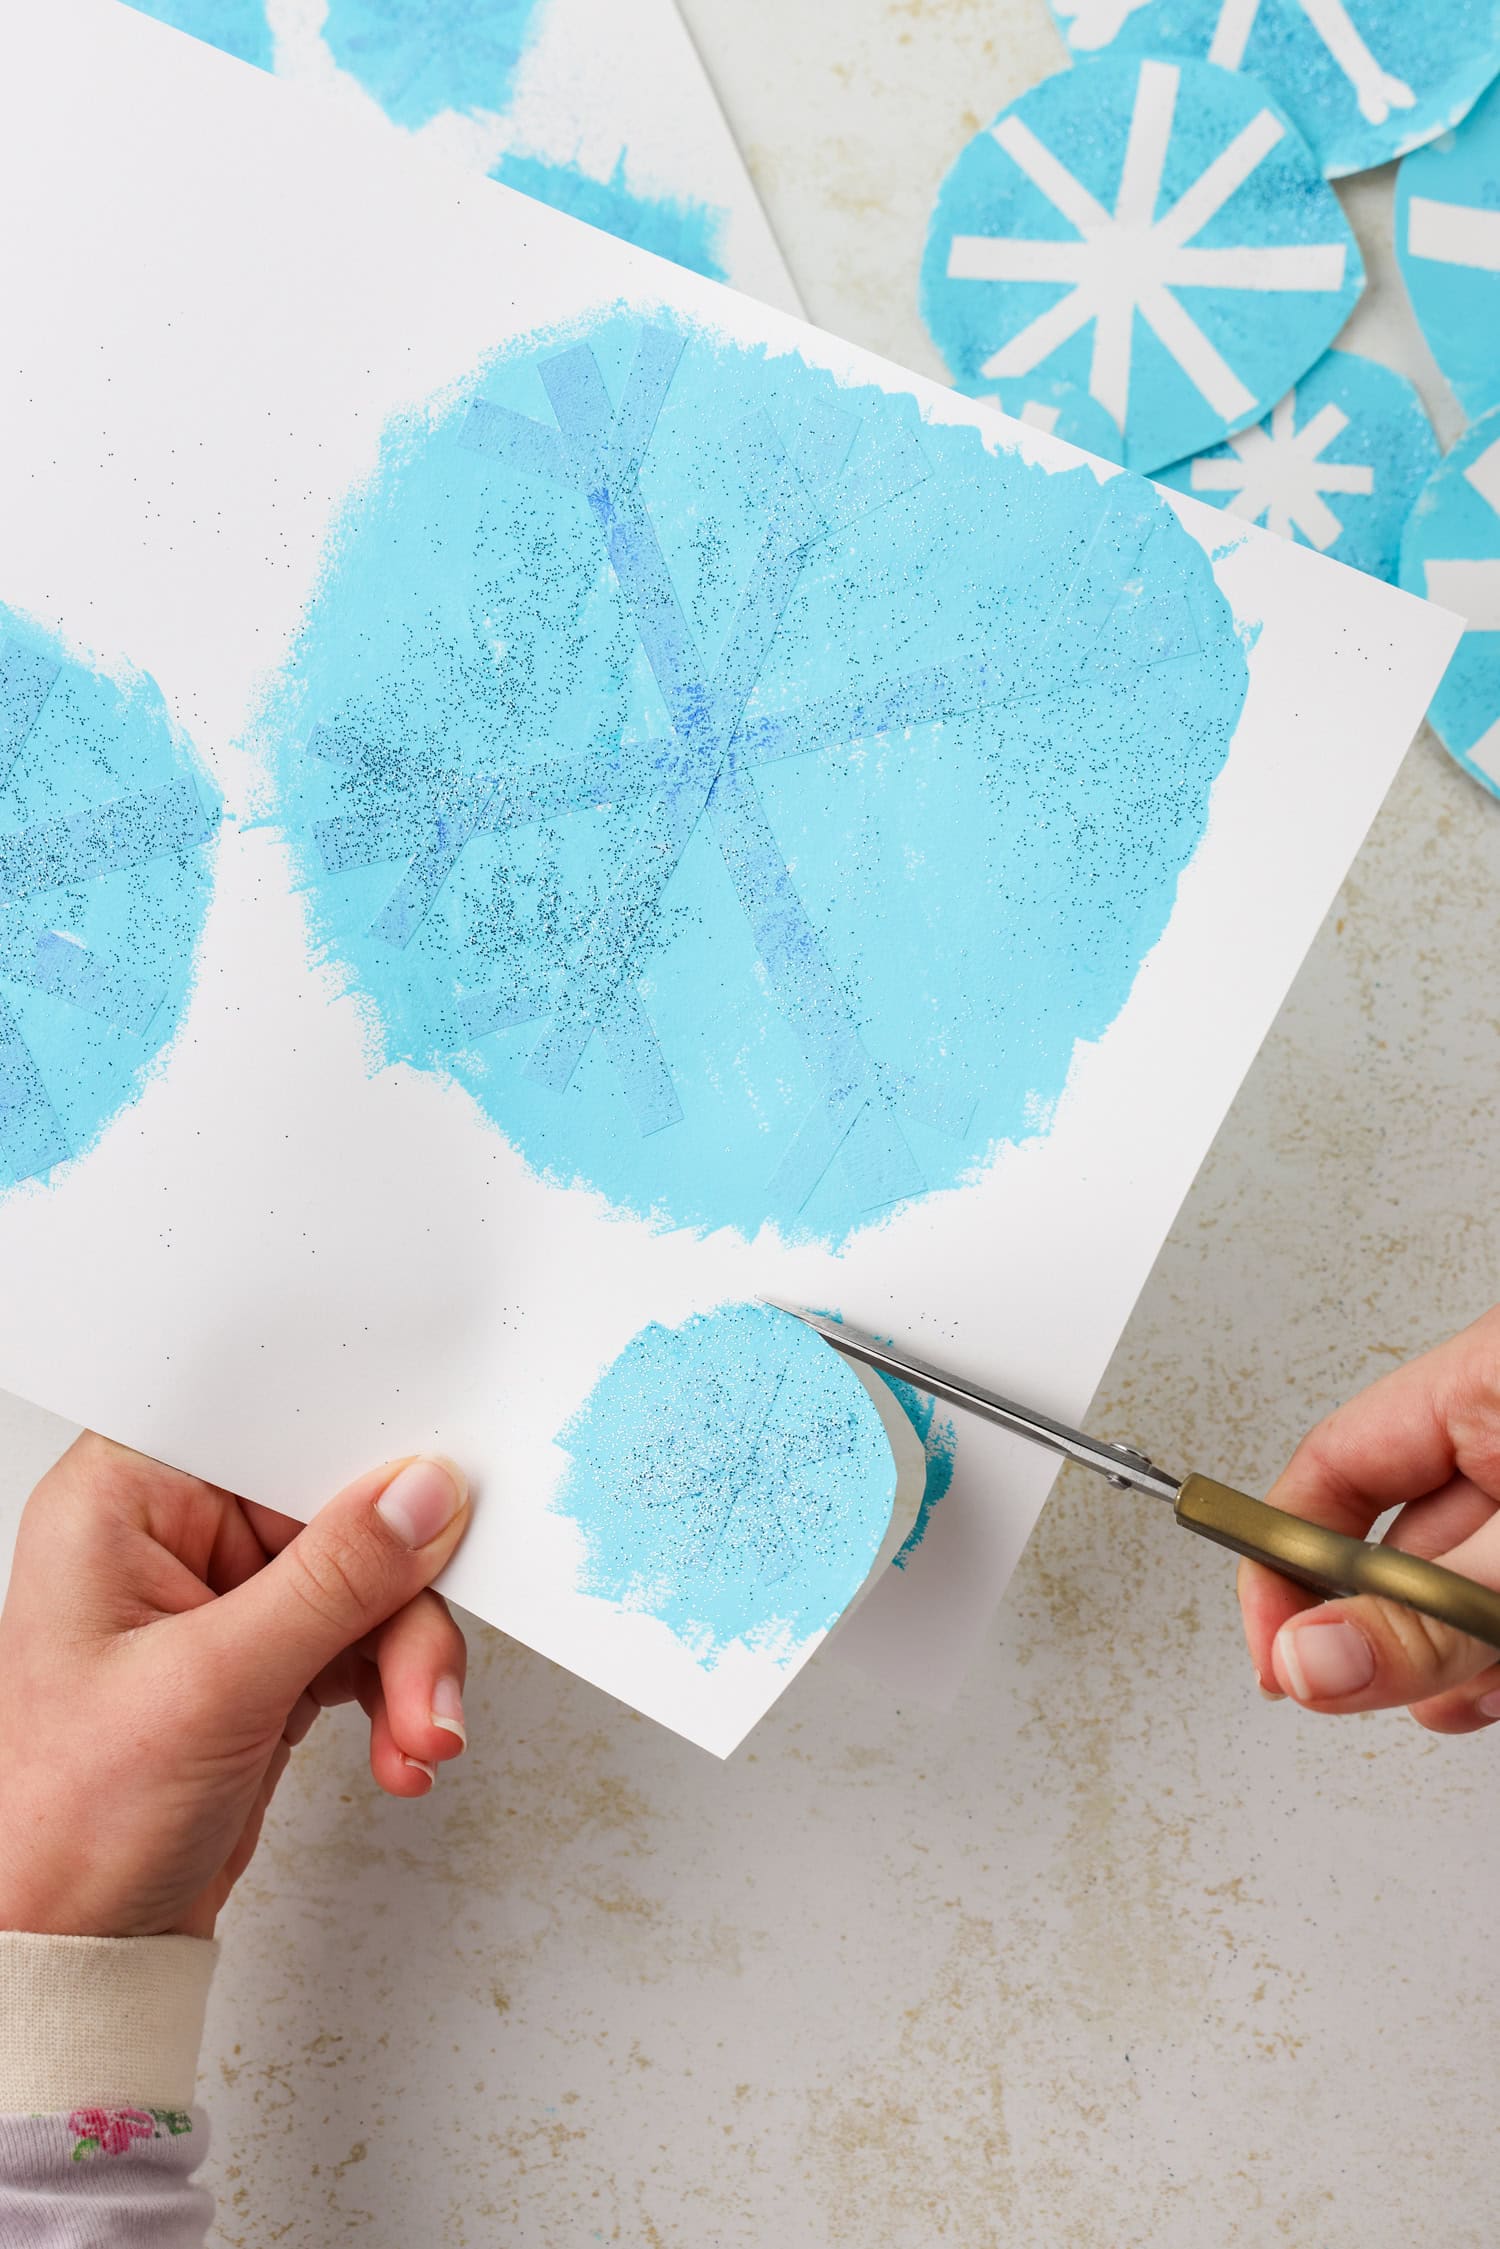
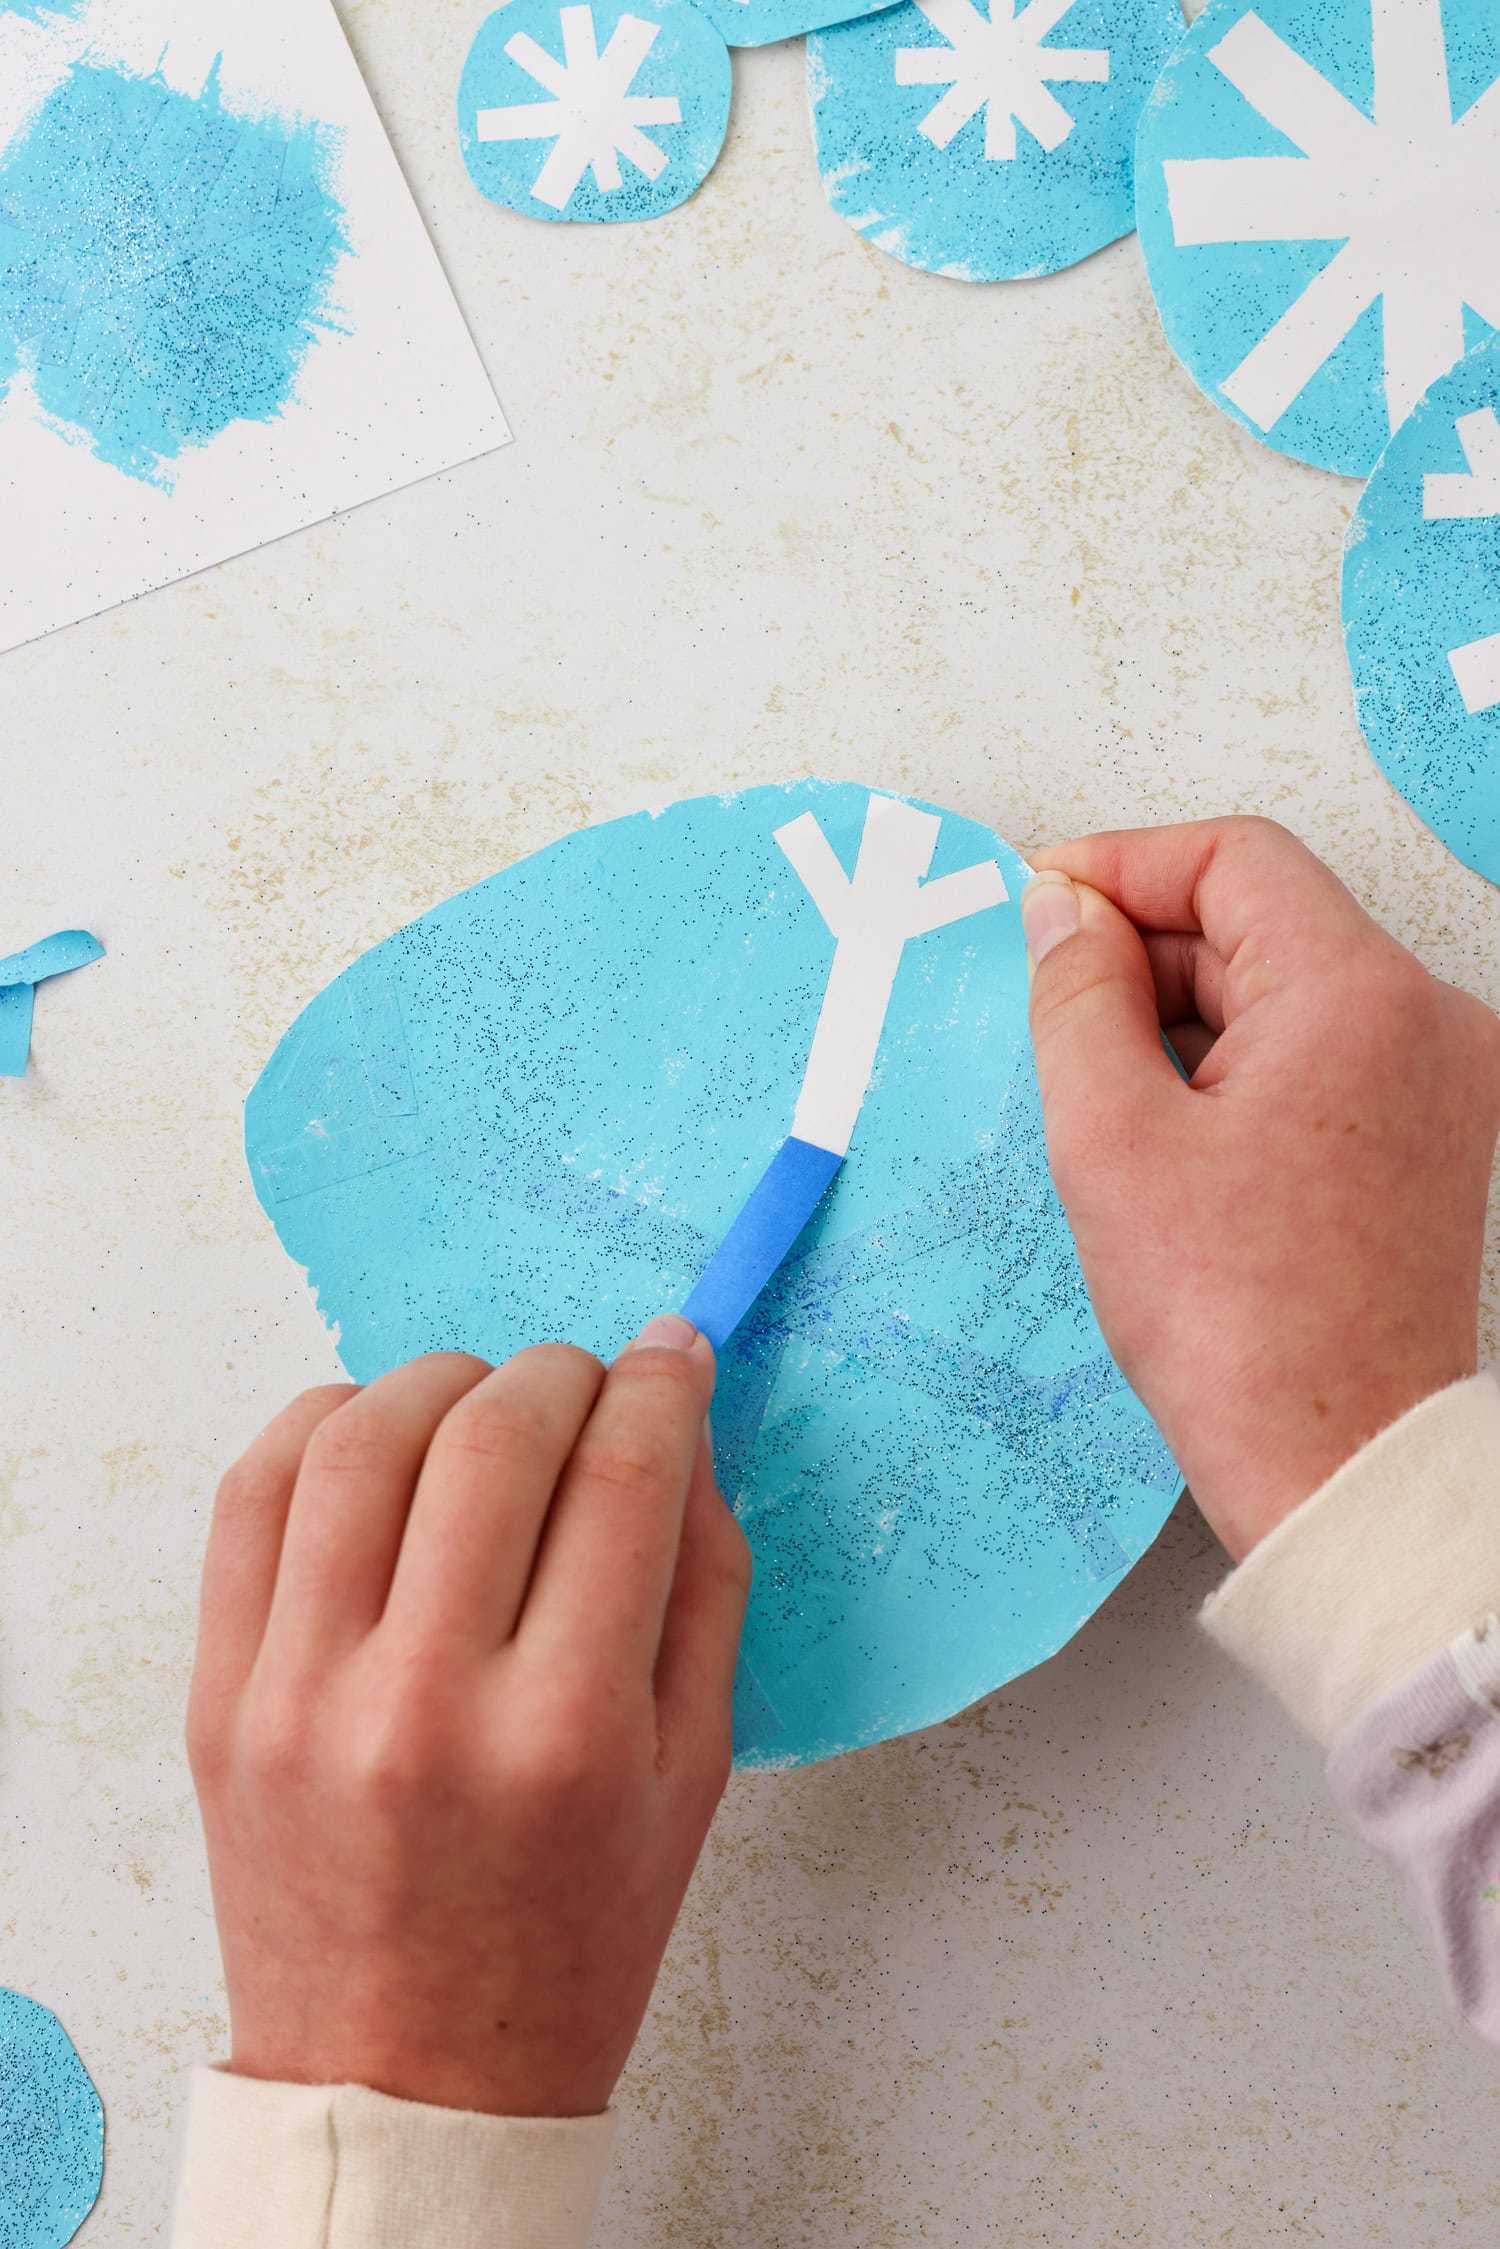
When the paint is dry, cut in a circle around each snowflake. Carefully remove the painter’s tape to reveal the snowflake.
Remove the backing from a large piece of contact paper and place your snowflakes on the sticky side.
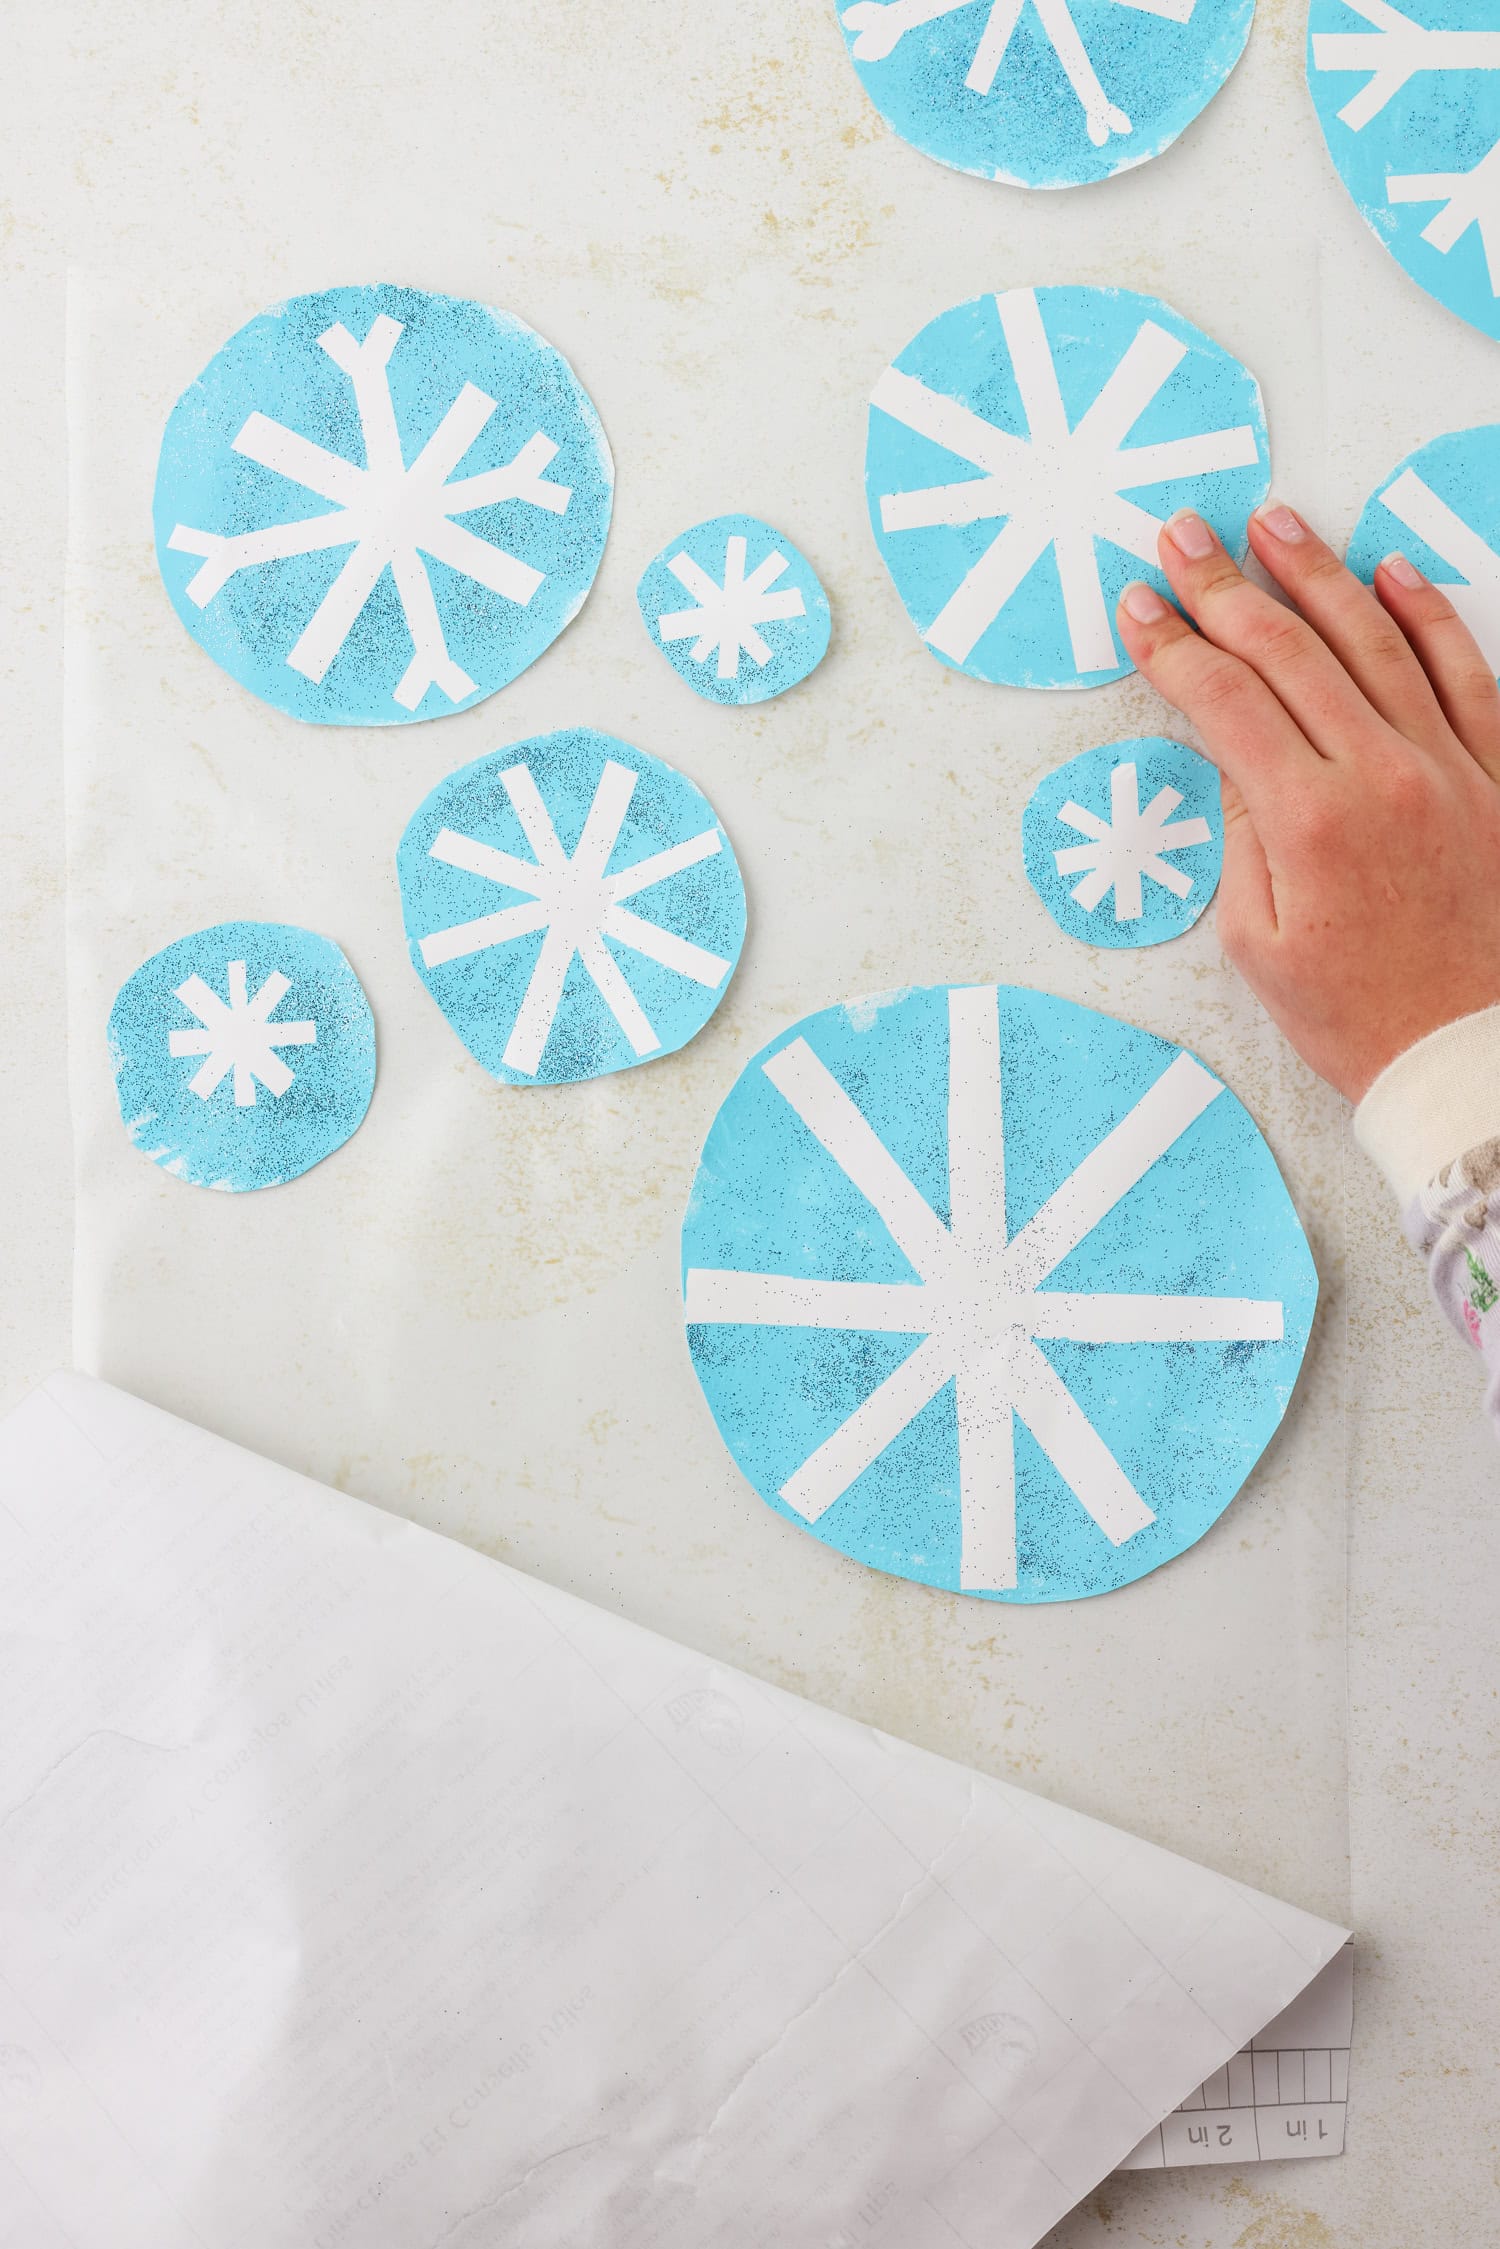
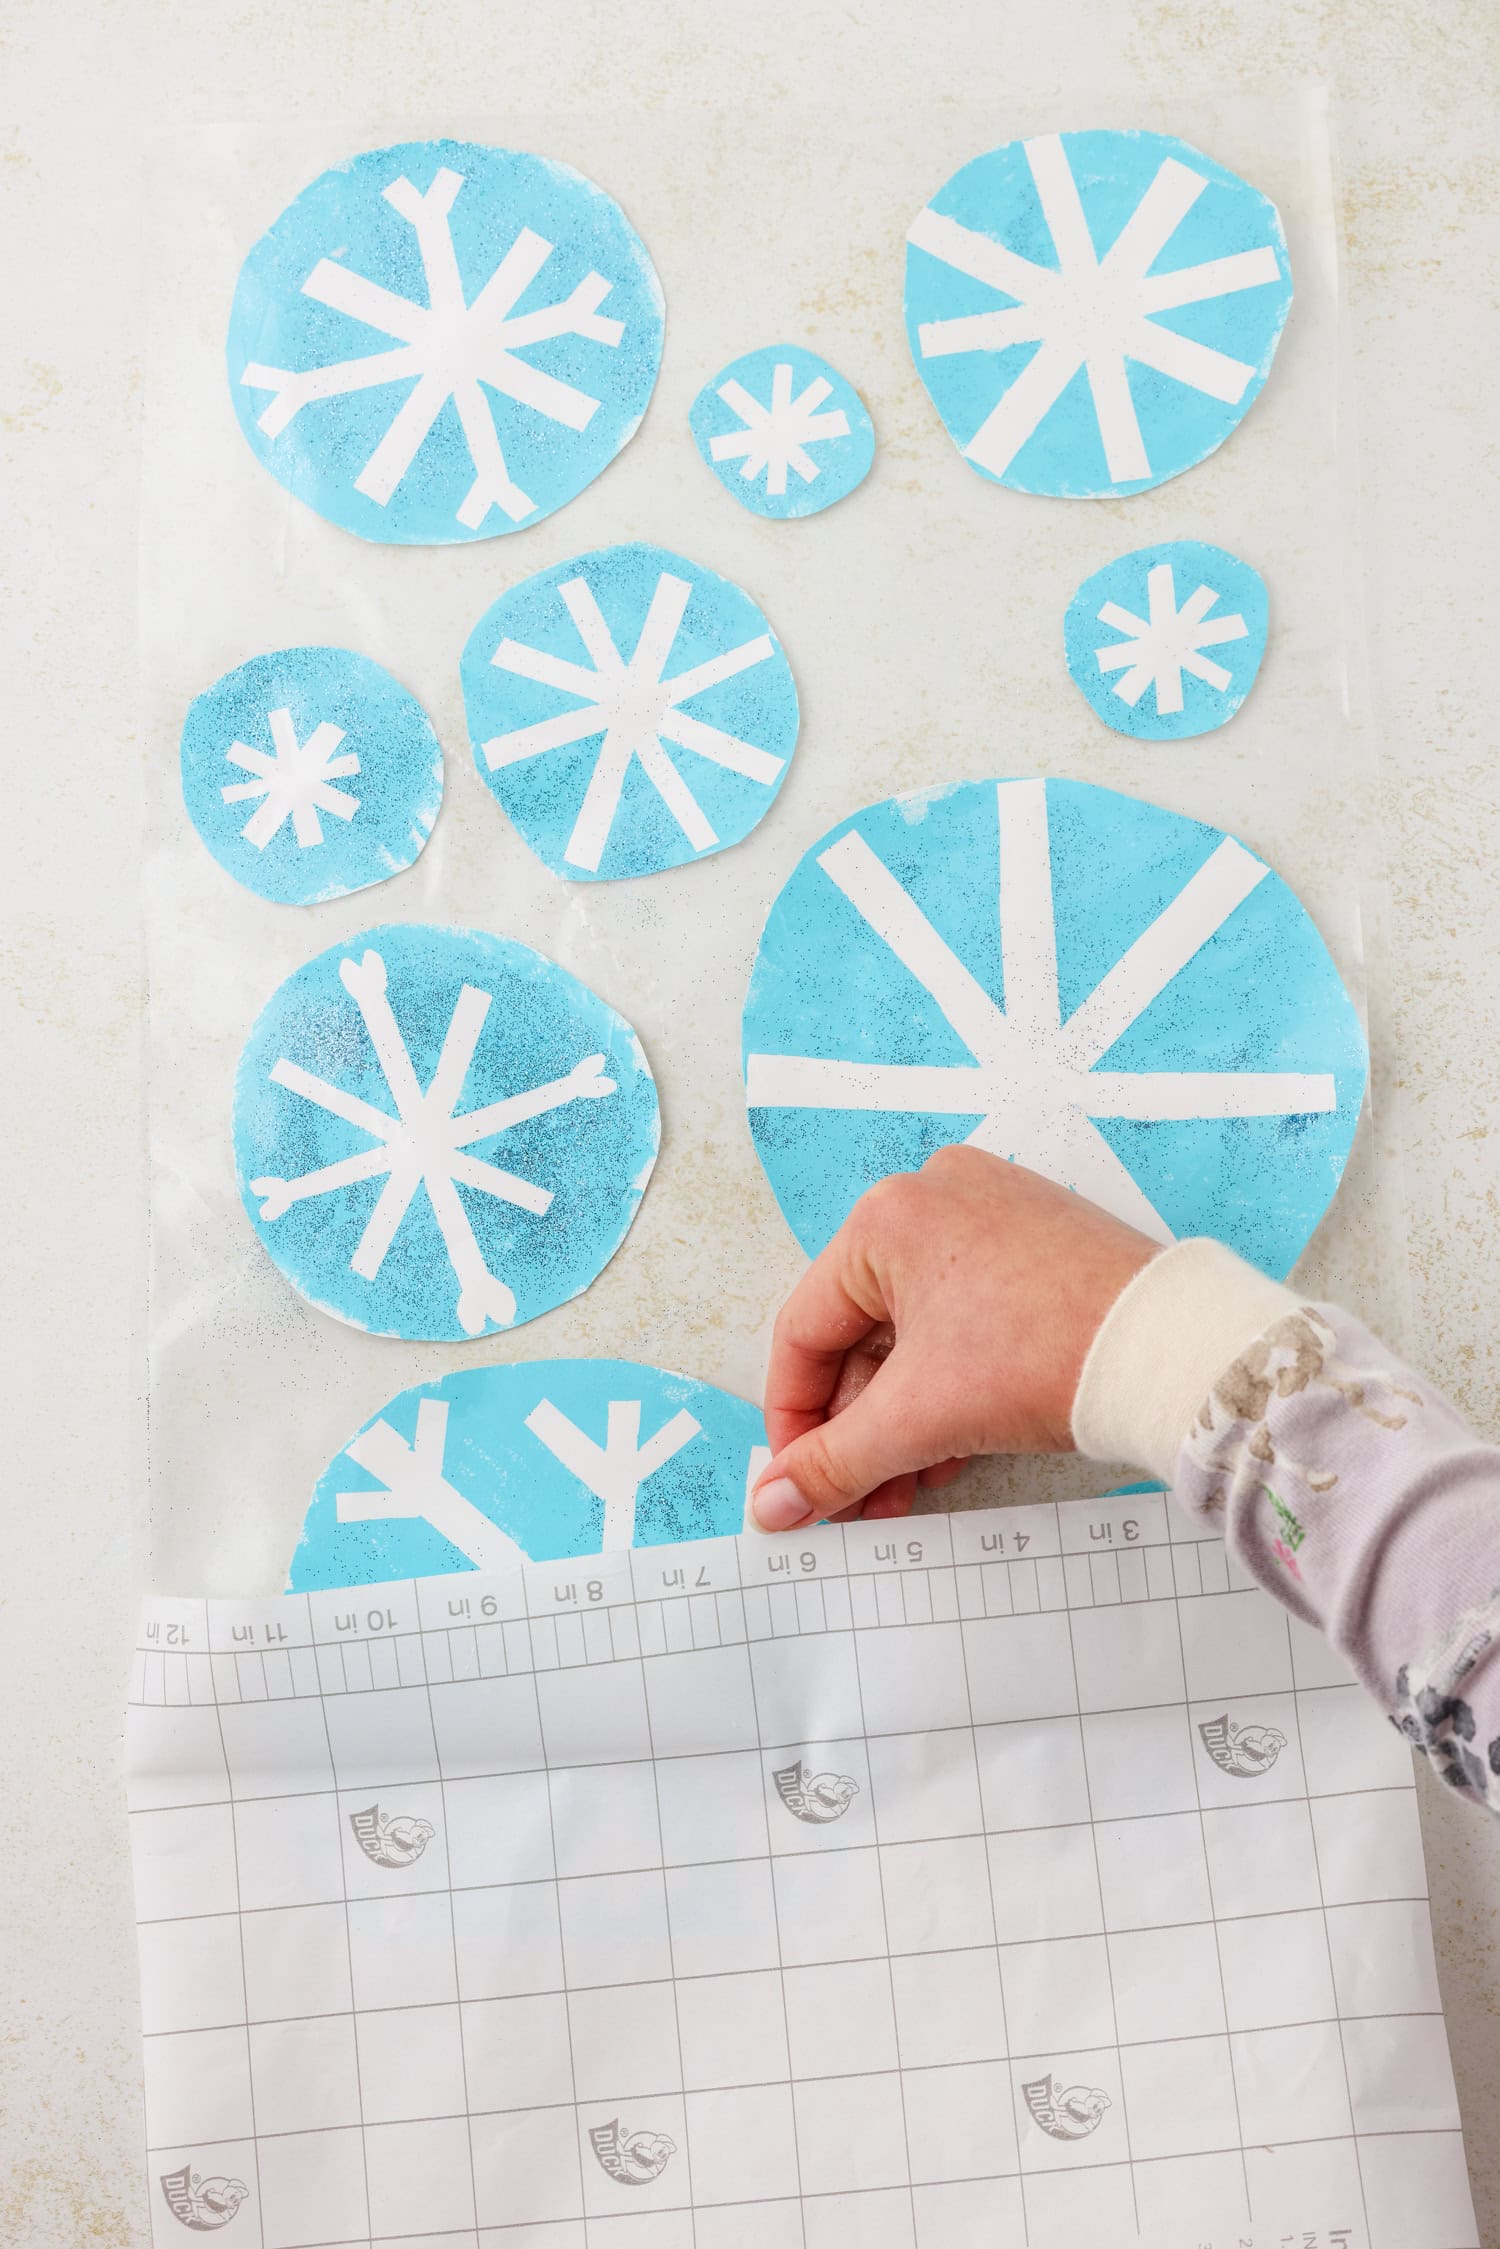
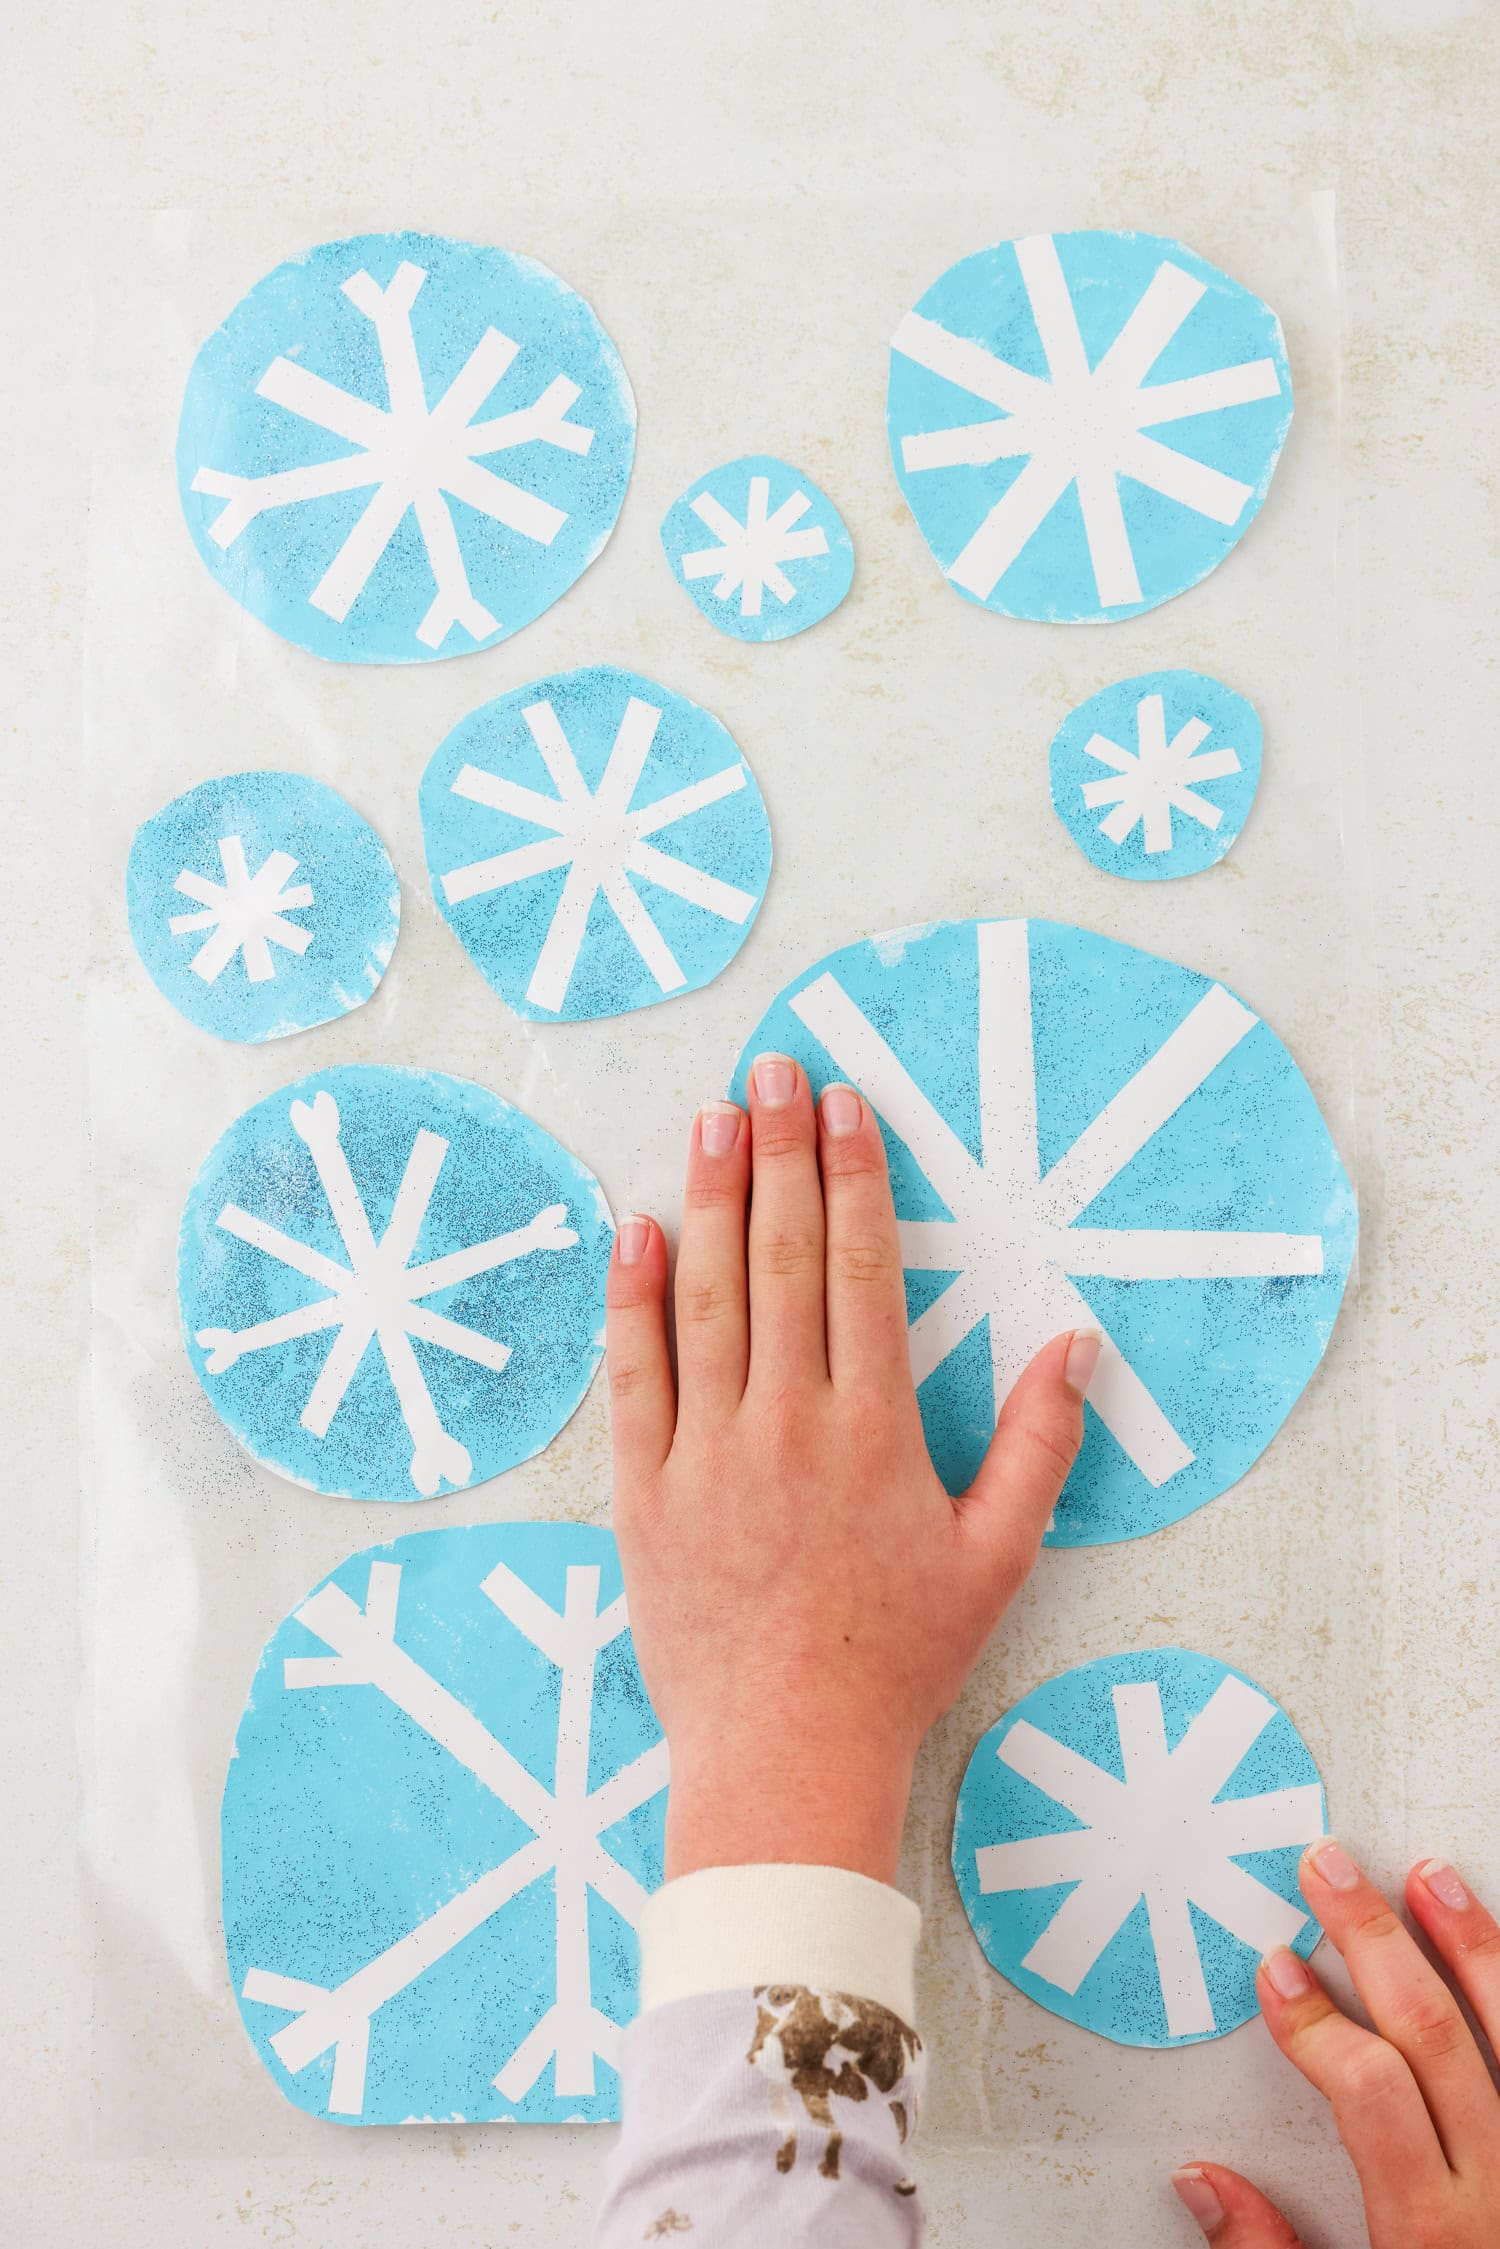
Remove the backing from a second piece of contact paper that is the same size as the first. Place the contact paper, sticky side down, over top of the snowflakes. Press firmly to seal them in.
Cut around each snowflake, leaving a little edge of the contact paper to create a good seal.
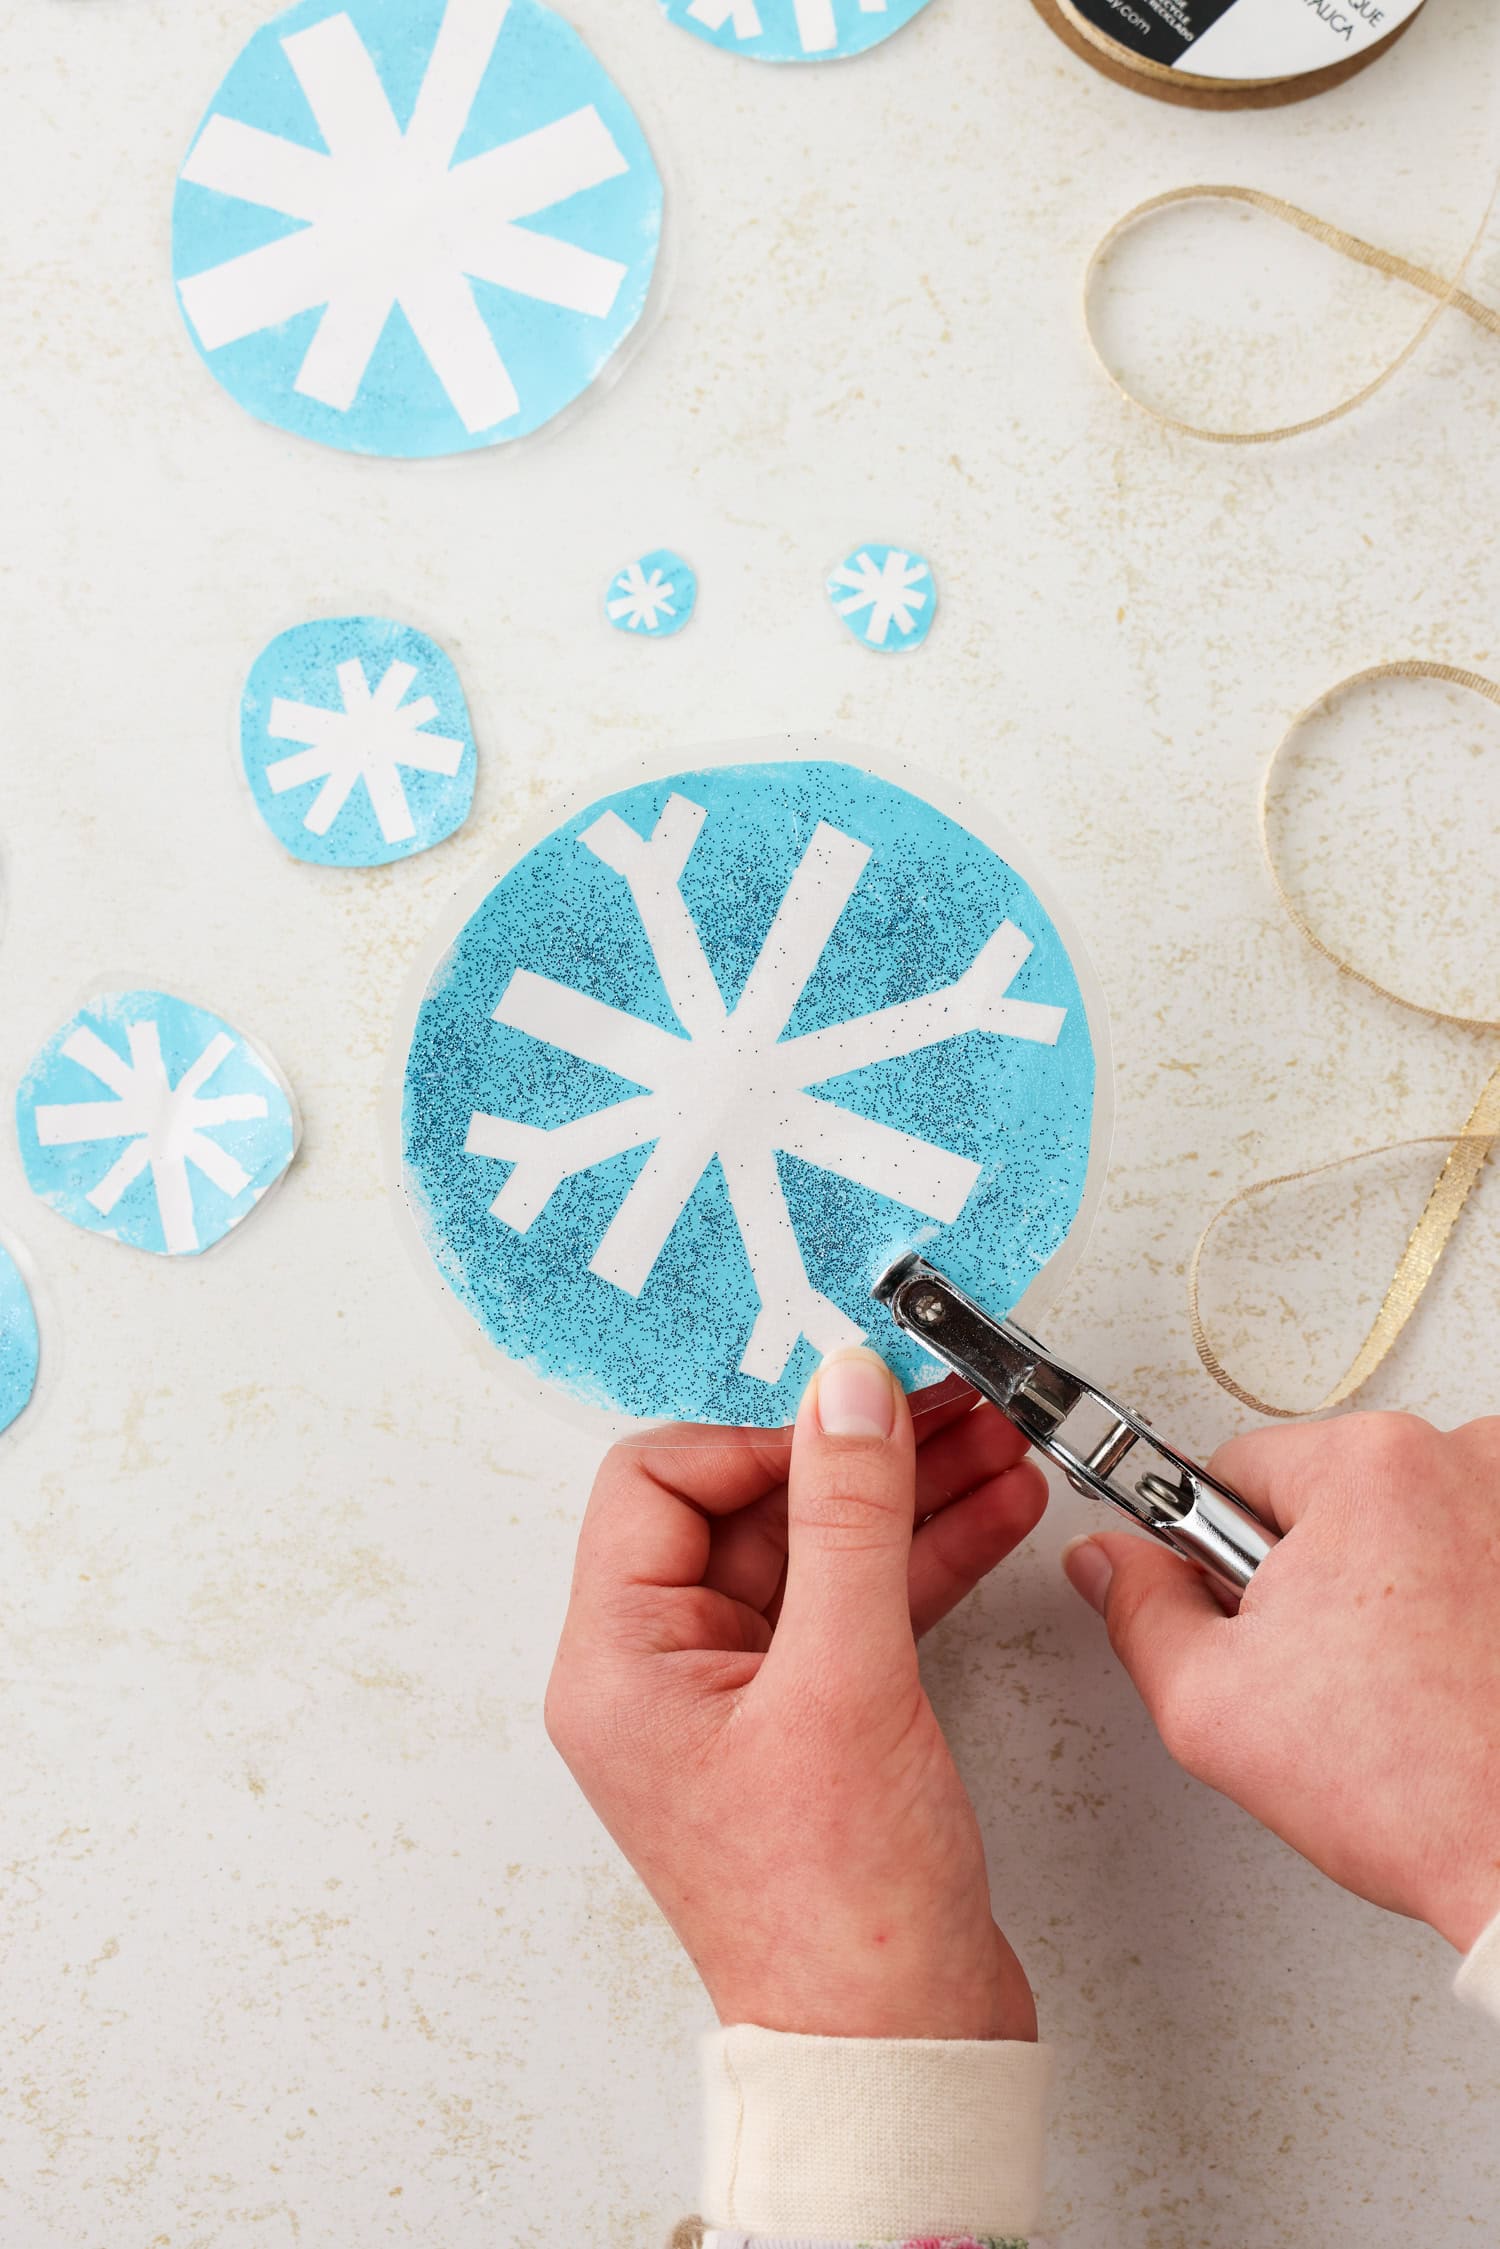
Punch a hole in the top of the snowflakes, about an inch from the top.
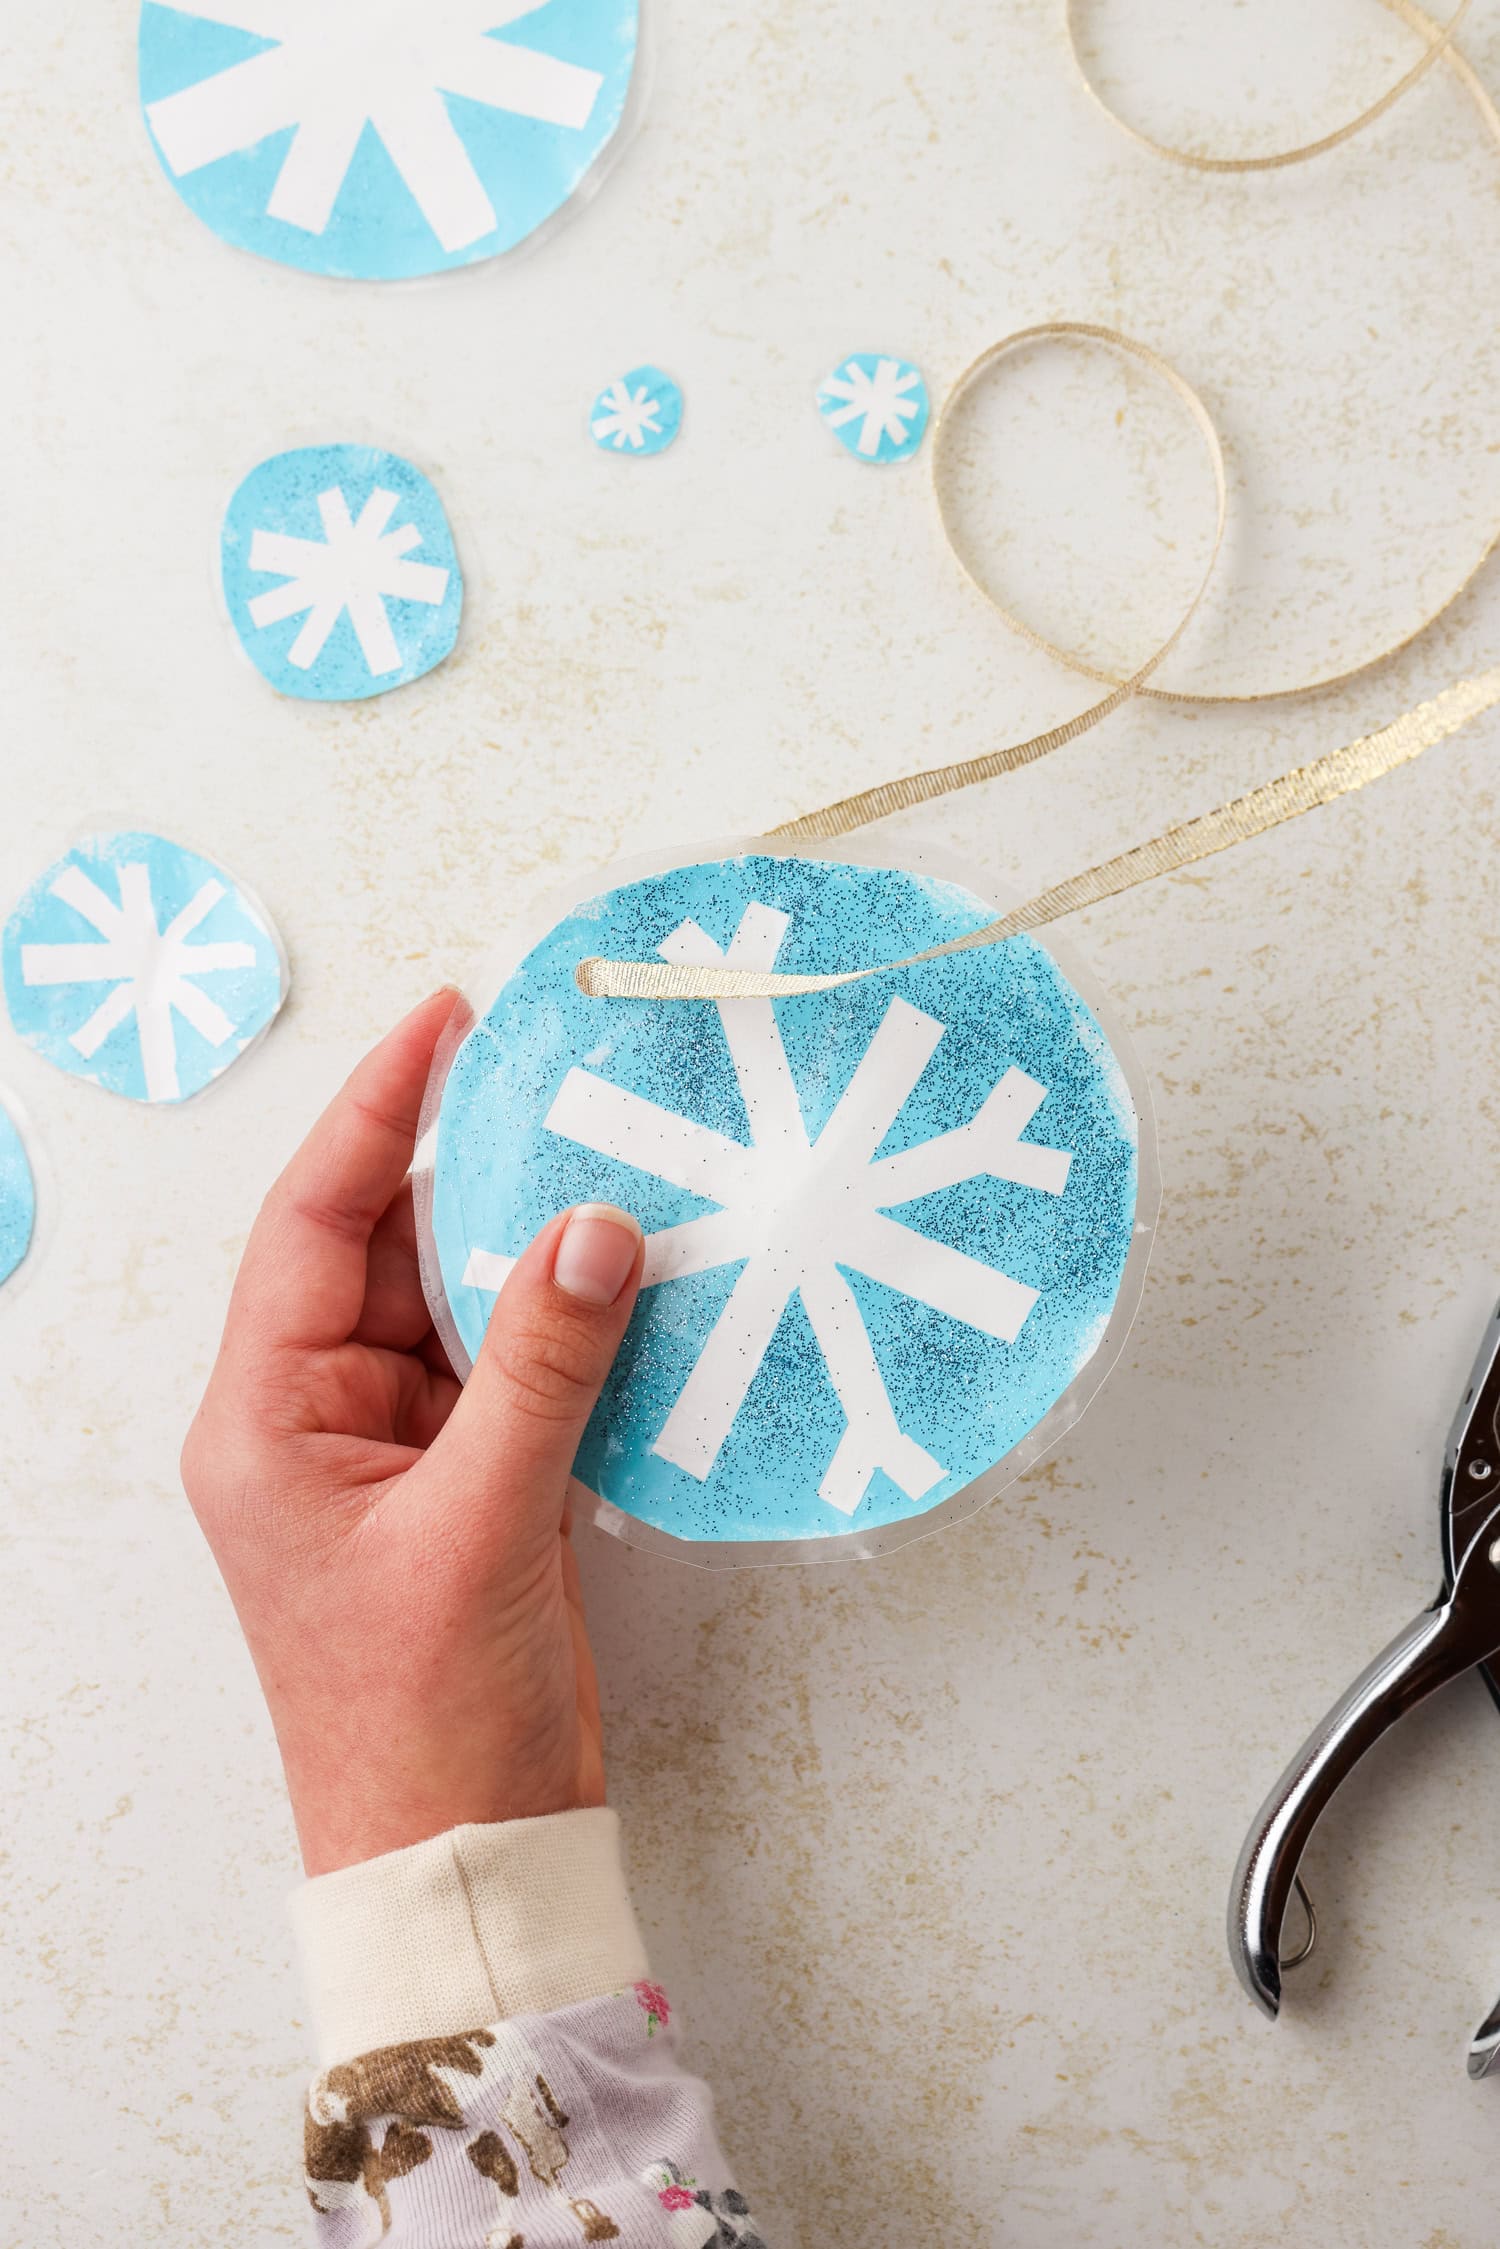
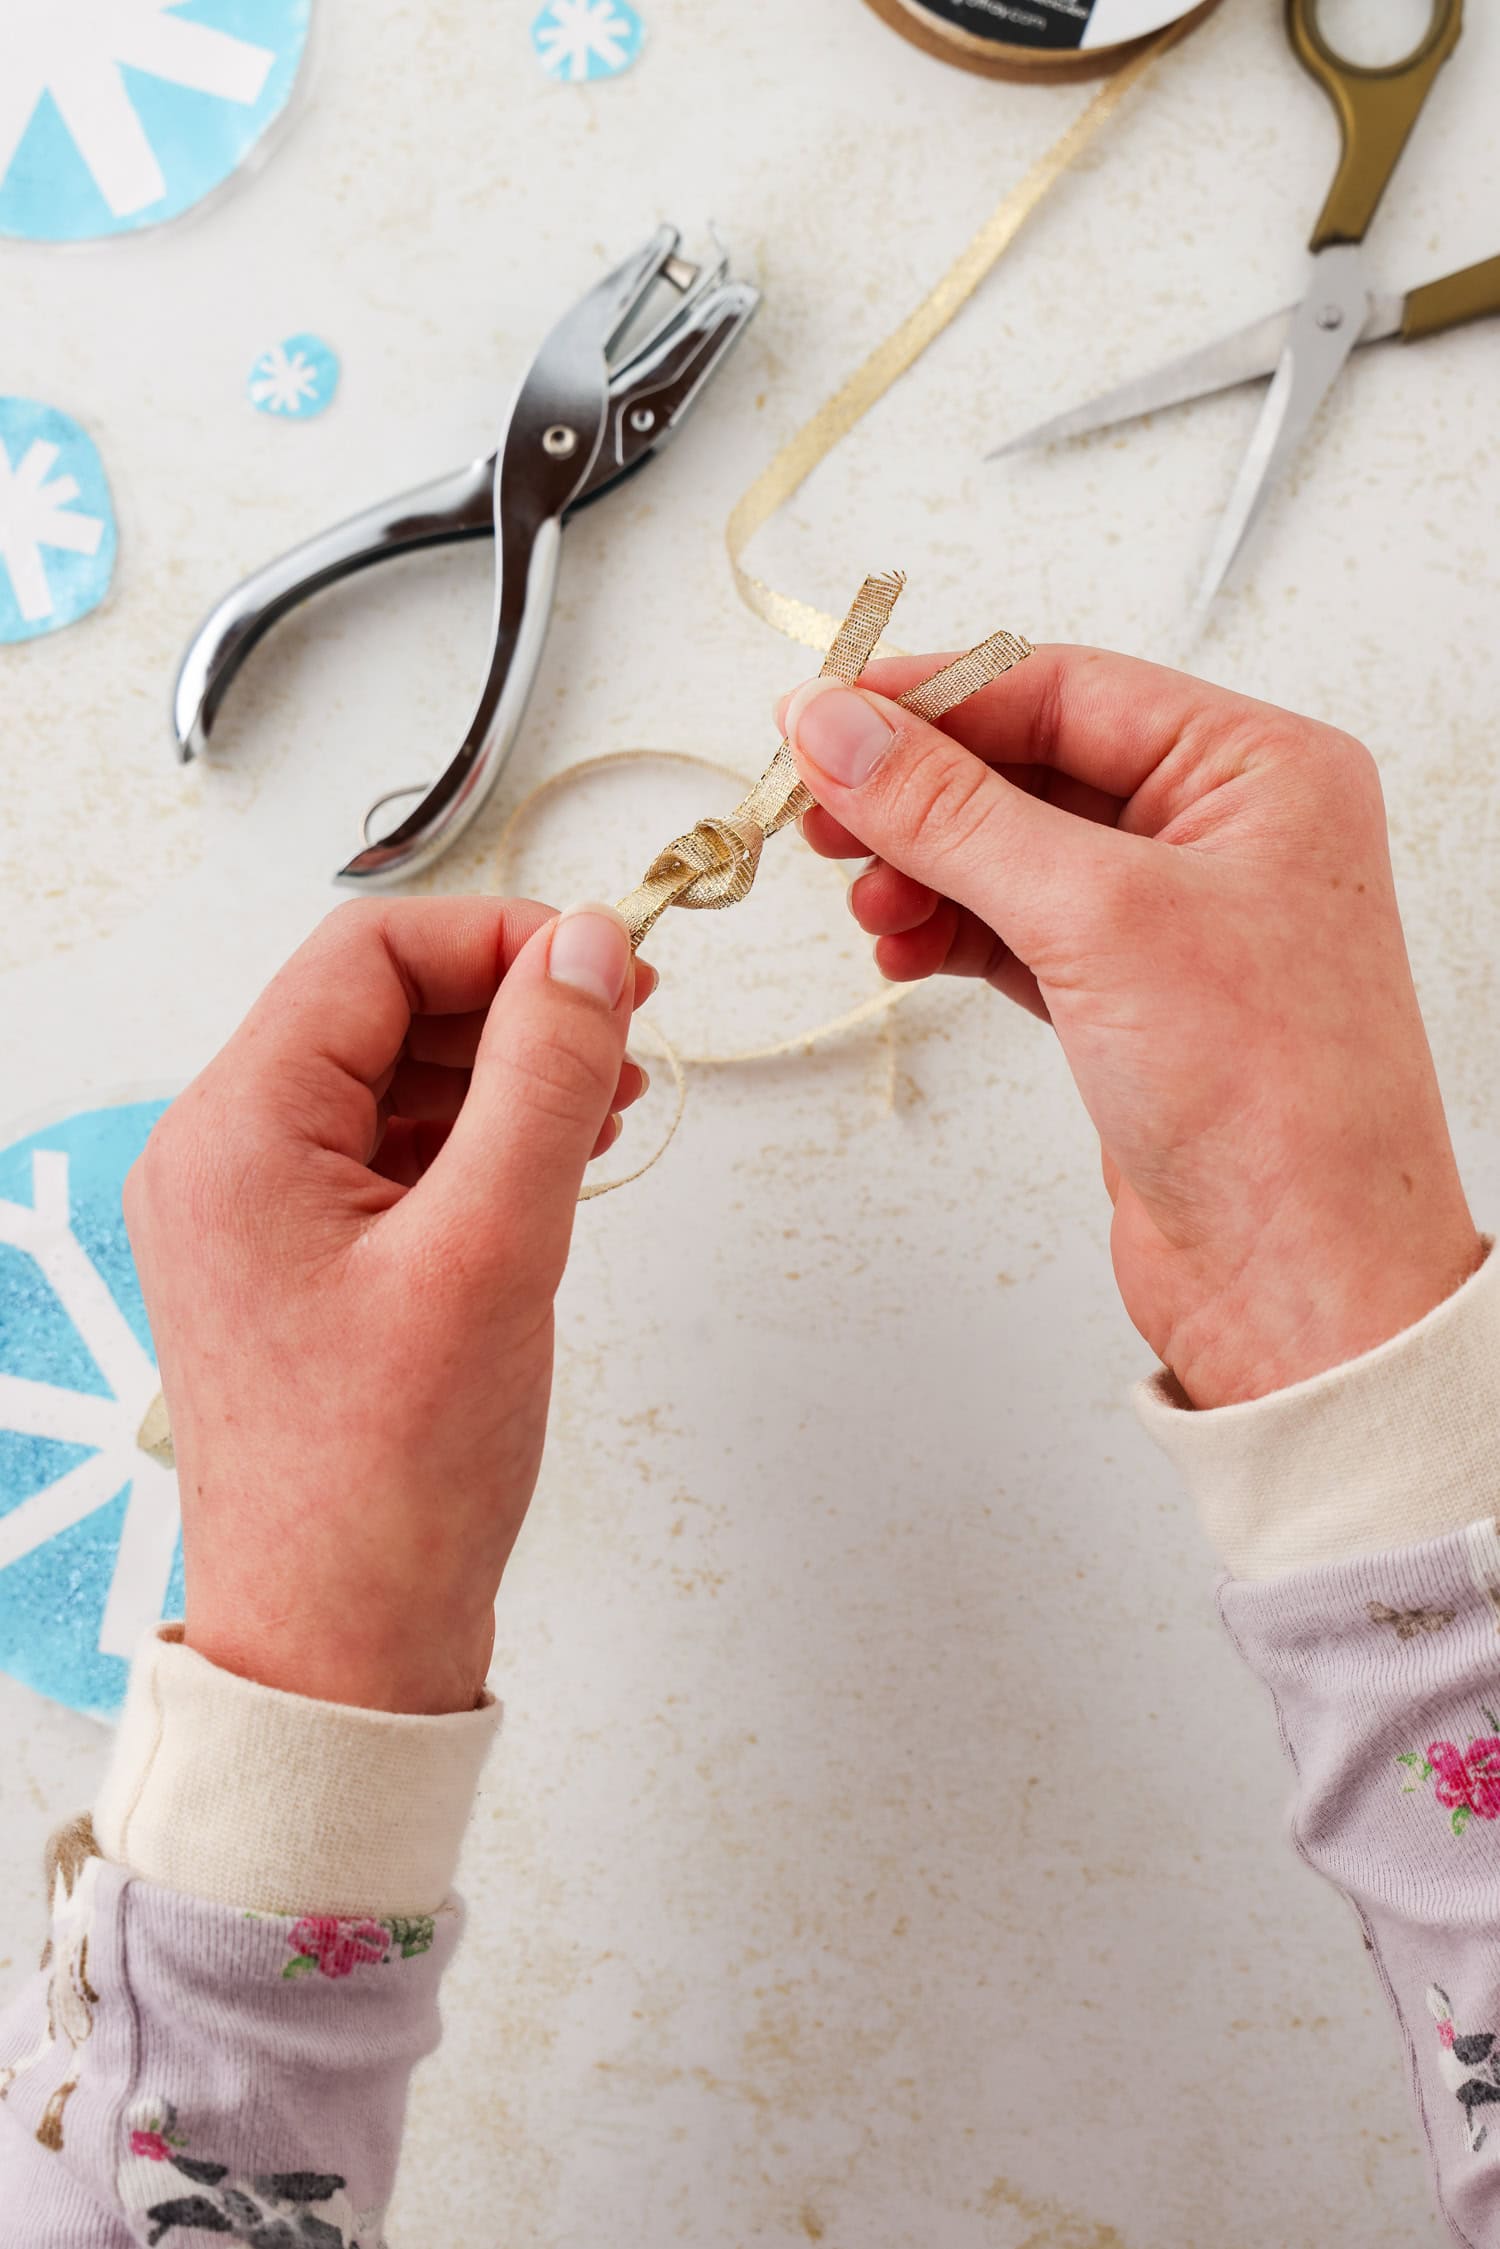
Cut a piece of ribbon long enough to tie it up and hang the snowflake on display.

Pro Tips
- Paint really well all over the tape so that the snowflake really stands out when you pull the tape off.
- If you are unable to locate a roll of contact paper, but you do have a laminator at home, that will work just as well.
- Create fun fridge or exterior door magnets by adding a small magnet to the back of the snowflakes.
- Be sure to use washable paint to make clean up a breeze.

Tape resist snowflake art is sure to be a hit in your household this winter season. Whether you live somewhere with four seasons or not, it is always so festive to have snowflakes on display during this time of year. Playing with the painter’s tape to make different shapes and sizes will really show off everyone’s creativity.
More great winter crafts
- Not sure where to start with paper snowflakes? We’ve got the perfect template ready for you to print off.
- A new winter bookmark is sure to get the kids flying through a few books.
- Minimal supplies and easy prep will have the kids making a paper snowman in no time.
If you take a picture of your Tape Resist Snowflake Crafts and share them on Instagram, make sure to #kidsactivityzone or tag us @kidsactivityzoneblog so we can see them!
Tape Resist Snowflakes Craft
Ingredients
- Blue paint acrylic or washable is fine
- Painter’s tape
- Paint sponges
- Glitter
- Cardstock paper 80lb thickness works great
- Hole puncher
- Con-Tact self-adhesive paper clear (shelf liner)
- Ribbon or yarn
- Scissors
Instructions
- Cut the painter’s tape into strips as you make snowflake shapes and patterns on the cardstock paper. You can make the snowflakes as big or small as you like! Get creative and have fun making symmetrical patterns… Just like real snowflakes!
- Once you have finished making all the snowflake patterns, use a paint sponge to dab a thin layer of paint all over each snowflake. Make sure to paint over the strips of painter’s tape to make the snowflake pattern stand out.
- Sprinkle glitter over each snowflake.
- Allow the paint to dry.
- When the paint is dry, cut around each snowflake. Then remove the painter’s tape to reveal your one-of-a-kind snowflake!
- Place a large piece of contact paper on your work surface and remove the backing. Lay the sticky side facing up and begin placing your snowflakes on top.
- Cut another piece of contact paper to the same size as the first and peel off the backing. Place the contact paper over the snowflakes, sticky side down, making sure the sticky sides of the contact papers are touching each other and the snowflakes are in between. Press firmly all around the snowflakes to seal them in. The contact paper isn’t necessary, but I like to use it for two reasons: It preserves the snowflakes for years to come, and it also helps to contain any loose glitter! This is similar to laminating the snowflakes, which would work, as well!
- Cut around each snowflake. Leave a little edge of the contact paper all around each snowflake. This will help to seal them in better and preserve your work of art!
- Use a hole puncher to make a hole in the top of the snowflakes about an inch from the top. Make sure to leave enough space at the top so that the hole doesn’t rip through.
- Cut a piece of ribbon or yarn long enough to tie it up and hang your snowflake for display. Insert one end of the ribbon through the hole and tie a knot at the top to form a loop. You can also use double-sided sticky tape or sticky dots to display the snowflakes in a window!
- Hang up your snowflakes for display! If you hang them up in a window, you can enjoy the sunshine coming through them!