Milk Carton Gingerbread House
Learn how to make an adorable and fun Milk Carton Gingerbread House! This is the perfect Christmas activity for at home or in the classroom. Kids will love making a gingerbread house using a milk carton as a base and decorating it with graham crackers, icing and candy!

You remember those tiny milk cartons you’d always get in the school cafeteria? Well, what if I told you that you can turn that into the cutest gingerbread house ever? These easy milk carton gingerbread houses are one of the most fun activities of the holiday season. The paper carton makes for an easy guide for littles who maybe can’t build a gingerbread house without a bit of guidance.
And no, this isn’t necessarily a real gingerbread house. You’ll graham crackers as the main structure. But if you’re craving that classic cookie, then make some gingerbread man cookies before you start on this craft! That way, you get the best of both worlds. ‘Tis the season for cheerful activities and crafts! These mini milk carton gingerbread houses will put a smile on anyone’s face.
Why You’ll Love Milk Carton Gingerbread Houses
- These are so much easier to make than regular gingerbread houses. The milk carton provides a sturdy structure to build around, meaning there’s likely to be less frustration and much more fun!
- Upcycle those empty school milk cartons and make a cute graham cracker house instead. These are perfect to make in schools!
- You can make these in a large group setting, or one on one. It’s a wonderful activity for young children since it doesn’t need much guidance and “how-to”.

Ingredients and Supplies for Gingerbread Houses
- Milk cartons – You’ll need some small empty milk carton for to be the center structure for your cute little gingerbread houses.
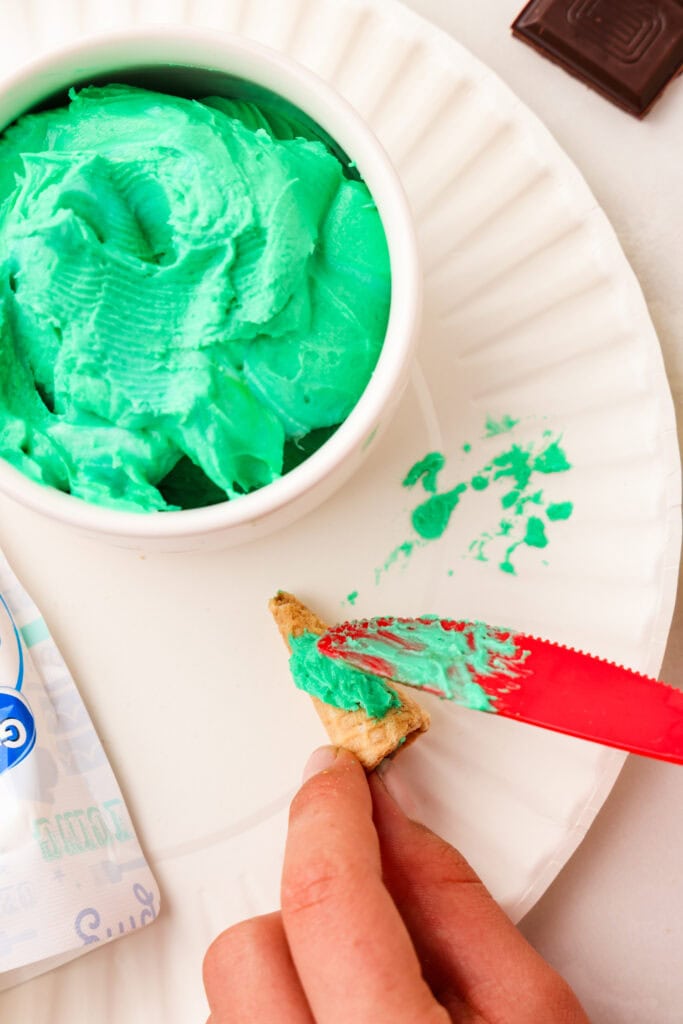
- Plastic knives – Use plastic knives to spread green icing over the bugles and create little Christmas trees as landscaping for your gingerbread house.
- Green frosting – You don’t have to use green frosting and bugles, but it really does make the cutest mini Christmas trees!
- Paper plates – Keep your work space clean and give your gingerbread houses a base with some plain white paper plates.
- Edible adhesive – You’ll need edible adhesive to attach the graham crackers to the outside of the paper milk cartons.
- Glue – Not to worry! You won’t be using the glue on any of the food. Just use this to reseal the flap on your milk carton so that it’s easy to build on.
- Graham crackers – You’ll need some boxes of graham crackers that break down into even squares.
- Cookie icing – White cookie icing is the easiest way to decorate these mini gingerbread houses.
- Mini m&ms – Use the teeny tiny M&Ms to decorate the outside of your graham cracker gingerbread houses.
- Marshmallows – Marshmallows resemble snow, which you can never have too much of here! It adds to the charm of this adorable little creation.
- Chocolate – Make a door decoration out of a square of chocolate. Any chocolate will work, just make sure that it can break into squares!
- Peppermints – A ginger bread house just isn’t complete unless there’s some kind of peppermint or candy cane on it.
- Gumdrops – Gumdrops are another classic, must-have decoration for your easy gingerbread house.
- Bugles – Turn these cone-shaped chips into little Christmas tree decorations for the “front yard” of your gingerbread house.
- Crackers – Grab some crackers in a shape of an animal! I love the little penguin shaped crackers for my mini gingerbread houses.

How to Make a Milk Carton Gingerbread House
Ready to make this easy craft? Then let’s get started:
Prep the Carton
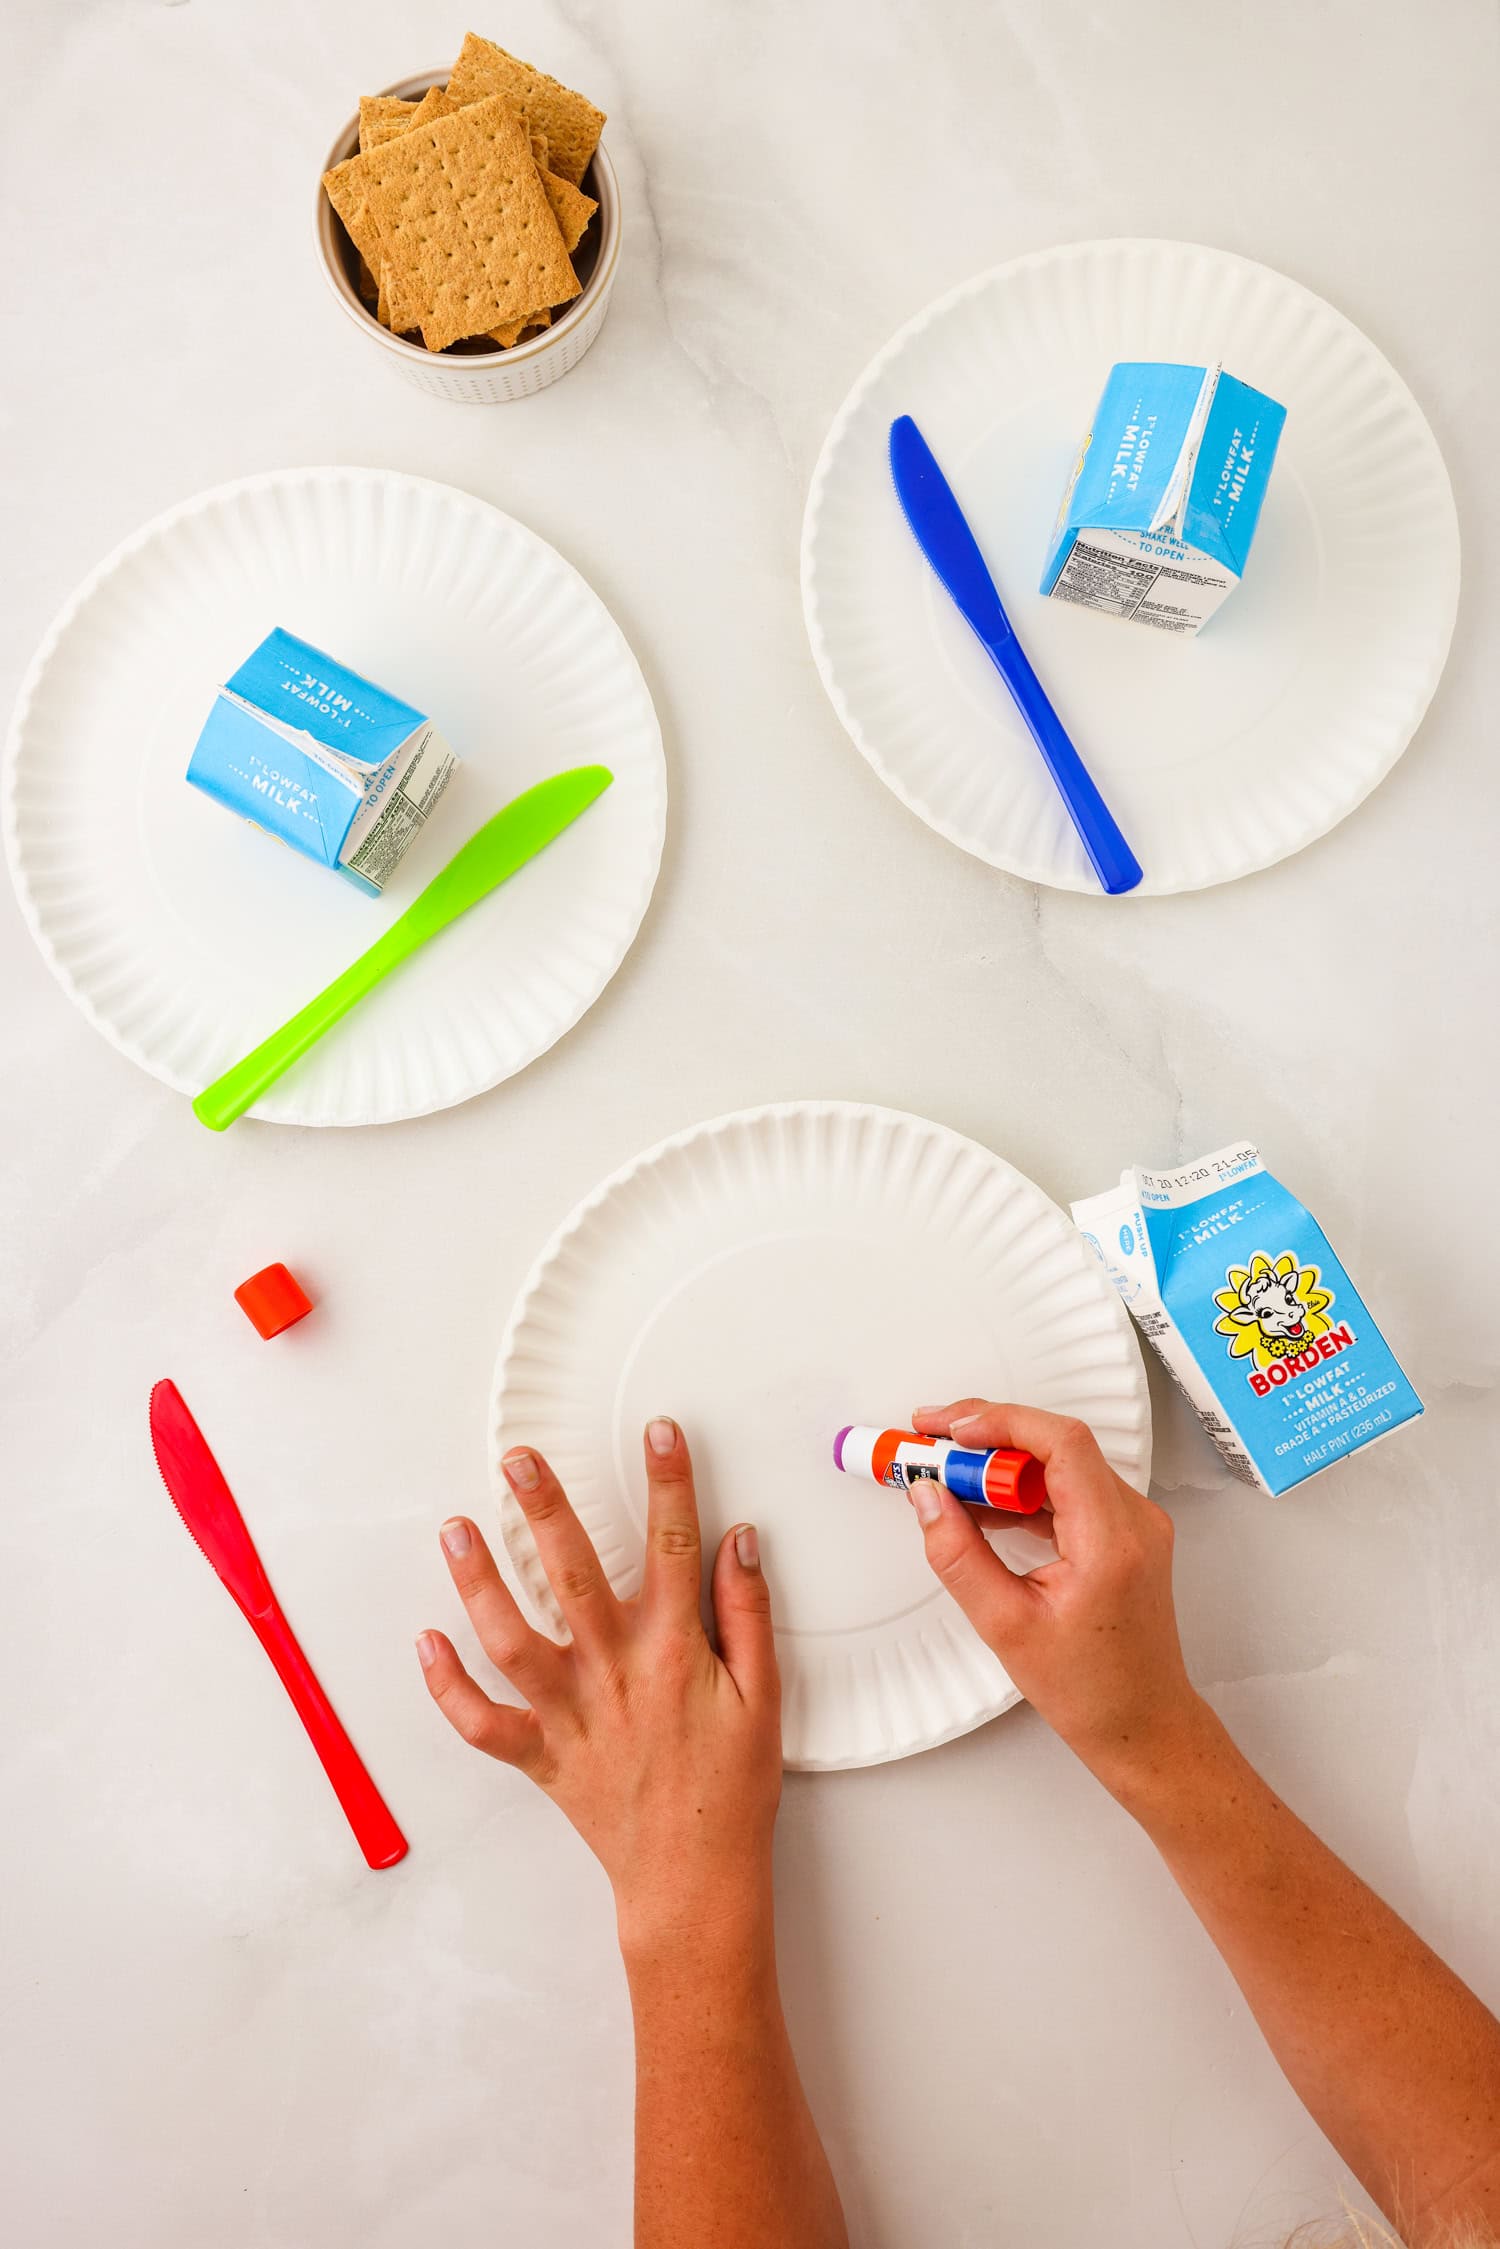
It is very important to make sure that your milk cartons are empty, clean and dry before beginning this craft. I like to rinse the milk cartons thoroughly and then set them out in the sun to dry for a full day.
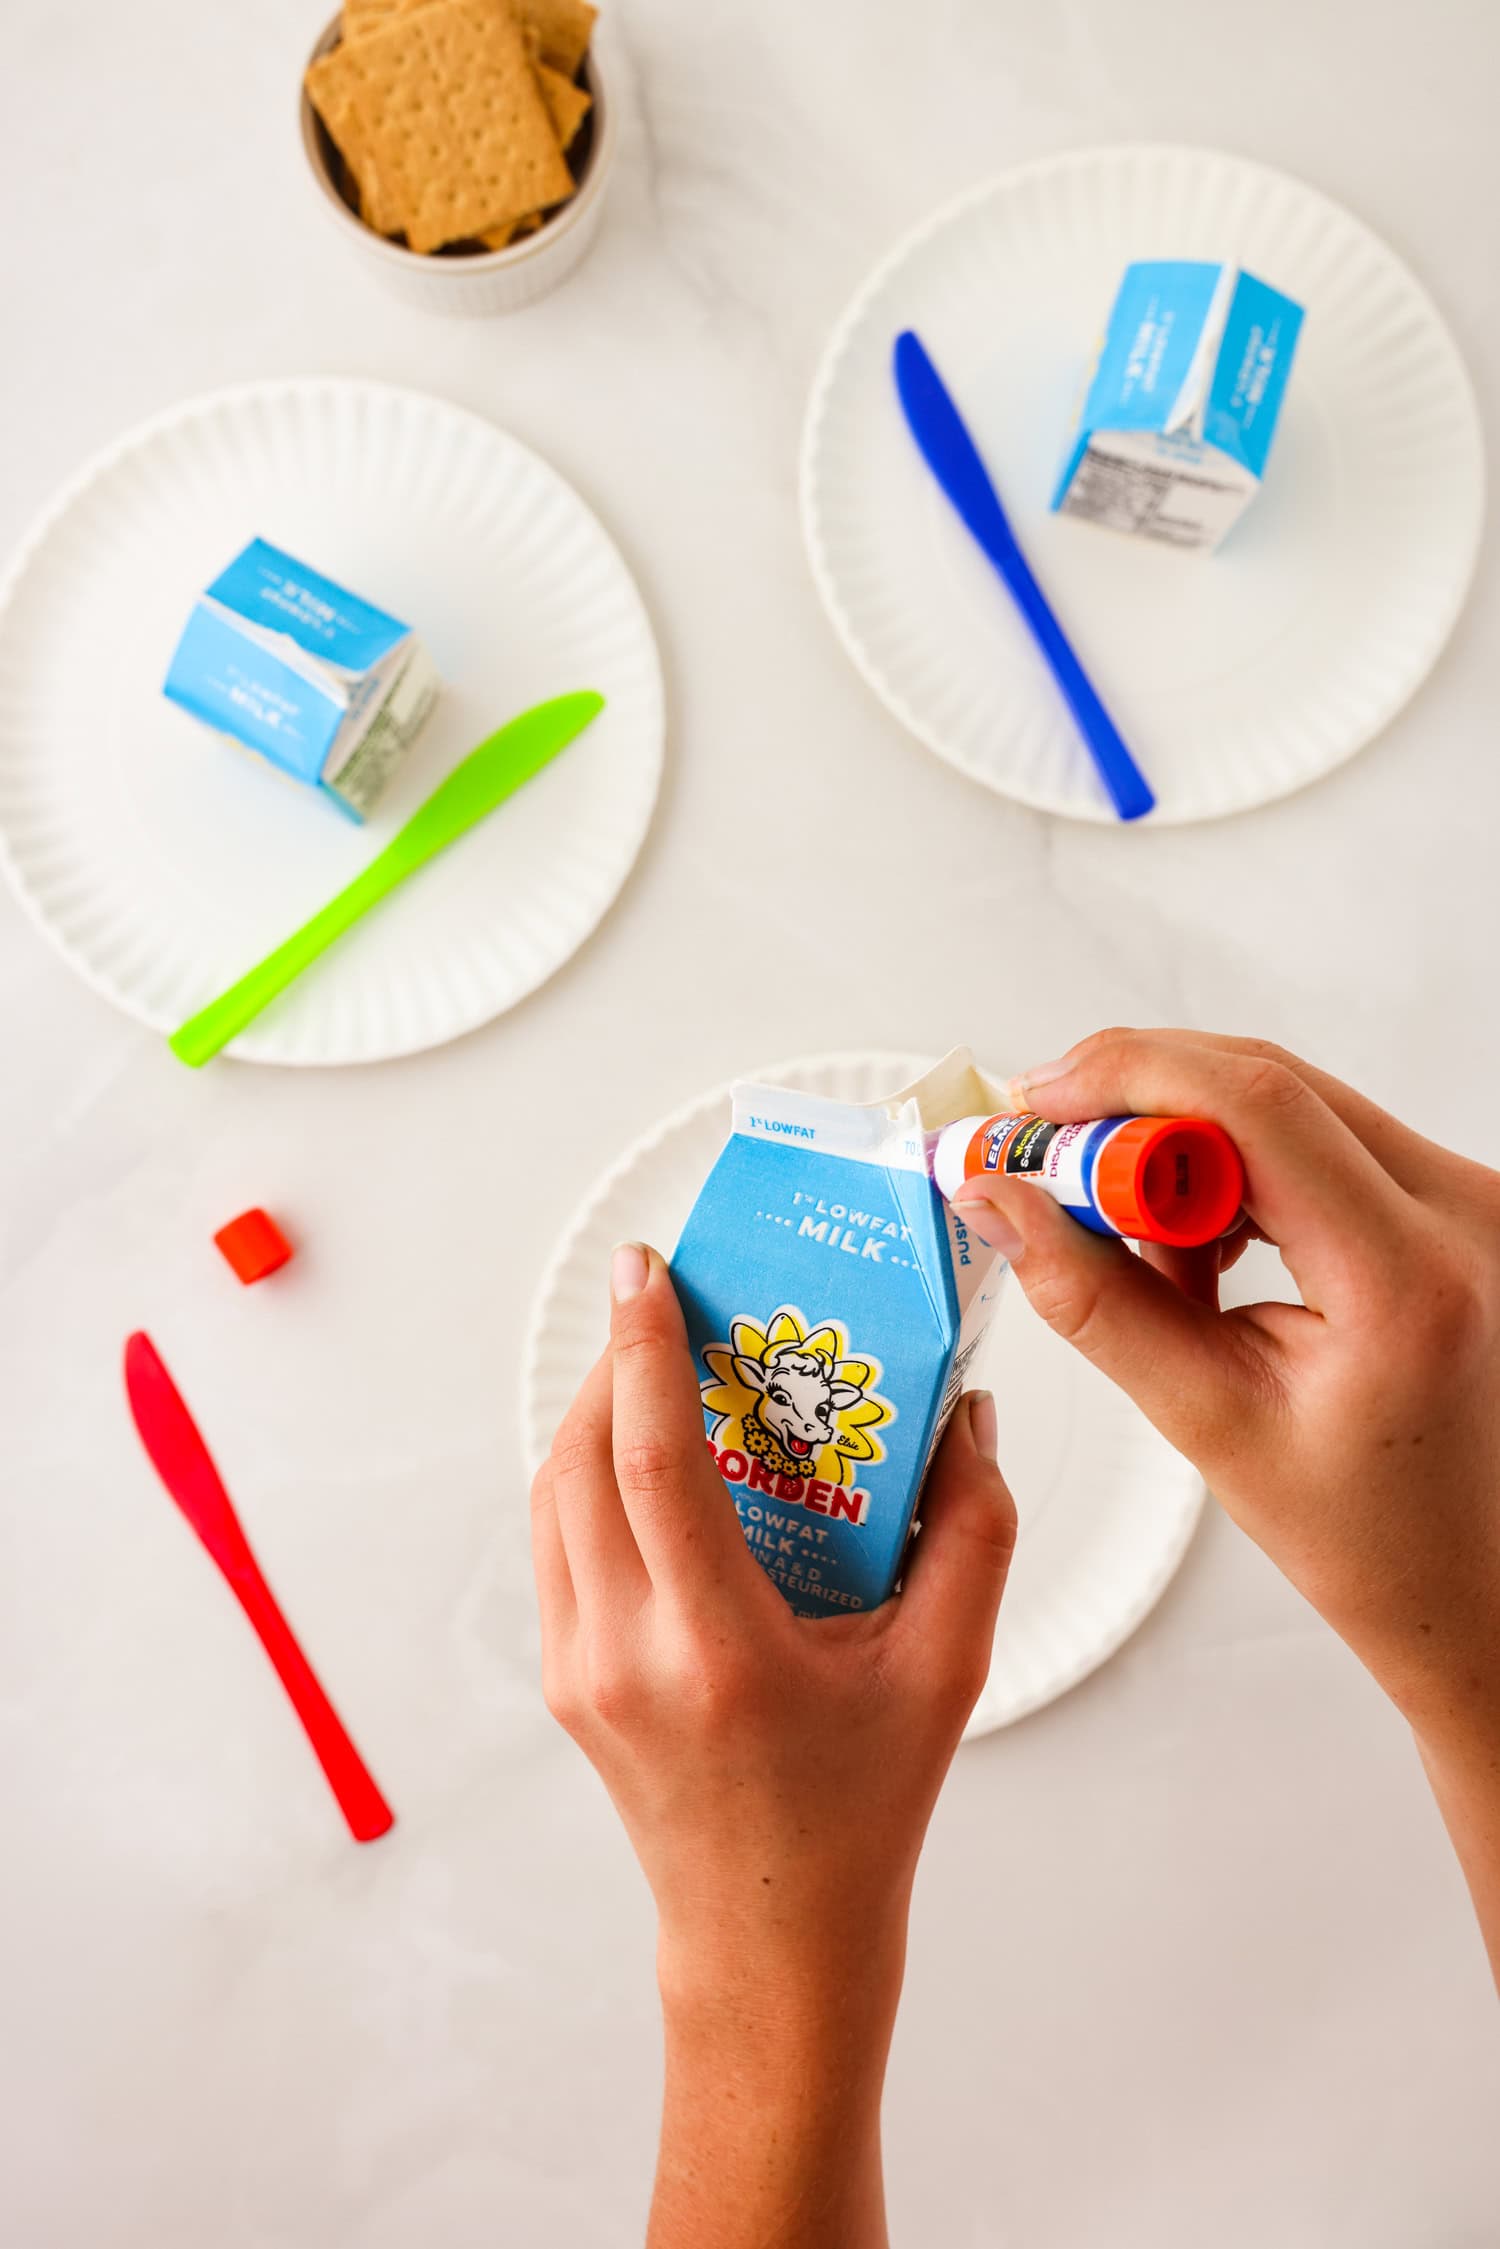
Once they’re clean and dry, seal the opening shut using a bit of glue. Press and hold shut for a minute to keep it sealed up.
Rub a generous amount of school glue on the paper plate and glue the milk carton to the plate. This will keep the gingerbread house still while little hands work. The paper plate will also serve as the “yard” for lots of decorations.
Allow the glue to dry for a few minutes. Again, if you are prepping several milk cartons for this craft, it may be best to use hot glue.
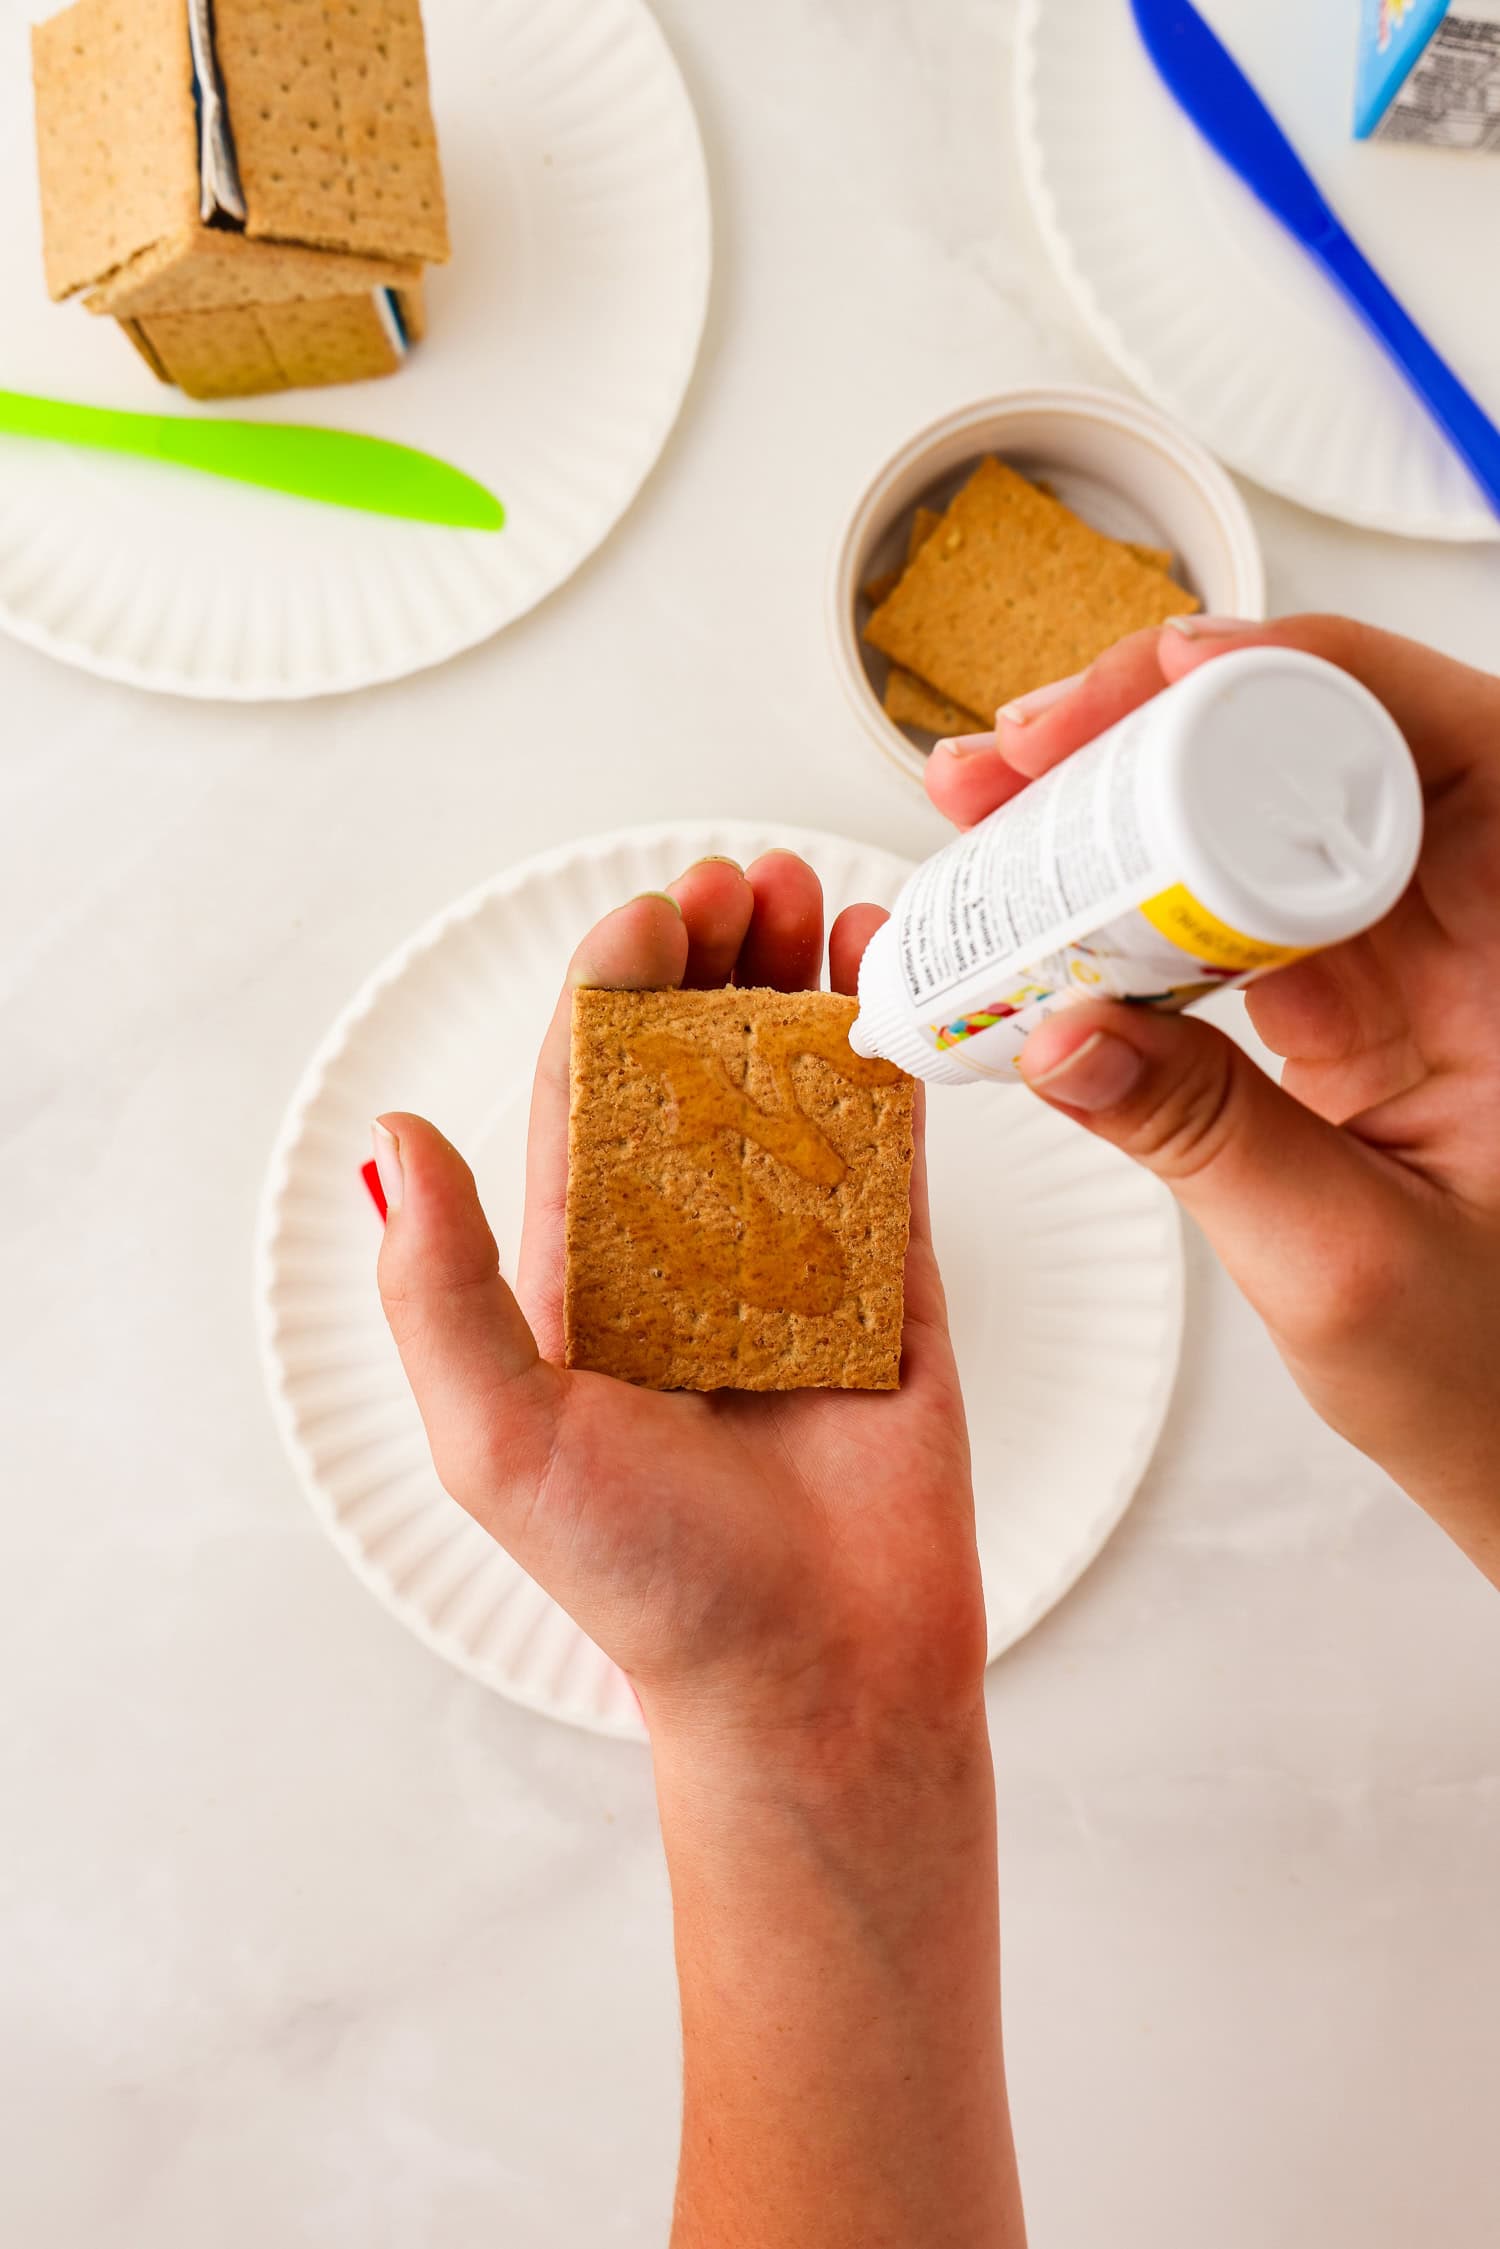
Once the milk carton is stuck to the paper plate, you can begin assembling the house by “gluing” the graham crackers to the top and sides of the milk carton with edible adhesive.
Build the House
You will need 7 halves (3 ½ graham crackers) per gingerbread house. Four halves for the sides, two halves for the roof, and one half cut into triangles to cover the front and back just below the roof.
Use a generous amount of edible adhesive to keep the graham crackers in place. Gently press and hold in place until the graham crackers stay on the sides of the gingerbread house. Pressing too hard will cause the graham crackers to crack!
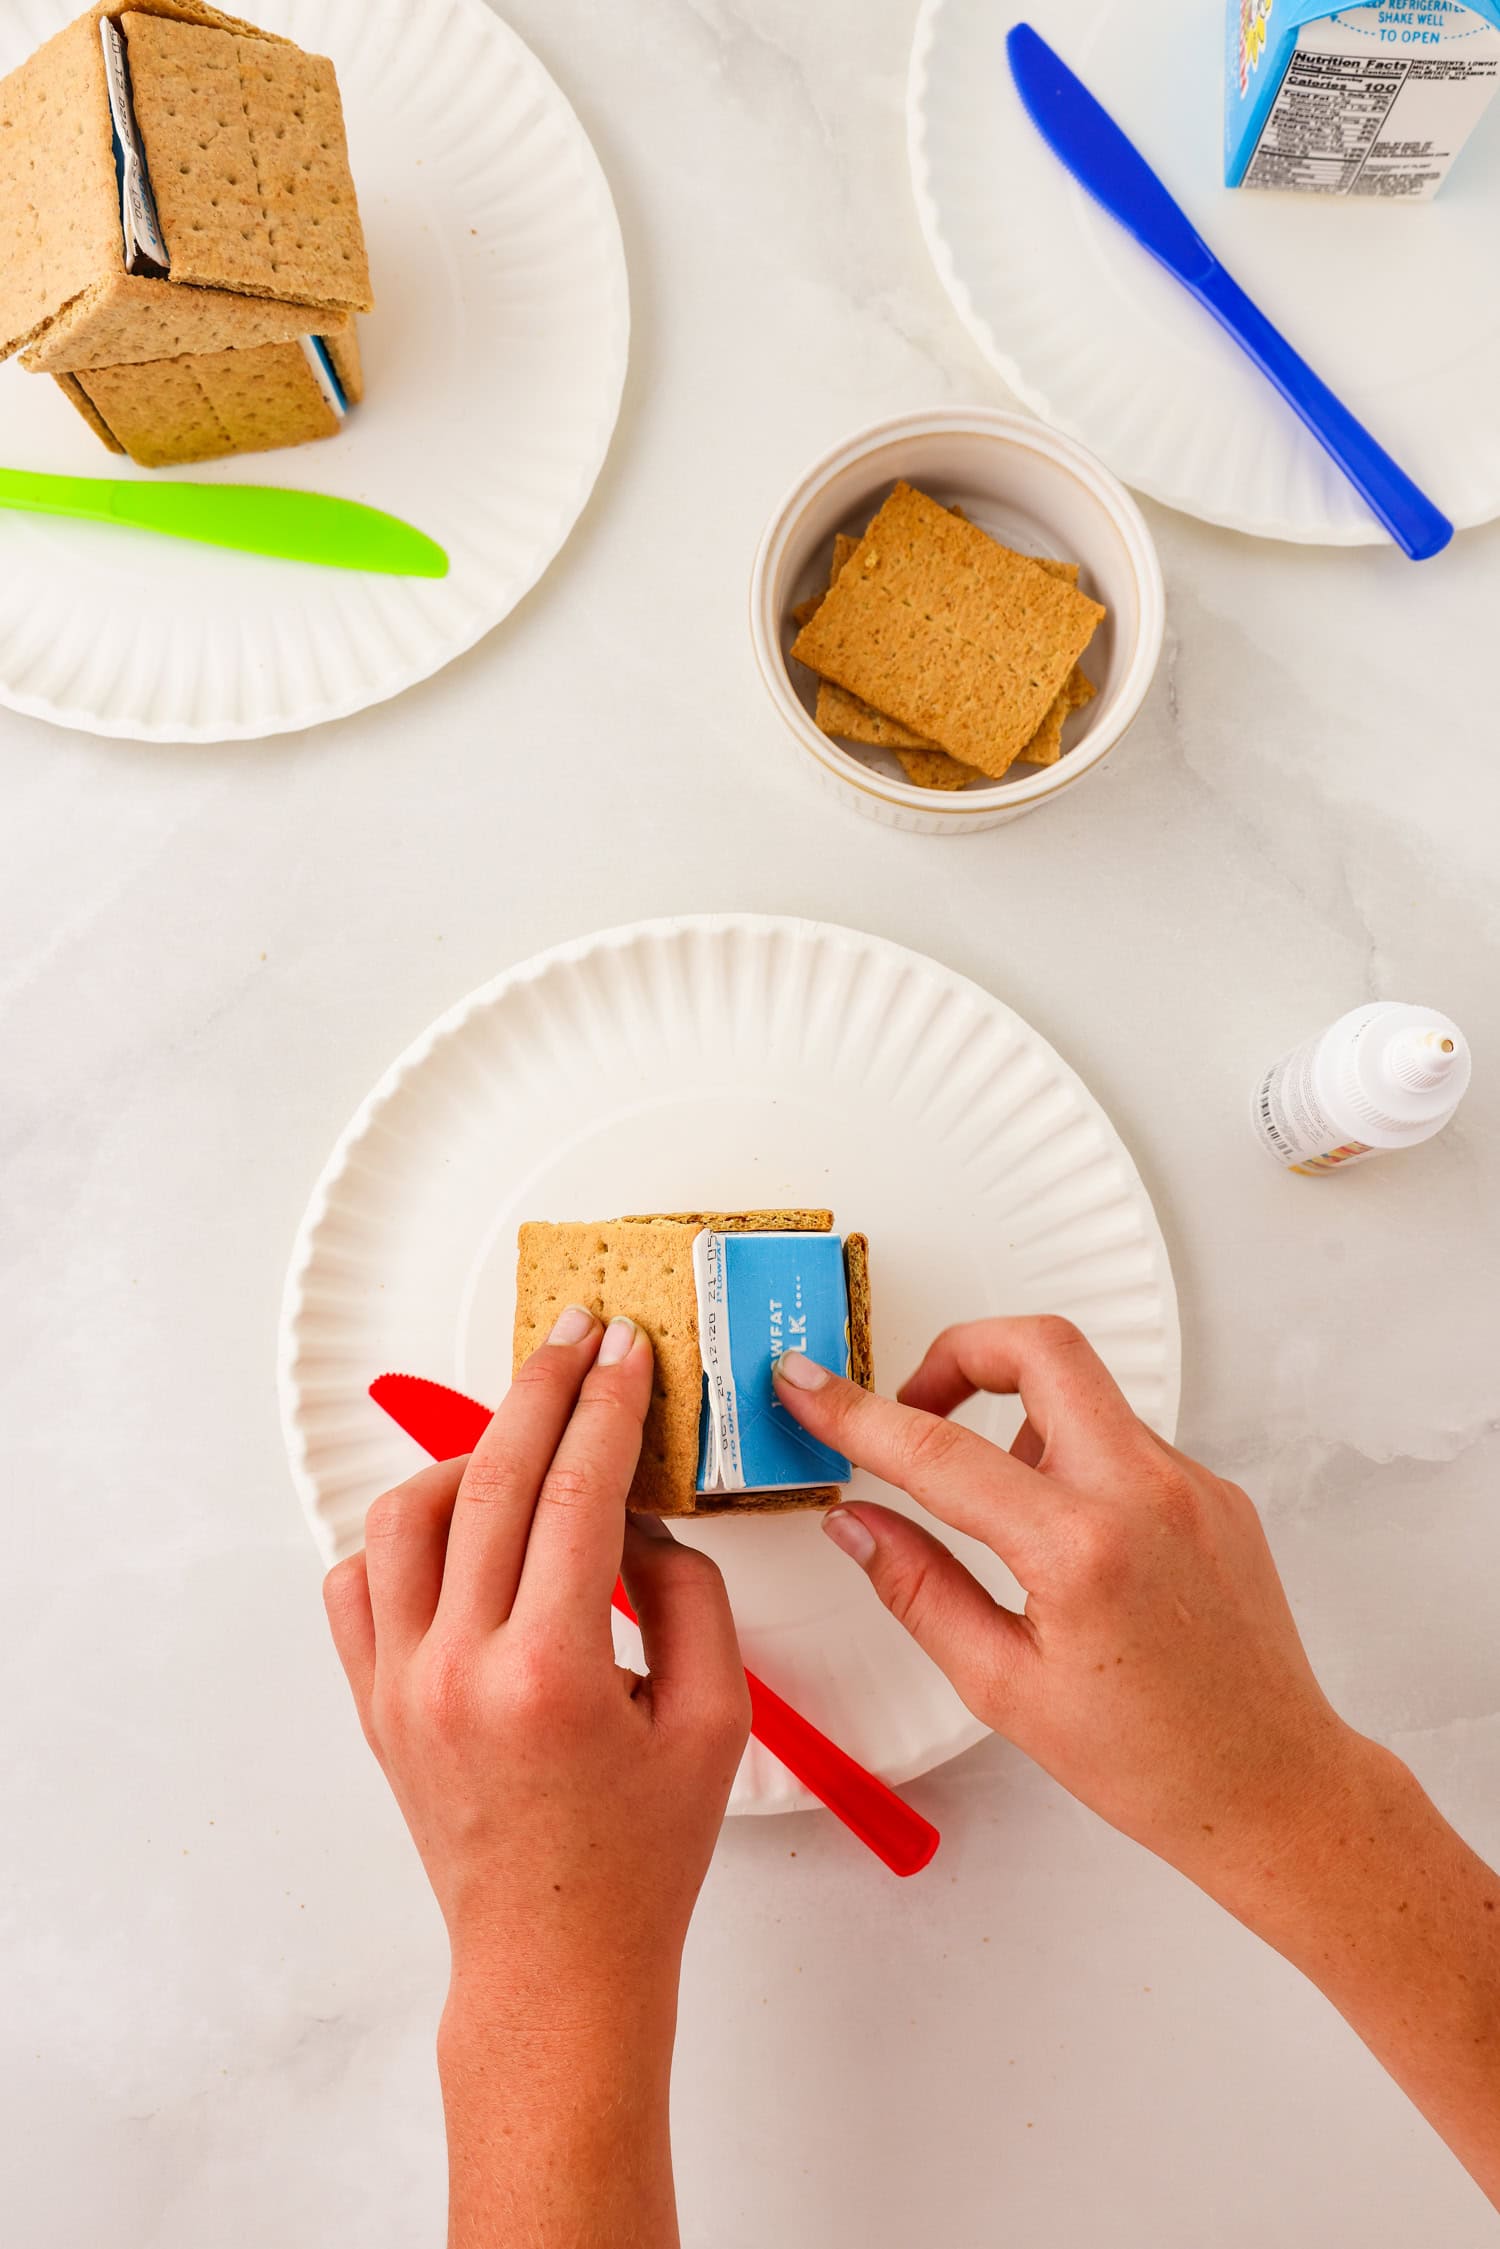
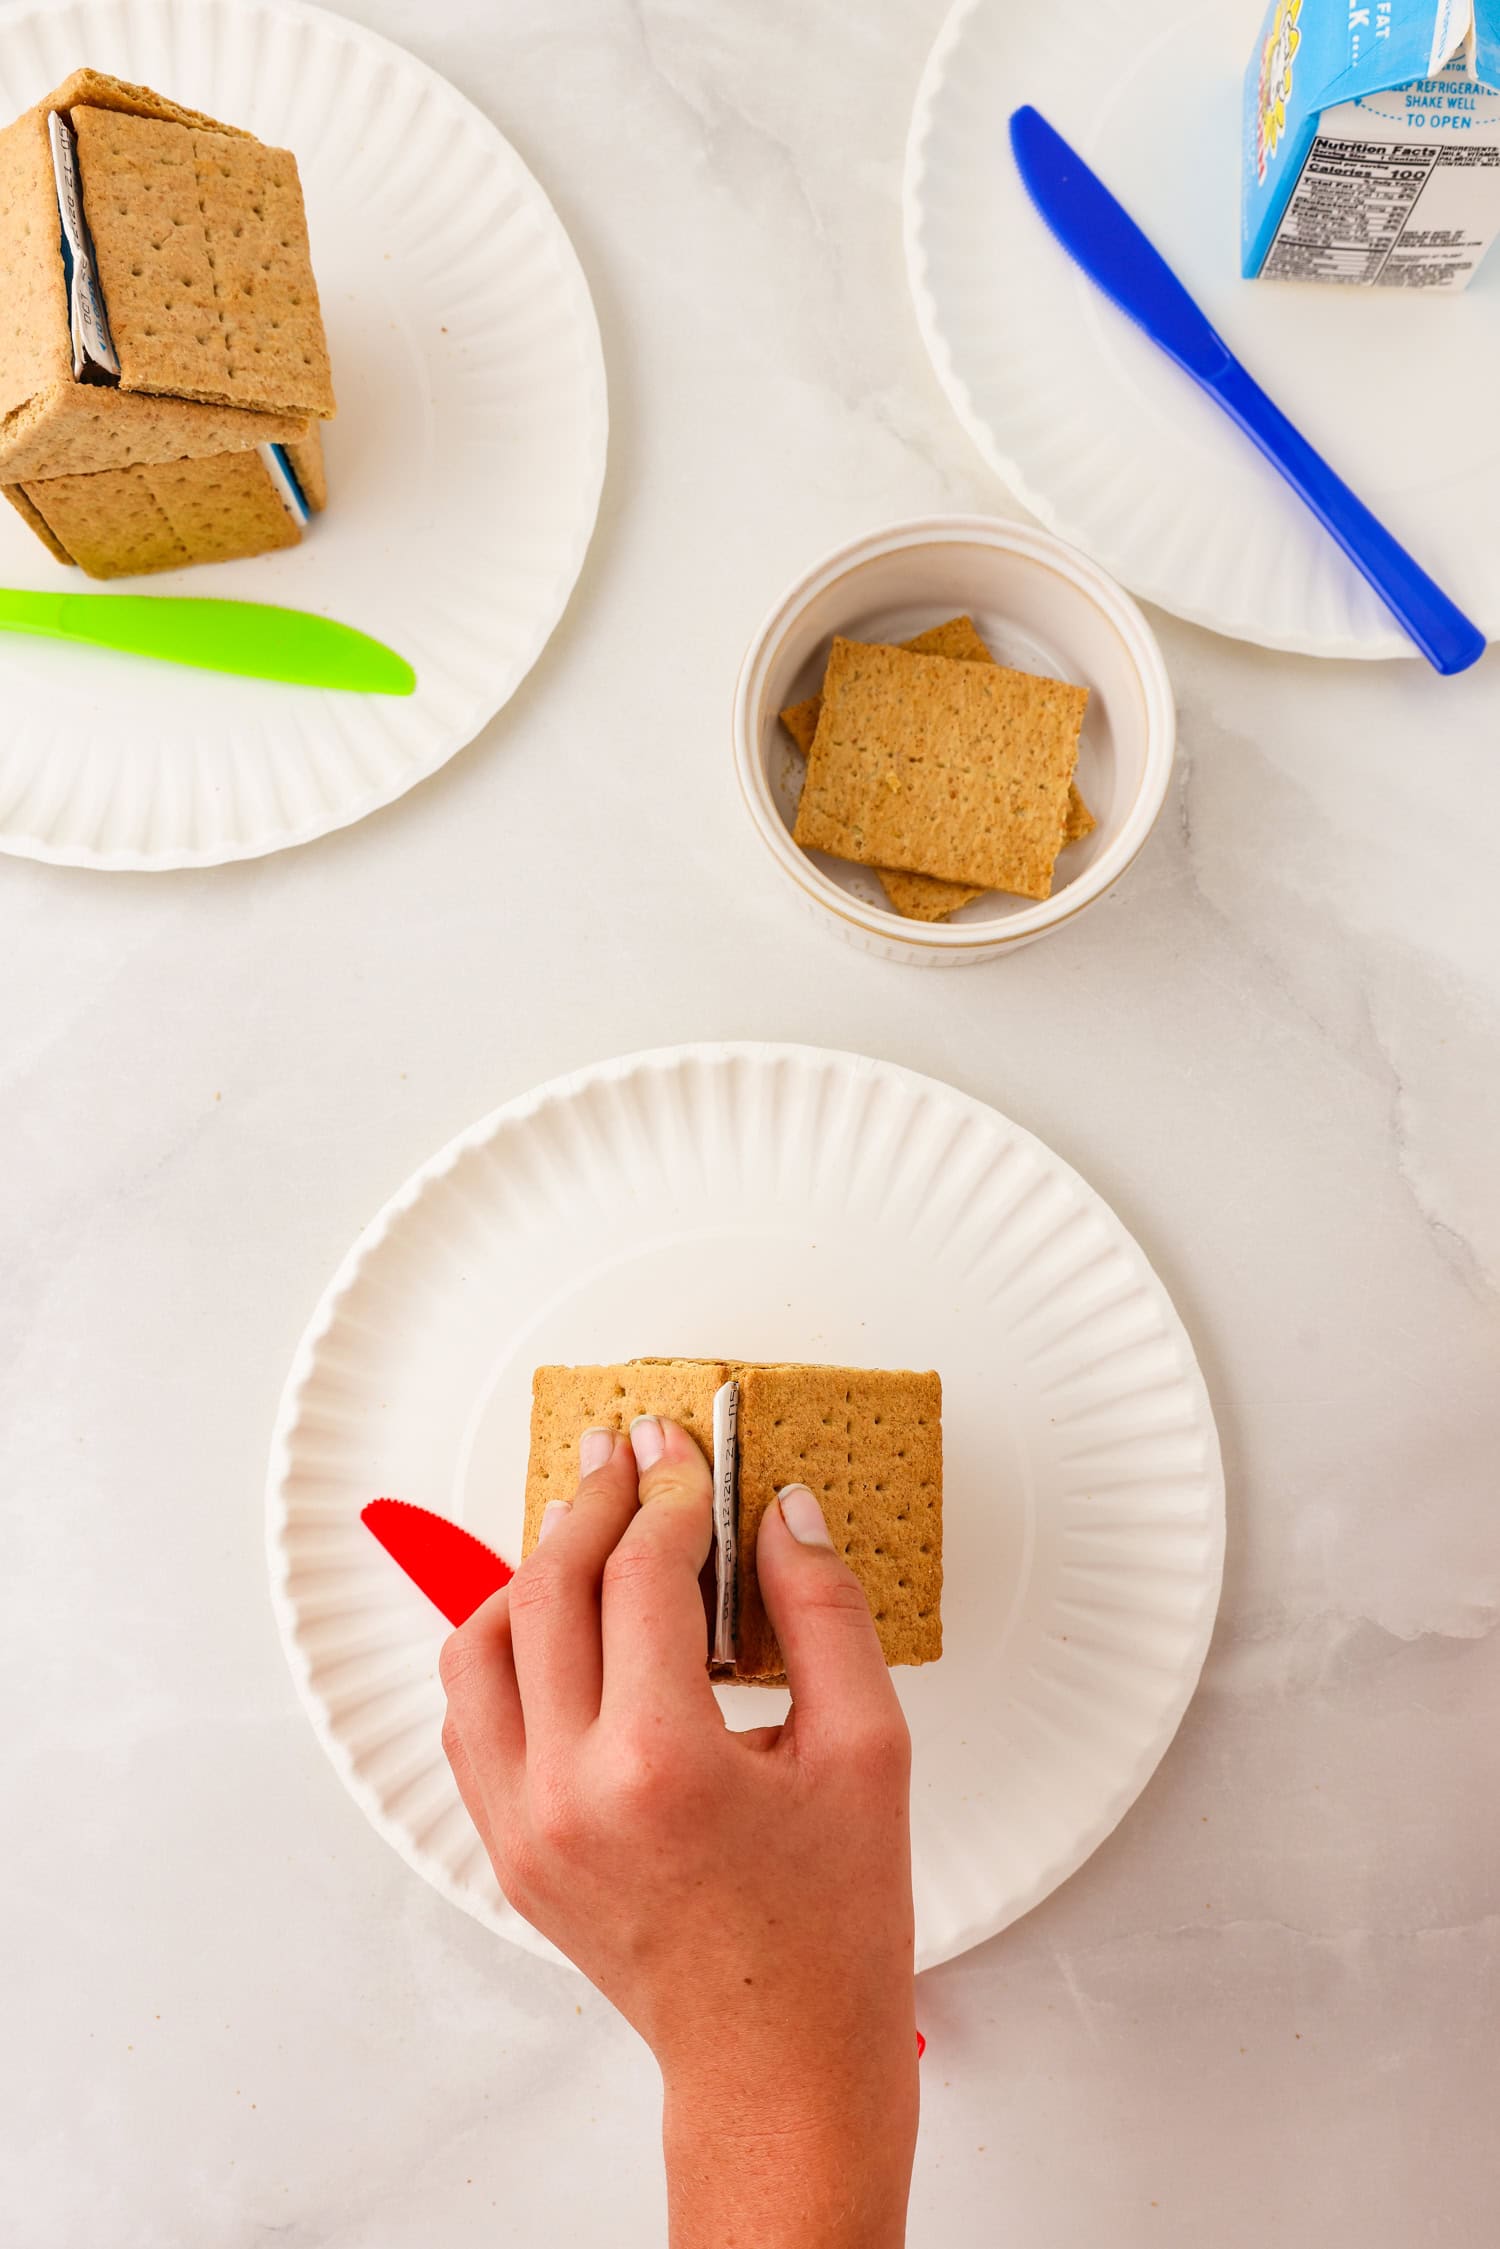


Don’t worry if there is a small space between the graham crackers at the corners of the house. This can be filled in while decorating!
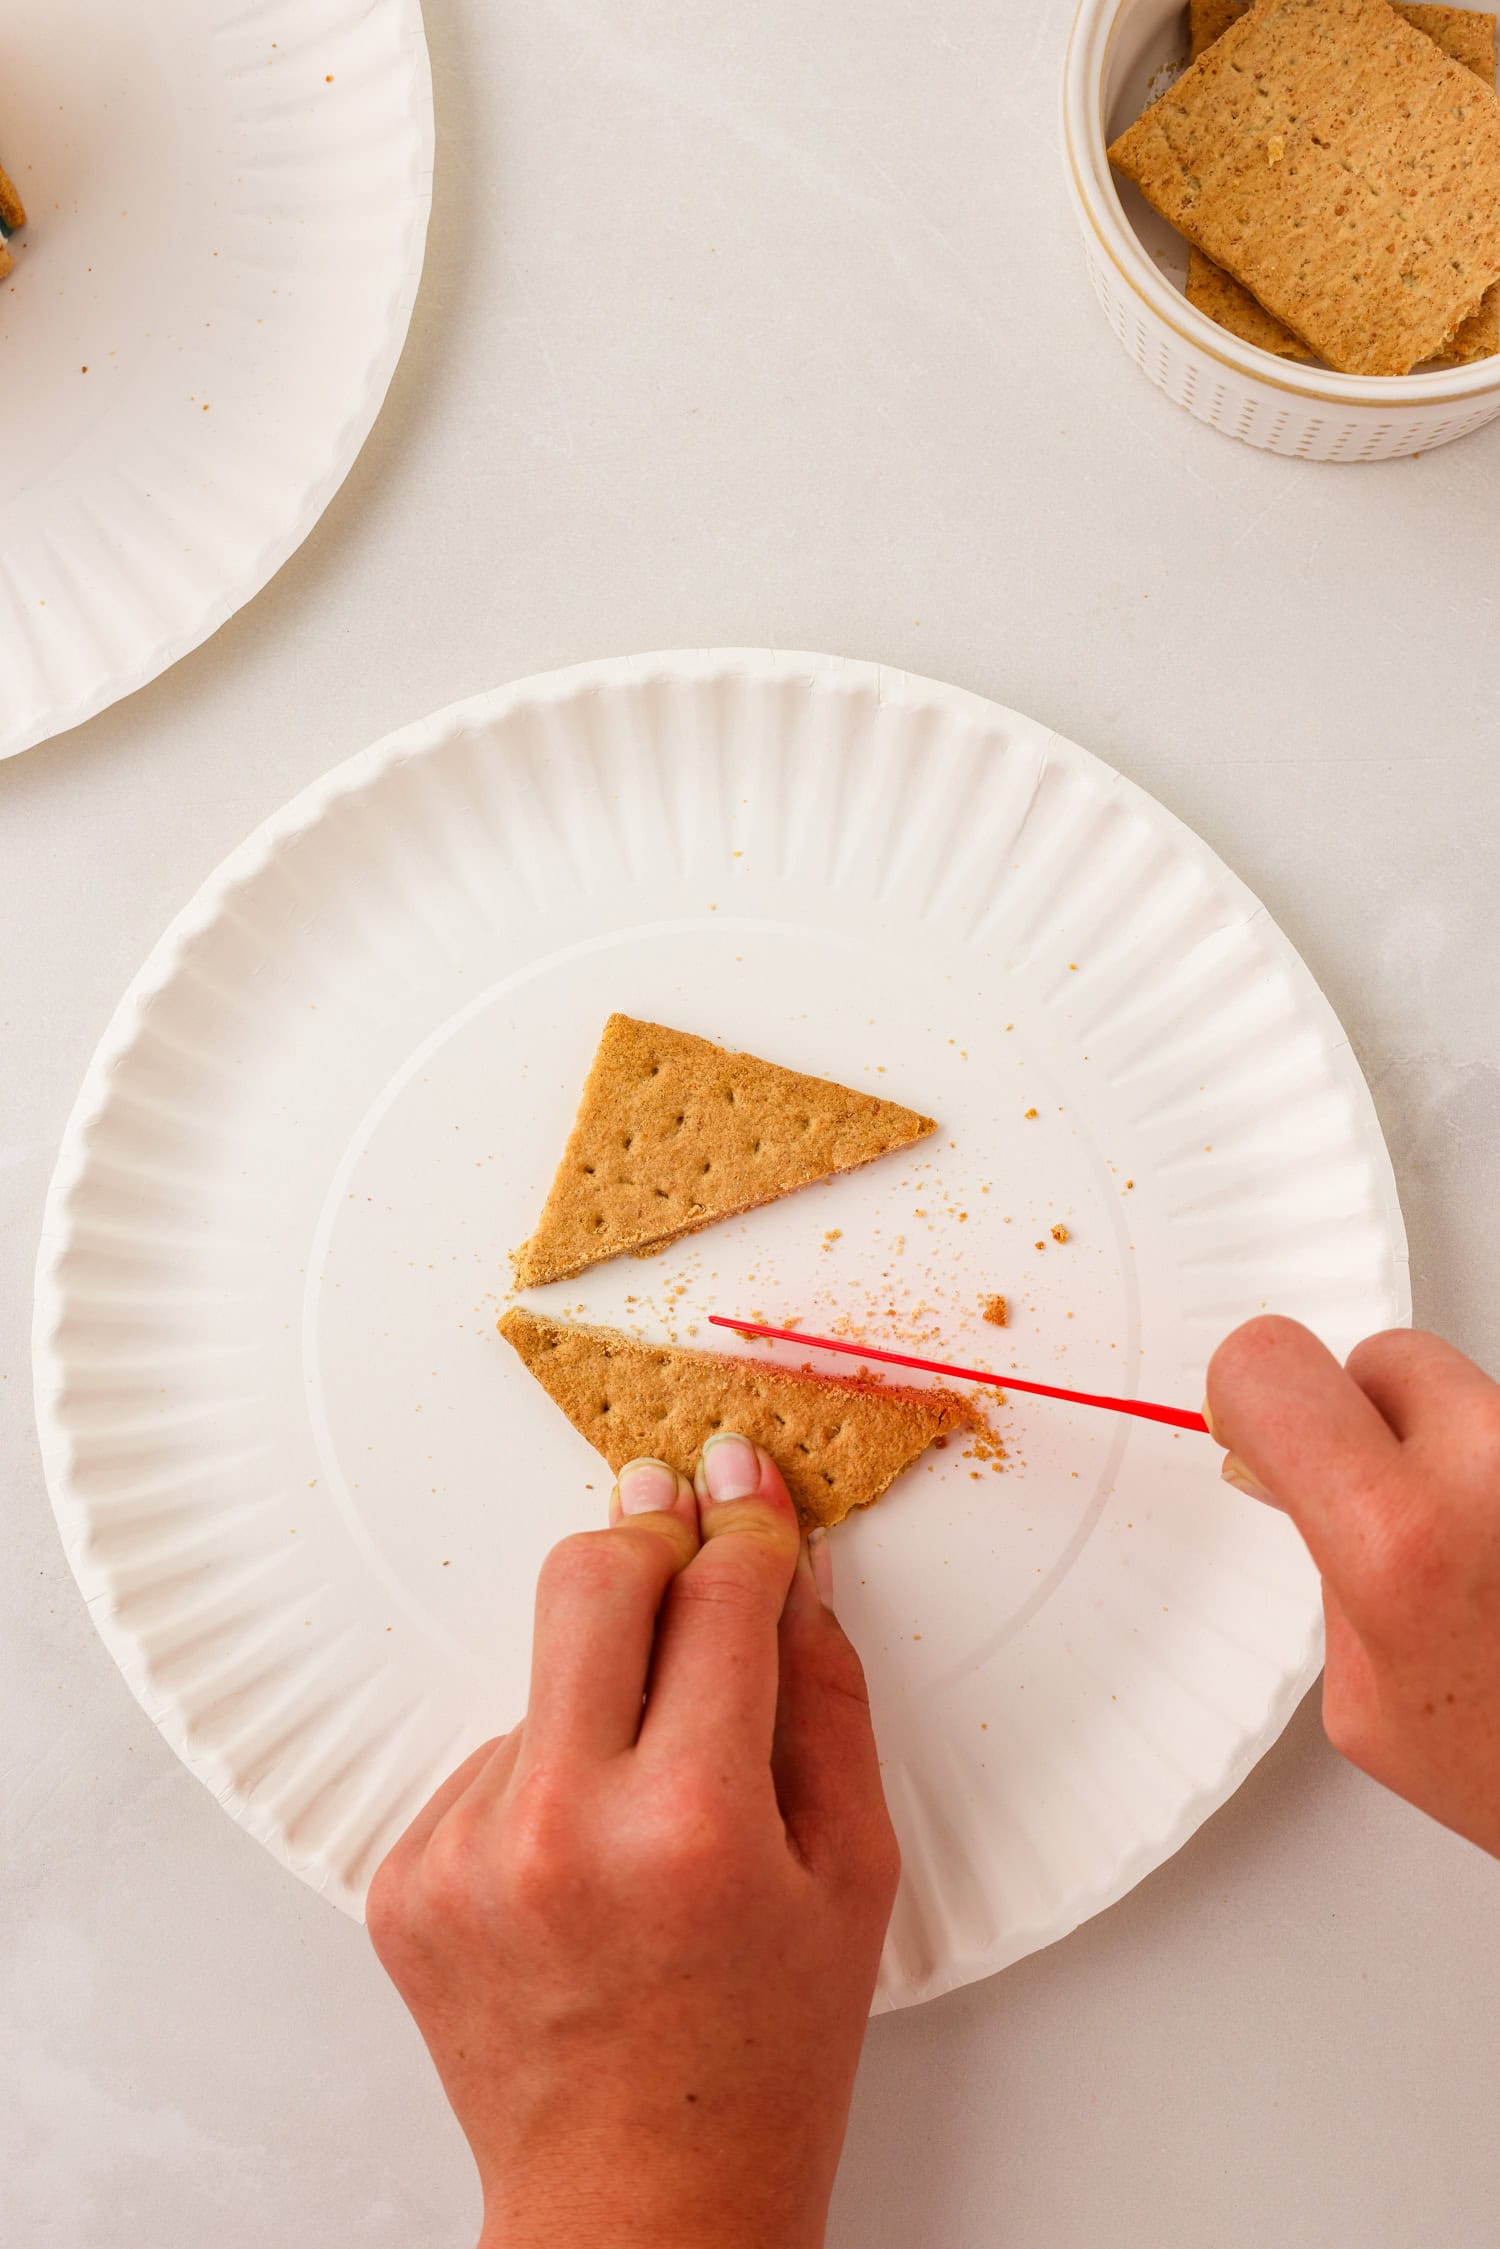
To cut the graham cracker half into triangles for the roof, work diagonally. The trick to making the triangles is to gently saw back and forth all the way through the graham crackers. Do not press down or the graham cracker will break unevenly! Littles may need some help with this part.
Place a generous amount of edible adhesive to stick the triangles to the top portion of the milk carton, then press and hold gently in place for a minute.
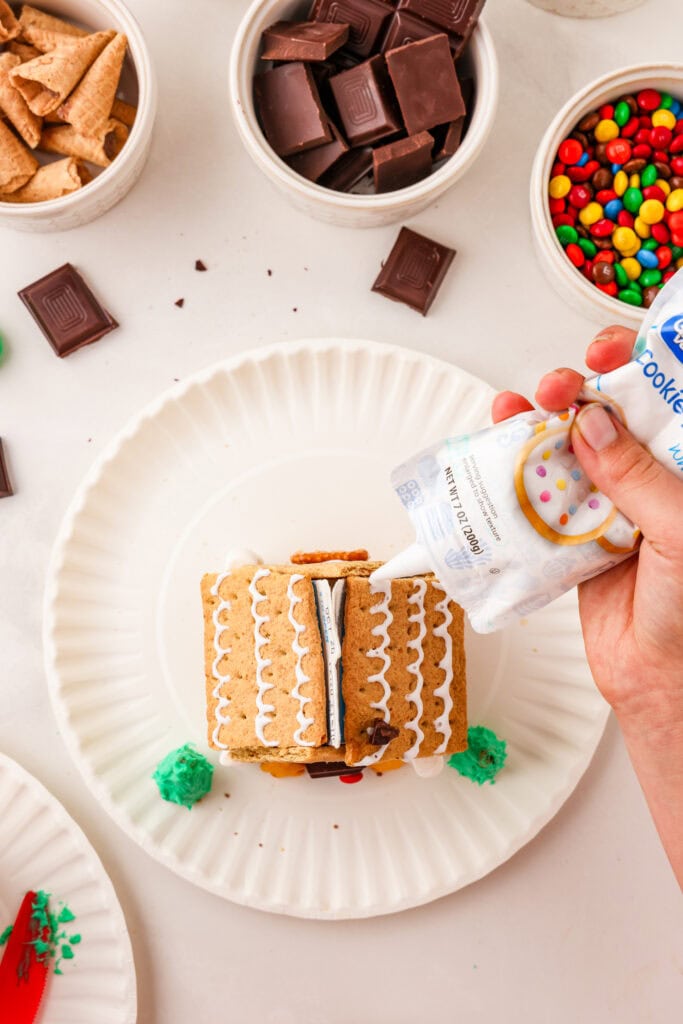
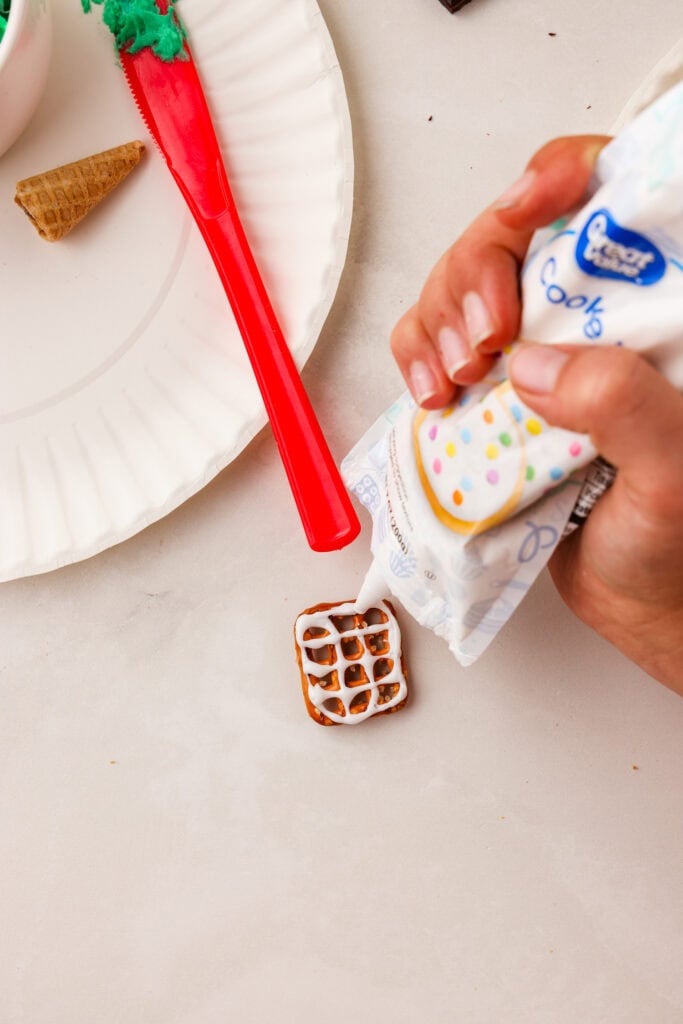
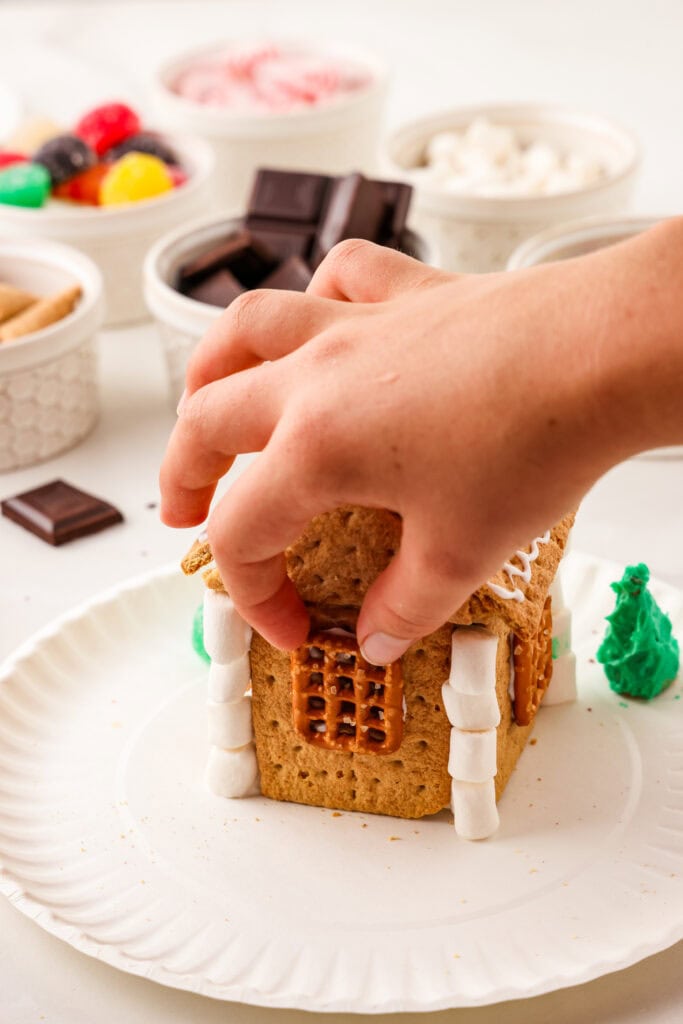
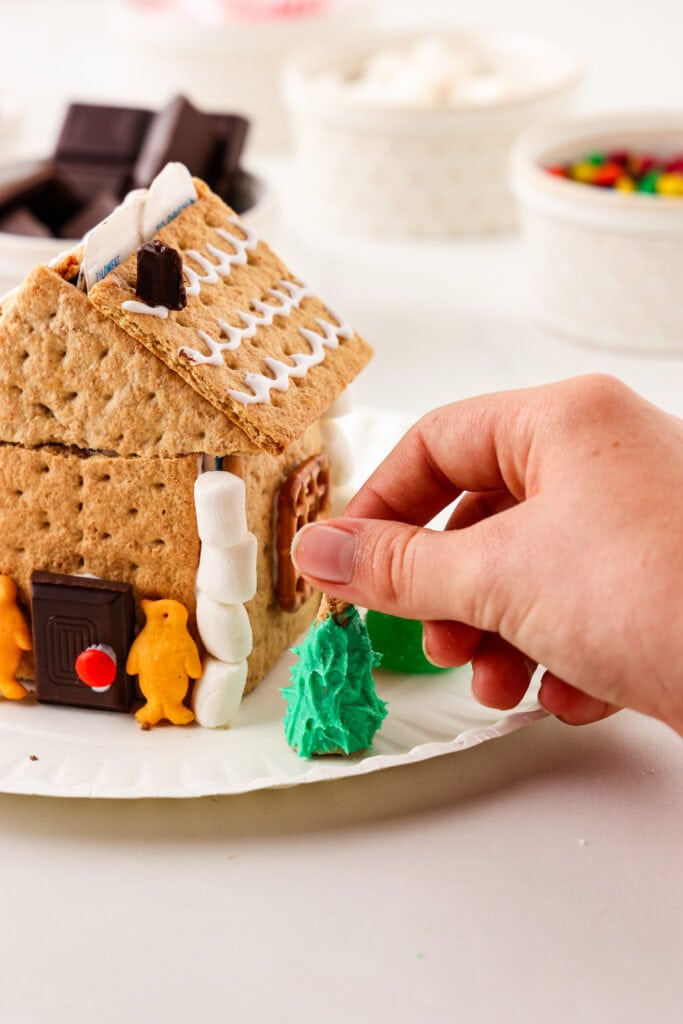
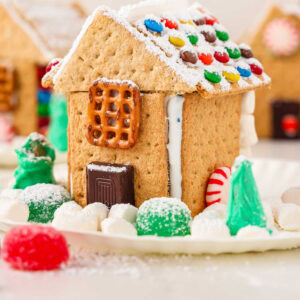
Once the 7 halves are in place around the milk carton, allow the house to dry and set up for 30 minutes. After the 30 minutes are up, it is time to decorate! Cookie icing works very well to “glue” most of the decorations in place on the gingerbread house.
Decorate the House
Use your imagination and have fun! Pretzels become windows, chocolate pieces can be doors, marshmallows look like piles of snow, and they make some really cute little snowmen, mini waffle cones make the perfect trees, and mini m&m’s make the sweetest rooftops!

What other edible decorations can I use on a milk carton gingerbread house?
The possibilities are endless when it comes to decorating a graham cracker milk carton gingerbread house! You can use anything you want:
- candy canes
- licorice
- sprinkles
- small candy decorations (little trees, lights, bells, etc.)
- sanding sugar
- edible glitter
- red hots
- gum balls
- shredded coconut
- powdered sugar
Pro Tips for Extra FUN!
- Other ideas for an edible “adhesive” would be cookie icing, thick white frosting, or even peanut butter would work well!
- Use edible adhesive to keep the whole craft edible. But if you don’t plan on snacking on the gingerbread house, feel free to use hot glue. It’ll go faster using hot glue too!
- If you are making these in a classroom setting or a larger group, prepare all of the pieces ahead of time! Leave them in bowls or on plates, and then even go ahead and glue the milk carton to plates. This will help the whole process go a bit more smooth.

You’ll never look at a milk carton the same again after you make these cutie little houses! I hope you enjoy, and Merry Christmas!
More Christmas Time Fun!
- If you’re looking for more gingerbread fun, then check out these adorable Gingerbread Man Puppets.
- Make No Bake Christmas Tree Pretzels when you need an easy holiday treat but you don’t want to turn on the oven.
- This Handprint Christmas Tree Ornament is a precious way to capture little hands in time!
- Need a no-brainer activity for the holidays? Then print out these Christmas Color by Code pages.
Milk Carton Gingerbread House
Ingredients
- milk cartons empty, clean, and completely dry
- school glue sticks
- paper plates
- plastic knives
- edible adhesive or royal icing
- cookie icing
- frosting
- graham crackers
- Decorations such as gumdrops chocolate, peppermint, mini waffle cones, marshmallows, mini M&M’s, penguin crackers, etc.
Instructions
- It is very important to make sure that your milk cartons are EMPTY, CLEAN, and DRY before beginning this craft. I rinsed the milk cartons thoroughly and then set them out in the sun to dry for a full day.
- Seal the opening shut using glue. Press and hold shut for a minute to keep it sealed up. Feel free to speed up the process by using hot glue or a stapler if you are prepping several milk cartons at once.
- Rub a generous amount of school glue on the paper plate and glue the milk carton to the plate. This will keep the gingerbread house still while little hands work. The paper plate will also serve as the “yard” for lots of decorations. Allow the glue to dry for a few minutes. Again, if you are prepping several milk cartons for this craft, it may be best to use hot glue.
- Once the milk carton is stuck to the paper plate, you can begin assembling the house by “gluing” the graham crackers to the sides and top. We use Wilton’s Edible Adhesive to keep the whole craft edible, but if you don’t plan on snacking on the gingerbread house, feel free to use hot glue. Other ideas for an edible “adhesive”: cookie icing, thick frosting, or peanut butter would work well! You will need 7 halves (3 ½ graham crackers) per gingerbread house. Four halves for the sides, two halves for the roof, and one half cut into triangles to cover the front and back just below the roof.
- Use a generous amount of edible adhesive to keep the graham crackers in place. Gently press and hold in place until the graham crackers stay on the sides of the gingerbread house. Pressing too hard will cause the graham crackers to crack! Don’t worry if there is a small space between the graham crackers at the corners of the house. This can be filled in while decorating! We used cookie icing, marshmallows, and mini m&m’s.
- To cut the graham cracker half into triangles, work diagonally. The trick to making the triangles is to gently saw back and forth all the way through the graham crackers. Do not press or the graham cracker will break unevenly!
- Place a generous amount of edible adhesive to stick the triangles to the top portion of the milk carton. Press and hold gently in place for a minute. Again, if you are looking for a stronger/quicker hold, feel free to use hot glue.
- Once 7 halves are in place around the milk carton, allow the house to dry and set up for 30 minutes.
- Once the 30 minutes is up, it is time to decorate! Cookie icing works very well to “glue” most of the decorations in place on the gingerbread house. Use your imagination and have fun! Pretzels become windows, chocolate pieces can be doors, marshmallows look like piles of snow, and they make some really cute little snowmen, mini waffle cones make the perfect trees, and mini m&m’s make the sweetest rooftops! Powdered sugar can be sprinkled over the scene to look like a fresh dusting of snow! There are so many fun and exciting ways to decorate your gingerbread house.