How to Make Rock Candy!
Did you know that making Rock Candy at home is fun to do and easy? That’s right! It’s the perfect activity for kids and it doubles as a science experiment. Have the kids get creative in the kitchen and try out this fun recipe and treat. Explore the endless colors and flavors you can combine in this easy sugar candy.
All you need is a few supplies and some patience to make your own homemade Rock Candy! It’s the perfect sweet treat for kids to grow and make themselves. A great opportunity for kids to be creative in the kitchen!
Why You’ll Love Making Rock Candy
- You probably already have all of the ingredients and supplies that you need to follow this rock candy recipe.
- Rock candy takes a while to be ready to eat, so your kids will learn to have patience.
- This is actually a super cool science experiment disguised as candy making! It’s a win-win!
What is Rock Candy
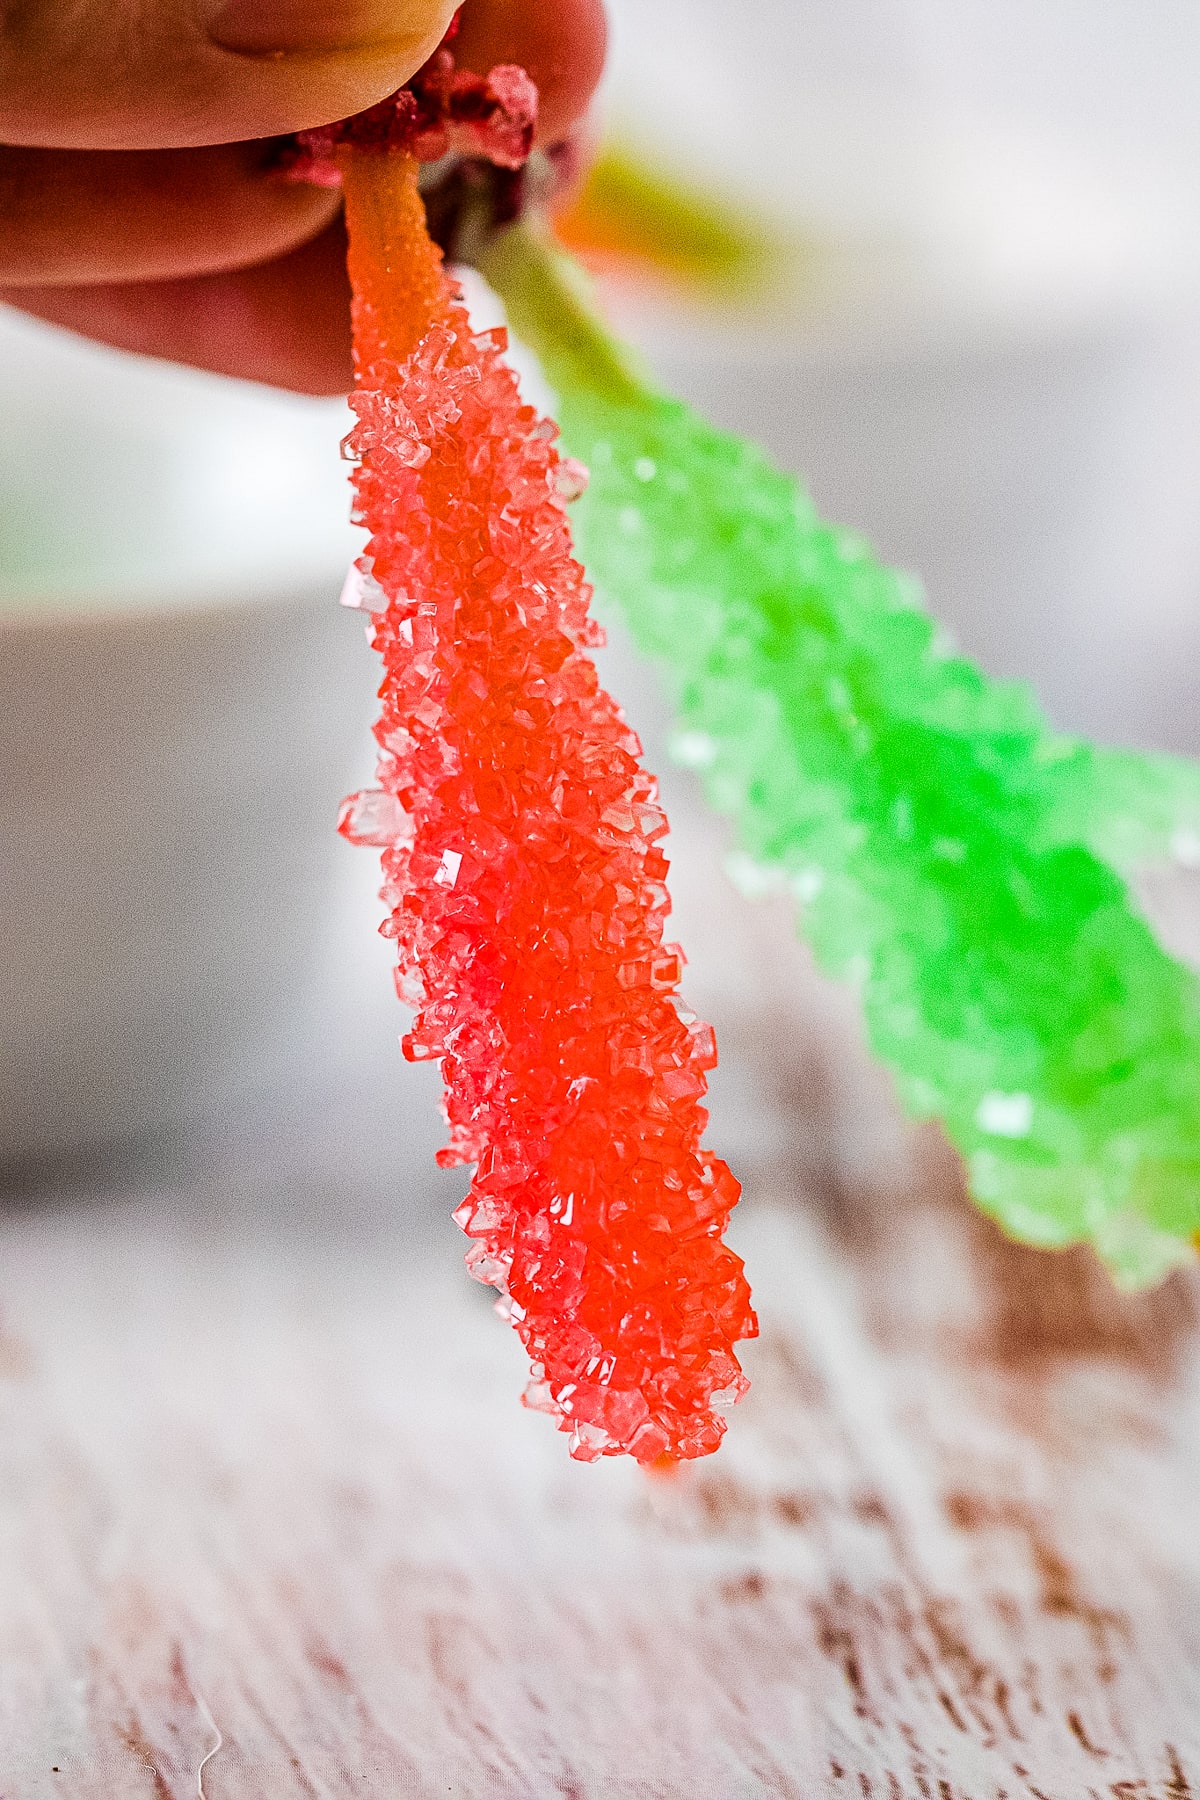
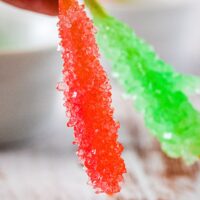
This easy candy to make is made by allowing a sugar syrup made from sugar and water crystallize onto the surface of something, like the skewer we are using today. It takes 3-10 days to grow this candy on the stick. The longer you let it sit, the larger the rock candy crystals will be.
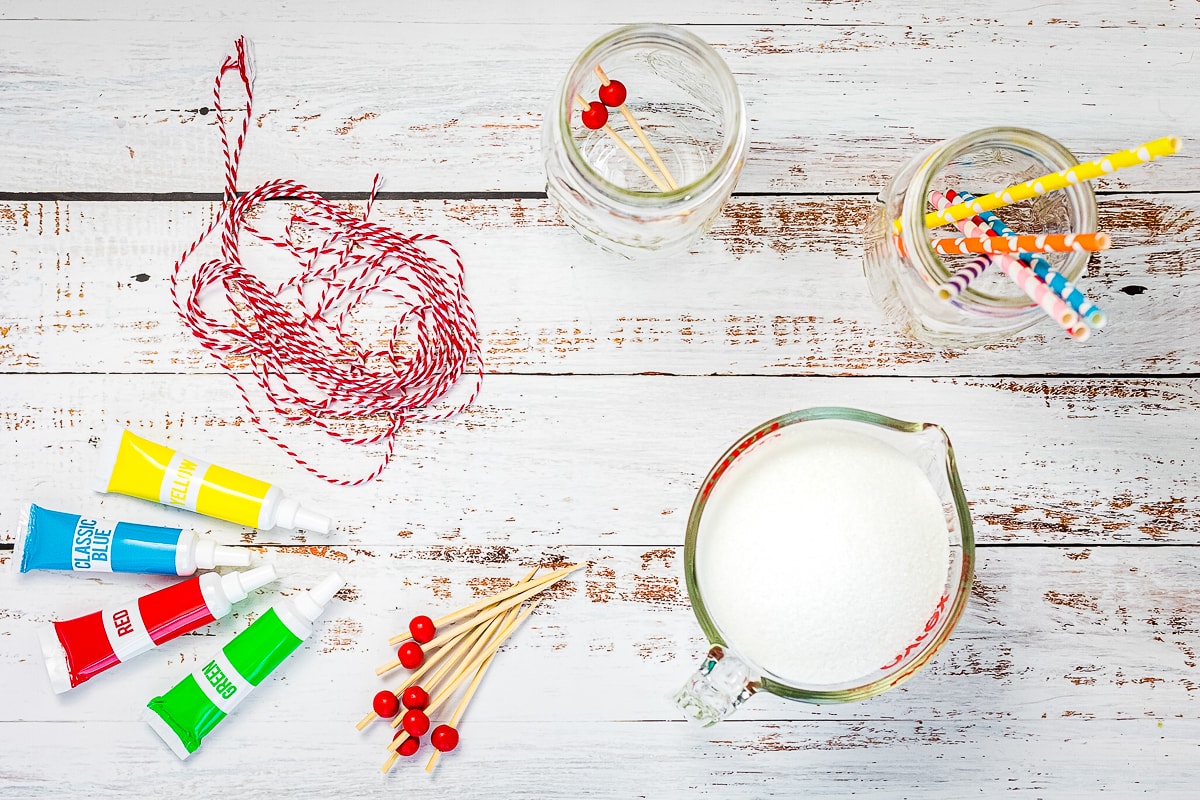
Supplies Needed for Rock Candy
- Granulated Sugar – You will use sugar to make a simple syrup and to coat the sticks where the rock candy will grow.
- Water – Sugar syrup is simply sugar and water!
- Wooden Skewers/Cocktail Sticks – These will be used to grow the rock candy. They will have to be a bit smaller than your glass jars so the lid will close without the stick touching the bottom of the jar.
- Clean Glass Jars with canning lid – The canning lid makes it easier to close the lid without moving the string.
- Straws – You will use straws to hold the rock candy up while it dries.
- Baker’s Twine – This is a food safe string that will hold up your rock candy sticks.
- 1/2 tsp Flavoring Oil or Extract (optional) – There are so many fun flavors of rock candy out there! Start with some favorites or get creative!
- Food Coloring (optional) – Gel works best to make colorful rock candy.
Prepare Sugar Syrup
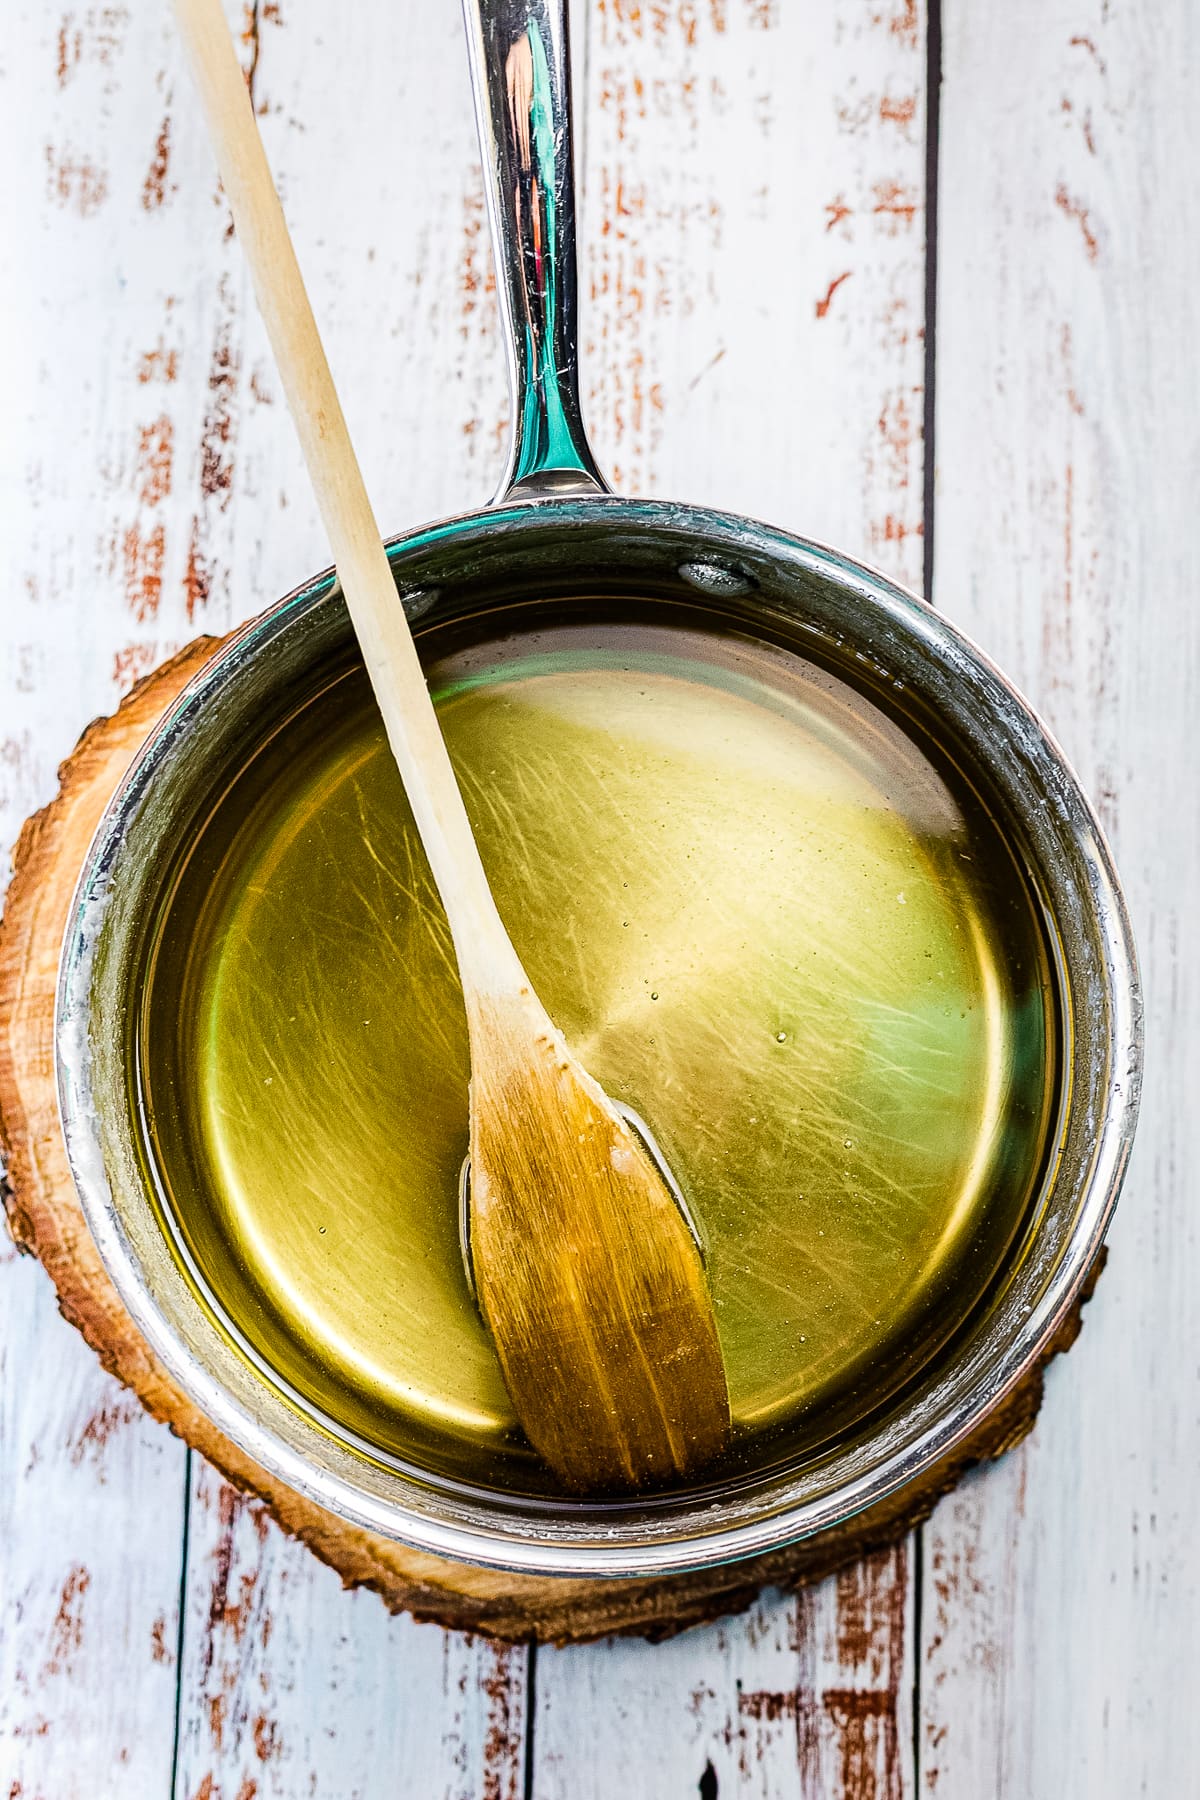
The first step to making rocking candy is to add sugar and water to a saucepan over high heat, stirring constantly until it reaches a rolling boil. Be careful not to boil the simple syrup too long or the candy will start to harden. Keep stirring!
Remove the saucepan from heat and keep stirring until all of the sugar granules have dissolved. The mixture will suddenly get clearer when this happens.
Carefully pour hot sugar mixture into your jars and put in the refrigerator to cool a bit. This usually takes 30 minutes to one hour depending on the size of your jars. We don’t want the mixture to be cold, just room temperature.
Prepare Skewers
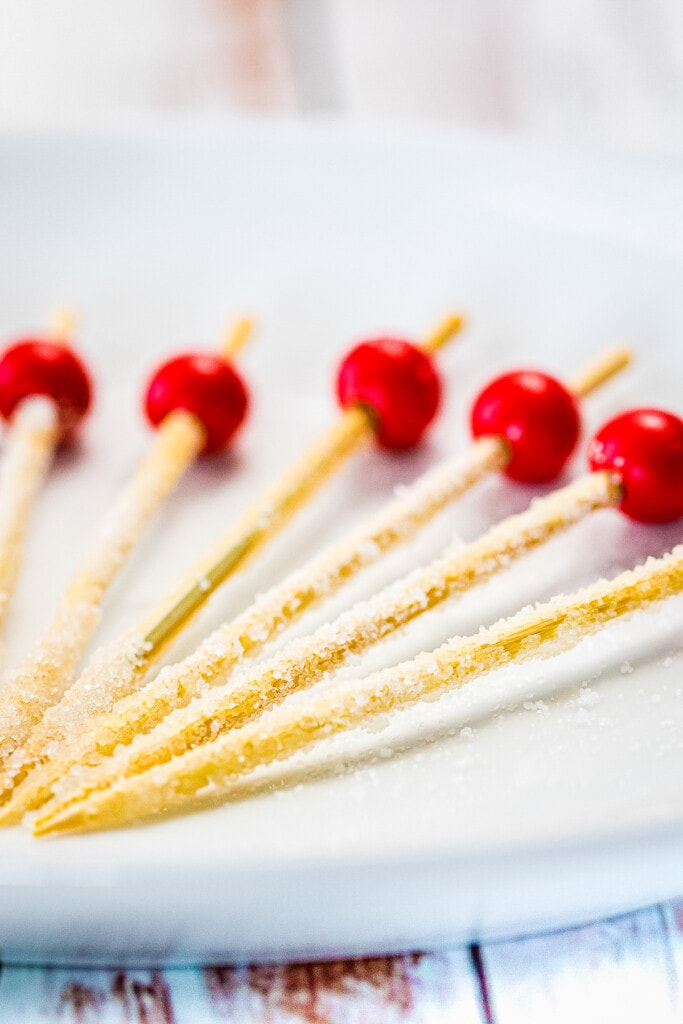
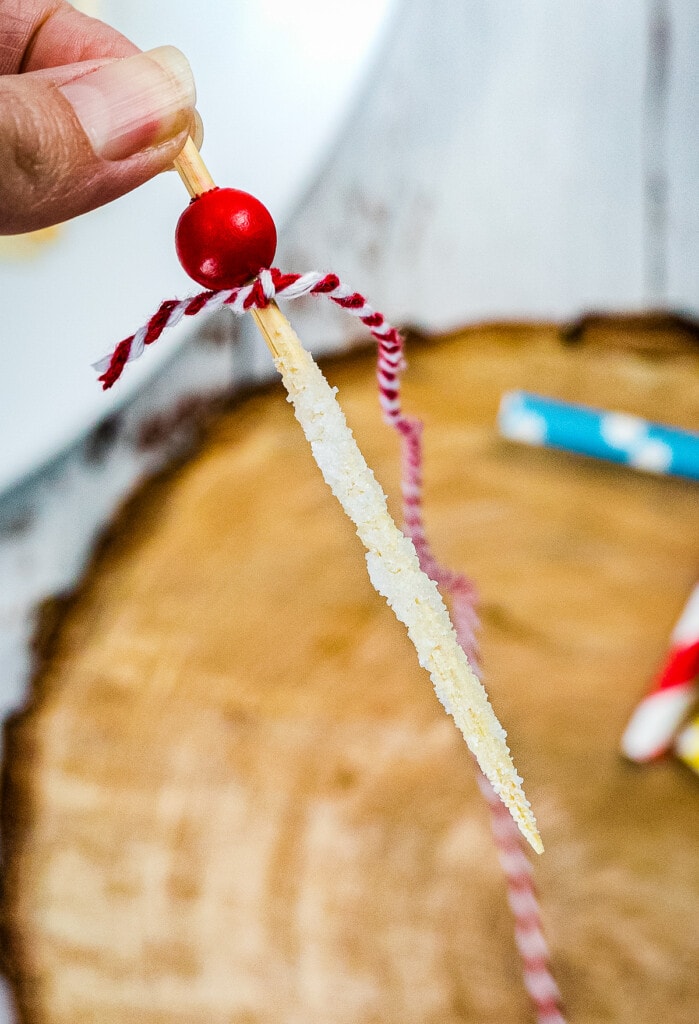
While your mixture is cooling, prepare your wooden skewers by tying bakers twine to the top of your picks.
Then get them damp and roll in sugar. Once they have a coating of dry sugar on them, put them aside to dry. This sugar coating will give our sugar mixture something to attach itself to and help us have larger crystals in our rock candy!
Dip Skewers in Sugar Syrup
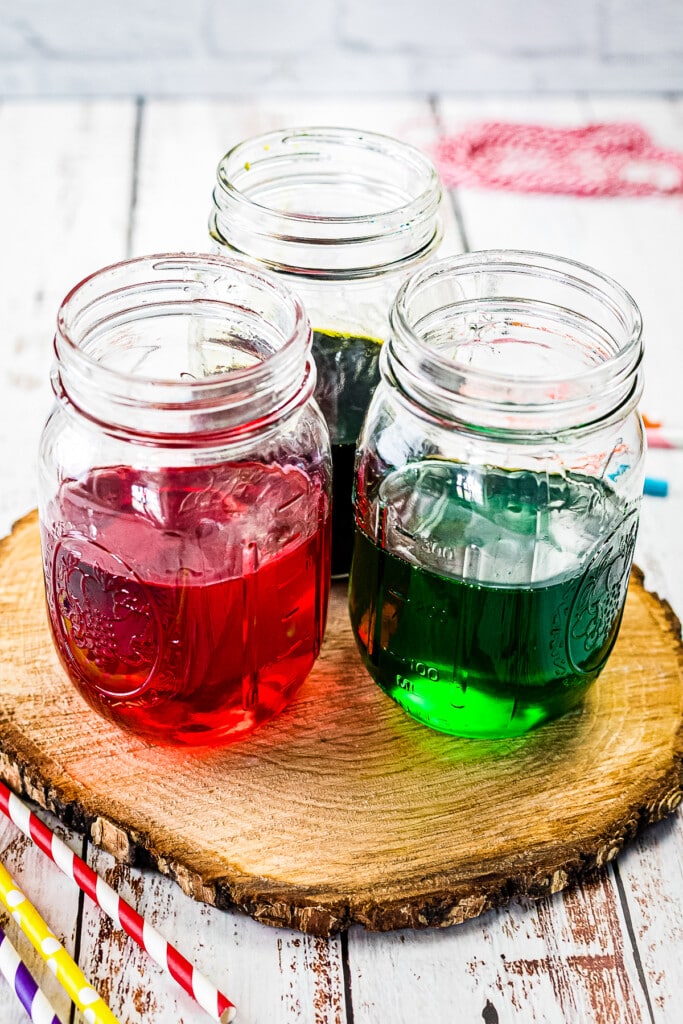
When the mason jars with sugar solution are cooled to near room temperature, remove the jars from the refrigerator. If you are adding flavoring or food coloring do that step now.
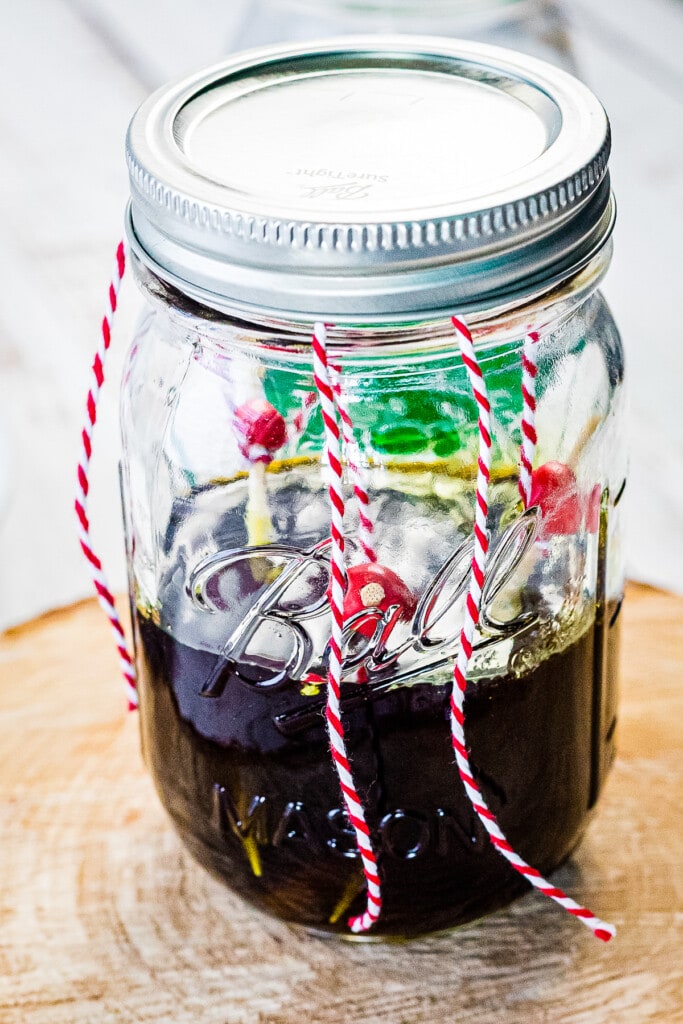
Dangle each skewer into the sugar mixture, try to keep them from touching the bottom or each other. Once you get the picks placed where you want them in the jar, hold their strings along the sides of the jar screw the top on to hold the strings in place.
Grow Crystals
Set the jar aside somewhere where it won’t be disturbed and wait 3-10 days for the sugar crystals to grow, the longer you wait the larger the crystals will get.
Time to Dry the Rock Candy
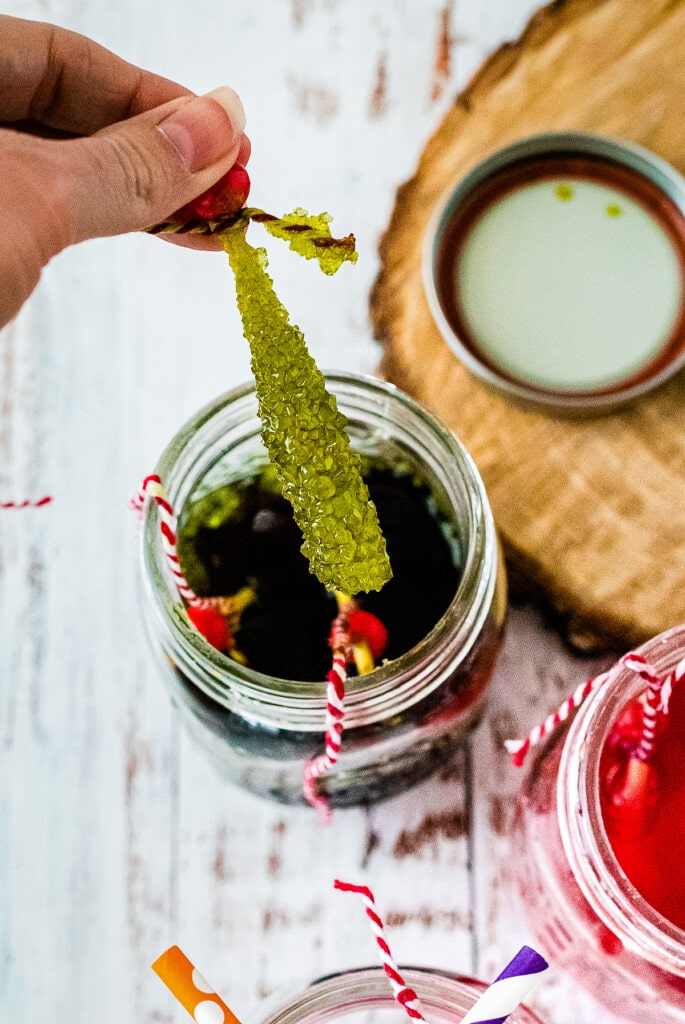
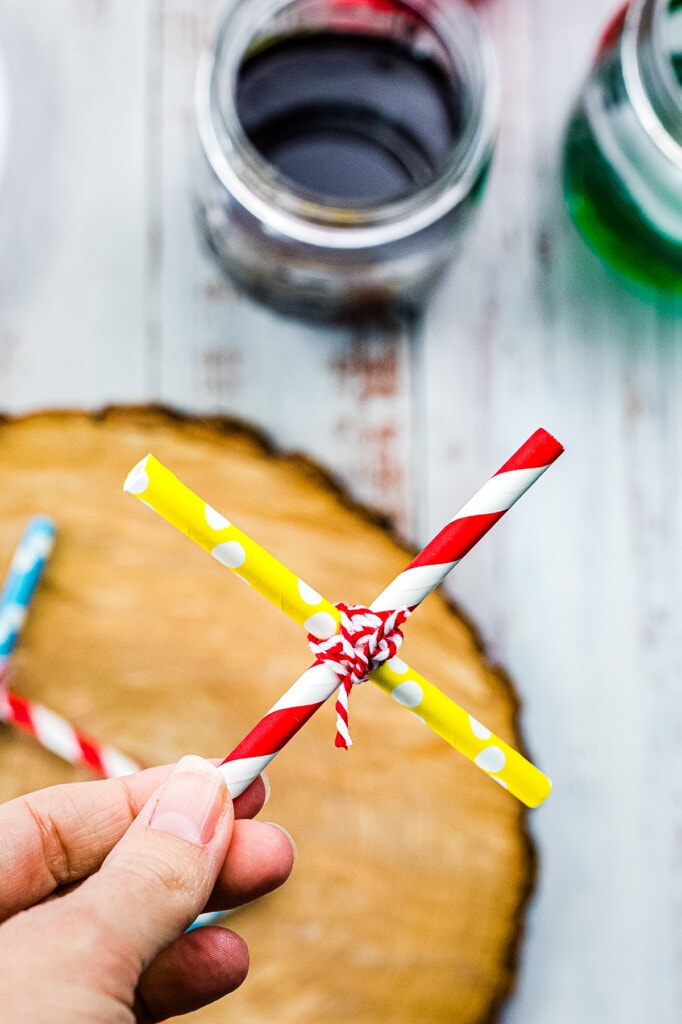
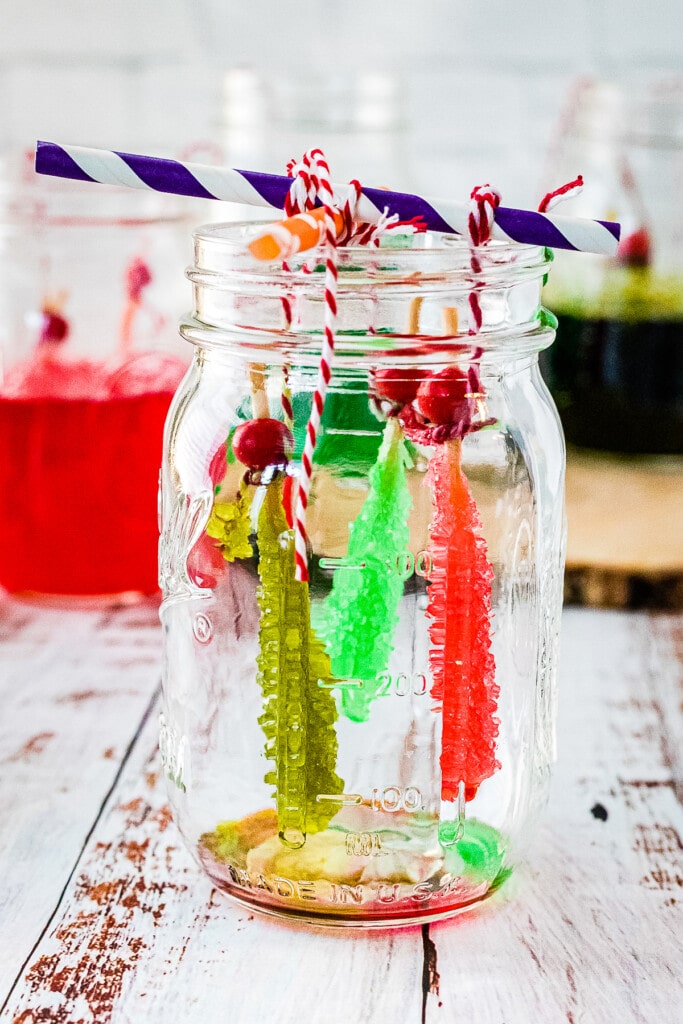
When the crystals grow to a good size, they are ready to dry. Tie two straws into an X and balance it on top of a clean jar. Carefully remove the rock candy sticks from their jars and tie their strings onto the straw X’s. Don’t let them touch each other, let them hang in the jar from the X until they are dry.
Once they are dry in a few hours, they are ready to eat!
Clothes Pin Alternative
An alternative to the twine and paper straw is using a clothespin to hold up the skewer.
Simply clip the top of the skewer with a clothespin then place it in a the jar with sugar syrup. Adjust the clothespin to make sure the stick doesn’t touch the bottom of the glass or it will be hard to remove.
When they are ready to dry after three days, simply remove the bamboo stick from jar, leaving clothespin clipped and transfer to a new clean jar to let dry.
Can I use a plastic cup instead of glass?
The best result is from using a glass cup or jar because glass is relatively nonporous and produces better crystals. Other material may attract the crystals away from the skewer because they are porous.
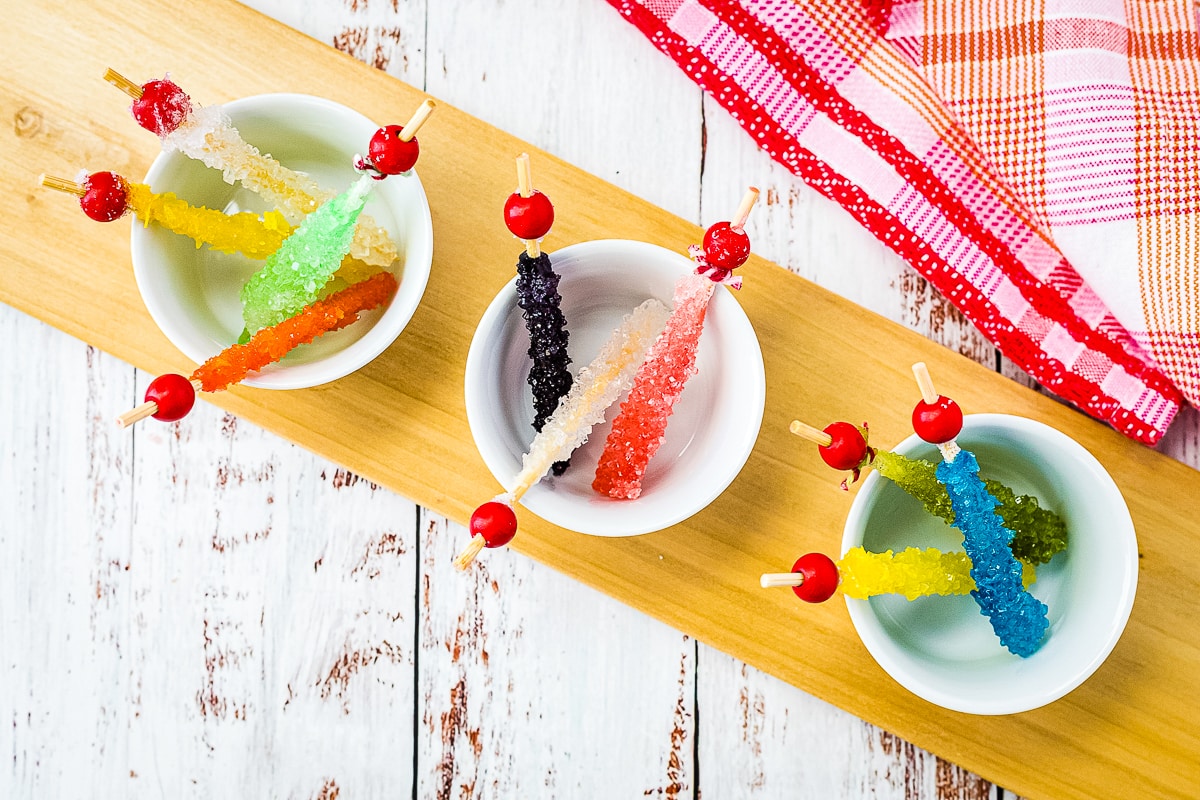
Flavor and Color Combinations
It’s fun to dye the sugar syrup and flavor it to give this candy flavor! Oils or extracts are the best option for adding flavor to the sugar syrup. Usually 1/2 – 1 tsp is enough flavoring, but adjust it to your preferences.
For the richest color use paste or gel food coloring. The color of the hard rock candy will be lighter than the syrup.
- Add purple food coloring to the sugar syrup and a grape flavoring to make a grape one.
- Raspberry extract paired with blue food coloring make a fun Blue Raspberry that’s always a hit.
- Adding cinnamon oil with red food coloring is the perfect treat around the holidays. This also makes a fun homemade gift idea.
- For fall add apple flavoring with green food coloring for a Green Apple Candy.
- Obviously cherry or strawberry flavoring with red or pink food color is an all-time favorite.
The possibilities for combinations are endless. Did someone say banana?
Jar Cleaning Tips
After you are done making the rock candy there will be some crystals in the jar, mainly on the bottom and side.
First, dump all the syrup and loose crystals out of the jar. Fill the jars with hot, soapy water and place the jar in a deep pan and pour boiling water into the pan so it’s about 3 inches full. This should loosen the crystals. If they are a little stuck use a fork to break up the sugar crystals.
How to Store Rock Candy
Store homemade rock candy in an airtight container or zip top bag at room temperature. You can keep it for up to a month.
Have fun making your rock candy and enjoying it! There are so many different color and flavor combinations, your kids are going to have a blast being creative making this classic rock candy.
More Fun Kids Activities!
- Kids loving making these easy Toilet Paper Roll Bird Feeders and watching the birds enjoy them!
- You can never go wrong with a batch of homemade playdough to play with! So soft and easy to make.
- Create a Valentine’s Day Rocket with supplies you’ve already got at home in your craft cupboard.
How to Make Rock Candy!
Ingredients
- 3 cups Granulated Sugar
- 1 cup Water
- Food Coloring optional
- ½ teaspoon Flavoring Oil or Extract optional
- Wooden Skewers/Cocktail Sticks
- Clean Glass Jars with canning lid
- Straws
- Baker’s Twine
Instructions
- Add sugar and water to a pan and heat over high heat, stirring constantly until it reaches a rolling boil. Be careful not to boil it too long or the candy will start to harden. Keep Stirring!
- Remove from heat and keep stirring until all of the sugar granules have dissolved. The mixture will suddenly get clearer when this happens.
- Carefully pour hot sugar mixture into your jars and put in the refrigerator to cool a bit. This usually takes 30 minutes to one hour depending on the size of your jars.. We don’t want the mixture to be cold, just room temperature.
- While your mixture is cooling, prepare your wooden skewers by tying baker’s twine to the top then getting them damp and rolling them in sugar. Once they have a coating of dry sugar on them, put them aside to dry. This sugar coating will give our sugar mixture something to attach itself to and help us have bigger sugar crystals in our rock candy!
- When they cool to near room temperature, remove the jars from the refrigerator. If you are adding flavoring or food coloring do that step now.
- Tie baker’s twine to your picks and dangle them into the sugar mixture, try to keep them from touching the bottom or each other. Once you get the picks placed where you want them in the jar, hold their strings along the sides of the jar screw the top on to hold the strings in place.
- Set the jar aside somewhere where it won’t be disturbed and wait 3-10 days for the sugar crystals to grow, the longer you wait the larger the crystals will get.
- When the crystals grow to a good size, they are ready to dry. Tie two straws into an X and balance it on top of a clean jar. Carefully remove the rock candy sticks from their jars and tie their strings onto the straw X’s. Don’t let them touch each other, let them hang in the jar from the X until they are dry.
- Once they are dry they are ready to eat!
My kids loved doing this, best summer activity so far.
Love to hear this Cathy!