How to Make a Red, White and Blue Tie Dye Shirt!
Learn how to make a festive and fun Red White and Blue Tie Dye Shirt! These are perfect for any patriotic event or just a fun shirt to make. A great kids craft or activity for summer before the 4th of July!
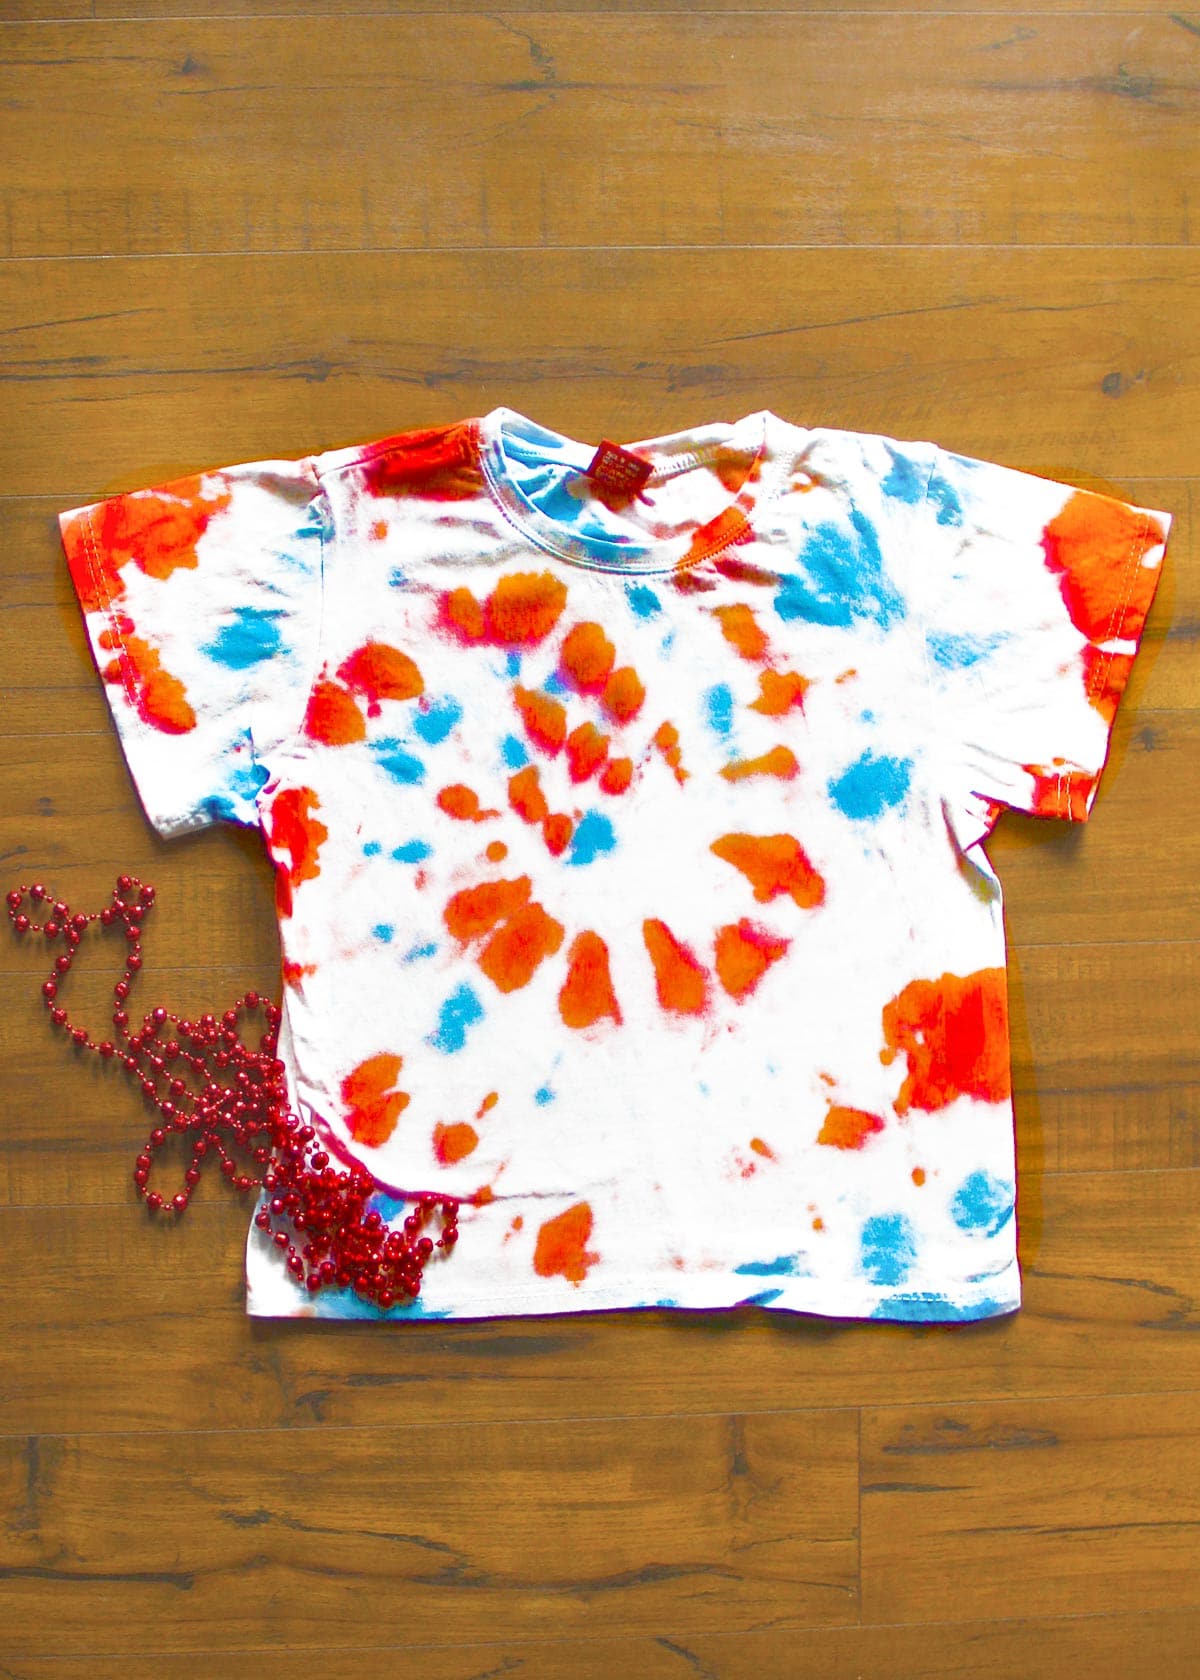
Looking for a fun 4th of July activity? Make adorable, festive 4th of July Red, White and Blue Tie Dye shirts!
Kids love to do tie dye shirts and it’s always fun to be festive on the 4th of July!
All you need is red and blue tie dye plus shirts. It takes a little time so patience is key. Tie Dying is a multi step activity.
This is an activity that will need to be supervised with younger children. Little kids can still help you squirt the dye into the shirt etc. Older kids will be able to do more of the steps by themselves. Therefore I think it’s a great family activity!

Supplies Needed
- Scissors
- Red and Blue Tie Dye Colors – You can get a blue and red tie dye kit that comes with gloves and rubber bands or just use those two colors out of a bigger kit!
- Gloves – Many kits come with these
- Rubberbands – Many kits come with these but it’s a great idea to have extras.
- White T-shirt – We recommend using a 100% cotton shirt as it will take the dye much better. If you use a blend like 60/40 cotton/poly leave the dye on for longer to make it take. We would leave the dye on for 18-24 hours if using a blend tee.
- Wire Rack
- Plastic table cloth
- Plastic bag


How to Make Patriotic Tie Dye Shirts!
This is how we made our shirts. It’s a good idea to read the directions on your tie dye package as they may be different!
- Wet the shirt just a bit. You want it to be damp but not soaking wet.
- Cover your work surface with a plastic table cloth you can throw away when finished.
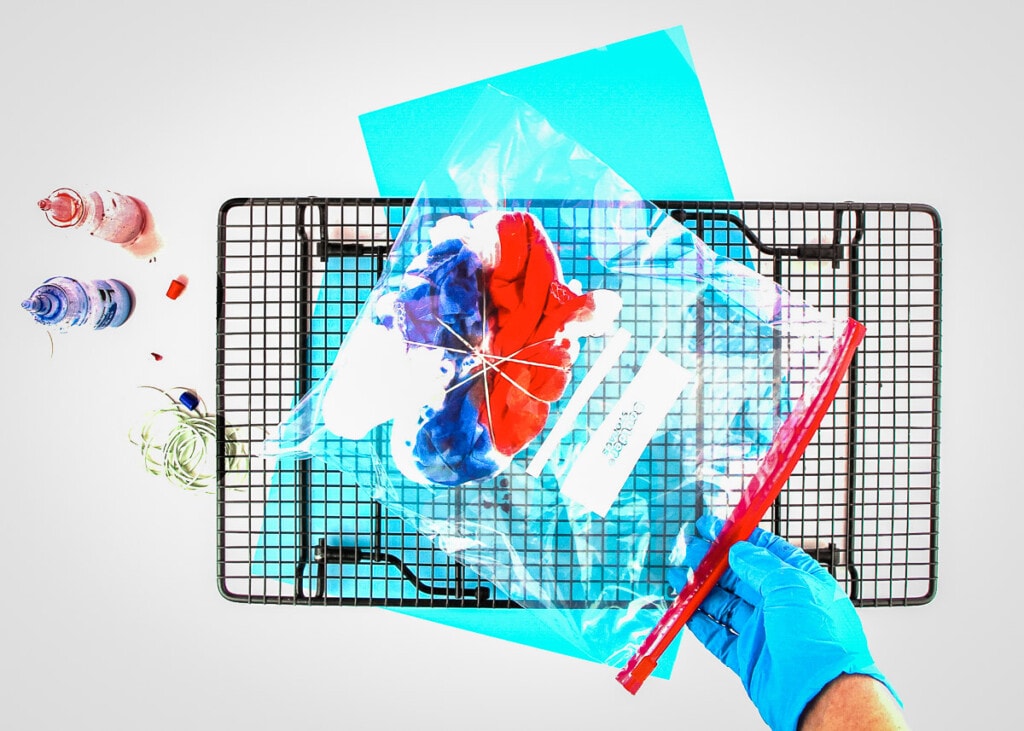
- Lay the shirt down on a flat surface. Grab a piece of the shirt in the middle and start twisting.
- Wrap 4 rubber bands around the shirt holding it in place. Tuck in the loose edges when possible. You should have 8 triangles when finished.
- Mix the red and blue dye according to package directions.
- Place the shirt on a wire rack and alternate the red and blue colors. If you want more white space, only color every other triangle. If you want more colors, squirt dye on each triangle. Don’t add too much dye to where it is dripping constantly onto the surface below.
- Flip the shirt over and add dye to that side.
- Place the shirt in a plastic bag and let sit for 8-10 hours.
- Cut off the rubber bands and rinse the shirt under cold water.
- Wash separately the first couple of times to get rid of extra dye still in the shirt.
How to Set the Dye
In our directions we recommend letting the dye sit for 8-10 hours to set it. This is what we did for these shirts.
Another options is to microwave the shirt for 3 minutes which should heat set the dye, but we did not do it using this method.
We recommend checking the instructions on the dye you use to make sure you are following their best practice since each brand differs a little.

More Fun with Red, White and Blue!
- Kids love to help make these easy Red, White and Blue Fruit Kabobs that are perfect for summer picnics!
- Celebrating Memorial Day or the 4th of July? Whip up a batch of this quick and easy Patriotic Bark with the kids for an easy, festive sweet treat!
If you take a picture using these Water Bombs and share them on Instagram make sure to #kidsactivityzone or tag us @kidsactivityzoneblog so we can see them!

How to Make a Red, White and Blue Tie Dye Shirt!
Ingredients
- Scissors
- Red and Blue Tie Dye Colors
- Gloves
- White T-shirt
- Wire Rack
- Plastic table cloth
- Plastic bag
Instructions
- Wet the shirt just a bit. You want it to be damp but not soaking wet.
- Cover your work surface with a plastic table cloth you can throw away when finished.
- Lay the shirt down on a flat surface. Grab a piece of the shirt in the middle and start twisting.
- Wrap 4 rubber bands around the shirt holding it in place. Tuck in the loose edges when possible. You should have 8 triangles when finished.
- Mix the red and blue dye according to package directions.
- Place the shirt on a wire rack and alternate the red and blue colors. If you want more white space, only color every other triangle. If you want more colors, squirt dye on each triangle. Don’t add too much dye to where it is dripping constantly onto the surface below.
- Flip the shirt over and add dye to that side.
- Place the shirt in a plastic bag and let sit for 8-10 hours.
- Cut off the rubber bands and rinse the shirt under cold water.
- Wash separately the first couple of times to get rid of extra dye still in the shirt.