Bunny Butt Cookies
Adorable Bunny Butt Cookies are so easy to make and fun for an Easter treat or in the spring! They start with store bought cookie dough, decorated with ready to spread frosting and marshmallows to create the cutest Bunny Butt.

You can’t make a sugar cookie with frosting any better, right? Wrong! Make them into adorable bunny butt cookies and they’re so much better. These easy Easter cookies are absolutely adorable and require no baking from scratch.
Theys are perfect for kids of any age to help decorate! They’re the perfect addition to any Easter party and make great gifts too. Pair them with peeps rice krispie treats and you’ve got yourself some winning desserts!
Why You’ll Love Bunny Butt Cookies
- Bunny cookies are a great quick dessert because they only take 20 minutes to make!
- These bunny sugar cookies make minimal mess and require minimal cleanup since they’re made from store-bought cookie dough and frosting.
- They are the perfect Easter dessert for kids to decorate! They’re simple and don’t require a long span of time to complete.
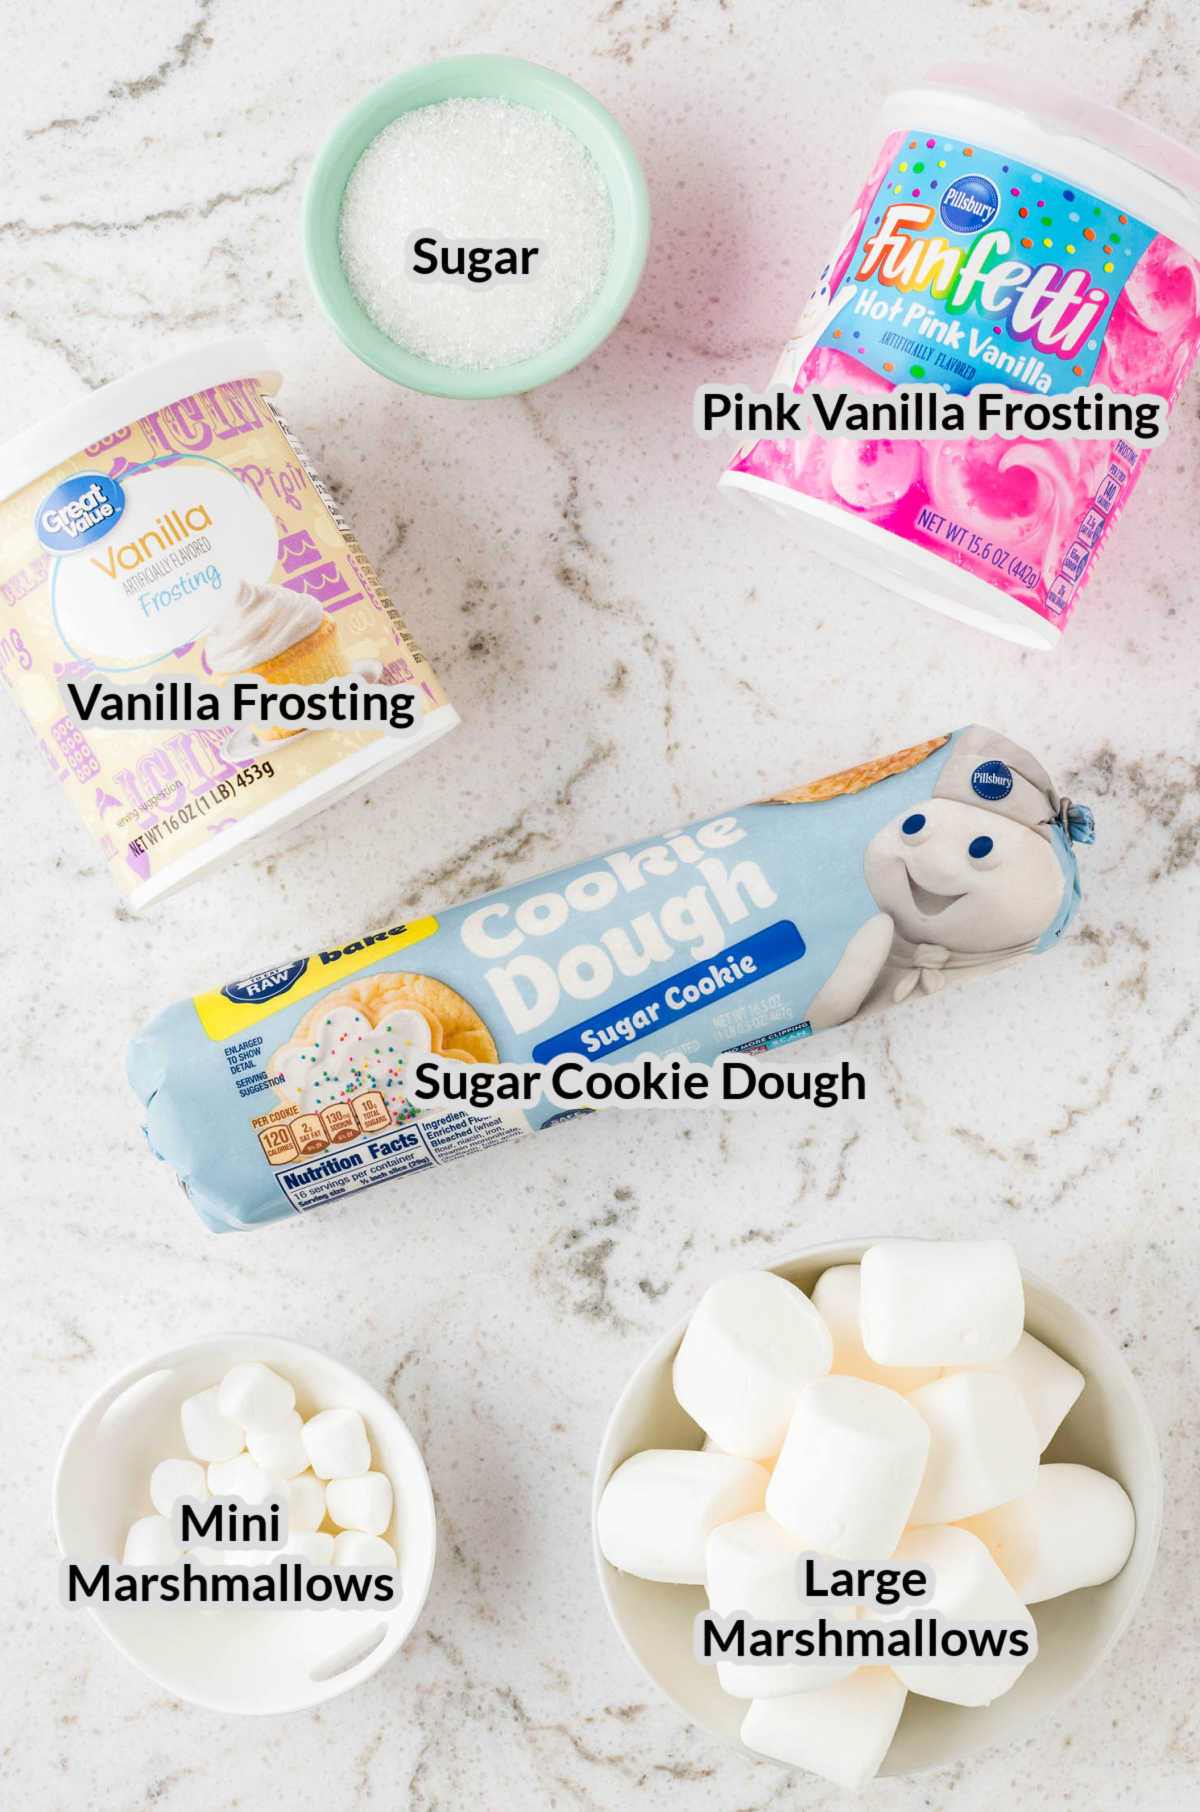
Ingredients needed for Bunny Butt Cookies
- Sugar Cookie Dough – This recipe is really easy because I use store-bought sugar cookie dough. However, you can make your own sugar cookie dough with this recipe if your prefer.
- Pink Vanilla Frosting – You’ll need pink frosting to make the cute little bunny feet on your bunny sugar cookies.
- Vanilla Frosting – Grab a can of your favorite vanilla frosting to frost the cookies with.
- Sugar – You’ll want to buy coarse, white sparkling sugar.
- Mini Marshmallows – You can have bunny cookies without a bunny tail! The mini marshmallows will be used as the tails.
- Large Marshmallows – Large marshmallows will become the feet to your little bunny cookies.
Helpful Tools
How to Make Easter Bunny Cookies
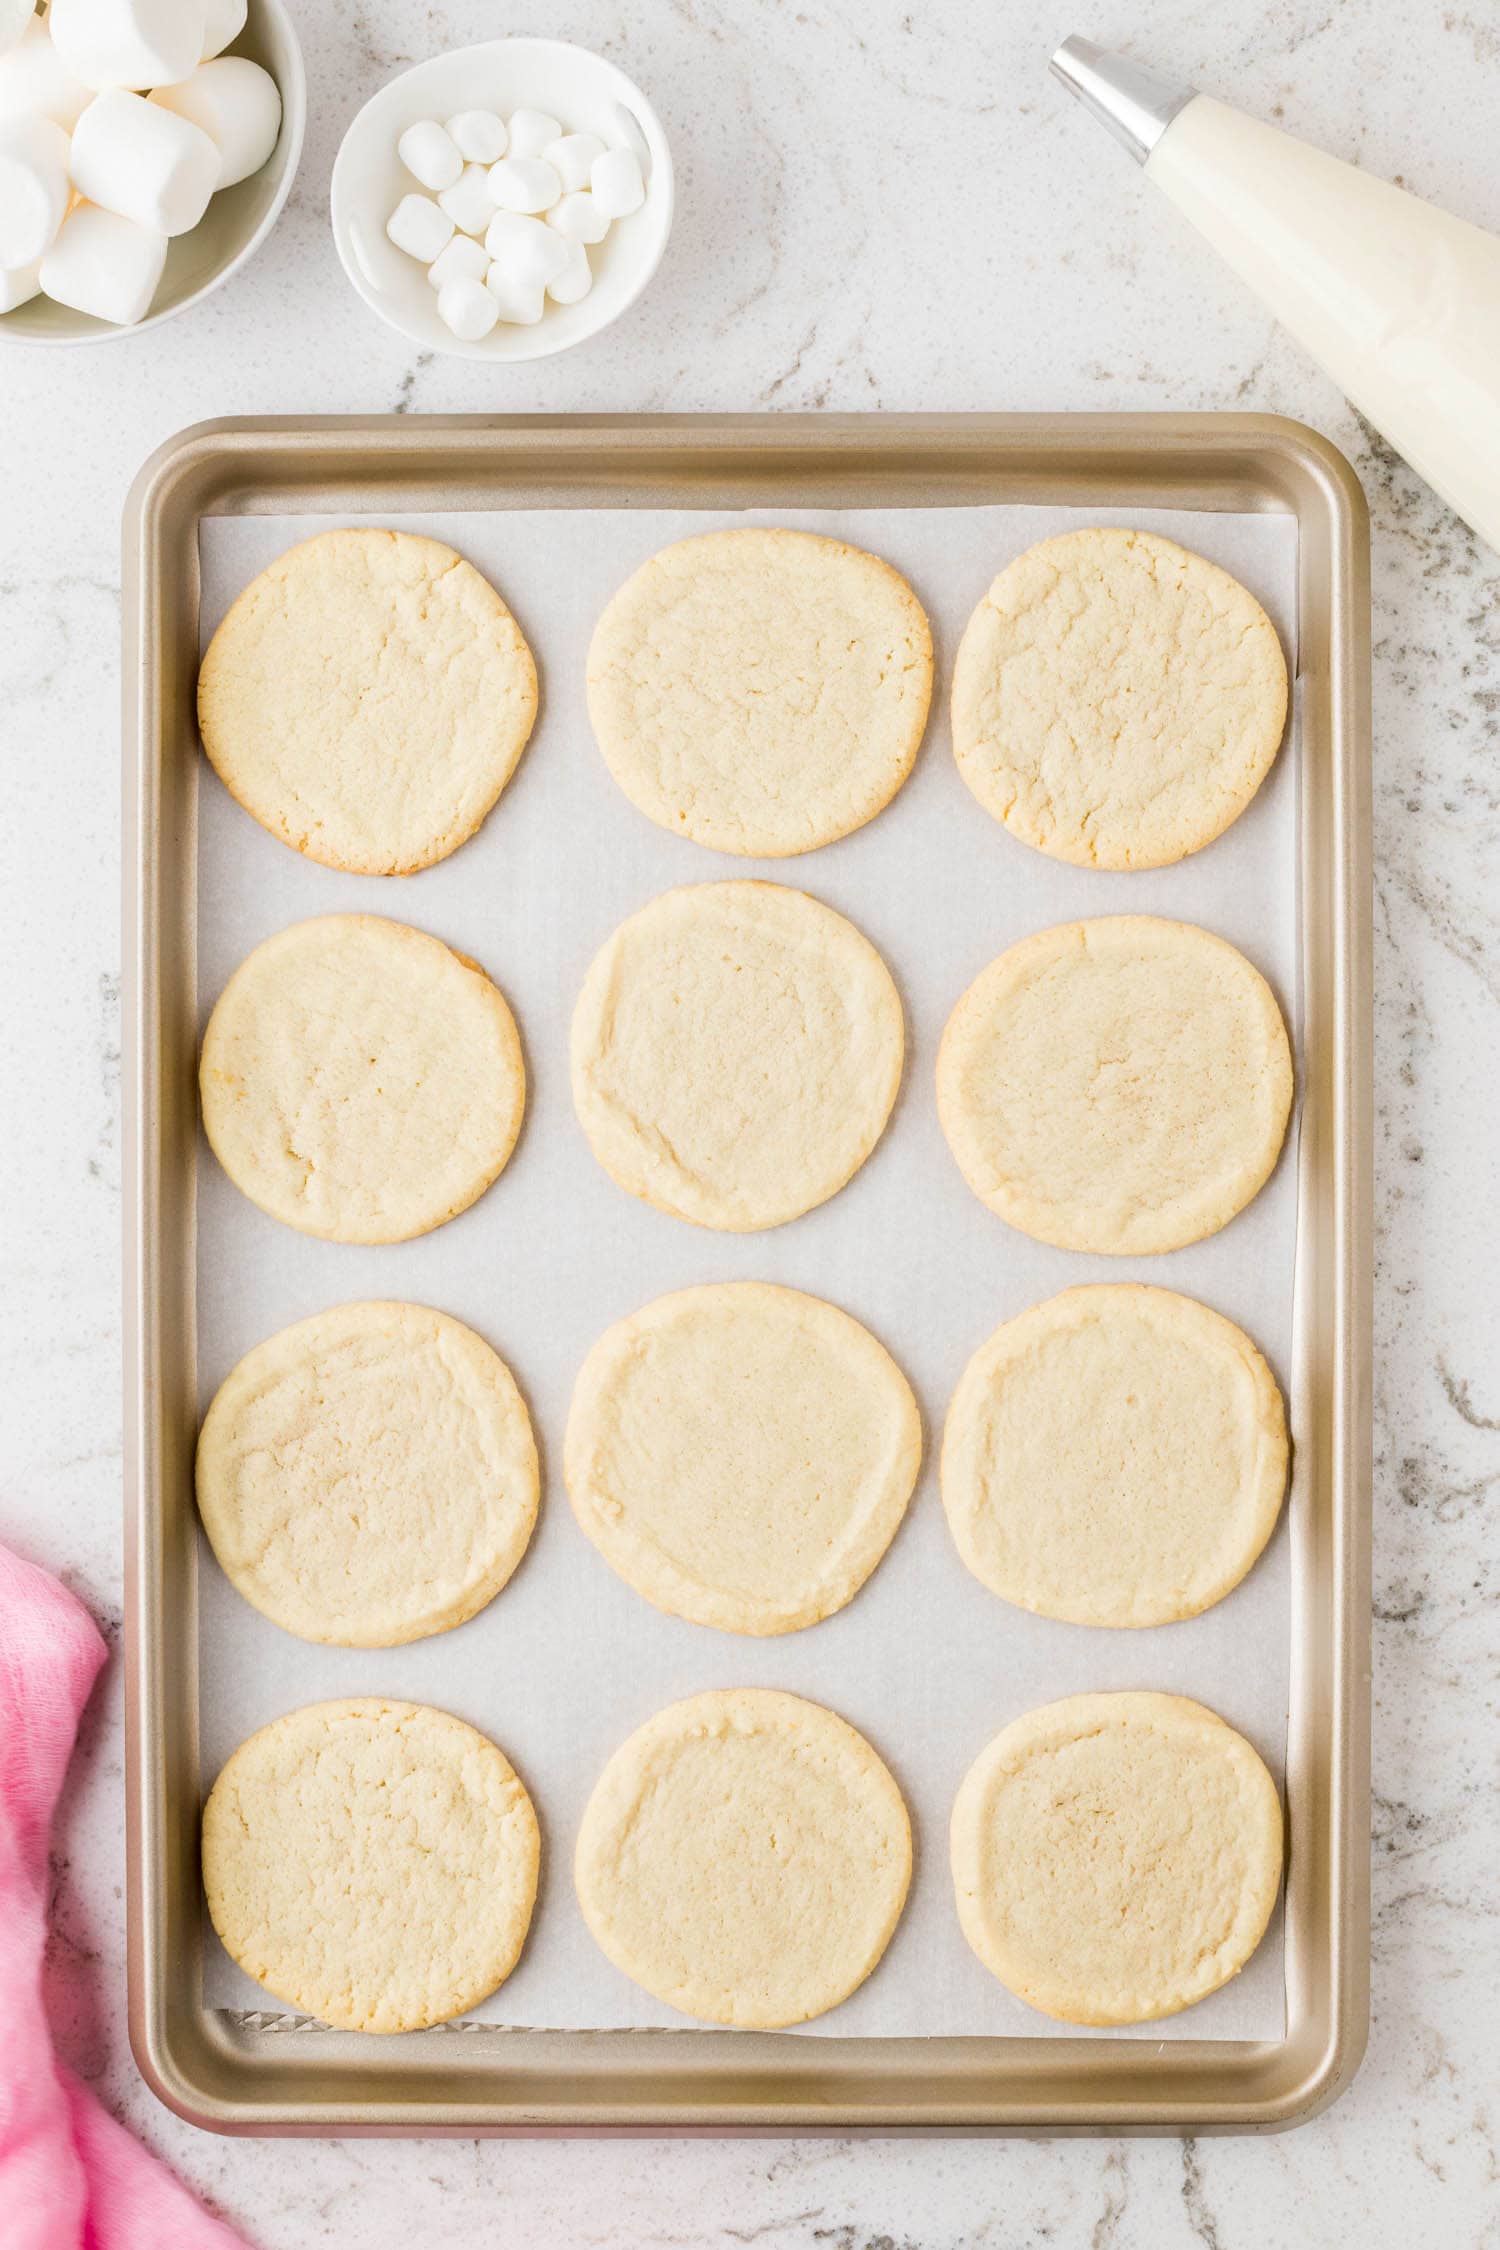
While your oven is preheating, prepare a baking sheet with parchment paper.
Then, cut the cookie dough in to fifteen 1/2 inch slices. Bake the cookies for 10-12 minutes until they are just turning golden brown.
Remove the cookies from the oven and place them on a cooling rack.
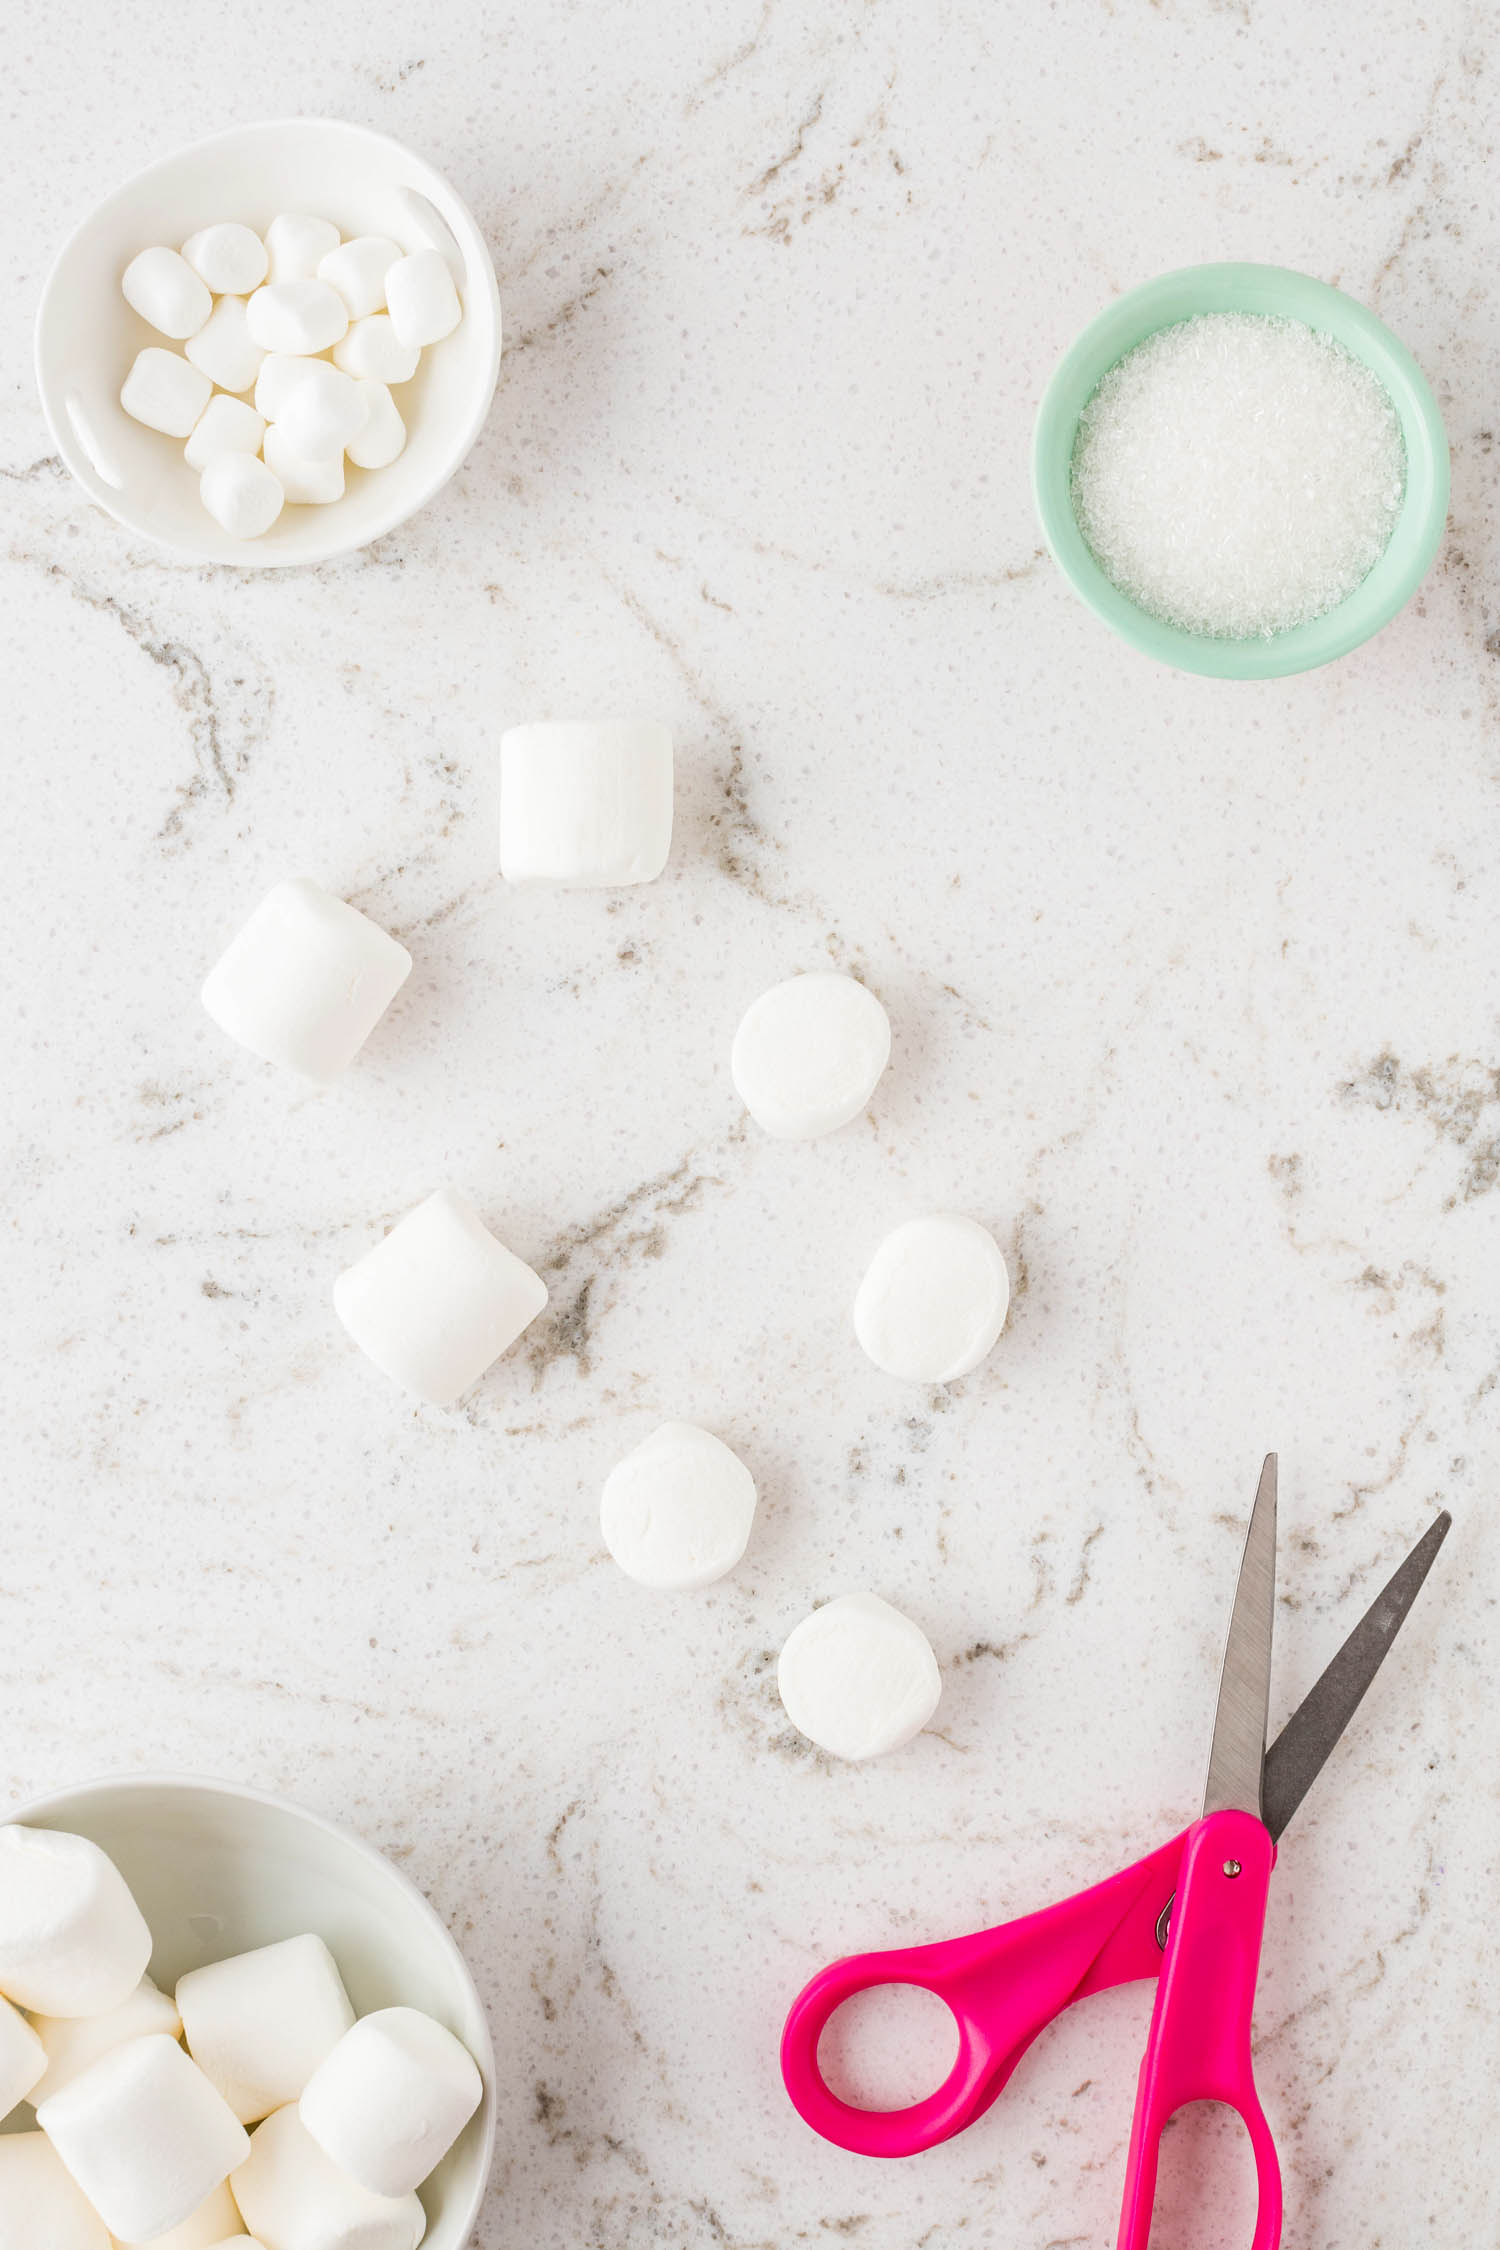
While the cookies cool, cut fifteen large marshmallows in half. These will become the bunny feet.
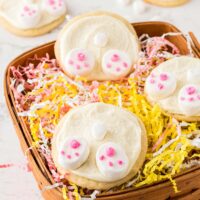
Once the cookies are completely cool, spread a generous layer of white frosting on top. Sprinkle the frosting with white sparkling sugar.

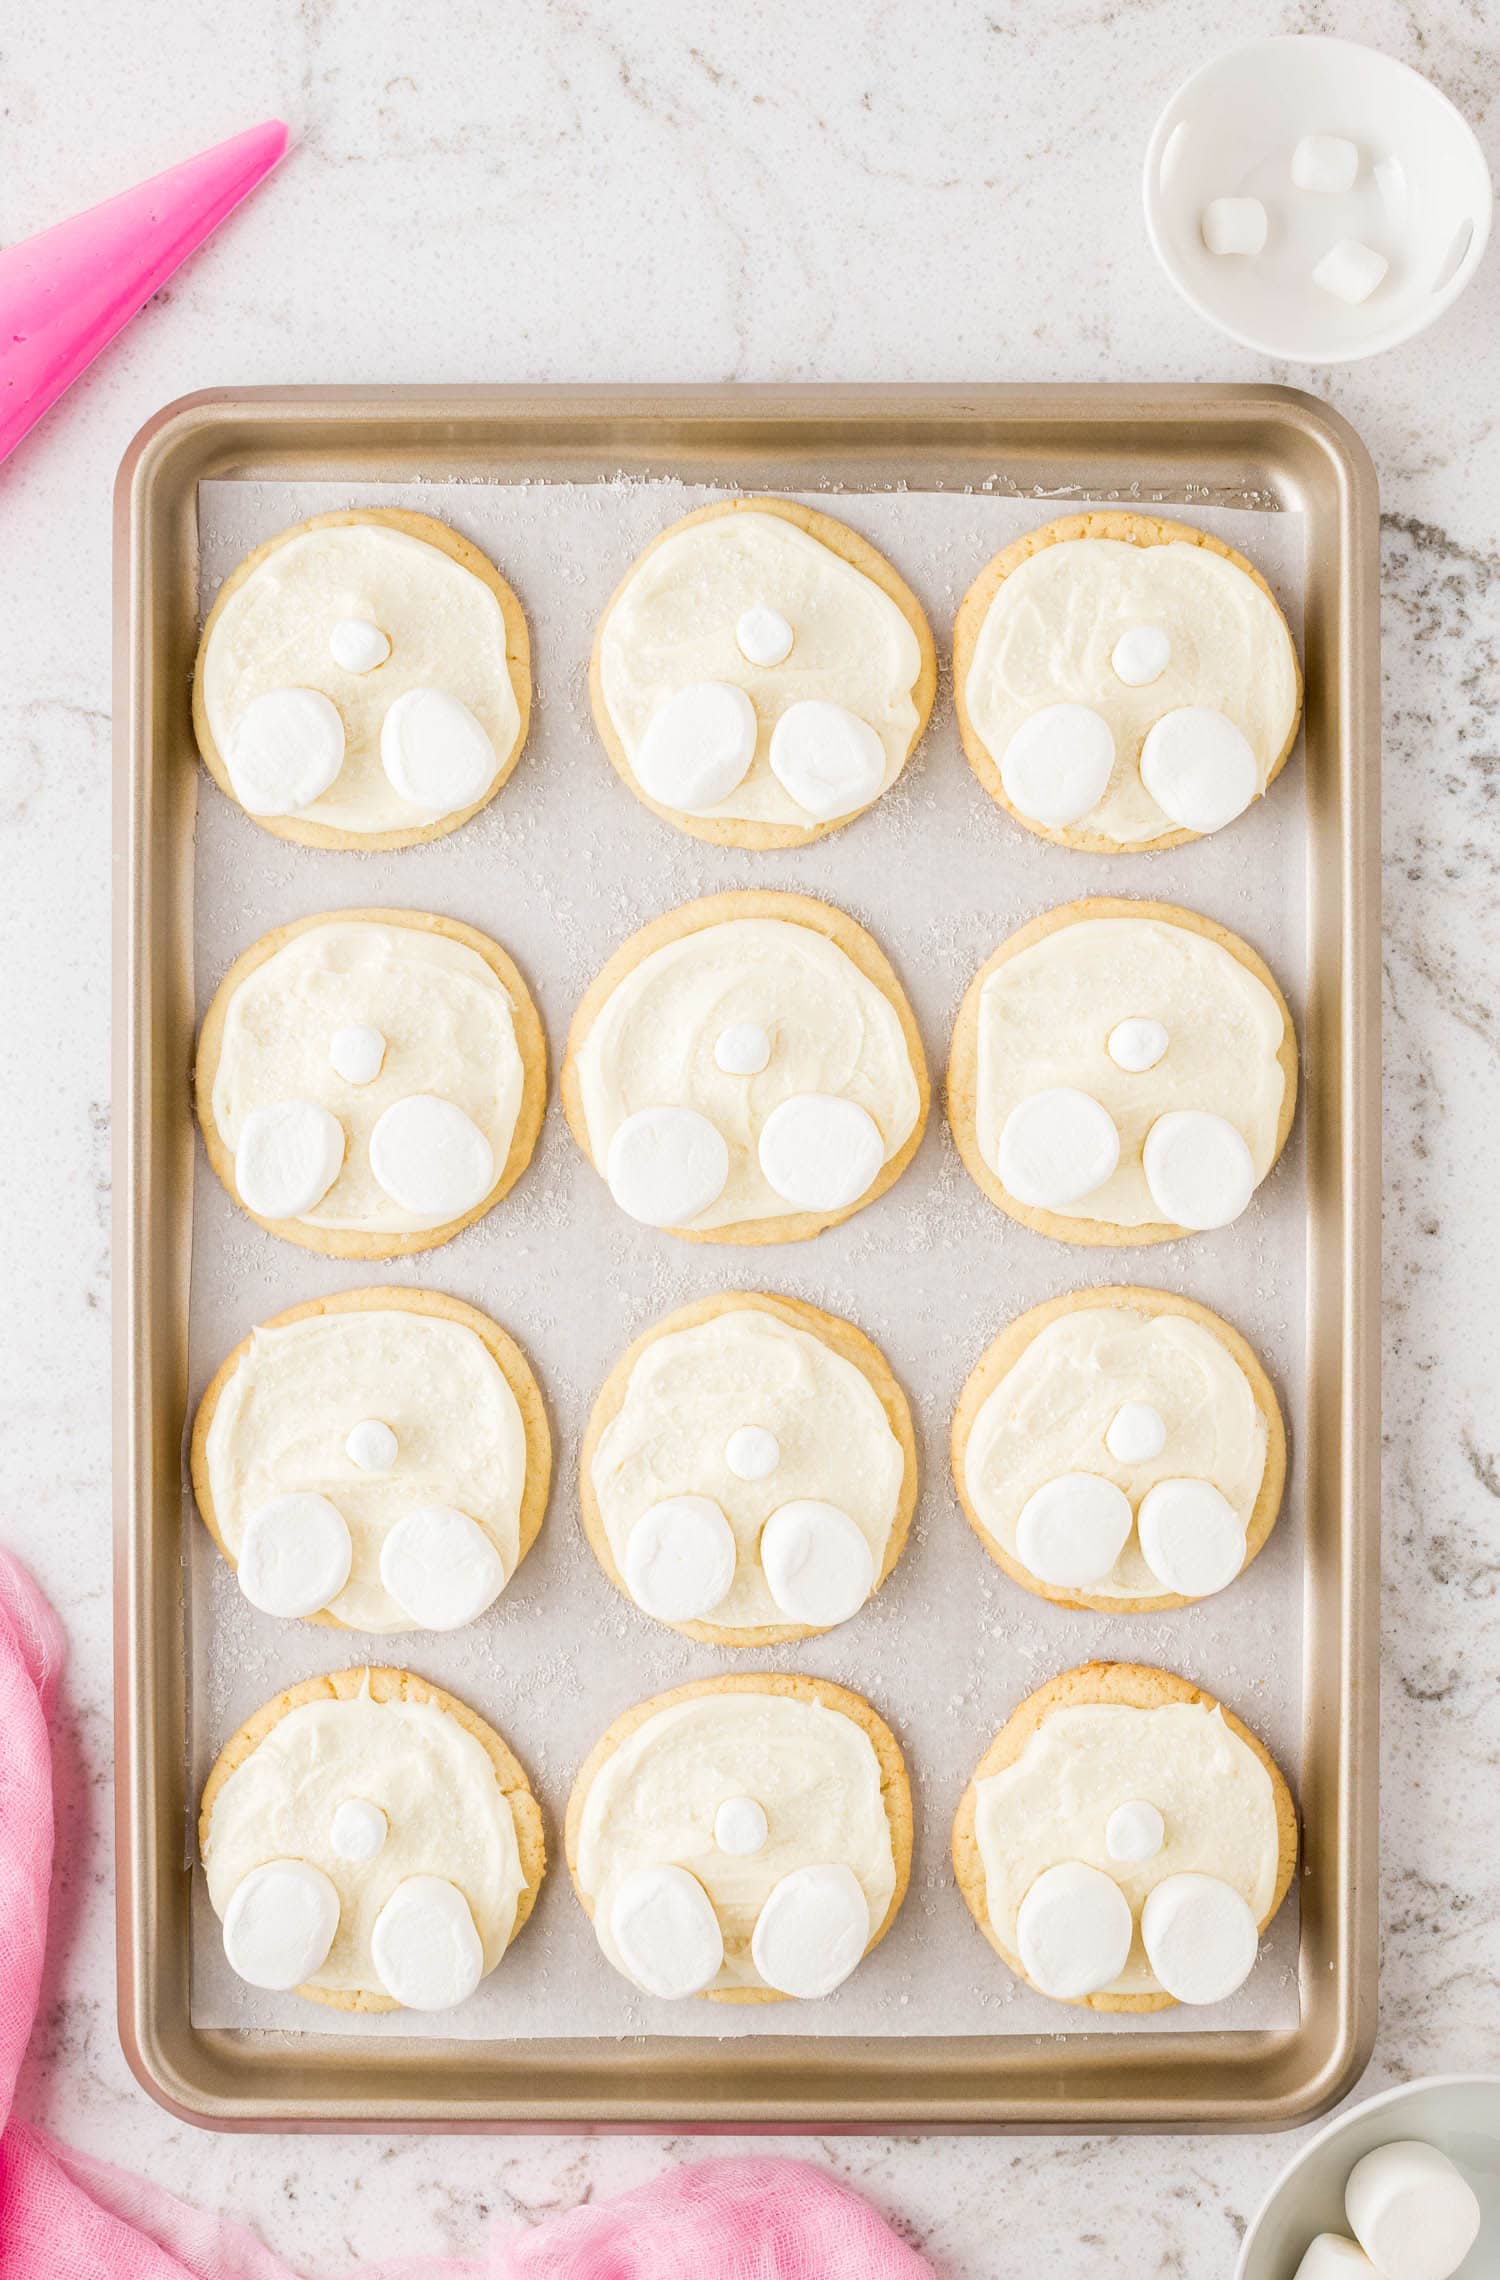

Place the previously cut marshmallows on the bottom of the bunny butt as the bunny feet. Then, place a mini marshmallow in the center of the cookie as the tail.
Fill a piping bag with the pink vanilla frosting and pipe a little heel and three toe pads onto each bunny foot.
Add any finishing touches needed, and enjoy!
How long do Bunny Butt Cookies last?
Store these easy bunny cookies in an airtight container at room temperature for 3 days. Before storing, be sure the frosting has fully set and put a layer of parchment paper in between cookies if you need to stack them.
What do I use if I can’t find marshmallows?
In place of the mini marshmallow tail, you could use a dot of frosting, a round sprinkle, a jelly bean, or anything else that would resemble a tail.
For the large marshmallows, see if you can find the large strawberry marshmallows if regular ones are sold out. Or, you could use small cookies as the feet too!
Pro Tips for the best Easy Bunny Cookies
- Change up the color of your bunnies for a more festive cookie platter! You could use Easter colors like baby blue, light green, or pink and make your bunnies full of color!
- If you don’t have a piping bag, you can use a toothpick to add the dots of pink frosting to the feet of the bunny cookies.
- Add bunny ears by attaching jelly beans or jordan almonds at the top!

I hope these adorable Easter cookies brighten your dessert table and make you smile!
More Cookie Recipes You’ll Love
- These 4th of July Cake Mix Cookies are the perfect easy and festive dessert to celebrate this fun holiday!
- No-Bake Haystack Cookies are a great dessert for any time of year.
- If you’re a sucker for mint chocolate, you’ll love these delicious Chocolate Mint M&M Cookies.
- Make Thumbprint S’mores Cookies for family movie night and you’ll think you’ve roasted s’mores by the fire!
Bunny Butt Cookies Recipe
Ingredients
- 16 ounces store-bought sugar cookie dough (1 package)
- 16 ounces store-bought white vanilla frosting (1 tub)
- 2 Tablespoons white sparkling sugar
- 15 large marshmallows
- 15 mini marshmallows
- 16 OUNCES store-bought bright pink vanilla frosting (1 Tub)
Instructions
- Preheat your oven to 325 degrees Fahrenheit and prepare a large nonstick baking sheet with parchment paper.
- Use a knife to cut the cookie roll into (15) ½-inch slices. Place the cookie dough on the prepared baking sheet 2 – 3 inches apart.
- Bake for 10 – 12 minutes or until just becoming brown. Remove from the oven and allow to cool on a cooling rack.
- Cut each of the 15 large marshmallows in half to form the bunny feet. Set aside.
- Once the baked cookies are completely cool, spread white vanilla frosting over the cooled cookies.
- Sprinkle the white icing with white sparkling sugar. Then place 2 large marshmallow halves on the frosted cookies as the bunny feet.
- Then place a mini marshmallow in the center of the cookie, just above the feet, to form the bunny tail.
- Place the pink icing in a piping bag and pipe a small heel pad and toe pads on the marshmallow halves that form the feet.
Notes
- You can also use a pink cookie or decorating icing instead of a tub of hot pink if you prefer.
- Bunny butt cookies are so easy that even small kiddos can help!