Salt Dough Handprint Santa Ornaments
Easy Salt Dough Handprint Santa Ornament—3-ingredient dough, bake or air-dry, then paint and decorate for a sweet Christmas keepsake.
Print
Pin
Servings: 4
Equipment
- craft paint
- Googly Eyes medium sized
- Pom Poms red and white
- Ribbon or twine for hanging
Ingredients
- 2 cups all-purpose flour
- 1 cup salt
- ¾ to 1 cup water
Instructions
- In a bowl, combine the flour and salt. Stir them together to ensure an even distribution.
- Gradually add water to the flour and salt mixture, stirring continuously. Start with ¾ cup of water and add more if needed. The goal is to form a smooth, pliable dough.
- Once the mixture starts to come together, transfer the mixture to a lightly floured surface. Knead the dough until it becomes smooth and elastic. If the dough is too sticky, add a bit more flour.
- Use a rolling pin to roll out the dough to your desired thickness. Typically, ¼ inch is a suitable thickness for most salt dough projects.
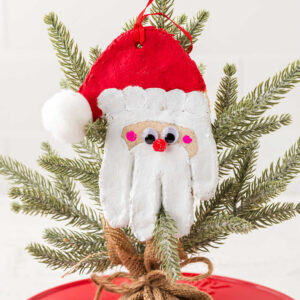
- Have your child press their hand firmly into the dough to create a clear handprint shape. This will form Santa’s beard and face. Carefully cut around the handprint, leaving a small border so it keeps its shape.
- Use a straw to poke a small hole near the top of the palm for hanging later.
- Place the handprints on a baking sheet lined with parchment paper. Bake at 250 degrees Fahrenheit for about 2 hours, or until hardened, or let air-dry for 24–48 hours, flipping once to prevent curling.
- Allow the ornaments to cool completely on the baking sheet for at least 45–60 minutes before painting. Make sure they’re fully dry and cool before moving on.
- Paint Santa’s beard by brushing the fingers white to form the beard around his face, and add a white band for the hat’s brim. Leave the center area of the palm unpainted for Santa’s face.
- Paint the top portion of the hat red, and allow each section to dry completely before continuing with the next details.
- Glue on googly eyes and a red pom pom for Santa’s nose. Add a white pom pom to Santa’s hat.
- Dip the end of your pencil in pink paint and give Santa some rosy cheeks. Allow your Santa creation to dry for at least 1 hour.
- Once dry, thread ribbon through the hole and tie it into a loop, and your ornament is ready to hang or gift.
Tried this recipe?Please leave a comment below or pin it to your Pinterest account!