Paper Plate Turtle Craft
Quick and easy Paper Plate Turtle Craft is the perfect summer activity for kids.
Print
Pin
Servings: 1 Paper Plate Turtle Craft
Ingredients
Instructions
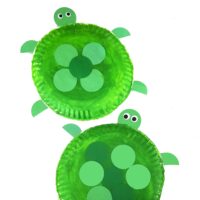
- Begin by painting the back of a paper plate green, so that the turtle ends up with a rounded shell. Let the paint dry completely.
- While the paint dries, punch some large circles out of the green cardstock. You will need 3 total for the head, arms, and legs as well as some for the shell.
- Now, take 3 green circles. Leave one intact and cut the other two in half.
- Glue the full circle to the top of the paper plate.
- Then, glue the half circles around the plate for arms and legs.
- Add googly eyes.
- Finally, glue the remainder of the circles onto the paper plate shell in a pattern of your choice.
Notes
- While the paint is wet, sprinkle green glitter onto the plate! Once dry, shake off any excess glitter and you've got a glittery turtle friend!
- Instead of placing circles on top of the "shell", you can free hand a shell pattern with a permanent marker. It'll give a more realistic look too!
- Use a deep dish paper plate to give a more raised and tall look to the turtle shell.
Tried this recipe?Please leave a comment below or pin it to your Pinterest account!