Paper Chain Birthday Countdown
Quick and easy paper chain birthday countdown craft is a great way to countdown to a child's big day!
Print
Pin
Ingredients
- Cardstock or construction paper in colors or patterns of your choice
- Paper cutter or scissors If you use scissors to cut your strips, a ruler will come in handy!
- Stapler
- Cupcake printable optional
- Sticky dots or double-sided tape optional
Instructions
- If you are going to use the printable cupcake, print it out on white cardstock. If you would like to edit the cupcake with text, I did this by uploading the picture in Canva and adding a text box!
- Choose a color or pattern of paper that you want to follow for your chain.
- Decide how many chains you will need for your countdown by counting the number of days until the birthday.
- Cut the colored cardstock or construction paper into 1-inch strips using your paper cutter or scissors. My paper cutter is conveniently marked with inches along the top. This makes it easy to form nice, straight lines every time! If you are using scissors, you could mark 1-inch sections lightly with a pencil, and then cut across.
- Once you have all of your paper strips cut, you can start to assemble the birthday chain!
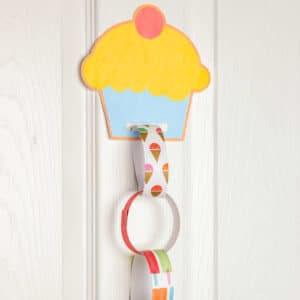
- If you’re using the printable cupcake, cut it out. Cut out the rectangle in the bottom middle. Using your scissors, you will have to carefully poke a hole in the center of the rectangle, and then cut around the edges. This is where you will slide your first chain in! If you would like to decorate the cupcake, now would be the perfect time to do so! You can use crayons, markers, special pens, and glitter… The possibilities are endless! Make it unique!
- Take one paper strips and slide it through the opening in the cupcake. You will form a circle with the strip by taking one end and overlapping the other end by about ½ inch. If you are not using the cupcake printable, simply form a circle with the first strip of paper and staple it together. This is the start of your chain!
- Staple the two ends together where they overlap.
- Take another strip and send one end through the circle you formed in step 5.
- Form another circle using this strip of paper by attaching the ends the same way. The first chain will be connected, and you will simply staple the two ends of the second strip of paper together while leaving the first chain “linked” inside.
- Continue Step 8 until the number of chains matches the number of days that you need to complete your countdown!
- If you would like to tear one right away (like my kids always do!) add an extra chain to your countdown chain. 😊
- Tear one chain off each day until you have reached your special day!
Tried this recipe?Please leave a comment below or pin it to your Pinterest account!