Paper Bag Scarecrow
Cute and easy Scarecrow Craft made out of a paper bag. The perfect fall kids activity!
Print
Pin
Servings: 1 Scarecrow Craft
Ingredients
- Brown paper lunch bags
- Cardstock any color
- Black marker
- Googly eyes large
- Scissors
- Glue stick
- Paint any color
- Paint brush
Instructions
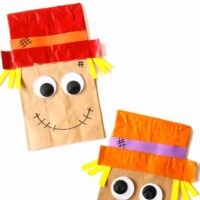
- With the flap of the bag being the top, begin by cutting a roughly 1 ½” strip from the bottom of the paper bag.
- Unfold the strip so it makes a circle. Cut the circle so it’s one long strip.
- Fold the strip over so that it’s longer than the width of the bag and glue in place. Cut away any excess.
- Glue the strip to the bottom of the flap of the bag.
- Place a scrap piece of paper under the flap and paint the flap of the bag/scarecrow’s hat in your choice of colors. Let the paint dry.
- While the paint is drying, you can add googly eyes to the body of the bag.
- Use a black marker to draw a simple mouth for the scarecrow.
- Cut 6 small strips from the yellow cardstock. You will also need to cut a larger strip, roughly the width of the bag, from the cardstock (in the color of your choice) for the band of the hat.
- Once the paint is completely dry, glue the band in place above the brim of the hat.
- Glue the yellow strips under the flap, at the sides of the hat.
- Use the black marker to make a few random crosshatch marks on the hat and face of the scarecrow.
Tried this recipe?Please leave a comment below or pin it to your Pinterest account!