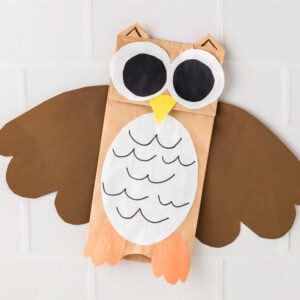
Paper Bag Owl Craft
Let your kids unleash their creativity with this fun and easy paper bag owl craft. It's a simple project that's perfect for kids of all ages.
Print
Pin
Servings: 1
Ingredients
- Brown paper bags one per owl
- Colored construction paper various colors for wings, beak, and eyes
- Scissors
- Glue stick
- Markers or crayons
- Pencil
- Paper Bag Owl Template
Instructions
- If using the template, trace the owl’s body parts onto construction paper. You can freehand this step if you would like.
- Flatten the paper bag with the bottom flap facing you. This will be the owl's face. Cut a triangle near the top corner of each flap and flip it up. This will make the owl's ears.
- Cut a triangle from the yellow construction paper for the owl’s beak. Glue it near the center of the flap, pointing downward.
- Cut two large circles from white construction paper for the eyes. Use a smaller piece of black paper to make the pupils. Glue these onto the white circles. Glue the eyes onto the flap of the paper bag.
- Cut an oval from a piece of white construction paper. This will be the owl's belly. Glue it to the front of the bag, below the beak.
- Cut 2 owl feet out of orange construction paper and glue them to the bottom of the paper bag.
- Cut two large wing shapes from colored construction paper. Glue the wings on the sides of the paper bag.
- Use markers, crayons, or additional construction paper to add feathers, patterns, or any other decorative elements.
Tried this recipe?Please leave a comment below or pin it to your Pinterest account!