Paint Splat Snowman
Kids will love making this Paint Splat Snowman for an easy winter craft project with minimal supplies and prep.
Print
Pin
Servings: 1 Snowman
Ingredients
- White Paint
- Cardstock - black brown, orange, background color of choice
- Googly eyes small
- Single hole punch
- White paint pen
- Scissors
- Glue stick
Instructions
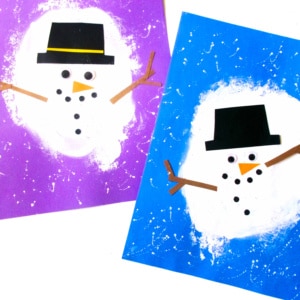
- Begin by pouring a generous amount of white acrylic paint on a sheet of cardstock. We used blue and purple cardstock for our backgrounds on this project, but you can use whatever two colors you’d like.
- Now, press the paint in between the two sheets of cardstock. Press it in with your hand and try to make sure the paint is as evenly spread as possible. Tip: Don’t press for too long, however, or the paint may start to peel up the cardstock!
- Next, carefully lift the top sheet from the bottom. You should, hopefully, have a nice round-ish paint splat on both sheets of cardstock.
- Let the paint dry completely.
- While the paint is drying, cut a simple top hat shape from black cardstock. You will need to cut a simple orange triangle nose, as well. Also, use a single hole punch to punch about 6 small black circles. Finally, cut two longer thin strips of brown cardstock and 4 total smaller thin strips. Glue these together for the stick arms.
- Then, when the paint is completely dry, glue the hat and eyes in the paint splat.
- Glue 4 of the small black circles for the mouth and the last two for coal buttons. And glue the nose somewhere, too, as well as the stick arms. Remember he’s melted, so his pieces can go where you want them.
- Finally, use a white paint pen to splatter paint across the cardstock to complete this fun melted snowman winter scene.
Tried this recipe?Please leave a comment below or pin it to your Pinterest account!