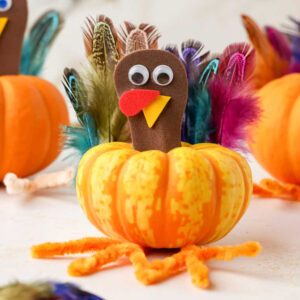
Mini Pumpkin Turkeys
Cute and adorable Mini Pumpkin Turkeys are the perfect fun and easy Thanksgiving craft.
Print
Pin
Servings: 1
Ingredients
- Mini pumpkins
- Feathers
- Adhesive foam Sheets
- Pipe cleaners orange, brown, or tan
- Googly eyes
- Hot glue gun and extra glue sticks
- Craft scissors
Instructions
- First, cut out the turkey’s head by folding a brown foam sheet in half and cutting a rounded “peanut” shape.
- Open the peanut shape and cut it in half to make two identical shapes. These two pieces will be the front and back of the turkey’s head.
- Peel off the backings and place one on each side of the stem of the pumpkin, adhesive sides touching. Sandwich the stem between the two adhesive foam sheets and press together.
- Cut a small triangle out of the yellow foam sheet for the turkey’s beak. Peel off the backing and press the sticky side on the turkey’s face.
- Cut a teardrop shape out of the red foam sheet to form the turkey’s snood. Place it at the top of the turkey’s beak.
- Using a pipe cleaner, form a turkey foot by making a balloon shape, making sure to leave a short “stem” at the bottom. Once the balloon is formed, twist the pipe cleaner around itself to hold it in place.
- Press the left side of the pipe cleaner down towards the twisted part of the balloon to form a mitten shape. This will be the turkey’s first toe.
- Press the right side of the mitten right in the middle towards the twisted part of the balloon. This will form the middle and right toes. The shape should look similar to a 3-leaf clover.
- Twist each of the toes to bring them together and form the turkey’s toes!
- Use a little bit of hot glue to attach each foot to the bottom of the pumpkin, and a tiny drop of hot glue to attach the googly eyes if they do not have adhesive backs.
- Finally, attach a row of colorful feathers to the backside of the pumpkin to create a beautiful display of tail feathers!
- Enjoy your cute turkey!
Tried this recipe?Please leave a comment below or pin it to your Pinterest account!