Butterfly Life Cycle Craft
Bring the butterfly life cycle to life with this colorful and engaging craft. It's a fun and hands-on activity that's perfect for learning at home or in the classroom
Print
Pin
Servings: 1 craft
Ingredients
- 1 piece white cardstock
- Toilet paper rolls
- Scissors
- Pipe cleaners
- Small pom poms
- Tissue paper
- Pens
- Colored pencils/crayons/markers
- School glue
- Paint cup A small bowl or paint palette will work, too!
- Paintbrush
Instructions
- Cut cardboard tubes into small sections to form circles. Cut about ½ inch in size. You can measure to be precise, if desired.
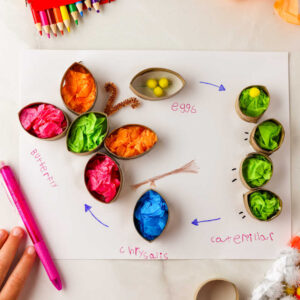
- Form the leaf: With your cardstock paper turned in the landscape orientation, use your paintbrush to glue one cardboard circle at the top. We are making a leaf shape, so it is ok if it is a little squished.
- Working clockwise, form the caterpillar: Cut 4 cardboard circles right through the middle. The circles need to be smaller to fit enough on the page to form a caterpillar, so cut them in the middle to form a smaller circle. Glue the sides back together. Hold in place for 20 seconds while the glue dries a bit. (This is good counting practice! 😊) Once the circle holds, glue it on the right side of the cardstock. Repeat with the remaining 3 circles. Glue in a “squiggly” pattern to form the caterpillar.
- At the bottom of the page glue one cardboard circle to form the chrysalis.
- Finally, at the left side of the page you will form the butterfly using 5 cardboard circles; 1 for the body and 2 on each side for the wings.
- Leave the page flat for about an hour to let the glue fully dry.
- Decorate! Add the details to the leaf with crayons or colored pencils and then glue the small pom pom “eggs”. Add legs and an eye to the caterpillar, a branch to the chrysalis, and antennae to the butterfly. Fill them in with tissue paper for extra fun and color!
- Draw arrows going clockwise around the page to show each stage of the life cycle.
- Get in some handwriting practice by adding the words “eggs”, “caterpillar”, “chrysalis”, and “butterfly” to each stage.
- Once the glue dries, display your life cycle of a butterfly craft to show all that you have learned together!
Tried this recipe?Please leave a comment below or pin it to your Pinterest account!