Paper Bag Butterfly
Fun, easy paper bag craft for kids! This Paper Bag Butterfly is easy to make and so fun for spring and summer.
Print
Pin
Ingredients
- Brown paper lunch bags
- Cardstock - pink purple, yellow, orange, etc.
- 1 inch circle paper punch
- ¾ inch circle paper punch
- Black marker
- Small googly eyes
- Scissors
- Glue
Instructions
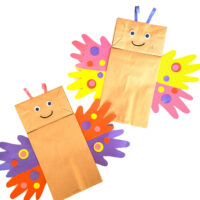
- First, choose 2 colors of cardstock. Trace your little one’s handprint on both colors. You will need 4 handprints total, 2 of each color.
- Cut out the handprints.
- Now, glue 2 of the handprints together, 1 of each color, side by side.
- Glue the handprints to the side of the bag.
- Repeat with the other 2 handprints on the other side of the bag to make wings.
- Next, glue the 2 googly eyes in place.
- Also, draw a simple mouth with the black marker.
- Then, use the different sized paper punches to make circles out of various colors of cardstock.
- Glue the circles on the handprint wings in your pattern of choice.
- Finally, cut two small strips of your choice of color cardstock.
- Roll the ends of the strips with your fingers or a pencil to make antennae.
- Then glue the antennae in place at the top of the bag.
- Such a beautiful spring craft that we had a lot of fun creating, and so many different color possibilities. Be sure to make more and see what colors you like best!
Tried this recipe?Please leave a comment below or pin it to your Pinterest account!