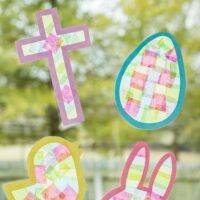
Easter Suncatchers
Learn how to make Easter Suncatchers! Templates for a chick, bunny, cross and egg. Perfect spring craft for kids.
Print
Pin
Servings: 1 Suncatcher
Ingredients
- Card stock pastel colors
- Pencil
- Scissors
- Tissue Paper pastel colors
- Adhesive contact paper clear
- Glue stick
- Bunny Chick, Cross, Egg Template, optional
Instructions
- Let’s start by printing out the template! Print out whichever template you like or all 4!
- Cut around the outside and inside of the template, leaving about a 1/2-inch border. Trace the template onto a piece of pastel-colored cardstock. Cut the desired shape. Set aside.
- It’s time to cut your tissue paper into 2-inch squares. Using multiple colors will give a stained glass effect.
- Now cut a piece of clear contact paper that is just larger than your bunny, chick, cross, or egg. Place the contact paper sticky side up over the top of your shape. Start placing your previously cut tissue paper squares. They will stick to the contact paper. It’s ok to overlap the tissue paper squares. Repeat until all negative space is filled.
- Next, take the card stock bunny, chick, cross, or egg and place a thin layer of glue on the back around the border. Then place it on top of the contact paper and tissue paper. Press to secure.
- Finally, cut the excess contact paper, and your Easter suncatcher is ready to shine!
Notes
- If you are unable to find adhesive contact paper, you can use press n seal! You can usually find it in the grocery aisle where ziplock bags and plastic wrap are located.
- To speed up this craft, pre-cut templates onto various colors of cardstock and pre-cut the little pieces of tissue paper. This would be a great idea if you are making this craft with a large group of kids.
Tried this recipe?Please leave a comment below or pin it to your Pinterest account!