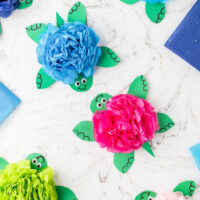
Tissue Paper Turtle Craft
Cute and fun Tissue Paper Turtle craft is a fun activity for kids!
Print
Pin
Equipment
Ingredients
Instructions
- Select a piece of tissue paper and fold and cut it into 5 x 5-inch sheets. Arrange 16 tissue paper sheets by stacking them evenly.
- Next, fold the stack of sheets in accordion style. Once folded, staple the stack in the center.
- Now it’s time to “fluff” our turtle body! Start by pulling the first layer of tissue paper towards the center. Repeat this step until all layers are fluffy and full. Set aside.
- Now let’s make the head, arms, legs, and tail for our turtle! Using an empty toilet paper roll, trace a circle on the green construction paper about 1 and ½ inches.
- Next, slightly squeeze the toilet paper roll and use it to trace an oval-like shape on the green construction paper. Repeat this step to make 4 legs.
- Lastly, draw an elongated triangle to use for the tail. Cut all of your tracings and set them aside.
- The turtles are ready to come alive! Using a small stapler, attach the 1 and ½ inch circle you previously cut for the head of the turtle. Secure it by stapling each side of the bottom of the circle to the bottom layers of tissue paper. Using the same method, attach the legs on opposite sides of the shell and the tail to the end.
- Now let’s give the legs some character by drawing 3 small humps on each to create some toes! Finally, add 2 googly eyes and a smile!
Notes
- When doing this craft with younger kiddos, you might consider pre-cutting the head, legs, and tails to reduce assembly time.
- You can change the size of your turtle by increasing or decreasing the size of your 5 x 5-inch sheets of tissue paper to fit your need.
Tried this recipe?Please leave a comment below or pin it to your Pinterest account!