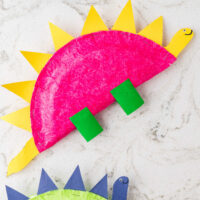
Paper Plate Dinosaur Craft
Fun and cute Dinosaur Paper Plate Craft! The perfect kids activity!
Print
Pin
Servings: 1
Ingredients
- Paper plate
- Tissue paper
- Craft glue
- Scissors
- Stapler
- Staples
- Construction paper
- Googly eyes
- Marker
- Craft paper
- Toilet paper roll
- Craft paint
- Foam craft paintbrush
Instructions
- Spread a thin layer of glue over the entire surface of the paper plate. Lay a sheet of tissue paper over the glue and press until secure. Cut the excess tissue paper from the edges. Set aside to dry for about 5 minutes.
- While the body is drying, let’s make the spikes, head, and tail for our dinosaur. Take a piece of construction paper and cut about 6 triangles for the spikes. Next, draw the head and tail and cut them out. Set aside.
- Now it’s time to assemble the dinosaur! Take your tissue paper-covered paper plate and fold it in half. Take one of the previously cut triangles and staple it to the top center, securing the spike and the folded paper plate. Repeat this step attaching the remaining spikes.
- Lastly, fasten the head and the tail to the paper plate. Using a marker add an eye and smile to personalize this dinosaur.
- Lastly, let’s make the legs for the dinosaur. Take a recycled toilet paper roll and paint it with craft paint. Allow it to dry for 10 minutes.
- Once dry, cut it into 4 rectangles. Affix the with craft glue to create the legs.
Notes
- Tracing your hand is an easy way to make the head and tail for your dinosaur.
- If you create this craft with younger children, you might consider precutting the items to reduce time.
Tried this recipe?Please leave a comment below or pin it to your Pinterest account!