DIY Felt Envelops
Make these cute and fun DIY Felt Envelopes with your kids to play with. Trace either one of our patterns to make your own felt envelope.
Print
Pin
Servings: 1
Ingredients
Instructions
- Choose which pattern you would like to use. I have included 2 patterns. The gray envelope pattern (#2) is very simple and easy for younger children to put together if you opt to leave off the optional stitching. This can also be used for hand-eye coordination practice, as long as you assist the child while operating the darning needle!
- Gather all of your supplies, and follow the directions for the envelope pattern that you choose!
Envelope Style #1:
- If you will be using a hot glue gun, plug it in so that it is ready when you need it. Alternatively, you can use fabric glue, just note that it will take some time to dry before you can move forward and finish your project.
- Print pattern 1 on a standard size 8.5” x 11” piece of paper. Cut out the mailbox shape.
- Once your pattern is printed and cut out, fold it in half. (The sides should line up perfectly.)
- Fold your felt sheet (color of choice) in half on the short edge. The long edges should be touching.
- Clip or pin your folded pattern to the folded felt on it’s fold (not on the open edges). You want both of their fold lines to be touching. You are putting the 2 folds together. When you cut and open up the felt, it will look just like your paper pattern when it is opened up. It will look similar to a fire hydrant! 😊
- Cut around the edges of the paper pattern using your fabric scissors. If you have little helpers, PLEASE help them with this part because fabric scissors are SHARP! If your helpers are itty bitty, I suggest prepping this step beforehand.
- Once the envelope shape is cut, unclip and unfold the felt. The part of the envelope facing up will become the inside of your envelope.
- Using your clips again, clip down the side flaps and use hot glue OR fabric glue to adhere the flaps to the bottom portion of your envelope. Just a little bit of glue will do, so use sparingly to avoid any spilling out and touching your fingers or looking messy!
- Once your envelope is glued and dried, it is time to add the letter and the stamp. This is optional, but makes it personalized and CUTE!
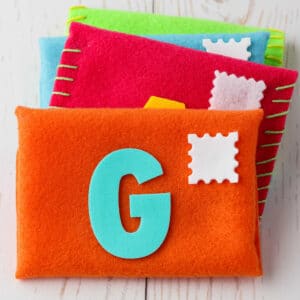
- Use hot glue or fabric glue to adhere the letter on the backside in the middle of your envelope, and to adhere the stamp in the top right corner, just like on a real envelope! I love to use this activity as a learning experience. Teaching children all about the sections of an envelope is fun!
- Once the glue is dry, it is time to add the button.
- For little hands, this step can be tricky. Please assist little ones, or do this step for them! Bigger kids can do this with ease. Place the button on the front side of your envelope somewhere near the top third line, in the middle.
- Thread your yarn darning needle with the embroidery thread. I like to double the thread by cutting a piece about 8 inches in length and sending it halfway through the needle. Then I tie a knot near the end. Start on the inside of your envelope, and carefully send the needle through the first buttonhole. Pull the embroidery thread all the way through until the knot is against the inside of the envelope. Then insert your needle from the top side through the other buttonhole, and pull the thread through until it is tight. You should end on the inside of the envelope, behind the button! Finish off with a double knot, and cut the ends leaving a little bit of extra thread so that it will not easily come undone.
- Once your button is sewn in place, it is time to cut the hole for the button to fit through. Fold your envelope in half, clip it at the very top using one clip, and snip a straight line (using your fabric scissors). You want to make the hole smaller than your button because the felt will stretch some. If the hole is larger than your button, it may not stay closed very well. For my button, I cut a line that was about ¼ inch in length. Just use your best judgment for the size button that you use.
- Time to PLAY! We love to use these little envelopes for handwriting practice, sibling bonding, and pretend play!
Envelope Style #2:
- If you are using a hot glue gun, plug it in so that it is ready when you are ready to use it.
- Print Felt Envelope Pattern 2 on a standard 8.5” x 11” piece of paper, and cut around the pattern.
- Line up the bottom of the envelope pattern with the bottom of your choice of color felt sheet. I like to line up the bottom right edges to make less work when cutting.
- Secure the pattern by placing 2 sewing pins through the pattern and the felt. Place one near the top (middle) and one near the bottom (middle).
- Cut around the pattern.
- Once your felt pattern is cut, you will fold up the bottom edge to meet just under the top “flap” that will fold down to be the envelope flap. Fold up from the bottom. Your envelope section should measure roughly 3.5 inches. You can be more precise and measure if you’d like. I just like to guess and leave enough room for the top flap to flap down. 😊 Clip the bottom portion in place to give you free hands to operate your glue gun.
- Unclip, one side at a time and secure in place with just a little bit of hot glue. If you prefer to use fabric glue because you have little hands helping, that will work just fine! You will just need to make sure that the glue has enough time to dry before moving forward.
- **The next steps are optional** If you would like to add stitching to the side, you can do that now. You can opt to leave it simple and just keep with the glued edges. Choose an embroidery thread color and thread your darning needle. I cut about 10 inches to give me plenty of string to work with, and then I thread it through the eye of the needle. Tie a knot near the end of the thread so that you can pull it to the envelope without it going through. If you want, you can CAREFULLY add a tiny drop of hot glue to anchor it in place. Alternatively, you can double-knot it before sending it inside the envelope to ensure it will stay in place.
- From the TOP of the envelope, insert your needle down to the INSIDE BOTTOM right-side corner of your envelope. You want to come out around the corner. From here, you will hold your envelope, facing up, and loop around to insert your needle from the top side and pull through the bottom. You will continue this process, inserting from the TOP and pulling through the BOTTOM each time until you reach the top of the envelope.
- Once you reach the top of the envelope, secure it with a double knot, and you can use a tiny bit of glue in between the felt fabric. The knot should be hidden between the front and back of the envelope.
- Repeat steps 8-10 for the left side of the envelope.
- Now it is time to add your button! For little hands, this step can be tricky. Please assist little ones, or do this step for them! Bigger kids can do this with ease. Place the button on the front side of your envelope somewhere near the top third line, in the middle.
- Thread your yarn darning needle with the embroidery thread. I like to double the thread by cutting a piece about 8 inches in length and sending it halfway through the needle. Then I tie a knot near the end. Start on the inside of your envelope, and carefully send the needle through the first buttonhole. Pull the embroidery thread all the way through until the knot is against the inside of the envelope. Then insert your needle from the top side through the other buttonhole, and pull the thread through until it is tight. You should end on the inside of the envelope, behind the button! Finish off with a double knot, and cut the ends leaving a little bit of extra thread so that it will not easily come undone.
- Once your button is sewn in place, it is time to cut the hole for the button to fit through. Fold your envelope in half, clip it at the very top using one clip, and snip a straight line (using your fabric scissors). You want to make the hole smaller than your button because the felt will stretch some. If the hole is larger than your button, it may not stay closed very well. For my button, I cut a line that was about ¼ inch in length. Just use your best judgment for the size button that you use.
- Finally, it is time to glue the letter and the stamp on the back of the envelope! For this stamp, I used my pinking shears to cut a square out of white felt. Feel free to use any color you would like for your stamp to make your envelope customized and personalized! Use hot glue or fabric glue to adhere the letter on the backside in the middle of your envelope, and to adhere the stamp in the top right corner, just like on a real envelope! I love to use this activity as a learning experience. Teaching children all about the sections of an envelope is fun!
Tried this recipe?Please leave a comment below or pin it to your Pinterest account!