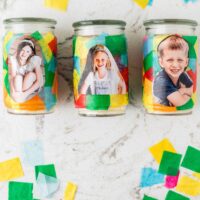
Tissue Paper DIY Photo Candle Craft
Tissue Paper Photo Candles make the perfect gift for Mother's Day, Grandparents Day and so much more. Easy to make with minimal supplies.
Print
Pin
Servings: 1 Photo Candle
Equipment
Ingredients
- Candle in a glass jar
- Tissue paper
- Scissors
- Mod podge
- Foam sponge brush
- Printed photo
Instructions
- Start by choosing a candle in a glass jar. Remove any stickers or labels and ensure the glass is clean and dry.
- Next, take the tissue paper and cut it into 1-inch squares. Use as many colors as you would like! Set them aside.
- Grab the foam sponge brush and apply a thin layer of mod podge to the glass jar. Place a cut tissue paper square onto the mod podge. Overlap the squares repeating until the entire jar is covered.
- Place an additional layer of mod podge over the whole surface to seal the tissue paper. Allow a few minutes to set.
- Let’s cut the printed photo to fit the size of the jar. Place a thin layer of mod podge on the back of the picture and place it in the center of the jar.
- Press the picture to be sure it sticks. Place another thin layer of mod podge over the top of the photo to seal it.
- Allow the completed candle to dry for 24 hours.
Tried this recipe?Please leave a comment below or pin it to your Pinterest account!