Paper Bag Bunny
Cute and easy Paper Bag Bunny craft perfect for Easter or spring!
Print
Pin
Servings: 1 Pape Bag Bunny
Ingredients
Instructions
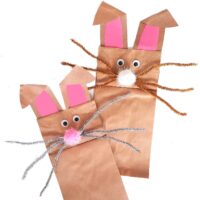
- Begin by printing the template for the bunny ears. Cut out the bunny ears on the template.
- Trace the large shapes on brown cardstock. Trace the smaller shapes on pink cardstock. Cut out the pieces.
- Glue the pink shapes inside the brown shapes.
- Then glue the ears to the top of a brown paper lunch bag.
- Fold the tips of the ears down for extra cuteness.
- Glue googly eyes in place above the fold of the bag.
- Now, take 3 pipe cleaners and twist together in the center.
- We like to use tape to secure onto the bag. Glue dots would work, as well, as would hot glue.
- Finally, once the pipe cleaners are secure, glue a large pom to the center. Again, if you find the large pom hard to stick with glue, use glue dots or hot glue.
Notes
- If you don’t have large googly eyes, there are many options you can use in their place! You can paint eyes on with black and white paint or paint pens, cut them out of construction paper, or draw them on!
- Cut a large oval out of the pink card stock and glue it onto the body of the paper bag bunny to give it a cute little belly!
- If you don’t have pipe cleaners, feel free to draw the whiskers onto each bag with black or brown sharpies or markers.
- Make your bunny stand out by adding some glitter or glitter glue to its ears!
Tried this recipe?Please leave a comment below or pin it to your Pinterest account!