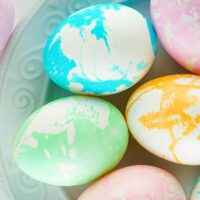
Marble Dyed Easter Eggs
Easter Eggs with a marbling effect on them! Marble Dyed Easter Eggs are a fun Easter activity and science all in one.
Print
Pin
Ingredients
- Boiled Eggs
- ½ Cup Boiling Water
- 1 Tablespoon Cooking Oil plus just a dab extra
- ½ Tablespoon Vinegar
- 10-20 Drops Food Dye
- Plastic Cereal Bowls
- Paper Towels
- Rubber Gloves
- Forks or Spoons
Instructions
- Add ½ cup boiling water to disposable paper bowls (you don't want the water to be higher than a half inch) along with ½ Tablespoon vinegar.
- Then add 10-20 drops of food coloring to each bowl. Once color per bowl. The darker the color the less dye it will need in the water.
- Stir to combine. Then add 1 Table spoon oil to each bowl.
- Add a little oil to a different bowl for use later.
- Make sure your eggs are dry and at room temperature.
- Put disposable gloves on to protect from the dye.
- Using your finger or a paint brush make streaks and spots of oil all over the egg, do not completely cover.
- Mix the oil and dye in the bowl with a spoon or fork. Immediately roll the egg in it so that the entire egg has touched the dye mixture at least once. Do this step quickly then pull the egg out immediately and wipe dry with a paper towel.
- Place egg back in egg carton and let it sit for 5 minutes to dry.
Notes
- Use lots of different colors! You can even buy neon food coloring to make really bright eggs. I find that the brighter colors do really well on marble dyed eggs.
- If you’re using a dark color, you won’t need as many drops of food coloring. So just eyeball it and when it looks like the bowl of dye has reached the right color, then stop adding dye.
- Don’t roll the egg around in the dye too much. If it’s touched the dye, it’s good to go!
Tried this recipe?Please leave a comment below or pin it to your Pinterest account!