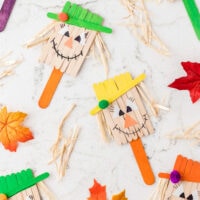
Scarecrow Craft
Quick and easy Scarecrow Craft made with wooden craft sticks makes the perfect fall kids activity!
Print
Pin
Servings: 1 Scarecrow Craft
Ingredients
Instructions
- We used craft paper to create a protective layer for the table or countertop before beginning the activity.
- Let’s start by laying 7 wooden craft sticks side by side vertically. Take an additional wooden craft stick and layer one side with glue. Press this glued side down across all of the sticks diagonally to secure. Allow drying for at least 2 minutes.
- Once dry, flip the previously glued wooden craft sticks over. Glue a stick slightly diagonally across the front of the wooden sticks to create a hat. Allow drying for another couple of minutes.
- Now it’s time to paint the hat with your choice of craft paint. Allow drying for 5 minutes.
- While the hat dries, let’s prepare the eyes and nose for the scarecrow. Cut 2 small triangles from the white construction paper for the eyes. Cut 1 small triangle from the orange construction paper for the nose.
- Affix the eyes and nose to the face of the scarecrow with glue. Use a black marker to fill in the pupils of the eyes and make eyelashes and a smile!
- Now let’s give our scarecrow some hair! Glue several pieces of raffia just under the hat on the back of both sides to create some hair. Allow at least 3 minutes to dry.
- While the “hair” is drying, place a small dab of glue on a jumbo wooden craft stick and affix it to the middle of the back of the craft. Allow drying for 2 to 3 minutes. Finally, add a small craft pom pom to the hat for decoration.
Notes
- Add a magnet on the back of popsicle stick scarecrow and make it a fun fall refrigerator magnet!
- Attach a piece of twine to the top and make a hanger to display your scarecrow art.
- Pre-cut the triangles for eyes and noses to save time!
Tried this recipe?Please leave a comment below or pin it to your Pinterest account!