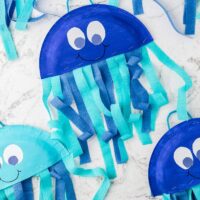
Paper Plate Jellyfish Craft
Cute adorable jellyfish craft made out of paper plates the kids will have fun making!
Print
Pin
Servings: 2 paper plate jellyfish
Ingredients
- Paper plate
- Scissors
- Craft paper or trash bag
- Craft paint
- Foam paintbrush
- Blue and white construction paper
- Marker or pencil
- Glue stick
- Crepe paper streamers
- Ruler
- Stapler
- Pipe cleaner
Instructions
- First, we will gather all of our supplies for the paper plate jellyfish!
- Let’s make the body of our jellyfish! Grab a 10-inch paper plate and cut it in half. Using a foam paintbrush, paint the back of each plate with your choice of craft paint. Set aside to dry for at least 10 minutes.
- While the body of your jellyfish is drying, let’s make the eyes! Trace a 1 ½ inch oval onto the white construction paper. Repeat this step to create 4 eyes. Using the bottom of the glue stick, trace 4 circles on the blue construction paper to create the pupils. Cut all of the tracings out and set your cuttings aside.
- Now that the jellyfish are dry, let’s assemble them! Start by using a glue stick to adhere your precut white ovals to the center of your jellyfish for the eyes. Glue the precut blue pupils to the white ovals to complete the eyes. Next, take a black marker and add a jellyfish smile!
- For the tentacles, we will use crepe paper streamers. Cut the streamers into seven strips 10 inches in length, and attach them horizontally across the bottom of the plate with a stapler. Once the streamers are secure, cut each one up the center to create movement.
- Finally, cut a pipe cleaner in half and staple each end to the top of the paper plate, creating an arch. Now it’s time to hang your jellyfish creation!
Notes
Although we used water-based craft paint, using craft paper or a trash bag to protect your countertop or other surface is recommended and makes for easy cleanup!
Tried this recipe?Please leave a comment below or pin it to your Pinterest account!